A libre, free, open source implementation of the XA and the TX specifications
Copyright © 2023 Christian Ferrari
Table of Contents
- Preface
- 1. Introduction
- 2. Installation
- 3. Configuration
- 4. Execution
- 5. Developing C Application Programs using TX (Transaction Demarcation) interface
- The TX (Transaction Demarcation) Specification
- LIXA library linkage
- The first example
- Examples with Oracle Database Server
- An example with IBM DB2 DBMS
- An example with Oracle and IBM DB2
- An example with PostgreSQL & Oracle
- An example with PostgreSQL & IBM DB2
- An example with MySQL/MariaDB
- An example with MySQL & PostgreSQL
- An example with MySQL, PostgreSQL & Oracle
- An example with two MySQL servers
- An example with WebSphere MQ
- Introduction
- Set-up WebSphere MQ environment
- Start the LIXA state server
- Build the client program (SRV mode)
- Set-up LIXA environment (SRV mode)
- Some checks before program execution (SRV mode)
- Program execution (SRV mode)
- Build the client program (ETC mode)
- Set-up LIXA environment (ETC mode)
- Some checks before program execution (ETC mode)
- Program execution (ETC mode)
- An example with WebSphere MQ, MySQL and PostgreSQL
- 6. Developing COBOL Application Programs using TX (Transaction Demarcation) interface
- 7. Developing C Application Programs with the Transaction Coupling (TC) TX extensions
- 8. Developing Application Programs using XTA (XA Transaction API) interface
- 9. Recovery
- 10. In Depth
- 11. Tuning
- 12. Troubleshooting
- Bibliography
- A. Resource Managers Configuration
List of Figures
- 3.1. Typical LIXA topology
- 3.2. Easiest non trivial deployment model
- 3.3. Trivial deployment model
- 3.4. Fully distributed deployment model
- 3.5. Complex distributed deployment model
- 3.6. The LIXA components and the necessary configuration files
- 3.7. The structure of lixad_conf.xml
- 3.8. The structure of lixac_conf.xml
- 3.9. A "real" environment
- 5.1. Deploy model of an example with two dummy resource managers
- 5.2. Deploy model of an example with IBM DB2 DBMS
- 5.3. Deploy model of an example showing a distributed transaction with Oracle and IBM DB2
- 5.4. Deploy model of an example showing a distributed transaction with PostgreSQL and Oracle
- 5.5. Deploy model of an example showing a distributed transaction with PostgreSQL and IBM DB2
- 5.6. Deploy model of an example showing a distributed transaction with MySQL and PostgreSQL
- 5.7. Deploy model of an example showing a distributed transaction with MySQL, PostgreSQL and Oracle
- 5.8. Deploy model of an example showing a distributed transaction with two MySQL servers
- 5.9. Deploy model of an example with WebSphere MQ
- 5.10. Deploy model of an example with WebSphere MQ, MySQL and PostgreSQL
- 6.1. Deploy model of an example with two dummy resource managers
- 6.2. Deploy model of an example with PostgreSQL DBMS
- 6.3. Deploy model of an example with Oracle DBMS
- 6.4. Deploy model of an example showing a distributed transaction with PostgreSQL and Oracle
- 7.1. Deployment model of two example applications with Oracle DBMS
- 8.1. Software stack of an XTA application
- 8.2. Single application layout
- 8.3. Multiple applications layout
- 8.4. XTA Resource Hierarchy
- 8.5. Simplified sequence diagram for the “Single Application Program” Pattern
- 8.6. Example of “Multiple Applications, Consecutive Calls” with two Application Programs and one Resource Manager
- 8.7. Simplified sequence diagram for the “Multiple Applications, Consecutive Calls” Pattern
- 8.8. Example of “Multiple Applications, Consecutive Calls/Pseudo Synchronous” with two Application Programs and two Resource Managers
- 8.9. Simplified sequence diagram for the “Multiple Applications, Concurrent Branches/Pseudo Synchronous” Pattern
- 8.10. Example of “Multiple Applications, Consecutive Calls/Pseudo Synchronous” with two Application Programs and two Resource Managers
- 8.11. Simplified sequence diagram for the “Multiple Applications, Concurrent Branches/Pseudo Asynchronous” Pattern
- 9.1. The Application Program crashes before
xa_prepare() - 9.2. The Application Program crashes after
xa_prepare() - 9.3. Workload balanced Application Server
- 10.1. HA, step 1: the active node is on the left, the passive one is on the right
- 10.2. HA, step 2: the active node fails
- 10.3. HA, step 3: the passive node takes over the service
- A.1. Deploy model of an example with MySQL/MariaDB DBMS
- A.2. Deploy model of an example with Oracle Database Server
- A.3. Deploy model of an example with PostgreSQL DBMS
LIXA is acronym of LIbre XA: it's a free, libre, open source implementation of two X/Open specifications: "Distributed Transaction Processing: The TX (Transaction Demarcation) Specification" [TXspec] and "Distributed Transaction Processing: The XA Specification" [XAspec].
The main goals of the LIXA project are:
implementing an XA compliant Transaction Manager
supplying a TX compliant Application Programming Interface (API)
to be free
to be compliant as much as possible with X/Open CAE specifications
From the following links you can buy and/or download for free the official X/Open documentation:
[RefModel] Distributed Transaction Processing: Reference Model, Version 3
[TXspec] Distributed Transaction Processing: The TX (Transaction Demarcation) Specification
[XAspec] Distributed Transaction Processing: The XA Specification
[XA+spec] Distributed Transaction Processing: The XA+ Specification Version 2
LIXA documentation tries to avoid duplication with the content of the above books.
Intended audience
This manual is maintained in the hope it can help:
developers who want to use LIXA project to develop applications
system administrators that have to install, configure and manage LIXA project instances
curious people that want to discover the features offered by the LIXA project
Acknowledgements
Supporting every author is an understanding family, or nothing would ever get produced! I am grateful to my family, Sara and Carola for their understanding everytime I am spending some time on this open source and free software project.
Numerous individuals provided me useful feedback, but one person deserves a special thank for his help: Pieter Janse van Rensburg. Pieter has added to the project an interesting extension and he continues to provide me interesting ideas for further improvements.
Language
Unfortunately English is not my mother tongue. This manual may contain a lot of language mistakes. If you sent me a revisioned versions of the Docbook sources (XML), I would accept your fixes promptly.
LIXA project allows you to develop Application Programs that perform two phase commit transactions using multiple Resource Managers. Two phase commit is a transactional protocol designed to guarantee ACID (Atomicity, Consistency, Isolation, Durability) transactionality.
LIXA supports different programming APIs and different programming models:
XTA, XA Transaction API, an original API implemented by LIXA to provide two phase commit transactions for micro services and/or serverless oriented applications
TX, a standard developed by X/Open in 1995
Warning
It applies to XA/TX programming model only.
The reference model ([RefModel]) technical guide available on the Open Group™ web site is more recent than the XA specification ([XAspec]); after XA, the X/Open Company developed the XA+ specification and the reference model was improved with the concepts necessary for XA+. LIXA project does not implement the XA+ specification, but only XA and the following concepts explained in [RefModel] do not apply to the LIXA project:
3.1: Superior Node
3.1: Subordinate Node
3.1: Communication Resource Manager (CRM)
3.5: Distributed Communication Facilities
3.6: Activity between Functional Components Involving Two or More APs
3.7: CRM Communication Paradigms with APs
3.8: High-level TP Language
XA specification was designed to implement the two phase commit protocol in the case there is only one Application Program running inside a Transaction Monitor and using a Transaction Manager to coordinate any number of Resource Managers. XA+ specification was designed to implement the two phase commit protocol in the case there are two or more Application Programs running inside distinct Transaction Monitors and using distinct Transaction Managers to coordinate any number of Resource Managers.
Note
The above warning does not applies to XTA programming model, because it provides an alternative implementation of the following concepts:Superior Node
Subordinate Node
Activity between Functional Components Involving Two or More APs
Since its inception, LIXA has supported the TX Transaction Demarcation Specification published by X/Open as the standard programming model. TX is a quite old standard published in 1995 and it's based on some architecture choices that are no more actual.
For modern applications, the LIXA project provides XTA (XA Transactional API) [2]: it's a new interface designed to support distributed transactions among distributed Application Programs developed in possibly different programming languages and without direct coupling among TP Monitors or Application Servers.
As explained in Appendix A of [RefModel] a Transaction Manager can be though as a subset of a Transaction Monitor. Most commercial products tend to merge the features in a single bundle; this is good if you need a Transaction Monitor, this may be bad if you only need a Transaction Manager.
IBM TXSeries[3] is a Transaction Monitor with an integrated Transaction Manager. Oracle (BEA) Tuxedo[4] is a Transaction Monitor with an integrated Transaction Manager. JBoss[5] is a JEE (Java Enterprise Edition) application server; it is a Transaction Monitor with an integrated Transaction Manager for Java based applications.
JOTM (Java Open Transaction Manager) and BTM (Bitronix JTA Transaction Manager) are Transaction Managers, but they are not Transaction Monitors and they can be used in conjunction with a JVM (Java Virtual Machine) and possibly any Transaction Monitor. Unfortunately they are Java based technologies and not native ones; in the Java arena there are a few stand-alone Transaction Manager, while in the C language arena it is not easy to find out one.
The LIXA project implements a distributed Transaction Manager that your Application Programs can use to coordinate a distributed transaction among two or more Application Programs running on different systems.
XTA has been designed to support polyglot use cases in distributed environments and it can potentially support many programming languages. See Chapter 8, Developing Application Programs using XTA (XA Transaction API) interface for more information about XTA.
The LIXA project implements a stand-alone Transaction Manager that your Application Program can use in many different ways:
from a C application launched from shell or something else
from a COBOL application launched from shell or something else
With the aid of the LIXA Transaction Manager potentially any web server can be converted in an Application Server with two phase commit support.
From an architectural point of view, the LIXA project adopts an original approach: an Application Program links the LIXA client library and embeds the Transaction Manager logic. Every Application Program instance runs its own Transaction Manager instance and every Transaction Manager instance uses the LIXA server daemon to save and retrieve the state of the managed transactions. LIXA project was designed to allow massive parallelism and embedding at the same time: the parallelism is necessary to support high volume workloads while the embeddable property is necessary to avoid conflicts with the process and thread management feature of any Transaction Monitors.
LIXA architecture when used in conjunction with XTA is explained in Chapter 8, Developing Application Programs using XTA (XA Transaction API) interface.
Generic LIXA architecture is explained in Chapter 3, Configuration
The LIXA project tries to be as compliant as possible with the X/Open CAE specifications cited in bibliography. Below there are the features that are not implemented and the features that are not implementable.
As explained in [TXspec] (3.4, 3.8.1) two values are available:
TX_COMMIT_COMPLETEDTX_COMMIT_DECISION_LOGGED
LIXA TX API implementation supports only
TX_COMMIT_COMPLETED
this behavior is allowed by the specification.
As explained in [TXspec] (4.2, page 16)
tx_info() can return three values:
TX_ACTIVETX_TIMEOUT_ROLLBACK_ONLYTX_ROLLBACK_ONLY
LIXA
tx_info() does not return
TX_ROLLBACK_ONLY. This does not hurt the
X/Open CAE specification.
In [TXspec] (Appendix B.4, page 64) it is suggested
to return the value TX_ERROR when the Resource
Manager returns XA_RETRY; this is explained in
“note 1”.
The LIXA implementation of
for tx_commit() and
tx_rollback() returns
TX_NO_BEGIN instead of
TX_ERROR because it seems a more useful
information for the Application Program: the transaction has been
successfully committed/rolled back, but a new transaction can not be
started
[6].
In [TXspec] (Appendix B.5, page 69) it is
explained XA_RETRY is a valid return code for
function xa_rollback(). Unfortunately
[XAspec] does not agree with this point of view: the
XA_RETRY is not a valid return code for
function xa_rollback(). It may be an error in
[TXspec]: the same row could have been copied from
the previous table (page 68).
[XA+spec] does not list
XA_RETRY as a valid return code for
function xa_rollback(); it lists
XA_RETRY_COMMFAIL but it does not apply to LIXA
implementation because it is related to the
Communication Resource Manager concept that is
not supported by LIXA implementation.
The LIXA implementation sticks to [XAspec]: if a
resource manager returned XA_RETRY it would be
considered a bug inside the resource manager.
[1] See Chapter 8, Developing Application Programs using XTA (XA Transaction API) interface for more information on XTA.
[2] See Chapter 8, Developing Application Programs using XTA (XA Transaction API) interface for more information on XTA.
[3] TXSeries is a registered trademark of IBM corporation
[4] Tuxedo is a registered trademark of Oracle corporation
[5] JBoss is a registered trademark of Red Hat corporation
[6] The X/Open CAE specification document
“suggests” the mapping and it seems there is some
flexibility in the suggestions. From a LIXA perspective all this
stuff is academic because TMNOWAIT is not
used by LIXA implementation.
This chapter explains how to download, install and verify the software released by LIXA project.
LIXA project is developed on an x86-64 based Ubuntu 14.04 system . LIXA project is ported on different Linux versions for x86-64: major stable releases are tested using some different configurations, please refer to file TestLog for an update. Installation on a different Linux distribution should be quite straightforward; installation on a different UNIX™ like system would probably need some work.
If you successfully installed LIXA on a different system, you might publish your experience on the public forum hosted on SourceForge.net and share your results with other users.
To compile LIXA software the GNU tools are needed: gcc, gmake, libtool. Autoconf and automake are used, but they should not be necessary if you install from the original tarball.
Some libraries (run time and development stuff) are necessary too:
libdl
libglib (libglib2.0-dev on Ubuntu)
libgmodule
libgthread
libm
libpthread
libuuid (uuid-dev on Ubuntu)
libxml2 (libxml2-dev on Ubuntu)
libglib (and others libg*) and
libxml2 are discovered with
pkg-config command, while the others must be in
standard include PATH.
LIXA and XTA sources are developed using ANSI C: a standard and
complete C build tool set is necessary to compile and link them.
Client libraries for other languages are automatically built and
installed if configure discover the proper tool
at config time.
C++ is available only for XTA: the legacy TX Transaction Demarcation standard interface is a pure C API and it does not make sense to wrap it as a set of C++ classes. Anyway, you should be able to use the ANSI C standard API inside a C++ program.
If you are interested in COBOL, LIXA supports only Gnu COBOL 1.1 or upper; COBOL development and testing is currently performed on Ubuntu 14.04 with default COBOL version: 1.1
COBOL is actually supported only by the legacy TX Transaction Demarcation standard interface. XTA for COBOL is not available, but it could be implemented on users' request.
Python is available only for XTA: implementing it for the legacy TX Transaction Demarcation standard interface would require a lot changes in Python specific resource (database) drivers.
XTA for Python works with Python 2 and Python 3, but the build procedure compiles and links just one version at a time. If your system uses Python 2 as the default Python version as in the following example:
tiian@ubuntu1404-64:~/lixa$ python --version Python 2.7.6 |
you configure XTA for Python 2 with a command like this one:
tiian@ubuntu1404-64:~/lixa$ ./configure --with-mysql --with-postgresql |
and you configure XTA for Python 3 with a command like this one:
tiian@ubuntu1404-64:~/lixa$ PYTHON_VERSION=3 ./configure --with-mysql --with-postgresql |
xsltproc, docbook-xsl and docbook-xml are necessary to produce this manual.
automake and autoconf are necessary to run the test suite (make check).
This packages are necessary to create a build environment: glib2-devel.i686, libuuid-devel.i686, libxml2-devel.i686, gcc.i686, libtool.i686 and make.i686.
docbook5-style-xsl.noarch is necessary to produce this manual.
If you are trying to install LIXA software on a different operating system, these are some fundamental requirements:
poll: LIXA daemon uses this function for high parallelism network operationsmmap: LIXA daemon uses this function for high performance disk accessdlopen: LIXA transaction manager uses this function to dynamically load resource managers XA switch structuresuuid_generate: LIXA transaction manager uses this function to generate unique transaction identifiers (xid)
Without the above functions, a specific porting process is necessary to adapt LIXA to your system.
There's no specific hardware requirement for the client part of LIXA (libraries and utilities): the type of hardware you are using for your application will be sufficient to run your application even if you start to use LIXA libraries for TX or XTA.
LIXA state server, lixad, requires low latency
disks to perform at its best: the lower the latency of the disks that
hosts the state files, tipically /opt/lixa/var,
the better. The best performance should be expected by a storage
array with battery-backed cache or a technology with equivalent
speed.
An XA transaction manager is used to coordinate one or more XA resource managers. From a LIXA perspective there are basically 3 type of resource managers:
LIXA: Resource Managers provided by the project that are useful only for testing and as sample implementations
F/OSS: Resource Managers provided by Free/Open Source Software projects like PostgreSQL and MySQL
Proprietary: Resource Managers provided by business corporations using commercial licensing.
There is not a list of supported third party resource managers, because LIXA is a project and not a product; this is the list of third party resource managers that have been tested in conjuction with LIXA transaction manager:
IBM DB2 Express-C 9.7 (32 bit) / IBS DB2 Express0C 11.1 (64 bit)
MySQL 5.0 (32 bit) / MySQL 5.1 (64 bit) / MySQL 5.6.34 (64 bit) / MySQL 8.0.22 (64 bit) [7]
Oracle XE 10.2 (32 bit) / Oracle XE 11.2 (64 bit)
Oracle SE 12.1 (64 bit) Instant Client
PostgreSQL 8.3 (32 bit) / PostgreSQL 8.4 (64 bit) / PostgreSQL 9.2 (64 bit) / PostgreSQL 12.4 (64 bit)
WebSphere MQ 7.1 (32 bit)
Important
The software produced by the LIXA project does not require any special authorization to run.
You can run the processes with the desired UNIX user you prefer but in this manual specific user and group will be used as a suggestion.
lixa user and the
lixa group:
tiian@ubuntu:~$ sudo su -
root@ubuntu:~# id
uid=0(root) gid=0(root) groups=0(root)
root@ubuntu:~# addgroup --system lixa
Adding group `lixa' (GID 113) ...
Done.
root@ubuntu:~# adduser --system --ingroup lixa --shell /bin/bash lixa
Adding system user `lixa' (UID 106) ...
Adding new user `lixa' (UID 106) with group `lixa' ...
Creating home directory `/home/lixa' ...
root@ubuntu:~# su -c id lixa
uid=106(lixa) gid=113(lixa) groups=113(lixa)
root@ubuntu:~# exit
logout
lixa user and the
lixa group:
[tiian@centos ~]$ su -
Password:
[root@centos ~]# id
uid=0(root) gid=0(root) groups=0(root),1(bin),2(daemon),3(sys),4(adm),6(disk),10(wheel)
[root@centos ~]# groupadd --system lixa
[root@centos ~]# useradd --system --no-user-group --gid lixa --home /home/lixa --create-home --shell /bin/bash lixa
[root@centos ~]# su -c id lixa
uid=496(lixa) gid=490(lixa) groups=490(lixa)
[root@centos ~]# exit
logout
Refer to the man page of your Linux distribution if the above commands fail; on some distributions you must use “su -” instead of “sudo su -”.
Note
LIXA client communicates to LIXA server (daemon) throught TCP/IP and
the client processes do not access the status files located in
/opt/lixa/var/, only the
lixad has to access the files.
The LIXA client can be considered stateless
because all the state information is persisted by the LIXA server.
A certified configuration is a configuration that passed all the
relevant test cases. The list of the certified configurations is
described inside the file TestLog that's
distributed along with LIXA tarball.
Note
A certified configuration should build and install flawlessly on any system with the same configuration.
A tested configuration is a configuration that was tested in the past and should reasonably work with similar configurations: tested configurations are proposed in Chapter 5, Developing C Application Programs using TX (Transaction Demarcation) interface. They can be used as a starting point for non trivial configurations with one or more commercial Resource Managers.
The LIXA project is hosted both on GitHub.com and SourceForge.net portals. GitHub.com is mainly intended for system software developers that need to access, change and share the source code with the project. SourceForge.net is mainly intended for system engineers that need to download and install the software.
Note
The source code that can be fetched using git typically contains the last commit: there's no guarantee that every commit contains stable software, sometimes it can be intermediate work that does not compile. Every release is explicitly tagged.
Warning
The tarball that can be downloaded by SourceForge.net is a release that has passed some sort of test and should compile and run flawlessly. Even releases are associated to stable software and odd releases are associated to testing software with new features.
LIXA project tries to adhere to the GNU de facto
standard. Supposing you downloaded the package
lixa-X.Y.Z.tar.gz, the basic sequence is:
tar xvzf lixa-X.Y.Z.tar.gz
cd lixa-X.Y.Z
./configure
make
Note
Sometimes, especially if you clone the git repository, you can get an error like the following one:
WARNING: 'aclocal-1.14' is missing on your system.
         You should only need it if you modified 'acinclude.m4' or
         'configure.ac' or m4 files included by 'configure.ac'.
         The 'aclocal' program is part of the GNU Automake package:
         <http://www.gnu.org/software/automake>
         It also requires GNU Autoconf, GNU m4 and Perl in order to run:
         <http://www.gnu.org/software/autoconf>
         <http://www.gnu.org/software/m4/>
         <http://www.perl.org/>
Makefile:457: recipe for target 'aclocal.m4' failed
make: *** [aclocal.m4] Error 127
You can try the following command to solve the issue:
touch configure.ac aclocal.m4 configure Makefile.am Makefile.in
or, in the event that the previous one failed, the following one:
autoreconf -v -f -i
To install the software you need
root
access. With some distributions,
like Ubuntu,
root
access is available with the
sudo command and your own password:
sudo make install
If the previous command does not work,
root
access is available with the
su command and the
root
password:
su -c "make install"
If nothing goes wrong, the above commands install the LIXA software
artifacts in /opt/lixa default directory.
After the installation you should change the authorization
assigned to some directories. Use sudo su -c
(Ubuntu) or
su -c (CentOS) to gain root privileges and execute
chown:
tiian@ubuntu:~$ sudo su -c "chown -R lixa:lixa /opt/lixa/etc/ /opt/lixa/var/"
tiian@ubuntu:~$ ls -la /opt/lixa/etc/ /opt/lixa/var/
/opt/lixa/etc/:
total 16
drwxr-xr-x 2 lixa lixa 4096 2011-03-30 23:13 .
drwxr-xr-x 9 lixa root 4096 2011-03-30 23:14 ..
-rw-r--r-- 1 lixa lixa 3542 2011-03-30 23:13 lixac_conf.xml
-rw-r--r-- 1 lixa lixa  447 2011-03-30 23:13 lixad_conf.xml

/opt/lixa/var/:
total 12
drwxr-xr-x 2 lixa lixa 4096 2011-03-30 23:14 .
drwxr-xr-x 9 lixa root 4096 2011-03-30 23:14 ..
-rw-r--r-- 1 lixa lixa  178 2011-03-30 23:14 README
The succesful execution of the above commands guarantees that the
configuration and the state files can be managed using the
LIXA administrative account (
user=lixa,
group=lixa).
Note
The chown command must be executed after every make install execution.
There are many options you can pass to the configure command to meet your needs (see below). Skip this section and jump directly to the section called “Linking third party resource managers” if you are not expert in LIXA configuration.
Important
It is strongly suggested you issue the make clean command every time you re-configure the package. If you didn't clean the previous build, you might catch some strange undebuggable errors related to not aligned libraries.
Note
The commands explained in the previous section should be adapted to different paths, if you choosed a non standard installation path.
to perform the very first installation /tmp
could be a good destination:
./configure --prefix=/tmp/lixa
After some testing, you might prefer your home directory:
./configure --prefix=$HOME/lixa
and you will get a layout like this:
$HOME/lixa/bin
$HOME/lixa/etc
$HOME/lixa/include
$HOME/lixa/lib
$HOME/lixa/sbin
$HOME/lixa/var
You can split code and data with something like this:
./configure --prefix=/ --exec-prefix=/usr/local
To produce LIXA manual in HTML format you need
xsltproc installed in your current search
path and chunk.xsl docbook.xsl stylesheet
files. Use
./configure --with-docbook
to enable manual build and search for stylesheets in a subdir of
/usr/share. You may specify a different path
using:
./configure --with-docbook=/path/to/father/of/xhtml/dir
If any of the pre-requisite library include files are not in the
standard search PATH, you can export
CPPFLAGS before the configure process to add
your custom path:
export CPPFLAGS=-I/path/to/libuuid
./configure
make
to see the list of environment variables that can affect the build process use the command
./configure --help
The supplied defaults are generally good enought to start working with LIXA, but if you want to perform some hacking you might be interested in activating/deactivating some optional features.
The tracing feature is enabled by default: the binary objects produced by the build procedure contains a lot of messages that can be displayed turning on tracing at run time.
Removing the tracing feature can save RAM (smaller binary objects) and CPU (every trace message is tested against run time configuration).
Important
Disabling tracing seems a good way to increase the performance of the software, but unfortunately without a trace it is quite impossible to debug some issues. Only rock stable software can be compiled without tracing, and this is not the case of LIXA.
To disable tracing, use --disable-trace on
./configure command line:
./configure --disable-trace
To enable extra debug code and messages, that's basically some
additional code and trace messages, use
--enable-debug on
./configure command line:
./configure --enable-debug
This feature is typically used for debugging some hard issues during development and porting activities; for normal use of the LIXA project software, it should not be used.
This feature is useful when testing the software: with crash
simulation the software can be tested against simulated software
crashes and, on some extents, power outages.
To enable crash simulation use --enable-crash on
./configure command line:
./configure --enable-crash
This feature is typically used for testing some features during development and porting activities; for normal use of the LIXA project software, it should not be used.
To link an already tested third party resource manager you can use a specific option on ./configure command; to link a new resource manager, you have to hack the Makefiles and put all you need in place or you can perform a manual link.
IBM DB2 Express-C 9.7, 11.1[8]
This step is useful if you want to use IBM DB2 as a Resource Manager coordinated by LIXA; only versions Express-C 9.7 and 11.1 have been tested, but there should not be relevant differences with a different version. Use something like this:
./configure --with-ibmdb2=/opt/ibm/db2/V9.7
Or the following for V11.1
./configure --with-ibmdb2=/opt/ibm/db2/V11.1
to create a loadable module containing the switch structure.
MySQL 5.0, 5.1, 5.5, 5.6, 8.0[9]
This step is useful if you want to use MySQL [10] as a Resource Manager coordinated by LIXA; only versions 5.0, 5.1, 5.5 and 5.6 have been tested, but there should not be relevant differences with a different version. Use something like this:
./configure --with-mysql
or something like this if you need to point a specific installation:
./configure --with-mysql=/path/to/mysql_config
to create a loadable module containing the switch structure. It's not necessary to specify the MySQL installation directory because the mysql_config utility command is used.
If you want to use XTA for Python (see
Table 8.1, “Resouce Managers and Programming Languages for XTA”), you need the
“mysqlclient-python” driver
with function _get_native_connection enabled:
sudo pip install mysqlclient
or
sudo pip3 install mysqlclient
if you are using Python 3. The required feature is available in mysqlclient-python starting with version 1.4.0.
If you want to use XTA for Java (see Table 8.1, “Resouce Managers and Programming Languages for XTA”), you need a JDBC driver that supports MySQL and JTA standard. Specify the JAR file that contains the JDBC driver during config phase with something like this:
./configure --with-mysql --with-mysql-jdbc=/usr/share/java/mysql.jar
As a general warning, don't stick to the version provided by your Linux distribution: sometimes a better one is available in the vendor's portal.
Note
MySQL does not supply an XA standard switch structure, but
only some SQL non standard statements (
XA START, XA END, XA PREPARE, XA COMMIT, XA ROLLBACK,
	      XA RECOVER
) that can be used to implement some XA features.
This is good enough to build a loadable module that can be
used by the LIXA transaction manager, but some XA standard features
- like dynamic registration - can not be implemented.
Warning
Some old versions of the software are affected by a serious documented bug (# 12161) related to the XA implementation of MySQL. The symptoms perceived while developing LIXA are described below:
a MySQL client application invokes XA START
it updates some data in the database
it invokes XA END and XA PREPARE
it crashes and disconnects from the MySQL server
MySQL server rollbacks the transaction and there's no way to see it again using XA RECOVER
This behavior violates the XA specification: below there is an
excerpt for xa_prepare from man page (
[XAspec], page 44)
“Once this function successfully returns,
the resource manager
must guarantee that the transaction branch may be either
committed or rolled back regardless of failures. A resource
manager cannot erase its knowledge of a branch until the
transaction manager calls either xa_commit() or xa_rollback ()
to complete the branch
”.
The impact of this bug is quite severe and seriously compromises the ACID properties of the resulting system (application program + MySQL resource manager + LIXA transaction manager).
Even if MariaDB is different from MySQL, it can be used with LIXA in the same way of MySQL: most of the times it's just a matter of changing some file or directory name. LIXA does not provide specific options for MariaDB, just use the options provided for MySQL.
Oracle XE 10.2/11.2 (server)[11]
This step is useful if you want to use Oracle Database as a Resource Manager coordinated by LIXA; only version XE 10.2/11.2 has been tested, but there should not be relevant differences with a different version. Use something like this for Oracle 10.2 (32 bit architecture):
./configure --with-oracle=/usr/lib/oracle/xe/app/oracle/product/10.2.0/server
and something like this for Oracle 11.2 (64 bit architecture):
./configure --with-oracle=/u01/app/oracle/product/11.2.0/xe
to create a loadable module containing the switch structure.
Extra configuration is needed in order to use Oracle DBMS; the necessary steps are documented in the configuration chapter.
Oracle SE 12.1 (Instant Client)[12]
This step is useful if you want to use Oracle Database Instant Client as a Resource Manager coordinated by LIXA; only version Standard Edition 12.1 has been tested, but there should not be relevant differences with a different version. Use something like this for Oracle 12.1 Instant Client (64 bit architecture):
./configure --with-oracle-include=/opt/oracle/instantclient_12_1/sdk/include/ \
            --with-oracle-lib=/opt/oracle/instantclient_12_1/
to create a loadable module containing the switch structure.
Extra configuration is needed in order to use Oracle DBMS; the necessary steps are documented in the configuration chapter.
PostgreSQL 8.3, 8.4, 9.2, 9.3, 9.5, 10, 12.4[13]
This step is useful if you want to use PostgreSQL as a Resource Manager coordinated by LIXA; only versions 8.3, 8.4 and 9.3 have been tested, but there should not be relevant differences with a different version. Use something like this (Ubuntu):
./configure --with-postgresql-include=/usr/include/postgresql --with-postgresql-lib=/usr/lib
or something like this (CentOS) [14]:
./configure --with-postgresql-include=/usr/include --with-postgresql-lib=/usr/lib
to create a loadable module containing the switch structure.
If you want to use XTA for Python (see
Table 8.1, “Resouce Managers and Programming Languages for XTA”), you need the
“psycopg2” driver
with function get_native_connection enabled:
sudo pip install psycopg2
or
sudo pip3 install psycopg2
if you are using Python 3. The required feature is available in psycopg2 starting with version 2.8.
If you want to use XTA for Java (see Table 8.1, “Resouce Managers and Programming Languages for XTA”), you need a JDBC driver that supports PostgreSQL and JTA standard. Specify the JAR file that contains the JDBC driver during config phase with something like this:
./configure --with-postgresql --with-postgresql-jdbc=/opt/postgresql/postgresql.jar
As a general warning, don't stick to the version provided by your Linux distribution: sometimes a better one is available in the project's portal. For instance, version 9.2-1002-1 distributed with Ubuntu 14.04 does not pass all case tests due a bug related to XA protocol implementation.
Note
PostgreSQL does not supply an XA standard switch structure, but
only some SQL non standard statements (
PREPARE TRANSACTION, COMMIT PREPARED, ROLLBACK PREPARED
) that can be used to implement some XA features.
This is good enough to build a loadable module that can be
used by the LIXA transaction manager, but some XA standard features
- like dynamic registration - can not be implemented.
WebSphere MQ 7.1[15]
If you want to use WebSphere MQ with server/bind mode, you have to use something like this when configuring LIXA:
./configure --enable-wsmq --with-wsmq=/opt/mqm71
If you want to use WebSphere MQ with Extended Transactional Client mode, you have to use something like this when configuring LIXA:
./configure --enable-wsmq=ETC --with-wsmq=/opt/mqm71
There should be no reason you want both on the same host: if you could use the server/bind mode, you should use it because it would give you the best performance. If you don't have the queue manager inside the host, you will have to use the Extended Transactional Client mode (ETC).
If you want to use two or more resource managers, and this is a
typical condition for the XA usage, you must concatenate two or more
--with- parameters.
This command, for instance, can be used to build IBM DB2, Oracle
and PostgreSQL loadable modules:
./configure --with-ibmdb2=/opt/ibm/db2/V9.7 \
> --with-oracle=/usr/lib/oracle/xe/app/oracle/product/10.2.0/server \
> --with-postgresql-include=/usr/include/postgresql --with-postgresql-lib=/usr/lib \
> --with-mysql
To build the XTA for Java component, it's not strictly necessary to specify at configure time the classpath of all the Resource Managers that will be linked by the Application Programs. Anyway, if you want to check you build, you have to specify all the jar files related to the Resource Managers used by the tests. The following configure command, for example, configure 3 Java Resource Managers: MySQL, PostgreSQL and Oracle Database server:
./configure --with-mysql --with-mysql-jdbc=/usr/share/java/mysql.jar \
> --with-postgresql --with-postgresql-jdbc=/opt/postgresql/postgresql.jar \
> --with-oracle-include=/opt/oracle/instantclient_12_1/sdk/include/ --with-oracle-lib=/opt/oracle/instantclient_12_1/ --with-oracle-jdbc=/opt/oracle/OJDBC-Full/ojdbc7.jar
Notice the parameters related to JDBC drivers:
--with-mysql-jdbc=/usr/share/java/mysql.jar,
--with-postgresql-jdbc=/opt/postgresql/postgresql.jar,
--with-oracle-jdbc=/opt/oracle/OJDBC-Full/ojdbc7.jar.
Other parameters like
--with-mysql refer to the C
driver used by other languages: C, C++, Python...
Note
JDBC drivers available inside Linux distributions are sometimes old in comparison with the drivers that can be downloaded directly from the project or product site: if possible, try to use the latest available JDBC driver that's compatible with your (database) server and with your Java Runtime Environment.
The options illustrated above can be combined to obtain a specific configuration. This is an example of a IBM DB2 + Oracle enabled installation using an alternate installation path:
tar xvzf lixa-X.Y.Z.tar.gz
cd lixa-X.Y.Z
./configure --prefix=$HOME/lixa --with-ibmdb2=/opt/ibm/db2/V9.7 --with-oracle=/usr/lib/oracle/xe/app/oracle/product/10.2.0/server
make
sudo make install
Before using LIXA to manage your transactions you might be interested in checking the compiled software quality.
LIXA has its own test suite implemented with Autotest. A specific build configuration is necessary to enable all the tests:
tar xvzf lixa-X.Y.Z.tar.gz
cd lixa-X.Y.Z
./configure --prefix=/tmp/lixa --enable-crash
make check
If the binary code produced by the compiler is fine, and your system is fine too, all the test must complete without errors.
Some case tests, specifically MT/1.0/* and MT/2.0/*, stress the LIXA software with a massive multithread workload. Sometimes the tests fail due to the configuration of your system and/or your user account. There are two well known issues:
max files: the case tests open approximately 1000 files (TCP/IP sockets); command ulimit -n must return the value 1024 or more
stack size: if the stack size is too large, 32 bit platform can experience addressing limit errors; reduce the default stack size to 4096 if necessary with command ulimit -s 4096
Due to practical reasons, for some features there is not automatic testing: tests that requires too many configurations become very difficult to develop and to maintain. Here's a list of features that are not automatically tested and how you can manually test them if necessary:
Oracle Instant Client: it does not provide a standard
oracle_env.shand a SqlNet configuration should be done in advance. To test it, use sample programs provided and follow the reference manual for environment set-up, program build and testOracle Pro*C: the "sys_include" statement of file
pcscfg.cfgrequires a lot of hacking for proper configuration, especially if the user installed the "zip" package and/or the system is Ubuntu Linux. To test it, use sample programs provided and follow the reference manual for environment set-up, program build and testOracle Pro*COBOL: not yet available. To test it, use sample programs provided and follow the reference manual for environment set-up, program build and test
If you are interested in checking the internals of LIXA you can activate memory or thread check using Valgrind (it's assumed you already have installed Valgrind). If you were insterested in memory usage analysis, this is the sequence of commands you would use:
export CLIENT_CHECK_TYPE=memory
export SERVER_CHECK_TYPE=memory
make check
If you were interested in thread usage analysis, this is the sequence of commands you would use:
export CLIENT_CHECK_TYPE=thread
export SERVER_CHECK_TYPE=thread
make check
Check type can be set independently: you may check memory behavior of the client component without checking memory behavior of the server component and vice versa.
Note
Valgrind is a very good tool, but can not understand some optimizations and detects some wrong memory leaks (false positives). Nevertheless if you were suspecting there is a memory leak inside LIXA, this would be a good start point to discover where the issue is.
Sometimes it may be useful to execute the case tests under the supervision of gdb instead of running it directly from the shell. Both client and server can be executed inside gdb using these commands:
export CLIENT_CHECK_TYPE=debug
export SERVER_CHECK_TYPE=debug
make check
Note
Running a case test inside gdb may change the exit code checked by automake tests. You can not use this option as a default test option, but it may be useful to inspect some strange problems because gdb produce the stack trace related to the issue.
[7] You must use InnoDB back-end to perform transactions with MySQL; MyISAM back-end is not supported.
[8] IBM and DB2 are trademarks of IBM™ corporation
[9] MySQL is a trademark of Oracle™ corporation; details are available at this link: http://www.mysql.com/about/legal/
[10] These are the necessary packages on CentOS: mysql.i686 mysql-devel.i686 mysql-server.i686
[11] Oracle is a trademark of Oracle™ corporation
[12] Oracle is a trademark of Oracle™ corporation
[13] The Trademark Policy of PostgreSQL is available at this link: http://wiki.postgresql.org/wiki/Trademark_Policy
[14] These are the necessary packages on CentOS: postgresql-server.i686 postgresql.i686 postgresql-devel.i686
[15] WebSphere and WebSphere MQ are trademarks of IBM™ corporation
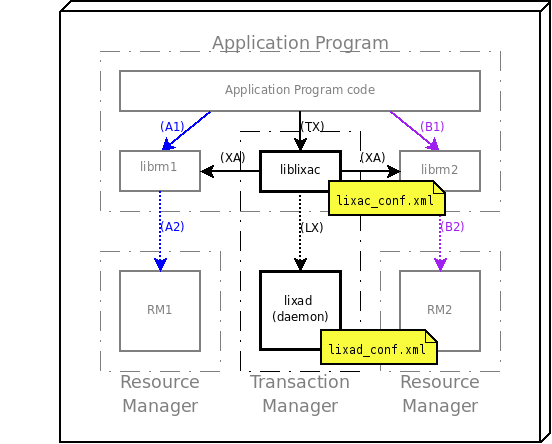
A LIXA system is the assembling of two components: the client and the server. The figure below shows a typical configuration with one Application Program and two Resource Managers.
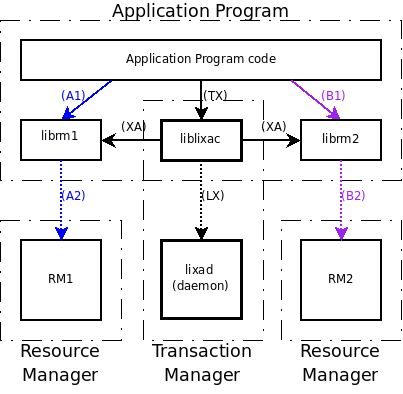
The model shows logical and "phisycal" blocks:
"Application Program code" is the code of your own application
"librm1" is the code of the library your application must use to communicate with "RM1" (the first resource manager)
"librm2" is the code of the library your application must use to communicate with "RM2" (the second resource manager)
"liblixac" is the code of the library your application must use to invoke the TX verbs and send instruction to the Transaction Manager
"Application Program code" + "librm1" + "librm2" + "liblixac" must be linked togheter to produce the Application Program; the Application Program is an executable object
"RM1" is the first resource manager; it may be a relational database (RDBMS)
"RM2" is the second resource manager; it may be an object oriented database (OODBMS)
"lixad" is the daemon used by "liblixac" to store the states of the transactions
The model shows how the blocks communicate:
(A1): is the protocol supplied by the first resource manager; SQL/CLI is an example and is supplied by IBM DB2, SQL/OCI is another example and is supplied by Oracle Database Server
(B1): is the protocol supplied by the second resource manager; every resource manager has its own protocol and its own API
(A2): is the internal protocol used by the client of RM1 to communicate with RM1 server process(es); it can be a cross memory or a network protocol and it depends on RM1 configuration
(B2): is the internal protocol used by the client of RM2 to communicate with RM2 server process(es); it can be a cross memory or a network protocol and it depends on RM2 configuration
(TX): is the protocol supplied by the LIXA project and is described in [TXspec]; it's a standard protocol and API
(XA): is the standard protocol used by the LIXA project to communicate with the resource managers and is described in [XAspec]; it's a standard protocol and API
(LX): is the internal protocol used by the client of LIXA to communicate with the LIXA server process (lixad); it is a network protocol
The lixad daemon process can be executed on any system: there is no need to execute it on the same system that's hosting the Application Programs. The communications between the client and the server (lixad) uses TCP/IP sockets.
The lixac library is
embedded in the Application
Programs; the communication between the Application Program and
the lixac library uses
TX (Transaction Demarcation)
API, see [TXspec].
The lixac
library contains all the logic of the LIXA Transaction Manager.
The communication between the Application Program and the Resource
Managers depends on Resource Managers type and configuration:
it may be cross memory, TCP/IP, System V IPC, etc...
The communication between the
lixac library and the
Resource Manager depends on Resource Manager configuration and must be
of the same used by the Application Program.
The communication between
lixac library and
lixad is ever istantiated by the client: the
server never calls the clients.
This section explains some different deployment models you can set up leveraging the LIXA project technology.
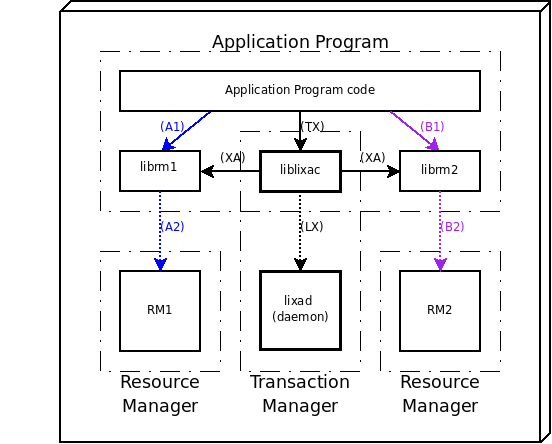
The easiest non trivial deployment of a distributed transaction processing system based on the LIXA project is showed below: a single node hosts the Application Program, the Resource Managers and the LIXA server.
A trivial deployment of a distributed transaction processing system based on the LIXA project is showed below: a single node hosts the Application Program, the Resource Manager and the LIXA server. This configuration is obtained from the previous one removing a Resource Manager.
Using only one Resource Manager is supported by the LIXA project technology, but it's quite useless because you don't need a transaction manager to perform single phase commit against one Resource Manager. This type of configuration will not be described more deeply.

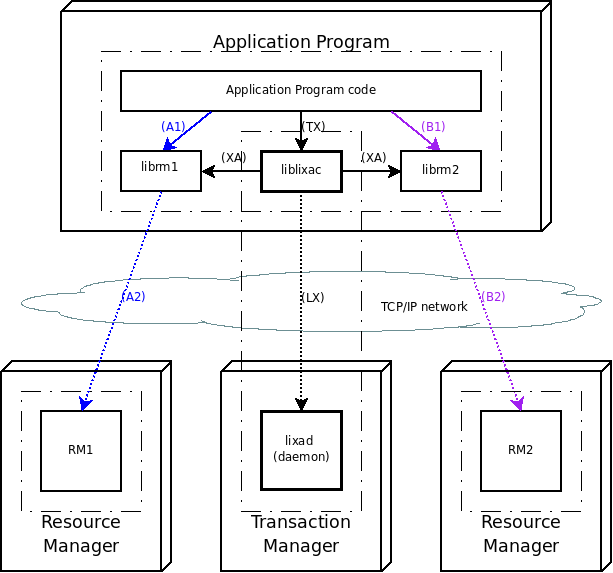
A fully distributed transaction processing system can be achieved hosting every component in a different node. The picture below shows 4 different nodes:
an application server node hosting the Application Program
a Transaction Manager dedicated node hosting the LIXA server
two Resource Manager dedicated nodes hosting the Reosurce Managers
A more complex distributed transaction processing system can be achieved introducing a second application server and a third Resource Manager; in the picture below the third Resource Manager is hosted in the same node of the second Resource Manager.
The two different Application Programs do not need to be hosted in different application servers. They are different Application Programs because they use a different mix of Resource Managers.
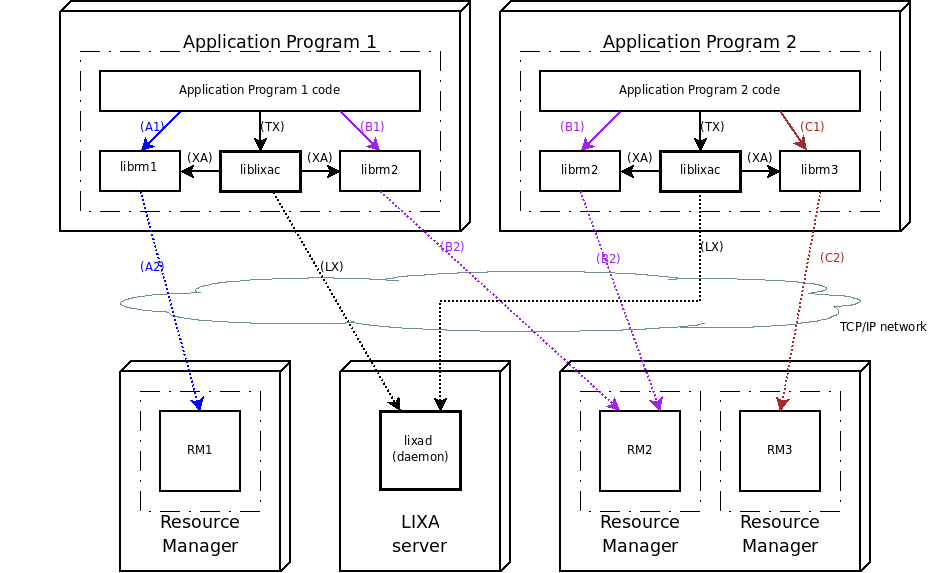
Further complexity can be reached introducing an Application Program that uses three (or more) different Resource Managers, but this document will not go on this path to preserve understandability [16] .
The picture below shows the LIXA components that must be configured:
The client component (lixac)
is configured using the
etc/lixac_conf.xml file; the server component
(lixad) is configured using the
etc/lixad_conf.xml file
[17].
If a node hosts both the client and the server components, both the files must be configured. If a node hosts only one component, only one configuration file is necessary [18].
The default configuration file is
etc/lixad_conf.xml
and is located at the root installation path (i.e.
/opt/lixa/etc/lixad_conf.xml).
The file is composed of three sections:
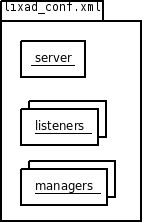
the server section contains the global parameters of the server
the listeners section specifies how many TCP/IP addresses and ports must be listened to accept incoming client connections
the managers section specifies how many server threads must be activated to serve the LIXA clients
Below there is a sample configuration file:
<?xml version="1.0" encoding="UTF-8" ?>
  <server
    pid_file="/opt/lixa/var/run.pid"
    min_elapsed_sync_time="0" max_elapsed_sync_time="0"
    log_size="524288" max_buffer_log_size="131072"
    log_o_direct="1" log_o_dsync="0" log_o_rsync="0" log_o_sync="0">
  <listeners>
    <listener domain="AF_INET" address="127.0.0.1" port="3456"/>
    <listener domain="AF_INET" address="0.0.0.0" port="2345"/>
  </listeners>
  <managers>
    <manager status_file="/opt/lixa/var/lixad_status1"/>
    <manager status_file="/opt/lixa/var/lixad_status2"/>
    <manager status_file="/opt/lixa/var/lixad_status3"/>
  </managers>
</server>
The tags and the properties of the XML file are described below:
pid_file: it is the file used by the server to store the daemon PID; the server creates the file at start-up and destroys it at shutdownmin_elapsed_sync_time: minimum time expressed in millisecond between a request for file synchronization and the start of the synchronization operation; use 0 to obtain the lowest RPO (Recovery Point Objective), use higher values to obtain higher performances of the servermax_elapsed_sync_time: maximum time expressed in millisecond between a request for file synchronization and the start of the synchronization operation; use 0 to obtain the lowest RPO (Recovery Point Objective), use higher values to obtain higher performances of the servermax_elapsed_sync_timecan not be less thanmin_elapsed_sync_time;log_size: maximum desired size for state log files used by the journal based state engine, it does not apply to traditional state engine; it must be considered a soft limit: if necessary, the state engine can expand it. The lower the storage performance, the higher the space necessary for the log filesmax_buffer_log_size: maximum desired size in RAM for log buffering, it does not apply to traditional state engine; it's a hard limit. A large buffer can alleviate the issue deriving by a slow storagelog_o_direct: boolean value (1 or 0) to activate/deactivate the O_DIRECT flag for log files, the flag is described in open(2) man page, it does not apply to the traditional state enginelog_o_dsync: boolean value (1 or 0) to activate/deactivate the O_DSYNC flag for log files, the flag is described in open(2) man page, it does not apply to the traditional state enginelog_o_rsync: boolean value (1 or 0) to activate/deactivate the O_RSYNC flag for log files, the flag is described in open(2) man page, it does not apply to the traditional state engine and it's currently of no relevance for Linuxlog_o_sync: boolean value (1 or 0) to activate/deactivate the O_SYNC flag for log files, the flag is described in open(2) man page, it does not apply to the traditional state enginedomain: the type of socket must be used to listen for clients. The only allowed type isAF_INET; this may change in the futureaddress: the address that must be used to listen for clients; the special value "0.0.0.0" means any addressport: the port that must be used to listen for clients; it must be a free port (use command netstat to find out one)manager: any configured manager is a server worker and runs as a dedicated thread. Refer to Chapter 11, Tuning for a discussion about configuration and performance resultsstatus_file: the physical path that must be used to create the status files (a couple) for a manager; this generally is a persistent and reliable storage device like a RAID partition. The string specified by the tagstatus_fileis used as a prefix: every manager (thread) creates two files with the same prefix and different suffixes.
Parameters
min_elapsed_sync_time,
max_elapsed_sync_time,
log_size,
max_buffer_log_size,
log_o_direct,
log_o_dsync,
log_o_rsync, and
log_o_sync
plays a fundamental role in reliability and performance of the LIXA
state server.
The provided default values are valid for general
purpose scenarios, for advanced use cases, refer to:
the section called “Tuning the journal state engine” and
the section called “Tuning the traditional state engine”.
Before version 1.9.0, the state engine was based on memory mapped
files flushed through msync(2). Even if the
solution proved to be robust, it requires a very fast, in term of
IOPS, storage subsystem to perform well.
Version 1.9.0 introduces a new alternative state engine based on a much more sophisticated technology that uses log files and asynchronous IO. The new state engine has been designed to provide sub-millisecond transaction time even in presence of common storage subsystems.
Important
The new journal based state engine passes all the test cases, but it's a fresh new piece of software and it can contain unknown bugs. Activate it in a production environment only after appropriate testing has been performed.
To switch from traditional to
journal state engine use the
LIXA_STATE_ENGINE environment variable before
starting lixad state server.
To use the journal state engine:
$ export LIXA_STATE_ENGINE=JOURNAL
to use the traditional state engine (default):
$ export LIXA_STATE_ENGINE=TRADITIONAL
The default configuration file is
etc/lixac_conf.xml
and is located at the root installation path (i.e.
/opt/lixa/etc/lixac_conf.xml).
The file is composed of three sections:
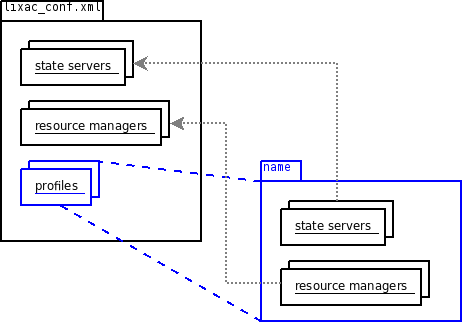
the state servers section contains a list of the available LIXA state servers and how they can be contacted
the resource managers section contains a list of the available Resource Managers and how they can be managed by LIXA using XA standard API and protocol
the profiles section contains a set of possibly different profiles: every Application Program can use only one profile; if you had different Application Programs with different requirements, you should create different profiles. Every profile contains a set of servers and a set of Resource Managers that must be used to support the Application Program.
Below there is a sample configuration file:
<?xml version="1.0" encoding="UTF-8" ?>
<client
  connection_timeout="3000">
  <sttsrvs>
    <sttsrv name="local_1" domain="AF_INET" address="10.23.45.67" port="2345" />
    <sttsrv name="local_2" domain="AF_INET" address="10.23.46.91" port="3456" />
  </sttsrvs>
  <rsrmgrs>
    <rsrmgr name="OracleXE_dynreg" switch_file="/opt/lixa/lib/switch_oracle_dynreg.so" xa_open_info="Oracle_XA+Acc=P/hr/hr+SesTm=30+LogDir=/tmp+threads=true+DbgFl=7+Loose_Coupling=true" xa_close_info="" />
    <rsrmgr name="OracleXE_stareg" switch_file="/opt/lixa/lib/switch_oracle_stareg.so" xa_open_info="Oracle_XA+Acc=P/hr/hr+SesTm=30+LogDir=/tmp+threads=true+DbgFl=7+Loose_Coupling=true" xa_close_info="" />
    <rsrmgr name="IBMDB2_dynreg" switch_file="/opt/lixa/lib/switch_ibmdb2_dynreg.so" xa_open_info="axlib=/opt/lixa/lib/liblixac.so,db=sample,tpm=lixa" xa_close_info="" />
    <rsrmgr name="IBMDB2_stareg" switch_file="/opt/lixa/lib/switch_ibmdb2_stareg.so" xa_open_info="axlib=/opt/lixa/lib/liblixac.so,db=sample,tpm=lixa" xa_close_info="" />
  </rsrmgrs>
  <profiles>
    <profile name="GT71">
      <sttsrvs>
        <sttsrv>local_1</sttsrv>
      </sttsrvs>
      <rsrmgrs>
        <rsrmgr>OracleXE_stareg</rsrmgr>
        <rsrmgr>IBMDB2_stareg</rsrmgr>
      </rsrmgrs>
    </profile>
    <profile name="VZ67">
      <sttsrvs>
        <sttsrv>local_1</sttsrv>
      </sttsrvs>
      <rsrmgrs>
        <rsrmgr>OracleXE_dynreg</rsrmgr>
        <rsrmgr>IBMDB2_dynreg</rsrmgr>
      </rsrmgrs>
    </profile>
    <profile name="AG71">
      <sttsrvs>
        <sttsrv>local_2</sttsrv>
      </sttsrvs>
      <rsrmgrs>
        <rsrmgr>IBMDB2_dynreg</rsrmgr>
      </rsrmgrs>
    </profile>
  </profiles>
</client>
The tags and the properties of the XML file are described below:
connection_timeout: this property is used to define the client connection timeout, see the section called “LIXA_CLIENT_CONNECTION_TIMEOUT” for the corresponding environment variable and further informationsttsrv: this section is used to describe a state server (a LIXA server instance) that must be reached by any client described belowsttsrv/name: a name associated to the state server; it is a logical name that is referenced by the profiles defined belowdomain: it must be the same domain specified by the listener that must be reached; the listener is configured inlixad_conf.xml(see above) and may be local or remoteaddress: it must be the same same address specified by the listener that must be reached; the listener is configured inlixad_conf.xml(see above) and may be local or remoteport: it must be the same port specified by the listener that must be reached; the listener is configured inlixad_conf.xml(see above) and may be local or remotersrmgr: this section is used to describe a resource manager that will be used by the Application Programs configured below (see profiles)rsrmgr/name: a name associated to the Resource Manager; it is a logical name that is referenced by the profile defined belowswitch_file: name of the file that contains the XA switch structure; the file is produced by the installation procedurexa_open_info: it is the string of parameters that must be passed to the Resource Manager by the xa_open() function call; the content of the string depends on the Resource Manager, please refer to the documentation distributed with the resource manager you are using. The string can not exceed 255 charactersxa_close_info: it is the string of parameters that must be passed to the Resource Manager by the xa_close() function call; the content of the string depends on the Resource Manager, please refer to the documentation distributed with the resource manager you are using. The string can not exceed 255 charactersprofile: it contains the description of the LIXA every transactional profile must be used by the Application Programs needs to be listed hereprofile/name: the name associated to the transaction profile; this name is used in different places and it is suggested to avoid special characters, blanks and possibly mixed case (these hints may help you in troubleshooting)profile/sttsrv: the state server that will be used to store the transactional information associated to this profile; more than one state servers can be specified but only the first one is used with the current release softwareprofile/rsrmgr: every Resource Manager that must be used by the Application Programs associated to this transactional profile needs to be listed here. There is no a limit: you can specify 1, 2, 3, ... resource managers. Avoid useless resource manager because xa_open() and xa_close() will be performed against all the listed resource managers. If you can choose between a "dynamic" and a "static" version of the same resource manager, the "dynamic" one is more efficient
The client configuration file contains three sections:
sttsrvs: is the list of the LIXA daemons you are running inside your network and you will use to manage the persistent state of the clients that are using the configuration file; many times a single LIXA state server is sufficient, but sometimes you need more (development, test and production environment might use different LIXA servers)rsrmgrs: the list of the Resource Managers necessary execute the Application Programs; there is no limit to the number of resource managers you can specify from a LIXA point of view, but you should avoid to list useless Resource Managers to obtain the best performanceprofiles: the list of the available transactional profiles for your Application Programs. This concept allows you a great configuration flexibility: the same configuration file can be used for completely different Application Programs and completely different environment. As an example, imagine you have 3 distinct applications and every application uses a different mix of resource managers; then you manage 3 different environments (development, test and production): with 9 profiles you can model your transactional needs completely (APP1DEV, APP2DEV, APP3DEV, APP1TEST, APP2TEST, APP3TEST, APP1PROD, APP2PROD, APP3PROD).
Important
Every profile lists some Resource Managers: LIXA guarantees that all the XA functions are called in the same exact order [19] of the Resource Managers as enlisted in the profile.
In the above example, profile "VZ67" enlists Resource Managers
"OracleXE_dynreg" in first position and "IBMDB2_dynreg" in second
position; every XA function, like for example
xa_prepare and xa_commit
are called by LIXA in the same exact order:
	    ...
	    xa_prepare("OracleXE_dynreg")
	    xa_prepare("IBMDB2_dynreg")
	    ...
	    xa_commit("OracleXE_dynreg")
	    xa_commit("IBMDB2_dynreg")
	    ...
The picture below models an environment that's using the sample
etc/lixac_conf.xml
showed above:
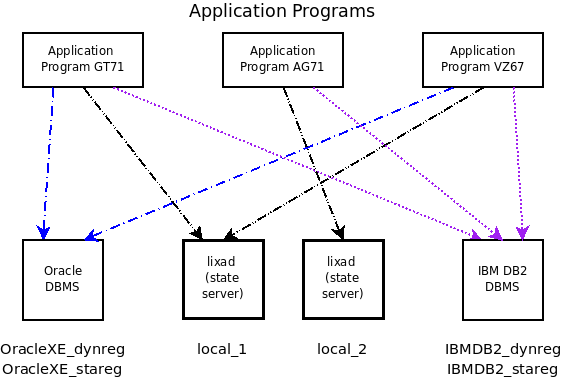
The scenario is composed of three distinct applications:
GT71: it's an application that uses both an Oracle and an IBM DB2 DBMS; most of the transactions need to perform distributed transaction processing and the profile specifies the static registration versions of the switch files.
AG71: it's an application that uses only an IBM DB2 DBMS; only few transactions need to perform distributed transaction processing and the profile specifies the dynamic registration versions of the switch files. This application does not need an XA Transaction Manager because it uses only one Resource Manager, but the development team decided to use LIXA because it will use a second Resource Manager in the next few months.
VZ67: it's an application that uses both an Oracle and an IBM DB2 DBMS; only few transactions need to perform distributed transaction processing and the profile specifies the dynamic registration versions of the switch files.
The scenario uses two distinct LIXA state servers: this is an unusual situation but it works.
The LIXA_PROFILE environment variable must be used
to specify the transactional profile associated to the Application
Program.
If you do not specify a valid transactional profile,
the first profile
of the list will be applied (in the above example it's
GT71).
Note
There is not an alternate way to specify the
transactional profile:
tx_open does not allow parameters.
With reference to scenario showed above, Application Program GT71
must export LIXA_PROFILE before execution; if
you are using bash shell you must specifiy
something like this
export LIXA_PROFILE=GT71
before application execution. The same applies to Application Program AG71 and VZ67:
export LIXA_PROFILE=AG71
[...]
export LIXA_PROFILE=VZ67
If you change the content of lixac_conf.xml
you will change the signature associated to the configuration file
from LIXA Transaction Manager. The signature is very important
because LIXA Transaction Manager will not activate automatic
recovery of “prepared/recovery pending” transactions
if configuration file signatures do not match. In the case of
signature mismatch during automatic recovery, the LIXA system
reacts with some log messages as below:
Feb  8 21:38:51 ubuntu lixad[2517]: LXD011W a client is performing recovery but config file changed in the meantime for job 'a100c8728292168b21ba7239bffc137d/127.0.0.1      ' and transaction '1279875137.46d1df80428d4d6c85e6919b16b4a744.a100c8728292168b21ba7239bffc137d'
Feb  8 21:38:51 ubuntu lixat[2532]: LXC001E transaction '1279875137.46d1df80428d4d6c85e6919b16b4a744.a100c8728292168b21ba7239bffc137d' can NOT be recovered because current config digest 'a100c8728292168b21ba7239bffc137d' does NOT match server stored config digest '9e4c11057107c73366c9fc421eaa85ca'
LIXA state server issues a warning (LXD011W) while LIXA Transaction Manager (client) issues an error (LXC001E): this behavior is necessary to protect the whole system against undesired recovery operation that could damage your data inside the Resource Managers.
This protection has a cost explained in the section called “Recoverying a transaction associated to a different job”.
Important
Before editing (and saving) lixac_conf.xml,
be sure there are no
“prepared/recovery pending” transactions
(you can use --dump as explained in
the section called “Dump execution” and in
the section called “Recoverying a “recovery failed” transaction”
to verify the content of the state server).
Create a different config file and use
LIXA_CONFIG_FILE environment variable
as explained in
the section called “Environment variables” until you are not sure
about the changes you are performing.
You can use some environment variables to tailor the LIXA configuration to your needs. Some environment variables applies only to one component, others apply to both client and server LIXA components.
This environment variable can be used to specify the maximum time a client can wait for an answer from the state server. The value is expressed in milliseconds, -1 is a special value with "no timeout" meaning and 0 is not an acceptable value.
Note
The environment variable and the correlated configuration parameter in the XTA interface has been introduced to prevent process starvation in some specific situations that may happen implementing the “Multiple Applications, Concurrent Branches” patterns (see the section called “The XTA Programming Model”). There should be no useful usage of this variable outside the two XTA specific patterns.
This environment variable can be used to specify an alternate
configuration file for your application.
Example: if you are trying a new configuration, but you
wont to modify the default
etc/lixac_conf.xml
file, you can export the variable before program execution:
export LIXA_CONFIG_FILE=/tmp/my_lixac
./myapp
myapp will be executed using the configuration
stored inside
/tmp/my_lixac
instead of the configuration stored inside the default
etc/lixac_conf.xml
client configuration file.
This environment variable must be used only in a development
environment: after the program crossed the
crash point as many times as the value of
this variable (default = 1), the process crashes. See
environemt variable
LIXA_CRASH_POINT too.
This environment variable must be used only in a development
environment: it specifies the crash point inside the LIXA
code. The acceptable values for this variable are listed
inside the C header file
src/common/lixa_crash.h
LIXA project uses
the abort() function to simulate a soft crash.
Warning
This environment variable may be very useful to deal with some specific requirements, but it changes how the automatic recovery process works and the final result could be strange or "unpredictable" if you didn't understand the whole picture.
Use this environment variable to associate a specific transactional job identifier instead of the automatically assigned one. See the section called “Automatic recovery concepts” and the section called “Workload balanced environments” for more information.
This environment variable must be used
to specify the transactional profile associated to the Application
Program.
If you do not specify a valid transactional profile, the first
profile listed inside
etc/lixac_conf.xml
will be applied.
See the section called “Client configuration explanation” too.
This environment variable activate stack tracing for most of the functions in LIXA codebase; it is intended as a problem determination capability; the following values are allowed:
ALLto stack trace every function call; this value should not be used in a production environment to avoid a stack trace message congestionERRORSto stack trace only the function calls that end with an error condition; this is the value suggested to detect anomalous conditions in production environmentsWARNINGSto stack trace only the function calls that end with either a warning or an error condition; this setting can produce trace messages that are not related to anomalous conditions
This environment variable allows to choose the type of state engine that must be used by the LIXA state server; two values are allowed:
TRADITIONALfor the traditional memory mapped based state engine (default value)JOURNALfor the low latency, journal based state engine
This environment variable can be used to override the section
<sttsrvs> of the
etc/lixac_conf.xml configuration file.
It must contain a blank separated lists of URIs encoded as
tcp:://address:port/name, where:
address is the hostname or the IP address of a LIXA state server
port is the port used by the LIXA state server
name is the name associated to the LIXA state server and it's referenced by one or more profiles described in the configuration file
etc/lixac_conf.xml
A typical usage of the environment variable is the following one:
lixa@4944d8bff50d:/$ lixat
2019-02-09 18:10:18.931258 [8/139695483680640] INFO: LXC000I this process is starting a new LIXA transaction manager (lixa package version is 1.7.4)
tx_open(): -7

lixa@4944d8bff50d:/$ export LIXA_STATE_SERVERS="tcp://192.168.123.35:2345/default"
lixa@4944d8bff50d:/$ lixat
2019-02-09 18:10:59.794849 [9/140591460210560] INFO: LXC000I this process is starting a new LIXA transaction manager (lixa package version is 1.7.4)
tx_open(): 0
tx_close(): 0
Instead of changing the content of the
etc/lixac_conf.xml configuration file, in some
cases, it can be more practical to override the content using the
LIXA_STATE_SERVERS environment variable.
This environment variable specifies which internal modules must
be traced at run-time.
The C header file
src/common/lixa_trace.h
contains the exadecimal value of every internal module; if you
want to trace two or more modules you have make the logical OR
among all the desired values.
Supposing you are interested in tracing what happens inside
"server listener",
"server manager" and
"server status" modules.
Looking at file
src/common/lixa_trace.h:
#define LIXA_TRACE_MOD_SERVER_LISTENER    0x00000004
#define LIXA_TRACE_MOD_SERVER_MANAGER     0x00000008
#define LIXA_TRACE_MOD_SERVER_STATUS      0x00000010
the resulting value is 0x0000001C:
export LIXA_TRACE_MASK=0x00000010
The "trace all" value is 0xffffffff:
export LIXA_TRACE_MASK=0xffffffff
Warning
Too much tracing is dangerous: it slows down your system and possibly fills-up your filesystems.
Establishing the internal modules that must be traced is a typical troubleshooting task you can acquire working with LIXA project. In the section called “Tracing” you can discover some useful information related to the usage of this environment variable.
[16] The dashed box named "Transaction Manager" was removed to simplify the picture.
[17]
Both the files reside in /opt/lixa/etc/
directory and must be managed by
lixa user, the
LIXA administrative user
[18] The standard installation procedure installs both the files with default content; it's your responsability to customize the content of the files.
[19] XA functions can be skipped for dynamically registered Resource Managers if they are not part of the transaction.
Once you have installed (see Chapter 2, Installation) and configured (see Chapter 3, Configuration) your environment, you are ready to run LIXA.
Note
In this chapter it is assumed you installed the LIXA project
software at the default path /opt/lixa; if you
installed the software at a different path, you'd need to adjust
the shown commands consequently.
The first step you must perform is starting the state server; it's name is lixad (LIXA daemon). The command
tiian@ubuntu:~$ /opt/lixa/sbin/lixad --help
Usage:
  lixad [OPTION...] - LIXA server

Help Options:
  -?, --help             Show help options

Application Options:
  -d, --daemon           Run the process as a daemon
  -m, --maintenance      Start the server in maintenance mode only
  -u, --dump             Dump the content of status files using order [ufs] (u=used, f=free, s=sequential)
  -c, --config-file      Specify an alternate configuration file
  -t, --trace-file       Specify trace file name
  -l, --clean-failed     Clean recovery failed transactions at start-up
  -v, --version          Print package info and exit
displays the available command line options.
If you tried to start the state server without the appropriate privileges it should happen something like this:
tiian@ubuntu:~$ /opt/lixa/sbin/lixad
tiian@ubuntu:~$ sudo su -c "tail /var/log/daemon.log"
[...]
Mar 31 22:53:10 ubuntu lixad[5891]: LXD000N this process is starting a new LIXA server (lixa package version is 0.5.29)
Mar 31 22:53:10 ubuntu lixad[5891]: LXD015W unable to open pid file '/opt/lixa/var/run.pid'
Mar 31 22:53:10 ubuntu lixad[5891]: LXD004E error (ERROR: 'open' function returned an error condition) while starting manager(s), premature exit
because the process is not able to update the content of the
/opt/lixa/var/ directory; use the administrative
user and try again:
tiian@ubuntu:~$ sudo su - lixa
[sudo] password for tiian:
lixa@ubuntu:~$ /opt/lixa/sbin/lixad
Running the command without options blocks your shell and runs the state server in foreground; this is not terribly useful but it may help you when you are debugging some issue. Use these commands, from a different terminal, to retrieve the PID (process id) and to stop the state server:
tiian@ubuntu:~$ sudo su - lixa
lixa@ubuntu:~$ ps -ef|grep lixad|grep -v grep
lixa      5909  5906  0 22:56 pts/1    00:00:00 /opt/lixa/sbin/lixad
lixa@ubuntu:~$ kill 5909
lixa@ubuntu:~$ exit
logout
Alternatively you can strike ^C to break the foreground execution. A foreground execution is generally more useful if some tracing is enabled:
lixa@ubuntu:~$ export LIXA_TRACE_MASK=0x00000001
lixa@ubuntu:~$ /opt/lixa/sbin/lixad
2011-03-31 22:58:32.244333 [5920/3073509104] lixad/main: starting
2011-03-31 22:58:34.864062 [5920/3073509104] lixad/main: exiting
The most useful command option is --daemon: it
allows you to run the state server as a daemon
detached from any terminal:
lixa@ubuntu:~$ /opt/lixa/sbin/lixad --daemon
lixa@ubuntu:~$ ps -ef|grep lixad|grep -v grep
lixa      5926     1  0 22:59 ?        00:00:00 /opt/lixa/sbin/lixad --daemon
when running the state server as a daemon you need to perform some
special tasks to understand the process is up & running.
With ps -ef|grep lixad|grep -v grep you can
verify the process is running.
The state server registers its PID in a special file:
/opt/lixa/var/run.pid; if the content of the file
is different than the result retrieved with the grep
command, something is not running well.
lixa@ubuntu:~$ cat /opt/lixa/var/run.pid
5926
To stop a daemonized state server you must use the kill command as shown below:
lixa@ubuntu:~$ kill $(cat /opt/lixa/var/run.pid)
lixa@ubuntu:~$ ps -ef|grep lixad|grep -v grep
The grep command returns an empty result because
the state server is not running. The state server publishes some
messages using the syslog facility; Ubuntu 8.04
sends default messages to the file
/var/log/daemon.log; below there are some standard
messages:
tiian@ubuntu:~$ sudo su -c "cat /var/log/daemon.log|grep lixad|grep 5926"
Mar 31 22:59:11 ubuntu lixad[5926]: LXD014N LIXA server entered daemon status
Mar 31 23:00:48 ubuntu lixad[5926]: LXD019N received signal 15, server immediate shutdown in progress...
Mar 31 23:00:48 ubuntu lixad[5926]: LXD006N server terminated activities
The --maintenance option allows you to start
the state server to perform some special actions; only special
clients can connect to the server when the server is operating
in maintenance mode: customer developed
Application Programs can not perform distributed transactions.
A special client is lixar: a command line
utility designed for recovery purposes
(see Chapter 9, Recovery for more information).
Warning
A state server that's operating in maintenance mode is not serving the LIXA infrastructure and Distributed Transaction Processing can not be performed: use this option only if you really need it.There's no way to turn a server operating in maintenance mode in a server operating in standard mode: you have to stop and start the LIXA state server again.
Use --dump option to get a dump of the content
of the state currently persisted in the status files. The option
must specify one or more flags:
"s": dump all the blocks, in sequential order
"u": dump all the used blocks, travelling the used block chain
"f": dump all the free blocks, travelling the free block chain
You may specify two or more flags on the same command line: the output will duplicate some blocks.
The example below shows the output produced when dumping the content of a single status file with no current transactions in progress (the free block chain contains all the blocks):
tiian@ubuntu:~$ sudo su - lixa
lixa@ubuntu:~$ /opt/lixa/sbin/lixad --dump f
========================================================================
First file ('/opt/lixa/var/lixad_status1_1') will be dumped
Magic number is: 24848 (24848)
Level is: 1 (1)
Last sync timestamp: 2011-03-31T23:00:48.829787+0200
Size: 10 blocks
Used block chain starts at: 0 (empty chain)
Free block chain starts at: 1
Dumping records following physical order: 0
Dumping records following free block chain: 1
Dumping records following used block chain: 0
------------------------------------------------------------------------
Block: 1, next block in chain: 2
Block type: unknown (0)
------------------------------------------------------------------------
Block: 2, next block in chain: 3
Block type: unknown (0)
------------------------------------------------------------------------
Block: 3, next block in chain: 4
Block type: unknown (0)
------------------------------------------------------------------------
Block: 4, next block in chain: 5
Block type: unknown (0)
------------------------------------------------------------------------
Block: 5, next block in chain: 6
Block type: unknown (0)
------------------------------------------------------------------------
Block: 6, next block in chain: 7
Block type: unknown (0)
------------------------------------------------------------------------
Block: 7, next block in chain: 8
Block type: unknown (0)
------------------------------------------------------------------------
Block: 8, next block in chain: 9
Block type: unknown (0)
------------------------------------------------------------------------
Block: 9, next block in chain: 0
Block type: unknown (0)
Note
The dump can be performed while the state server is running: the dump will output the content of the currently sinchronized status file and you will not be able to see the last updates. Dumps performed at different times may produce different results if there is a running state server.Some additional options are available: they don't radically change the state server behavior, but supply some features.
With option --config-file you can specify a
non default configuration file; this option can be useful if you
want to test a different configuration without damaging your
production config file. It can be used if you want to
run different instances of the state server in the same
operating system image, too.
Below there is a sample invocation:
lixa@ubuntu:~$ /opt/lixa/sbin/lixad --config-file /tmp/lixad_conf.xml
With option --trace-file you can specify a
different trace file instead of the default
stderr
process stream; this option is especially useful when you are
running the state server as a daemon (see
the section called “Background (daemon) execution”).
Below there is a sample invocation:
lixa@ubuntu:~$ export LIXA_TRACE_MASK=0x01
lixa@ubuntu:~$ /opt/lixa/sbin/lixad --daemon --trace-file /tmp/lixad.trace
lixa@ubuntu:~$ ls -la /tmp/lixad.trace
-rw-r--r-- 1 lixa lixa 349 2011-03-18 16:14 /tmp/lixad.trace
Take a look to the section called “Tracing” for additional details.
Use option --clean-failed to clean-up the
state of the transactions that LIXA was not able to recover
automatically: this option is useful to remove useless information
from the state file, but you must pay attention to these
warnings.
If your LIXA installation worked properly, you would not need to clean-up the state file.
Removing recovery failed transactions cleans-up the history of your issues: you should understand why your state file is accumulating recovery failed transaction records need to clean-up the state file.
Don't use this option without a deep review of the content of Chapter 9, Recovery.
Use option --version to retrieve the
version of the installed software as shown below:
lixa@ubuntu:~$ /opt/lixa/sbin/lixad --version
LIXA: a Libre XA implementation
Copyright (c) 2009-2012, Christian Ferrari; all rights reserved.
License: GPL (GNU Public License) version 2
Package name: lixa; package version: 0.5.29
Access http://sourceforge.net/projects/lixa/ to report bugs and partecipate to the project
The lixad command does not start a real state server: it prints version information on stdout and exits.
The LIXA project supplies a test utility you can use to
perform basic tests on your LIXA environment.
The command is named lixat and is
located in the bin directory; use
--help option to retrieve the list of
the available options:
tiian@ubuntu:~$ /opt/lixa/bin/lixat --help
Usage:
  lixat [OPTION...] - LIXA test utility

Help Options:
  -?, --help                  Show help options

Application Options:
  -c, --commit                Perform a commit transaction
  -r, --rollback              Perform a rollback transaction
  -v, --version               Print package info and exit
  -b, --benchmark             Perform benchmark execution
  -o, --open-close            Execute tx_open & tx_close for every transaction [benchmark only]
  -s, --csv                   Send result to stdout using CSV format [benchmark only]
  -l, --clients               Number of clients (threads) will stress the state server [benchmark only]
  -d, --medium-delay          Medium (random) delay between TX functions [benchmark only]
  -D, --delta-delay           Delta (random) delay between TX functions [benchmark only]
  -p, --medium-processing     Medium (random) delay introduced by Resource Managers operations between tx_begin and tx_commit/tx_rollback [benchmark only]
  -P, --delta-processing      Delta (random) delay introduced by Resource Managers operations between tx_begin and tx_commit/tx_rollback [benchmark only]
Important
The LIXA test utility is a LIXA client program and it
does not need
any special authorization to run because it does not need to write
the content of /opt/lixa/var/ directory.
The lixat command does nothing useful except trying to contact the state server and optionally perform a commit and/or rollback dummy distributed transaction [20]. Below there's the output of a trivial execution: the program connects to the state server, performs tx_open() against all the configured resource managers and performs tx_close() against all the configured resource managers.
tiian@ubuntu:~$ /opt/lixa/bin/lixat
tx_open(): 0
tx_close(): 0
With --commit option the test program performs a
dummy commit against all the configured resource managers too:
tiian@ubuntu:~$ /opt/lixa/bin/lixat --commit
tx_open(): 0
tx_begin(): 0
tx_info(): 1
        xid/formatID.gtrid.bqual = 1279875137.080f2b63a3804bfbbdd3347ca7607ba3.ef954655163edff9fee662b12f881c97
tx_commit(): 0
tx_close(): 0
A dummy commit does not damage your data because the program does not contains instructions that modify the content of the resource managers. A dummy rollback can be performed as well:
tiian@ubuntu:~$ /opt/lixa/bin/lixat --rollback
tx_open(): 0
tx_begin(): 0
tx_info(): 1
        xid/formatID.gtrid.bqual = 1279875137.c651f0f2efb249bd92f3f2b5a76741a5.ef954655163edff9fee6-62b12f881c97
tx_rollback(): 0
tx_close(): 0
The test utility can be used to:
check the state server is up and running
	      tiian@ubuntu:~$ /opt/lixa/bin/lixat
	      tx_open(): -7
	      tiian@ubuntu:~$ echo $?
	      1
(the state server is not running)
check the content of
etc/lixac_conf.xmlis oktiian@ubuntu:~$ export LIXA_PROFILE=XXXX tiian@ubuntu:~$ /opt/lixa/bin/lixat tx_open(): -7 tiian@ubuntu:~$ echo $? 1
(the profile “XXXX” does not exist)
try different profiles described inside
etc/lixac_conf.xml...
You can safely experiment by yourself using lixat command.
The LIXA project supplies a recovery utility you must use to
perform some special tasks related to distributed transaction
recovery. The command is named lixar and is
located in the bin directory; use
--help option to retrieve the list of
the available options:
tiian@ubuntu:~$ /opt/lixa/bin/lixar --help
Usage:
  lixar [OPTION...] - LIXA recovery utility

Help Options:
  -?, --help                      Show help options

Application Options:
  -p, --print                     Print a report of all the prepared and in-doubt transactions compatible with current configuration and profile
  -x, --xid                       Select specified transaction for rollback/commit
  -X, --xid-file                  Select specified file as a list of transaction to rollback/commit
  -c, --commit                    Commit prepared & in-doubt transactions
  -r, --rollback                  Rollback prepared & in-doubt transactions
  -v, --version                   Print package info and exit
  -b, --bypass-bqual-check        Bypass xid branch qualifier check
  -B, --bypass-formatid-check     Bypass xid format id check
  -e, --use-tmendrscan-flag       Use TMENDRSCAN flag for last xa_recover call
Important
The LIXA test utility is a LIXA client program and it does
not need
any special authorization to run because it does not need to write
the content of /opt/lixa/var/ directory.
The usage of the lixar command is strictly related to recovery tasks and is explained in Chapter 9, Recovery.
Note
All the option except--commit and
--rollback are safe; only
specifying “commit” and “rollback” can
damage the state of the data managed by your resource managers.
You must start the state server before you can start lixar; if you don't start the state server, you will get something like shown below:
tiian@ubuntu:~$ /opt/lixa/bin/lixar
Execution options:
        - print report = no
        - transaction(s) will be committed = no
        - transaction(s) will be rolled back = no
        - bypass xid branch qualifier check = no
        - bypass xid format id check = no
        - use TMENDRSCAN flag for last xa_recover call = no

tx_open() returned TX_FAIL: unable to proceed
The LIXA project provides this utility to list all global transactions and their
related branches. Once the xid is known, the lixar utility
can be used to perform recovery operations.
The command is named lixatpm and is located in the
bin directory; use
--help option to retrieve the list of
the available options:
tiian@ubuntu:~$ /opt/lixa/bin/lixatpm --help
Usage:
  lixatpm [OPTION...] - LIXA transaction process monitor client

Help Options:
  -h, --help       Show help options

Application Options:
  -r, --report     Report on all transactions linked to the current configuration and profile
You must start the state server before you can start lixatpm.
LIXA provides a configuration utility named
lixa-config. It can be used to retrieve some
useful information necessary for other shell commands.
Try it with --help parameter:
[tiian@centos lixa]$ /opt/lixa/bin/lixa-config --help
Usage:
  lixa-config [OPTION...] - LIXA config utility

Help Options:
  -h, --help                       Show help options

Application Options:
  -c, --cflags                     [-Wall]
  -C, --config-dir                 [/opt/lixa/etc]
  -f, --cppflags                   [-I/opt/lixa/include]
  -i, --include-dir                [/opt/lixa/include]
  -d, --ldflags                    [-Wl,-rpath -Wl,/opt/lixa/lib]
  -L, --lib-dir                    [/opt/lixa/lib]
  -l, --libs                       [-L/opt/lixa/lib -llixac]
  -o, --include-dir-postgresql     [/usr/include]
  -p, --libs-postgresql            [-L/opt/lixa/lib -llixac -llixapq]
  -y, --include-dir-mysql          [/usr/include/mysql]
  -m, --libs-mysql                 [-L/opt/lixa/lib -llixac -llixamy]
  -P, --prefix                     [/opt/lixa]
  -s, --state-dir                  [/opt/lixa/var]
  -r, --rsrc-mngrs                 list of configured Resource Managers
If you need to set a variable with the path containing LIXA libraries, simply use something like:
[tiian@centos lixa]$ export FOOBAR=$(/opt/lixa/bin/lixa-config --lib-dir)
[tiian@centos lixa]$ echo $FOOBAR
/opt/lixa/lib
It may be useful when you installed two different version of LIXA inside the same host: pointing the right lixa-config is sufficient to retrieve all the correlated info.
Warning
The options related to PostgreSQL and MySQL would not appear if you didn't configure them at build time. This give you a simple way to determine if the LIXA is built with PostgreSQL/MySQL support: testing the return code ($?) of /opt/lixa/bin/lixa-config --libs-postgresql will return 0 or 1 (error, LIXA not configured for PostgreSQL).
This chapter explains how you can develop your own C application using the libraries and the tools supplied by LIXA project.
LIXA project ships some example C programs you can find in
directory
/opt/lixa/share/doc/lixa-X.Y.Z/examples/ after
software installation (see Chapter 2, Installation).
Note
This chapter is focused on the C programming language. The COBOL programming language is addressed by another dedicated chapter.
LIXA project adopts the standard described in [TXspec] as the API you should use when developing an Application Program.
The API is very easy, it supplies C functions and COBOL routines. The following C example can be briefly explained:
/* include this header: it's the header associated to The TX (Transaction
   Demarcation) Specification */
#include <tx.h>

/* your stuff */

int main(int argc, char *argv[])
{
        /* use an int variable to pick-up function return code */
        int rc;

        /* use tx_open() to open ALL the Resource Managers associated to
           the current LIXA_PROFILE */
        if (TX_OK != (rc = tx_open()))
                /* this is an error, manage it! */

        /* put your stuff here ... */

        /* this function delimits the transaction begin */
        if (TX_OK != (rc = tx_begin()))
                /* this is an error, manage it! */

        /* put your commands about the Resource Managers here ... */

        /* this function commits the modification operated by the
           Resource Managers */
        if (TX_OK != (rc = tx_commit()))
                /* this is an error, manage it! */
        /* you can use tx_rollback() instead of tx_commit() if you decide
           the work must be rolled back */

        /* put here other transactions if you need them (loops are possible
           too) */

        /* use tx_close() to close ALL the Resource Managers associated to
           the current LIXA_PROFILE */
}
These are the available C functions (the descriptions come from [TXspec]):
tx_begin: begin a global transactiontx_close: close a set of resource managerstx_commit: commit a global transactiontx_info: return global transaction informationtx_open: open a set of resource managerstx_rollback: roll back a global transactiontx_set_commit_return: setcommit_returncharacteristictx_set_transaction_control: settransaction_controlcharacteristictx_set_transaction_timeout: settransaction_timeoutcharacteristic
Refer to [TXspec] for the complete description.
A program developed for TX (Transaction Demarcation) Specification must access the resource managers coordinated by the transaction manager using specific functions. Unfortunately, the TX Specification does not specify a standard unified method to access a coordinated resource manager.
Tipically, every resource manager provides its own specific function(s) to retrieve one or more connection handler(s). Once you have got the right connection handler(s), you can use the resource manager as you use without a transaction manager.
The supplied examples (see doc/examples directory)
show the functions that must be used to
retrieve the connection handler(s) necessary to interact with
the resource managers.
Note
Special attention must be payed to commit and rollback operations: a well designed program developed for TX (Transaction Demarcation) Specification must not specify the resource manager native version of commit and rollback operations. If your software violates this rule, your environment will generate warning conditions related to euristically completed transaction. If your software forces a resource manager to commit or rollback outside the control of the transaction manager, the transaction manager will not be able to perform the opposite operation if asked to do it. These situations tend to generate inconsistencies.
The examples showed in this chapter use these linkage options:
-Wl,-rpath -Wl,/opt/lixa/lib
dynamically generated by
/opt/lixa/bin/lixa-config -d
(/opt/lixa/bin/lixa-config --ldflags).
The options are specific to gcc and
ld Linux linker.
Alternatively you can avoid these options and set
LD_LIBRARY_PATH environment variable.
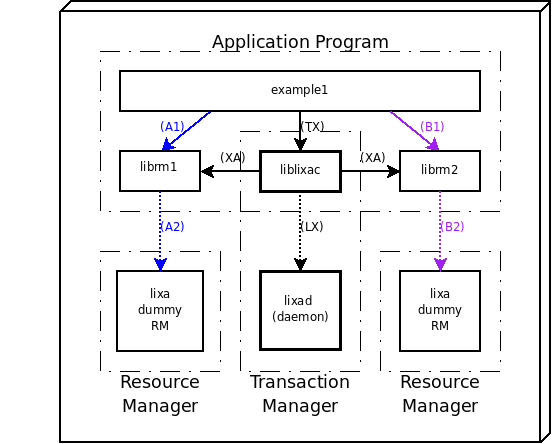
Create a working directory in a place you are comfortable with:
| [Shell terminal session] |
tiian@ubuntu:~$ cd tiian@ubuntu:~$ mkdir tmp tiian@ubuntu:~$ cd tmp tiian@ubuntu:~/tmp$ |
Copy file example1.c in your working dir:
| [Shell terminal session] |
tiian@ubuntu:~/tmp$ cp /opt/lixa/share/doc/lixa-X.Y.Z/examples/example1.c . |
Substitute “lixa-X.Y.Z” with the actual version of the software you installed.
Compile and link the C example program:
| [Shell terminal session] |
tiian@ubuntu:~/tmp$ gcc example1.c $(/opt/lixa/bin/lixa-config -c -f -l -d) -o example1 |
Check the output of the linker:
| [Shell terminal session] |
tiian@ubuntu:~/tmp$ ldd example1
        linux-gate.so.1 =>  (0xb773f000)
        liblixac.so.0 => /opt/lixa/lib/liblixac.so.0 (0xb7724000)
        libc.so.6 => /lib/tls/i686/cmov/libc.so.6 (0xb75d0000)
        libgmodule-2.0.so.0 => /usr/lib/libgmodule-2.0.so.0 (0xb75cb000)
        libdl.so.2 => /lib/tls/i686/cmov/libdl.so.2 (0xb75c7000)
        libgthread-2.0.so.0 => /usr/lib/libgthread-2.0.so.0 (0xb75c2000)
        librt.so.1 => /lib/tls/i686/cmov/librt.so.1 (0xb75b9000)
        libglib-2.0.so.0 => /usr/lib/libglib-2.0.so.0 (0xb7508000)
        libxml2.so.2 => /usr/lib/libxml2.so.2 (0xb73e8000)
        liblixab.so.0 => /opt/lixa/lib/liblixab.so.0 (0xb73d4000)
        libpthread.so.0 => /lib/tls/i686/cmov/libpthread.so.0 (0xb73bc000)
        /lib/ld-linux.so.2 (0xb7740000)
        libpcre.so.3 => /usr/lib/libpcre.so.3 (0xb7395000)
        libz.so.1 => /usr/lib/libz.so.1 (0xb7380000)
        libm.so.6 => /lib/tls/i686/cmov/libm.so.6 (0xb735b000)
        libuuid.so.1 => /lib/libuuid.so.1 (0xb7356000)
|
Now you are ready to start your first application:
| [Shell terminal session] |
tiian@ubuntu:~/tmp$ ./example1 tx_open(): -7 |
The tx_open() function returned the value
“-7” (TX_FAIL)
because the state server is not running.
Start the state server (see the section called “Background (daemon) execution”)
and try again:
| [Shell terminal session (Ubuntu)] |
tiian@ubuntu:~/tmp$ sudo su - lixa lixa@ubuntu:~$ /opt/lixa/sbin/lixad --daemon lixa@ubuntu:~$ exit logout tiian@ubuntu:~/tmp$ ps -ef|grep lixad|grep -v grep lixa 12866 1 0 21:35 ? 00:00:00 /opt/lixa/sbin/lixad --daemon tiian@ubuntu:~/tmp$ ./example1 tx_open(): 0 tx_begin(): 0 tx_info(): 1 xid.formatID: 1279875137 xid.gtrid_length: 16 xid.bqual_length: 16 when_return: 0 (TX_COMMIT_COMPLETED) transaction_control: 0 (TX_UNCHAINED) transaction_timeout: 0 s transaction_state: 0 (TX_ACTIVE) tx_commit(): 0 tx_info(): 0 xid.formatID: -1 xid.gtrid_length: 0 xid.bqual_length: 0 when_return: 0 (TX_COMMIT_COMPLETED) transaction_control: 0 (TX_UNCHAINED) transaction_timeout: 0 s transaction_state: 0 (TX_ACTIVE) tx_set_commit_return(): 1 tx_set_transaction_timeout(): 0 tx_set_transaction_control(): 0 tx_info(): 0 xid.formatID: -1 xid.gtrid_length: 0 xid.bqual_length: 0 when_return: 0 (TX_COMMIT_COMPLETED) transaction_control: 1 (TX_CHAINED) transaction_timeout: 5 s transaction_state: 0 (TX_ACTIVE) tx_set_transaction_control(): 0 tx_info(): 0 xid.formatID: -1 xid.gtrid_length: 0 xid.bqual_length: 0 when_return: 0 (TX_COMMIT_COMPLETED) transaction_control: 0 (TX_UNCHAINED) transaction_timeout: 5 s transaction_state: 0 (TX_ACTIVE) tx_begin(): 0 tx_rollback(): 0 tx_close(): 0 |
Your first program has connected to the state server and has performed two dummy distributed transactions: commit and rollback.
You have not specified a specific profile:
| [Shell terminal session] |
tiian@ubuntu:~/tmp$ echo $LIXA_PROFILE |
The LIXA client library used the default one, the first listed in
etc/lixac_conf.xml. If you inspected the
configuration file /opt/lixa/etc/lixac_conf.xml
you would see something like this:
| [Shell terminal session] |
tiian@ubuntu:~/tmp$ cat /opt/lixa/etc/lixac_conf.xml
<?xml version="1.0" encoding="UTF-8" ?>
<client>
  <sttsrvs>
    <sttsrv name="local_1" domain="AF_INET" address="127.0.0.1" port="2345" />
[...]
    <rsrmgr name="LIXAdummyRM" switch_file="/opt/lixa/lib/switch_lixa_dummyrm.so" xa_open_info="dummy open string" xa_close_info="dummy close string" />
[...]
  <profiles>
    <profile name="CF05">
      <sttsrvs>
        <sttsrv>local_1</sttsrv>
      </sttsrvs>
      <rsrmgrs>
        <rsrmgr>LIXAdummyRM</rsrmgr>
        <rsrmgr>LIXAdummyRM</rsrmgr>
      </rsrmgrs>
    </profile>
    <profile name="GT71">
[...]
  </profiles>
</client>
|
The default profile is named “CF05” and lists two
resource managers of the same type: “LIXAdummyRM”;
the related switch file is the file
/opt/lixa/lib/switch_lixa_dummyrm.so.
The dummy resource managers supplied by the LIXA project is
a special trivial resource managers: it ever returns
XA_OK. If you are interested in LIXA dummy
Resource Manager implementation, take a look to the source file
src/client/switch/lixa/lixa_dummyrm.c.
To verify that the program is using the dummy resource manager,
execute it with LIXA_TRACE_MASK environment
variable set to 0x00008000:
| [Shell terminal session] |
tiian@ubuntu:~/tmp$ export LIXA_TRACE_MASK=0x00008000 tiian@ubuntu:~/tmp$ ./example1 [...] 2011-04-05 22:07:59.953844 [29359/3073444096] client_config_load_switch 2011-04-05 22:07:59.953875 [29359/3073444096] client_config_load_switch: resource manager # 0, name='LIXAdummyRM', switch_file='/opt/lixa/lib/switch_lixa_dummyrm.so' 2011-04-05 22:07:59.954220 [29359/3073444096] client_config_load_switch: module address 0x804e410, function lixa_get_xa_switch found at address 0xb76dd790 2011-04-05 22:07:59.954254 [29359/3073444096] client_config_load_switch: lixa_getxa_switch()->name = 'lixa_dummyrm', lixa_get_xa_switch()->flags = 0 2011-04-05 22:07:59.954279 [29359/3073444096] client_config_load_switch: resource manager dynamically registers: false 2011-04-05 22:07:59.954302 [29359/3073444096] client_config_load_switch: resource manager does not support association migration: false 2011-04-05 22:07:59.954325 [29359/3073444096] client_config_load_switch: resource manager supports asynchronous operations: false 2011-04-05 22:07:59.954348 [29359/3073444096] client_config_load_switch: resource manager # 1, name='LIXAdummyRM', switch_file='/opt/lixa/lib/switch_lixa_dummyrm.so' 2011-04-05 22:07:59.954379 [29359/3073444096] client_config_load_switch: module address 0x804e410, function lixa_get_xa_switch found at address 0xb76dd790 2011-04-05 22:07:59.954405 [29359/3073444096] client_config_load_switch: lixa_getxa_switch()->name = 'lixa_dummyrm', lixa_get_xa_switch()->flags = 0 2011-04-05 22:07:59.954429 [29359/3073444096] client_config_load_switch: resource manager dynamically registers: false 2011-04-05 22:07:59.954451 [29359/3073444096] client_config_load_switch: resource manager does not support association migration: false 2011-04-05 22:07:59.954474 [29359/3073444096] client_config_load_switch: resource manager supports asynchronous operations: false [...] tx_open(): 0 tx_begin(): 0 tx_commit(): 0 tx_begin(): 0 tx_rollback(): 0 2011-04-05 22:08:00.128531 [29359/3073444096] client_unconfig 2011-04-05 22:08:00.128883 [29359/3073444096] client_unconfig: acquiring exclusive mutex 2011-04-05 22:08:00.129174 [29359/3073444096] client_config_unload_switch 2011-04-05 22:08:00.129399 [29359/3073444096] client_config_unload_switch: resource manager # 0, defined in config as 'LIXAdummyRM', module address 0x804e410, xa_switch->name='lixa_dummyrm', xa_switch->flags=0 2011-04-05 22:08:00.129594 [29359/3073444096] client_config_unload_switch: resource manager # 1, defined in config as 'LIXAdummyRM', module address 0x804e410, xa_switch->name='lixa_dummyrm', xa_switch->flags=0 2011-04-05 22:08:00.129852 [29359/3073444096] client_config_unload_switch/excp=1/ret_cod=0/errno=0 2011-04-05 22:08:00.130024 [29359/3073444096] client_unconfig/xmlCleanupParser 2011-04-05 22:08:00.130215 [29359/3073444096] client_unconfig: releasing exclusive mutex 2011-04-05 22:08:00.130371 [29359/3073444096] client_unconfig/excp=2/ret_cod=0/errno=0 tx_close(): 0 |
This section contains many examples related to different configurations:
the Application Program can be executed inside the same system that hosts the Resource Manager (Oracle Database) or in a different system. The first configuration is named "local" and necessitates only the Oracle Database Server software. The second configuration is named "remote" or "network" and necessitates both the Oracle Database Server and the Oracle Instant Client software
the C Application Program can be developed using Oracle Call Interface (OCI) or using embedded SQL that must precompiled using the Oracle Pro*C precompiler. OCI, Pro*C and XA are not compatible.
Using a real Resource Manager, like a DBMS, requires some extra effort because you have to set-up the environment needed by the Resource Manager. Refer to the section called “Local configuration (Server) and OCI” for Oracle configuration.
The LIXA state server (daemon) must be started as explained in the section called “Starting the state server (lixad)”.
Prepare the client (Application Program) using the below commands (gcc command was splitted on several lines using \ to help readability, but you may use a single line):
| System configuration details: |
Local connection, Ubuntu 8.04, Oracle XE 10.2 Database Server
tiian@ubuntu:~$ mkdir tmp tiian@ubuntu:~$ cd tmp tiian@ubuntu:~/tmp$ cp /opt/lixa/share/doc/lixa-X.Y.Z/examples/example2_ora.c . tiian@ubuntu:~/tmp$ gcc example2_ora.c $(/opt/lixa/bin/lixa-config -c -f -l -d) \ > -I/usr/lib/oracle/xe/app/oracle/product/10.2.0/server/rdbms/public \ > -L/usr/lib/oracle/xe/app/oracle/product/10.2.0/server/lib -l clntsh -l nnz10 \ > -o example2_ora |
| System configuration details: |
Local connection, Ubuntu 10.04, Oracle XE 11.2 Database Server
tiian@ubuntu:~$ mkdir tmp tiian@ubuntu:~$ cd tmp tiian@ubuntu:~/tmp$ cp /opt/lixa/share/doc/lixa-X.Y.Z/examples/example2_ora.c . tiian@ubuntu:~/tmp$ gcc example2_ora.c $(/opt/lixa/bin/lixa-config -c -f -l -d) \ > -I/u01/app/oracle/product/11.2.0/xe/rdbms/public/ \ > -L/u01/app/oracle/product/11.2.0/xe/lib/ -l clntsh -l nnz11 \ > -o example2_ora |
Verify the executable produced by gcc:
tiian@ubuntu:~/tmp$ ldd example2_ora
        linux-gate.so.1 =>  (0xb7709000)
        liblixac.so.0 => /opt/lixa/lib/liblixac.so.0 (0xb76ee000)
        libclntsh.so.10.1 => not found
        libnnz10.so => not found
        libc.so.6 => /lib/tls/i686/cmov/libc.so.6 (0xb7590000)
        libgmodule-2.0.so.0 => /usr/lib/libgmodule-2.0.so.0 (0xb758c000)
        libdl.so.2 => /lib/tls/i686/cmov/libdl.so.2 (0xb7588000)
        libgthread-2.0.so.0 => /usr/lib/libgthread-2.0.so.0 (0xb7583000)
        librt.so.1 => /lib/tls/i686/cmov/librt.so.1 (0xb7579000)
        libglib-2.0.so.0 => /usr/lib/libglib-2.0.so.0 (0xb74c8000)
        libxml2.so.2 => /usr/lib/libxml2.so.2 (0xb73a8000)
        liblixab.so.0 => /opt/lixa/lib/liblixab.so.0 (0xb7393000)
        libm.so.6 => /lib/tls/i686/cmov/libm.so.6 (0xb736e000)
        libpthread.so.0 => /lib/tls/i686/cmov/libpthread.so.0 (0xb7356000)
        /lib/ld-linux.so.2 (0xb770a000)
        libpcre.so.3 => /usr/lib/libpcre.so.3 (0xb732e000)
        libz.so.1 => /usr/lib/libz.so.1 (0xb7319000)
        libuuid.so.1 => /lib/libuuid.so.1 (0xb7315000)
There are three unresolved references that can be fixed setting up the environment properly:
tiian@ubuntu:~/tmp$ echo $LD_LIBRARY_PATH

tiian@ubuntu:~/tmp$ export LD_LIBRARY_PATH=/usr/lib/oracle/xe/app/oracle/product/10.2.0/server/lib

tiian@ubuntu:~/tmp$ echo $LD_LIBRARY_PATH
/usr/lib/oracle/xe/app/oracle/product/10.2.0/server/lib
Check again the executable:
tiian@ubuntu:~/tmp$ ldd example2_ora
        linux-gate.so.1 =>  (0xb76f9000)
        liblixac.so.0 => /opt/lixa/lib/liblixac.so.0 (0xb76de000)
        libclntsh.so.10.1 => /usr/lib/oracle/xe/app/oracle/product/10.2.0/server/lib/libclntsh.so.10.1 (0xb692a000)
        libnnz10.so => /usr/lib/oracle/xe/app/oracle/product/10.2.0/server/lib/libnnz10.so (0xb6724000)
        libc.so.6 => /lib/tls/i686/cmov/libc.so.6 (0xb65c7000)
        libgmodule-2.0.so.0 => /usr/lib/libgmodule-2.0.so.0 (0xb65c3000)
        libdl.so.2 => /lib/tls/i686/cmov/libdl.so.2 (0xb65bf000)
        libgthread-2.0.so.0 => /usr/lib/libgthread-2.0.so.0 (0xb65ba000)
        librt.so.1 => /lib/tls/i686/cmov/librt.so.1 (0xb65b0000)
        libglib-2.0.so.0 => /usr/lib/libglib-2.0.so.0 (0xb64ff000)
        libxml2.so.2 => /usr/lib/libxml2.so.2 (0xb63df000)
        liblixab.so.0 => /opt/lixa/lib/liblixab.so.0 (0xb63ca000)
        libm.so.6 => /lib/tls/i686/cmov/libm.so.6 (0xb63a5000)
        libpthread.so.0 => /lib/tls/i686/cmov/libpthread.so.0 (0xb638d000)
        libnsl.so.1 => /lib/tls/i686/cmov/libnsl.so.1 (0xb6374000)
        /lib/ld-linux.so.2 (0xb76fa000)
        libpcre.so.3 => /usr/lib/libpcre.so.3 (0xb634d000)
        libz.so.1 => /usr/lib/libz.so.1 (0xb6338000)
        libuuid.so.1 => /lib/libuuid.so.1 (0xb6334000)
Set-up the necessary environment variables. Here's an example for Oracle XE 10.2 using a local connection and the SID identifier:
| System configuration details: |
Local connection, Ubuntu 8.04, Oracle XE 10.2 Database Server
tiian@ubuntu:~/tmp$ export PATH=$PATH:$ORACLE_HOME/bin tiian@ubuntu:~/tmp$ echo $PATH /usr/local/sbin:/usr/local/bin:/usr/sbin:/usr/bin:/sbin:/bin:/usr/games:/usr/lib/oracle/xe/app/oracle/product/10.2.0/server/bin tiian@ubuntu:~/tmp$ export ORACLE_HOME=/usr/lib/oracle/xe/app/oracle/product/10.2.0/server tiian@ubuntu:~/tmp$ echo $ORACLE_HOME /usr/lib/oracle/xe/app/oracle/product/10.2.0/server tiian@ubuntu:~/tmp$ export ORACLE_SID=XE tiian@ubuntu:~/tmp$ echo $ORACLE_SID XE tiian@ubuntu:~/tmp$ export LIXA_PROFILE=ORA_DYN tiian@ubuntu:~/tmp$ echo $LIXA_PROFILE ORA_DYN |
It is suggested to set the necessary environment variables in your
profile if you are going to execute the programs many times.
This is the list of the suggested variables:
LD_LIBRARY_PATH,
LIXA_PROFILE,
ORACLE_HOME,
ORACLE_SID.
Important
the third and fourth variables can be
set sourcing oracle_env.sh script: it's
installed in the Oracle's bin directory or
alternatively you have to edit your own as explained above.
We set LIXA_PROFILE to value
“ORA_DYN”, looking at
/opt/lixa/etc/lixac_conf.xml:
    <profile name="ORA_DYN">
      <sttsrvs>
        <sttsrv>local_1</sttsrv>
      </sttsrvs>
      <rsrmgrs>
        <rsrmgr>OracleXE_dynreg</rsrmgr>
      </rsrmgrs>
    </profile>
the profile references the Resource Manager named “OracleXE_dynreg”, looking again at the config file:
<rsrmgr name="OracleXE_dynreg" switch_file="/opt/lixa/lib/switch_oracle_dynreg.so" xa_open_info="Oracle_XA+Acc=P/hr/hr+SesTm=30+LogDir=/tmp+threads=true+DbgFl=7+Loose_Coupling=true" xa_close_info="" />
we can discover that our application will access the Oracle
database using hr
user and writing the trace file to directory
/tmp (see LogDir)
[21]. Verify no trace file exists:
tiian@ubuntu:~/tmp$ ls -la /tmp/xa*
ls: cannot access /tmp/xa*: No such file or directory
Execute the client program as shown below:
tiian@ubuntu:~/tmp$ ./example2_ora
INSERT statement executed!
First arg is not 'DELETE', bypassing DELETE statement...
Check the table after program execution:
tiian@ubuntu:~/tmp$ sqlplus "hr/hr"

SQL*Plus: Release 10.2.0.1.0 - Production on Sun Apr 10 10:34:23 2011

Copyright (c) 1982, 2005, Oracle.  All rights reserved.


Connected to:
Oracle Database 10g Express Edition Release 10.2.0.1.0 - Production

SQL> select * from COUNTRIES where COUNTRY_ID = 'RS';

CO COUNTRY_NAME                              REGION_ID
-- ---------------------------------------- ----------
RS Repubblica San Marino                             1

SQL> exit
Disconnected from Oracle Database 10g Express Edition Release 10.2.0.1.0 - Production
The example program example2_ora inserted a
row in table COUNTRIES. Take a look to the
trace produced by the Oracle client library:
tiian@ubuntu:~/tmp$ ls -la /tmp/xa*
-rw-r--r-- 1 tiian tiian 1723 2011-04-10 10:33 /tmp/xa_NULL04102011.trc
tiian@ubuntu:~/tmp$ cat /tmp/xa_NULL04102011.trc

ORACLE XA: Version 10.2.0.1.0. RM name = 'Oracle_XA'.

103352.5300.3057182448.0:
xaoopen: xa_info=Oracle_XA+Acc=P/hr/hr+SesTm=30+LogDir=/tmp+threads=true+DbgFl=7+Loose_Coupling=true,rmid=0,flags=0x0

103352.5300.3057182448.0:
xaolgn_help: version#: 169869568 banner: Oracle Database 10g Express Edition Release 10.2.0.1.0 - Production

103352.5300.3057182448.0:
xaolgn: sqlxrc/sqlxss completed

103352.5300.3057182448.0:
xaolgn2: return XA_OK

103352.5300.3057182448.0:
xaoopen: xaolgn completed

103352.5300.3057182448.0:
xaoopen: return 0

103352.5300.3057182448.0:
ax_reg: xid=0x494c4158-8c6122ac9fd0477ebfe5f650e21a3539-a154ad9214d0544a3abbd33c8c2ba36f, rmid=0, flags=0x0

103352.5300.3057182448.0:
OCITransStart: Attempting

103352.5300.3057182448.0:
OCITransStart: Succeeded

103352.5300.3057182448.0:
xaodynpo 2: rmid=0, state=3

103352.5300.3057182448.0:
xaoend: xid=0x494c4158-8c6122ac9fd0477ebfe5f650e21a3539-a154ad9214d0544a3abbd33c8c2ba36f, rmid=0, flags=0x4000000

103352.5300.3057182448.0:
OCITransDetach: Attempting

103352.5300.3057182448.0:
OCITransDetach: Succeeded

103352.5300.3057182448.0:
xaoend: return 0

103352.5300.3057182448.0:
xaocommit: xid=0x494c4158-8c6122ac9fd0477ebfe5f650e21a3539-a154ad9214d0544a3abbd33c8c2ba36f, rmid=0, flags=0x40000000

103352.5300.3057182448.0:
OCITransCommit: Attempting

103352.5300.3057182448.0:
xaodynpo 2: rmid=0, state=1

103352.5300.3057182448.0:
OCITransCommit: Succeeded

103352.5300.3057182448.0:
xaocommit: rtn 0

103352.5300.3057182448.0:
xaoclose: xa_info=, rmid=0, flags=0x0

103352.5300.3057182448.0:
OCIServerDetach: Attempting

103352.5300.3057182448.0:
OCIServerDetach: Succeeded

103352.5300.3057182448.0:
xaoclose: rtn 0
The ax_reg function was called because the
dynamic registration configuration was used
(LIXA_PROFILE=ORA_DYN).
Now you can remove
the inserted record using the same program:
tiian@ubuntu:~/tmp$ ./example2_ora delete
First arg is 'delete', bypassing INSERT statement...
DELETE statement executed!
Check the content of the table again:
tiian@ubuntu:~/tmp$ sqlplus "hr/hr"

SQL*Plus: Release 10.2.0.1.0 - Production on Sun Apr 10 10:40:25 2011

Copyright (c) 1982, 2005, Oracle.  All rights reserved.


Connected to:
Oracle Database 10g Express Edition Release 10.2.0.1.0 - Production

SQL> select * from COUNTRIES where COUNTRY_ID = 'RS';

no rows selected

SQL> exit
Disconnected from Oracle Database 10g Express Edition Release 10.2.0.1.0 - Production
The row was deleted. Please remove the trace file before a new execution:
tiian@ubuntu:~/tmp$ rm /tmp/xa_NULL04102011.trc
Switch from dynamic registration to static registration (local connection):
tiian@ubuntu:~/tmp$ echo $LIXA_PROFILE
ORA_DYN
tiian@ubuntu:~/tmp$ export LIXA_PROFILE=ORA_STA
tiian@ubuntu:~/tmp$ echo $LIXA_PROFILE
ORA_STA
Here's the equivalent for the network connection using Oracle Instant Client:
tiian@ubuntu1404-64:/tmp$ echo $LIXA_PROFILE
ORAOCI_DYN
tiian@ubuntu1404-64:/tmp$ export LIXA_PROFILE=ORAOCI_STA
tiian@ubuntu1404-64:/tmp$ echo $LIXA_PROFILE
ORAOCI_STA
Execute the program again:
tiian@ubuntu:~/tmp$ ./example2_ora
INSERT statement executed!
First arg is not 'DELETE', bypassing DELETE statement...
tiian@ubuntu:~/tmp$ sqlplus "hr/hr"

SQL*Plus: Release 10.2.0.1.0 - Production on Sun Apr 10 10:53:05 2011

Copyright (c) 1982, 2005, Oracle.  All rights reserved.


Connected to:
Oracle Database 10g Express Edition Release 10.2.0.1.0 - Production

SQL> select * from COUNTRIES where COUNTRY_ID = 'RS';

CO COUNTRY_NAME                              REGION_ID
-- ---------------------------------------- ----------
RS Repubblica San Marino                             1

SQL> exit
Disconnected from Oracle Database 10g Express Edition Release 10.2.0.1.0 - Production
Inspect the produced trace file:
tiian@ubuntu:~/tmp$ ls -la /tmp/xa_*
-rw-r--r-- 1 tiian tiian 1661 2011-04-10 10:52 /tmp/xa_NULL04102011.trc
tiian@ubuntu:~/tmp$ cat /tmp/xa_NULL04102011.trc

ORACLE XA: Version 10.2.0.1.0. RM name = 'Oracle_XA'.

105236.5392.3057456880.0:
xaoopen: xa_info=Oracle_XA+Acc=P/hr/hr+SesTm=30+LogDir=/tmp+threads=true+DbgFl=7+Loose_Coupling=true,rmid=0,flags=0x0

105236.5392.3057456880.0:
xaolgn_help: version#: 169869568 banner: Oracle Database 10g Express Edition Release 10.2.0.1.0 - Production

105236.5392.3057456880.0:
xaolgn: sqlxrc/sqlxss completed

105236.5392.3057456880.0:
xaolgn: return XA_OK

105236.5392.3057456880.0:
xaoopen: xaolgn completed

105236.5392.3057456880.0:
xaoopen: return 0

105236.5392.3057456880.0:
xaostart: xid=0x494c4158-6119154810784a87b0d0aa83ea497a72-55263ef9237e27f8ae34f46936ce295d, rmid=0, flags=0x0

105236.5392.3057456880.0:
OCITransStart: Attempting

105236.5392.3057456880.0:
OCITransStart: Succeeded

105236.5392.3057456880.0:
xaostart: return XA_OK

105236.5392.3057456880.0:
xaoend: xid=0x494c4158-6119154810784a87b0d0aa83ea497a72-55263ef9237e27f8ae34f46936ce295d, rmid=0, flags=0x4000000

105236.5392.3057456880.0:
OCITransDetach: Attempting

105236.5392.3057456880.0:
OCITransDetach: Succeeded

105236.5392.3057456880.0:
xaoend: return 0

105236.5392.3057456880.0:
xaocommit: xid=0x494c4158-6119154810784a87b0d0aa83ea497a72-55263ef9237e27f8ae34f46936ce295d, rmid=0, flags=0x40000000

105236.5392.3057456880.0:
OCITransCommit: Attempting

105236.5392.3057456880.0:
OCITransCommit: Succeeded

105236.5392.3057456880.0:
xaocommit: rtn 0

105236.5392.3057456880.0:
xaoclose: xa_info=, rmid=0, flags=0x0

105236.5392.3057456880.0:
OCIServerDetach: Attempting

105236.5392.3057456880.0:
OCIServerDetach: Succeeded

105236.5392.3057456880.0:
xaoclose: rtn 0
The xa_start (xaostart) function was called
because the static registration configuration was used
(LIXA_PROFILE=ORA_STA).
Remove the inserted row again:
tiian@ubuntu:~/tmp$ ./example2_ora delete
First arg is 'delete', bypassing INSERT statement...
DELETE statement executed!
tiian@ubuntu:~/tmp$ sqlplus "hr/hr"

SQL*Plus: Release 10.2.0.1.0 - Production on Sun Apr 10 11:01:32 2011

Copyright (c) 1982, 2005, Oracle.  All rights reserved.


Connected to:
Oracle Database 10g Express Edition Release 10.2.0.1.0 - Production

SQL> select * from COUNTRIES where COUNTRY_ID = 'RS';

no rows selected

SQL> exit
Disconnected from Oracle Database 10g Express Edition Release 10.2.0.1.0 - Production
You have successfully executed an Application Program that uses Oracle Database Server as a Resource Manager.
The LIXA state server (daemon) must be started as explained in the section called “Starting the state server (lixad)”.
Prepare the client (Application Program) using the below commands (gcc command was splitted on several lines using \ to help readability, but you may use a single line):
| System configuration details: |
Remote connection, Ubuntu 14.04, Oracle 12.1 Instant Client
tiian@ubuntu1404-64:/tmp$ cp /opt/lixa/share/doc/lixa-X.Y.Z/examples/example2_ora.c . tiian@ubuntu1404-64:/tmp$ gcc example2_ora.c \ > $(/opt/lixa/bin/lixa-config -c -f -l -d) \ > -I/opt/oracle/instantclient_12_1/sdk/include \ > -L/opt/oracle/instantclient_12_1 \ > -Wl,-rpath -Wl,/opt/oracle/instantclient_12_1 \ > -l clntsh -l nnz12 -o example2_ora |
Verify the executable produced by gcc:
tiian@ubuntu1404-64:/tmp$ ldd example2_ora
linux-vdso.so.1 =>  (0x00007fff7649c000)
liblixac.so.0 => /opt/lixa/lib/liblixac.so.0 (0x00007f32ec40f000)
libclntsh.so.12.1 => /opt/oracle/instantclient_12_1/libclntsh.so.12.1 (0x00007f32e9452000)
libc.so.6 => /lib/x86_64-linux-gnu/libc.so.6 (0x00007f32e9082000)
libgmodule-2.0.so.0 => /usr/lib/x86_64-linux-gnu/libgmodule-2.0.so.0 (0x00007f32e8e7e000)
libglib-2.0.so.0 => /lib/x86_64-linux-gnu/libglib-2.0.so.0 (0x00007f32e8b76000)
libxml2.so.2 => /usr/lib/x86_64-linux-gnu/libxml2.so.2 (0x00007f32e880e000)
liblixab.so.0 => /opt/lixa/lib/liblixab.so.0 (0x00007f32e85f5000)
libpthread.so.0 => /lib/x86_64-linux-gnu/libpthread.so.0 (0x00007f32e83d7000)
libmql1.so => /opt/oracle/instantclient_12_1/libmql1.so (0x00007f32e8160000)
libipc1.so => /opt/oracle/instantclient_12_1/libipc1.so (0x00007f32e7de2000)
libnnz12.so => /opt/oracle/instantclient_12_1/libnnz12.so (0x00007f32e76d8000)
libons.so => /opt/oracle/instantclient_12_1/libons.so (0x00007f32e7492000)
libdl.so.2 => /lib/x86_64-linux-gnu/libdl.so.2 (0x00007f32e728e000)
libm.so.6 => /lib/x86_64-linux-gnu/libm.so.6 (0x00007f32e6f88000)
libnsl.so.1 => /lib/x86_64-linux-gnu/libnsl.so.1 (0x00007f32e6d6d000)
librt.so.1 => /lib/x86_64-linux-gnu/librt.so.1 (0x00007f32e6b65000)
/lib64/ld-linux-x86-64.so.2 (0x00007f32ec62c000)
libaio.so.1 => /lib/x86_64-linux-gnu/libaio.so.1 (0x00007f32e6963000)
libclntshcore.so.12.1 => /opt/oracle/instantclient_12_1/libclntshcore.so.12.1 (0x00007f32e63f0000)
libpcre.so.3 => /lib/x86_64-linux-gnu/libpcre.so.3 (0x00007f32e61b2000)
libz.so.1 => /lib/x86_64-linux-gnu/libz.so.1 (0x00007f32e5f98000)
liblzma.so.5 => /lib/x86_64-linux-gnu/liblzma.so.5 (0x00007f32e5d76000)
libuuid.so.1 => /lib/x86_64-linux-gnu/libuuid.so.1 (0x00007f32e5b71000)
Set-up the necessary environment variable:
tiian@ubuntu1404-64:/tmp$ export LIXA_PROFILE=ORA_DYN
tiian@ubuntu1404-64:/tmp$ echo $LIXA_PROFILE
ORA_DYN
We set LIXA_PROFILE to value
“ORA_DYN”, looking at
/opt/lixa/etc/lixac_conf.xml:
    <profile name="ORA_DYN">
      <sttsrvs>
        <sttsrv>local_1</sttsrv>
      </sttsrvs>
      <rsrmgrs>
        <rsrmgr>OracleIC_dynreg</rsrmgr>
      </rsrmgrs>
    </profile>
the profile references the Resource Manager named “OracleIC_dynreg”, looking again at the config file:
<rsrmgr name="OracleIC_dynreg" switch_file="/opt/lixa/lib/switch_oracle_dynreg.so" xa_open_info="Oracle_XA+Acc=P/hr/hr+SesTm=30+LogDir=/tmp+threads=true+DbgFl=7+SqlNet=lixa_ora_db+Loose_Coupling=true" xa_close_info="" />
we can discover that our application will access the Oracle
database using hr
user and writing the trace file to directory
/tmp (see LogDir)
[22].
Before executing the client program, Oracle Instant Client must be configured as described in the section called “Install and configure Oracle Instant Client”. If the Oracle Database server has never been used before with LIXA, even it requires some configurations as described in the section called “Local configuration (Server) and OCI”.
Execute the client program and check how the content table changes:
tiian@ubuntu1404-64:/tmp$ ./example2_ora
INSERT statement executed!
First arg is not 'DELETE', bypassing DELETE statement...
tiian@ubuntu1404-64:/tmp$ sqlplus hr/hr@lixa_ora_db

SQL*Plus: Release 12.1.0.2.0 Production on Wed Jan 18 23:41:11 2017

Copyright (c) 1982, 2014, Oracle.  All rights reserved.

Last Successful login time: Wed Jan 18 2017 23:40:54 +01:00

Connected to:
Oracle Database 12c Standard Edition Release 12.1.0.2.0 - 64bit Production

SQL> select * from COUNTRIES where COUNTRY_ID = 'RS';

	    CO COUNTRY_NAME      REGION_ID
-- ---------------------------------------- ----------
	    RS Repubblica San Marino     1

SQL> exit
Disconnected from Oracle Database 12c Standard Edition Release 12.1.0.2.0 - 64bit Production
tiian@ubuntu1404-64:/tmp$ ./example2_ora DELETE
First arg is 'DELETE', bypassing INSERT statement...
DELETE statement executed!
tiian@ubuntu1404-64:/tmp$ sqlplus hr/hr@lixa_ora_db

SQL*Plus: Release 12.1.0.2.0 Production on Wed Jan 18 23:41:40 2017

Copyright (c) 1982, 2014, Oracle.  All rights reserved.

Last Successful login time: Wed Jan 18 2017 23:41:35 +01:00

Connected to:
Oracle Database 12c Standard Edition Release 12.1.0.2.0 - 64bit Production

SQL> select * from COUNTRIES where COUNTRY_ID = 'RS';

no rows selected

SQL> exit
Disconnected from Oracle Database 12c Standard Edition Release 12.1.0.2.0 - 64bit Production
The example program example2_ora inserted a
row in table COUNTRIES. Take a look to the
trace produced by the Oracle client library for the first
execution ("insert"):
ORACLE XA: Version 12.1.0.2.0. RM name = 'Oracle_XA'.

234322.16513.1350203008.0:
xaoopen: xa_info=ORACLE_XA+Acc=P/hr/**+SesTm=30+LogDir=/tmp+threads=true+DbgFl=7+SqlNet=lixa_ora_db+Loose_Coupling=true,rmid=0,flags=0x0

234322.16513.1350203008.0:
xaolgn_help: version#: 185597952 banner: Oracle Database 11g Release 11.1.0.0.0 - Production

234322.16513.1350203008.0:
xaolgn: sqlxrc/sqlxss completed

234322.16513.1350203008.0:
xaolgn2: return XA_OK

234322.16513.1350203008.0:
xaoopen: xaolgn completed

234322.16513.1350203008.0:
xaoopen: return 0

234322.16513.1350203008.0:
ax_reg: xid=0x4c495841-d3c276e84a95421d95eb86c0563c5fa8-54bfbba0e21ccc50c05577130f0b2f6f, rmid=0, flags=0x0

234322.16513.1350203008.0:
OCITransStart: Attempting

234322.16513.1350203008.0:
OCITransStart: Succeeded

234322.16513.1350203008.0:
xaodynpo 2: rmid=0, state=131

234322.16513.1350203008.0:
xaoend: xid=0x4c495841-d3c276e84a95421d95eb86c0563c5fa8-54bfbba0e21ccc50c05577130f0b2f6f, rmid=0, flags=0x4000000

234322.16513.1350203008.0:
OCITransDetach: Attempting

234322.16513.1350203008.0:
OCITransDetach: Succeeded

234322.16513.1350203008.0:
xaoend: return 0

234322.16513.1350203008.0:
xaocommit: xid=0x4c495841-d3c276e84a95421d95eb86c0563c5fa8-54bfbba0e21ccc50c05577130f0b2f6f, rmid=0, flags=0x40000000

234322.16513.1350203008.0:
OCITransCommit: Attempting

234322.16513.1350203008.0:
xaodynpo 2: rmid=0, state=129

234322.16513.1350203008.0:
OCITransCommit: Succeeded

234322.16513.1350203008.0:
xaocommit: rtn 0

234322.16513.1350203008.0:
xaoclose: xa_info=, rmid=0, flags=0x0

234322.16513.1350203008.0:
OCIServerDetach: Attempting

234322.16513.1350203008.0:
OCIServerDetach: Succeeded

234322.16513.1350203008.0:
xaoclose: rtn 0
Note
This example has been tested using Red Hat Enterprise Linux 7.3 and Oracle Instant Client 12.1
Using a remote configuration instead of a local configuration introduces two differences:
the Oracle Database Server must be configured to be accessible from another system: a listener must be configured
the Oracle Instant Client software must be installed and configured in the system that will connect to the database
The first part of the Oracle Database Server is pretty the same described in the section called “Local configuration (Server) and OCI”. All the statements remain valid for Oracle 12c Standard Edition with the exception of the paths. Here's a default path installation example:
[oracle@centos7-oracle12 ~]$ ls -la $ORACLE_HOME/rdbms/admin/xaview.sql
-rw-r--r--. 1 oracle oinstall 1941 Apr 21  2011 /u01/app/oracle/product/12.1.0/dbhome_1/rdbms/admin/xaview.sql
Configure at least one Oracle listener as explained in the section called “Configure Oracle Listener”.
Install and configure Oracle Instant Client as explained in the section called “Install and configure Oracle Instant Client”.
If you don't like to use a lot of options on the command line,
you will have to configure the content of
pcscfg.cfg.
Here's an example for Red Hat Enterprise Linux 7.3:
[tiian@rhel73 admin]$ cat /opt/oracle/instantclient_12_1/precomp/admin/pcscfg.cfg
sys_include=(/usr/include,/usr/lib/gcc/x86_64-redhat-linux/4.8.5/include,/usr/lib/gcc/x86_64-redhat-linux/4.8.2/include)
include=($ORACLE_HOME/sdk/include,/opt/lixa/include)
ltype=short
define=__x86_64__
Especially "sys_include" and "include" need your attention.
The LIXA state server (daemon) must be started as explained in the section called “Starting the state server (lixad)”.
Prepare the client (Application Program) using the below commands (gcc command was splitted on several lines using \ to help readability, but you may use a single line):
| System configuration details: |
Remote connection, RHEL 7.3, Oracle 12.1 Instant Client
[tiian@rhel73 ~]$ export PATH=/opt/oracle/instantclient_12_1/sdk:/opt/oracle/instantclient_12_1:$PATH [tiian@rhel73 ~]$ type proc proc is /opt/oracle/instantclient_12_1/sdk/proc [tiian@rhel73 tmp]$ export LD_LIBRARY_PATH=/opt/oracle/instantclient_12_1:$LD_LIBRARY_PATH [tiian@rhel73 tmp]$ echo $LD_LIBRARY_PATH /opt/oracle/instantclient_12_1: [tiian@rhel73 tmp]$ cp /opt/lixa/share/doc/lixa-X.Y.Z/examples/example14_ora.pc . [tiian@rhel73 tmp]$ proc code=ANSI_C example14_ora.pc [tiian@rhel73 tmp]$ gcc example14_ora.c -Wno-unused-variable \ > $(/opt/lixa/bin/lixa-config -c -f -l -d) \ > -I/opt/oracle/instantclient_12_1/sdk/include \ > -L/opt/oracle/instantclient_12_1 \ > -Wl,-rpath -Wl,/opt/oracle/instantclient_12_1 \ > -l clntsh -l nnz12 -o example14_ora |
Verify the executable produced by gcc:
[tiian@rhel73 tmp]$ ldd example14_ora
    linux-vdso.so.1 =>  (0x00007ffc78dc6000)
    liblixac.so.0 => /opt/lixa/lib/liblixac.so.0 (0x00007f115d077000)
    libclntsh.so.12.1 => /opt/oracle/instantclient_12_1/libclntsh.so.12.1 (0x00007f115a0b9000)
    libnnz12.so => /opt/oracle/instantclient_12_1/libnnz12.so (0x00007f11599af000)
    libc.so.6 => /lib64/libc.so.6 (0x00007f11595e7000)
    libgmodule-2.0.so.0 => /lib64/libgmodule-2.0.so.0 (0x00007f11593e2000)
    libgthread-2.0.so.0 => /lib64/libgthread-2.0.so.0 (0x00007f11591e0000)
    libglib-2.0.so.0 => /lib64/libglib-2.0.so.0 (0x00007f1158ea9000)
    libxml2.so.2 => /lib64/libxml2.so.2 (0x00007f1158b3e000)
    liblixab.so.0 => /opt/lixa/lib/liblixab.so.0 (0x00007f1158926000)
    libm.so.6 => /lib64/libm.so.6 (0x00007f1158624000)
    libpthread.so.0 => /lib64/libpthread.so.0 (0x00007f1158407000)
    libmql1.so => /opt/oracle/instantclient_12_1/libmql1.so (0x00007f1158191000)
    libipc1.so => /opt/oracle/instantclient_12_1/libipc1.so (0x00007f1157e13000)
    libons.so => /opt/oracle/instantclient_12_1/libons.so (0x00007f1157bcd000)
    libdl.so.2 => /lib64/libdl.so.2 (0x00007f11579c9000)
    libnsl.so.1 => /lib64/libnsl.so.1 (0x00007f11577b0000)
    librt.so.1 => /lib64/librt.so.1 (0x00007f11575a7000)
    /lib64/ld-linux-x86-64.so.2 (0x00007f115d292000)
    libaio.so.1 => /lib64/libaio.so.1 (0x00007f11573a5000)
    libclntshcore.so.12.1 => /opt/oracle/instantclient_12_1/libclntshcore.so.12.1 (0x00007f1156e33000)
    libz.so.1 => /lib64/libz.so.1 (0x00007f1156c1c000)
    liblzma.so.5 => /lib64/liblzma.so.5 (0x00007f11569f6000)
    libuuid.so.1 => /lib64/libuuid.so.1 (0x00007f11567f1000)
Set-up the necessary environment variable:
tiian@ubuntu1404-64:/tmp$ export LIXA_PROFILE=ORA_STA
tiian@ubuntu1404-64:/tmp$ echo $LIXA_PROFILE
ORA_STA
In the previous example we used the dynamic XA registration, this time we are using the static one, but both can be used for OCI and Pro*C.
Execute the client program and check how the content table changes:
[tiian@rhel73 tmp]$ ./example14_ora
First arg is not 'DELETE', bypassing DELETE statement...
[tiian@rhel73 tmp]$ sqlplus hr/hr@lixa_ora_db

SQL*Plus: Release 12.1.0.2.0 Production on Thu Jan 19 00:30:27 2017

Copyright (c) 1982, 2014, Oracle.  All rights reserved.

Last Successful login time: Thu Jan 19 2017 00:30:11 +01:00

Connected to:
Oracle Database 12c Standard Edition Release 12.1.0.2.0 - 64bit Production

SQL> select * from COUNTRIES where COUNTRY_ID = 'RS';

CO COUNTRY_NAME      REGION_ID
-- ---------------------------------------- ----------
RS Repubblica San Marino     1

SQL> exit
Disconnected from Oracle Database 12c Standard Edition Release 12.1.0.2.0 - 64bit Production
[tiian@rhel73 tmp]$ ./example14_ora DELETE
First arg is 'DELETE', bypassing INSERT statement...
[tiian@rhel73 tmp]$ sqlplus hr/hr@lixa_ora_db

SQL*Plus: Release 12.1.0.2.0 Production on Thu Jan 19 00:30:46 2017

Copyright (c) 1982, 2014, Oracle.  All rights reserved.

Last Successful login time: Thu Jan 19 2017 00:30:45 +01:00

Connected to:
Oracle Database 12c Standard Edition Release 12.1.0.2.0 - 64bit Production

SQL> select * from COUNTRIES where COUNTRY_ID = 'RS';

no rows selected

SQL> exit
Disconnected from Oracle Database 12c Standard Edition Release 12.1.0.2.0 - 64bit Production
The example program example14_ora inserted a
row in table COUNTRIES. Take a look to the
trace produced by the Oracle client library for the second
execution ("delete"):
ORACLE XA: Version 12.1.0.2.0. RM name = 'Oracle_XA'.

003044.3009.2262976064.0:
xaoopen: xa_info=ORACLE_XA+Acc=P/hr/**+SesTm=30+LogDir=/tmp+threads=true+DbgFl=7+SqlNet=lixa_ora_db+Loose_Coupling=true,rmid=0,flags=0x0

003044.3009.2262976064.0:
xaolgn_help: version#: 185597952 banner: Oracle Database 11g Release 11.1.0.0.0 - Production

003044.3009.2262976064.0:
xaolgn: sqlxrc/sqlxss completed

003044.3009.2262976064.0:
xaolgn: return XA_OK

003044.3009.2262976064.0:
xaoopen: xaolgn completed

003044.3009.2262976064.0:
xaoopen: return 0

003044.3009.2262976064.0:
xaostart: xid=0x4c495841-a593cf11a3a24fcb945f6502b6f2210d-c220ba3a3bd0699d93a333c82bbac597, rmid=0, flags=0x0

003044.3009.2262976064.0:
OCITransStart: Attempting

003044.3009.2262976064.0:
OCITransStart: Succeeded

003044.3009.2262976064.0:
xaostart: return XA_OK

003044.3009.2262976064.0:
xaoend: xid=0x4c495841-a593cf11a3a24fcb945f6502b6f2210d-c220ba3a3bd0699d93a333c82bbac597, rmid=0, flags=0x4000000

003044.3009.2262976064.0:
OCITransDetach: Attempting

003044.3009.2262976064.0:
OCITransDetach: Succeeded

003044.3009.2262976064.0:
xaoend: return 0

003044.3009.2262976064.0:
xaocommit: xid=0x4c495841-a593cf11a3a24fcb945f6502b6f2210d-c220ba3a3bd0699d93a333c82bbac597, rmid=0, flags=0x40000000

003044.3009.2262976064.0:
OCITransCommit: Attempting

003044.3009.2262976064.0:
OCITransCommit: Succeeded

003044.3009.2262976064.0:
xaocommit: rtn 0

003044.3009.2262976064.0:
xaoclose: xa_info=, rmid=0, flags=0x0

003044.3009.2262976064.0:
OCIServerDetach: Attempting

003044.3009.2262976064.0:
OCIServerDetach: Succeeded

003044.3009.2262976064.0:
xaoclose: rtn 0
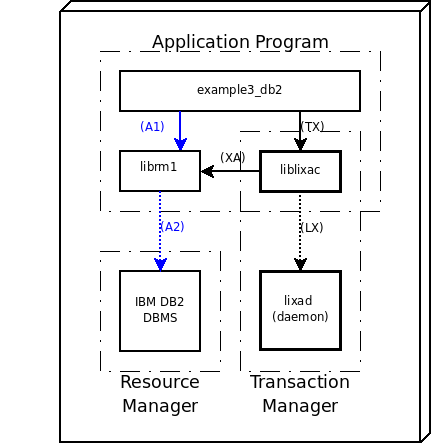
This example was developed using DB2 Express-C 9.7 for Linux (Ubuntu). If you were using a different version you would need to adapt some commands to your environment.
Note
If you did not yet installed the software provided by IBM, please refer to the official IBM site to download the software and to pick-up the information necessary to install and configure the database. This manual does not give you information related to IBM DB2 technology: it is assumed you already installed and configured the database.
Important
The LIXA software must be configured to support the IBM DB2 server resource manager as explained in the section called “Linking third party resource managers”.
If your server didn't start-up automatically at boot time, you could start it with the following commands:
tiian@ubuntu:~$ ps -ef | grep db2 | grep -v grep
tiian@ubuntu:~$ sudo /etc/init.d/db2exc start
  * Starting DAS:                       done.
  * Instance db2inst1 ( db2c_db2inst1 ):        done.
  * Activating database SAMPLE          done.
tiian@ubuntu:~$ ps -ef | grep db2 | grep -v grep
dasusr1  22959     1  0 10:54 pts/2    00:00:00 /home/dasusr1/das/adm/db2dasrrm
root     23190     1  2 10:54 pts/2    00:00:00 db2wdog
db2inst1 23192 23190  4 10:54 pts/2    00:00:01 db2sysc
root     23193 23192  0 10:54 pts/2    00:00:00 db2ckpwd
root     23194 23192  0 10:54 pts/2    00:00:00 db2ckpwd
root     23195 23192  0 10:54 pts/2    00:00:00 db2ckpwd
db2inst1 23206 23190  2 10:54 pts/2    00:00:00 db2acd   ,0,0,0,1,0,0,0,1,0,8a6614,14,1e014,2,0,1,11fd0,0x12600000,0x12600000,1600000,740002,2,a0800d
Switch to user db2inst1,
try to connect to database “SAMPLE”:
tiian@ubuntu:~$ sudo su - db2inst1
db2inst1@ubuntu:~$ db2
(c) Copyright IBM Corporation 1993,2007
Command Line Processor for DB2 Client 9.7.1

You can issue database manager commands and SQL statements from the command
prompt. For example:
    db2 => connect to sample
    db2 => bind sample.bnd

For general help, type: ?.
For command help, type: ? command, where command can be
the first few keywords of a database manager command. For example:
 ? CATALOG DATABASE for help on the CATALOG DATABASE command
 ? CATALOG          for help on all of the CATALOG commands.

To exit db2 interactive mode, type QUIT at the command prompt. Outside
interactive mode, all commands must be prefixed with 'db2'.
To list the current command option settings, type LIST COMMAND OPTIONS.

For more detailed help, refer to the Online Reference Manual.

db2 => connect to sample

   Database Connection Information

 Database server        = DB2/LINUX 9.7.1
 SQL authorization ID   = DB2INST1
 Local database alias   = SAMPLE
Check the tables “ORG” and “DEPT” exist and contain some data:
db2 => select * from ORG

DEPTNUMB DEPTNAME       MANAGER DIVISION   LOCATION
-------- -------------- ------- ---------- -------------
      10 Head Office        160 Corporate  New York
      15 New England         50 Eastern    Boston
      20 Mid Atlantic        10 Eastern    Washington
      38 South Atlantic      30 Eastern    Atlanta
      42 Great Lakes        100 Midwest    Chicago
      51 Plains             140 Midwest    Dallas
      66 Pacific            270 Western    San Francisco
      84 Mountain           290 Western    Denver

  8 record(s) selected.

db2 => select * from DEPT

DEPTNO DEPTNAME                             MGRNO  ADMRDEPT LOCATION
------ ------------------------------------ ------ -------- ----------------
A00    SPIFFY COMPUTER SERVICE DIV.         000010 A00      -
B01    PLANNING                             000020 A00      -
C01    INFORMATION CENTER                   000030 A00      -
D01    DEVELOPMENT CENTER                   -      A00      -
D11    MANUFACTURING SYSTEMS                000060 D01      -
D21    ADMINISTRATION SYSTEMS               000070 D01      -
E01    SUPPORT SERVICES                     000050 A00      -
E11    OPERATIONS                           000090 E01      -
E21    SOFTWARE SUPPORT                     000100 E01      -
F22    BRANCH OFFICE F2                     -      E01      -
G22    BRANCH OFFICE G2                     -      E01      -
H22    BRANCH OFFICE H2                     -      E01      -
I22    BRANCH OFFICE I2                     -      E01      -
J22    BRANCH OFFICE J2                     -      E01      -

  14 record(s) selected.
OK, the “ORG” and “DEPT” tables are populated. If something went wrong, you should refer to IBM DB2 documentation to fix the issue before the next step because you would not be able to execute the sample program without a basic running installation.
We want to execute our example program with a generic user,
not just using db2inst1
because that's the system user dedicated to the database
instance execution. The commands below explain as the generic
user tiian (my own
user) can be used instead of
db2inst1.
Grant DBADM privilege to the user
tiian:
db2 => grant DBADM on database to user tiian
DB20000I  The SQL command completed successfully.
DBADM is not the lowest authorization
level necessary to execute our example, but for the sake of
this example it's a “good enought” choice.
Add something like the 4 lines below to your
$HOME/.profile or equivalent profile
configuration:
# The following three lines have been added by IBM DB2 instance utilities.
if [ -f /home/db2inst1/sqllib/db2profile ]; then
    . /home/db2inst1/sqllib/db2profile
fi
Then login again and check your environment:
tiian@ubuntu:~$ env|grep -i db2
DB2INSTANCE=db2inst1
LD_LIBRARY_PATH=/home/db2inst1/sqllib/lib32
PATH=/usr/local/sbin:/usr/local/bin:/usr/sbin:/usr/bin:/sbin:/bin:/usr/games:/home/db2inst1/sqllib/bin:/home/db2inst1/sqllib/adm:/home/db2inst1/sqllib/misc:/home/db2inst1/sqllib/db2tss/bin
CLASSPATH=/home/db2inst1/sqllib/java/db2java.zip:/home/db2inst1/sqllib/java/db2jcc.jar:/home/db2inst1/sqllib/java/sqlj.zip:/home/db2inst1/sqllib/function:/home/db2inst1/sqllib/java/db2jcc_license_cu.jar:.
As shown above,
DB2INSTANCE, LD_LIBRARY_PATH,
PATH variables should refer to DB2 stuff too.
Connect to the database using your own user instead of
db2inst1:
tiian@ubuntu:~$ db2
(c) Copyright IBM Corporation 1993,2007
Command Line Processor for DB2 Client 9.7.1

You can issue database manager commands and SQL statements from the command
prompt. For example:
    db2 => connect to sample
    db2 => bind sample.bnd

For general help, type: ?.
For command help, type: ? command, where command can be
the first few keywords of a database manager command. For example:
 ? CATALOG DATABASE for help on the CATALOG DATABASE command
 ? CATALOG          for help on all of the CATALOG commands.

To exit db2 interactive mode, type QUIT at the command prompt. Outside
interactive mode, all commands must be prefixed with 'db2'.
To list the current command option settings, type LIST COMMAND OPTIONS.

For more detailed help, refer to the Online Reference Manual.

db2 => connect to sample

   Database Connection Information

 Database server        = DB2/LINUX 9.7.1
 SQL authorization ID   = TIIAN
 Local database alias   = SAMPLE

db2 => select * from DB2INST1.ORG

DEPTNUMB DEPTNAME       MANAGER DIVISION   LOCATION
-------- -------------- ------- ---------- -------------
      10 Head Office        160 Corporate  New York
      15 New England         50 Eastern    Boston
      20 Mid Atlantic        10 Eastern    Washington
      38 South Atlantic      30 Eastern    Atlanta
      42 Great Lakes        100 Midwest    Chicago
      51 Plains             140 Midwest    Dallas
      66 Pacific            270 Western    San Francisco
      84 Mountain           290 Western    Denver

  8 record(s) selected.

db2 => select * from DB2INST1.DEPT

DEPTNO DEPTNAME                             MGRNO  ADMRDEPT LOCATION
------ ------------------------------------ ------ -------- ----------------
A00    SPIFFY COMPUTER SERVICE DIV.         000010 A00      -
B01    PLANNING                             000020 A00      -
C01    INFORMATION CENTER                   000030 A00      -
D01    DEVELOPMENT CENTER                   -      A00      -
D11    MANUFACTURING SYSTEMS                000060 D01      -
D21    ADMINISTRATION SYSTEMS               000070 D01      -
E01    SUPPORT SERVICES                     000050 A00      -
E11    OPERATIONS                           000090 E01      -
E21    SOFTWARE SUPPORT                     000100 E01      -
F22    BRANCH OFFICE F2                     -      E01      -
G22    BRANCH OFFICE G2                     -      E01      -
H22    BRANCH OFFICE H2                     -      E01      -
I22    BRANCH OFFICE I2                     -      E01      -
J22    BRANCH OFFICE J2                     -      E01      -

  14 record(s) selected.

db2 => quit
DB20000I  The QUIT command completed successfully.
You have just verified that a generic user, like
tiian
in the example above, can connect to the database and execute
some query.
Start the state server as shown below:
tiian@ubuntu:~$ sudo su - lixa
lixa@ubuntu:~$ /opt/lixa/sbin/lixad --daemon
lixa@ubuntu:~$ exit
logout
tiian@ubuntu:~$ ps -ef|grep lixad|grep -v grep
lixa     12866     1  0 21:35 ?        00:00:00 /opt/lixa/sbin/lixad --daemon
Prepare the client (Application Program) using the below commands (gcc command was splitted on several lines using \ to help readability, but you may use a single line):
tiian@ubuntu:~$ mkdir tmp
tiian@ubuntu:~$ cd tmp
tiian@ubuntu:~/tmp$ cp /opt/lixa/share/doc/lixa-X.Y.Z/examples/example3_db2.c .
tiian@ubuntu:~/tmp$ gcc example3_db2.c $(/opt/lixa/bin/lixa-config -c -f -l -d) \
> -I/opt/ibm/db2/V9.7/include -L/opt/ibm/db2/V9.7/lib32/ -ldb2 -o example3_db2
Verify the executable produced by gcc:
tiian@ubuntu:~/tmp$ ldd example3_db2
        linux-gate.so.1 =>  (0xb775f000)
        liblixac.so.0 => /opt/lixa/lib/liblixac.so.0 (0xb7744000)
        libdb2.so.1 => /home/db2inst1/sqllib/lib32/libdb2.so.1 (0xb6212000)
        libc.so.6 => /lib/tls/i686/cmov/libc.so.6 (0xb60b4000)
        libgmodule-2.0.so.0 => /usr/lib/libgmodule-2.0.so.0 (0xb60b0000)
        libdl.so.2 => /lib/tls/i686/cmov/libdl.so.2 (0xb60ac000)
        libgthread-2.0.so.0 => /usr/lib/libgthread-2.0.so.0 (0xb60a7000)
        librt.so.1 => /lib/tls/i686/cmov/librt.so.1 (0xb609e000)
        libglib-2.0.so.0 => /usr/lib/libglib-2.0.so.0 (0xb5fed000)
        libxml2.so.2 => /usr/lib/libxml2.so.2 (0xb5ecc000)
        liblixab.so.0 => /opt/lixa/lib/liblixab.so.0 (0xb5eb9000)
        libpthread.so.0 => /lib/tls/i686/cmov/libpthread.so.0 (0xb5ea1000)
        libcrypt.so.1 => /lib/tls/i686/cmov/libcrypt.so.1 (0xb5e6e000)
        libpam.so.0 => /lib/libpam.so.0 (0xb5e64000)
        libm.so.6 => /lib/tls/i686/cmov/libm.so.6 (0xb5e3f000)
        libdb2dascmn.so.1 => /home/db2inst1/sqllib/lib32/libdb2dascmn.so.1 (0xb5e12000)
        libdb2g11n.so.1 => /home/db2inst1/sqllib/lib32/libdb2g11n.so.1 (0xb57a4000)
        libdb2genreg.so.1 => /home/db2inst1/sqllib/lib32/libdb2genreg.so.1 (0xb5763000)
        libdb2install.so.1 => /home/db2inst1/sqllib/lib32/libdb2install.so.1 (0xb5758000)
        libdb2locale.so.1 => /home/db2inst1/sqllib/lib32/libdb2locale.so.1 (0xb5745000)
        libdb2osse.so.1 => /home/db2inst1/sqllib/lib32/libdb2osse.so.1 (0xb5440000)
        libdb2osse_db2.so.1 => /home/db2inst1/sqllib/lib32/libdb2osse_db2.so.1 (0xb53d0000)
        libdb2trcapi.so.1 => /home/db2inst1/sqllib/lib32/libdb2trcapi.so.1 (0xb53bc000)
        libstdc++.so.6 => /usr/lib/libstdc++.so.6 (0xb52c9000)
        libgcc_s.so.1 => /lib/libgcc_s.so.1 (0xb52be000)
        /lib/ld-linux.so.2 (0xb7760000)
        libpcre.so.3 => /usr/lib/libpcre.so.3 (0xb5297000)
        libz.so.1 => /usr/lib/libz.so.1 (0xb5282000)
        libuuid.so.1 => /lib/libuuid.so.1 (0xb527d000)
Set-up the LIXA_PROFILE environment variable:
tiian@ubuntu:~/tmp$ echo $LIXA_PROFILE

tiian@ubuntu:~/tmp$ export LIXA_PROFILE=DB2_DYN
tiian@ubuntu:~/tmp$ echo $LIXA_PROFILE
DB2_DYN
No additional DB2 variables are needed because they are automatically set at login (see the section called “Set-up DB2 environment”).
We set LIXA_PROFILE to value
“DB2_DYN”, looking at
/opt/lixa/etc/lixac_conf.xml:
    <profile name="DB2_DYN">
      <sttsrvs>
        <sttsrv>local_1</sttsrv>
      </sttsrvs>
      <rsrmgrs>
        <rsrmgr>IBMDB2_dynreg</rsrmgr>
      </rsrmgrs>
    </profile>
the profile references the Resource Manager named “IBMDB2_dynreg”, looking again at the config file:
<rsrmgr name="IBMDB2_dynreg" switch_file="/opt/lixa/lib/switch_ibmdb2_dynreg.so" xa_open_info="axlib=/opt/lixa/lib/liblixac.so,db=sample,tpm=lixa" xa_close_info="" />
we can discover how the DB2 database is configured for XA [23].
It is suggested to open two different terminals: the first one
connected to “SAMPLE” DB2 database and the second
one pointing to the directory where the compiled program
example3_db2 lives.
First teminal session:
tiian@ubuntu:~$ db2
(c) Copyright IBM Corporation 1993,2007
Command Line Processor for DB2 Client 9.7.1

You can issue database manager commands and SQL statements from the command
prompt. For example:
    db2 => connect to sample
    db2 => bind sample.bnd

For general help, type: ?.
For command help, type: ? command, where command can be
the first few keywords of a database manager command. For example:
 ? CATALOG DATABASE for help on the CATALOG DATABASE command
 ? CATALOG          for help on all of the CATALOG commands.

To exit db2 interactive mode, type QUIT at the command prompt. Outside
interactive mode, all commands must be prefixed with 'db2'.
To list the current command option settings, type LIST COMMAND OPTIONS.

For more detailed help, refer to the Online Reference Manual.

db2 => connect to SAMPLE

   Database Connection Information

 Database server        = DB2/LINUX 9.7.1
 SQL authorization ID   = TIIAN
 Local database alias   = SAMPLE
Second teminal session:
tiian@ubuntu:~/tmp$ ls -la
total 28
drwxr-xr-x  2 tiian tiian  4096 2011-04-22 16:26 .
drwxr-xr-x 40 tiian tiian  4096 2011-04-18 22:55 ..
-rwxr-xr-x  1 tiian tiian 11030 2011-04-22 16:26 example3_db2
-rw-r--r--  1 tiian tiian  5898 2011-04-22 16:23 example3_db2.c
Check the content of “DB2INST1.ORG” table before program execution:
db2 => select * from DB2INST1.ORG

DEPTNUMB DEPTNAME       MANAGER DIVISION   LOCATION
-------- -------------- ------- ---------- -------------
      10 Head Office        160 Corporate  New York
      15 New England         50 Eastern    Boston
      20 Mid Atlantic        10 Eastern    Washington
      38 South Atlantic      30 Eastern    Atlanta
      42 Great Lakes        100 Midwest    Chicago
      51 Plains             140 Midwest    Dallas
      66 Pacific            270 Western    San Francisco
      84 Mountain           290 Western    Denver

  8 record(s) selected.
Execute the program:
tiian@ubuntu:~/tmp$ ./example3_db2 insert org
Check the content of the table again:
db2 => select * from DB2INST1.ORG

DEPTNUMB DEPTNAME       MANAGER DIVISION   LOCATION
-------- -------------- ------- ---------- -------------
      10 Head Office        160 Corporate  New York
      15 New England         50 Eastern    Boston
      20 Mid Atlantic        10 Eastern    Washington
      38 South Atlantic      30 Eastern    Atlanta
      42 Great Lakes        100 Midwest    Chicago
      51 Plains             140 Midwest    Dallas
      66 Pacific            270 Western    San Francisco
      84 Mountain           290 Western    Denver
     150 Europe             231 R&D        Mojan

  9 record(s) selected.
The example program inserted the last row! You can execute it again
tiian@ubuntu:~/tmp$ ./example3_db2 insert org
and it inserts another row:
db2 => select * from DB2INST1.ORG

DEPTNUMB DEPTNAME       MANAGER DIVISION   LOCATION
-------- -------------- ------- ---------- -------------
      10 Head Office        160 Corporate  New York
      15 New England         50 Eastern    Boston
      20 Mid Atlantic        10 Eastern    Washington
      38 South Atlantic      30 Eastern    Atlanta
      42 Great Lakes        100 Midwest    Chicago
      51 Plains             140 Midwest    Dallas
      66 Pacific            270 Western    San Francisco
      84 Mountain           290 Western    Denver
     150 Europe             231 R&D        Mojan
     150 Europe             231 R&D        Mojan

  10 record(s) selected.
Because there is no an unique constraint on this table; if you want to check an error while inserting, use “DEPT” table instead.
db2 => select * from DB2INST1.DEPT

DEPTNO DEPTNAME                             MGRNO  ADMRDEPT LOCATION
------ ------------------------------------ ------ -------- ----------------
A00    SPIFFY COMPUTER SERVICE DIV.         000010 A00      -
B01    PLANNING                             000020 A00      -
C01    INFORMATION CENTER                   000030 A00      -
D01    DEVELOPMENT CENTER                   -      A00      -
D11    MANUFACTURING SYSTEMS                000060 D01      -
D21    ADMINISTRATION SYSTEMS               000070 D01      -
E01    SUPPORT SERVICES                     000050 A00      -
E11    OPERATIONS                           000090 E01      -
E21    SOFTWARE SUPPORT                     000100 E01      -
F22    BRANCH OFFICE F2                     -      E01      -
G22    BRANCH OFFICE G2                     -      E01      -
H22    BRANCH OFFICE H2                     -      E01      -
I22    BRANCH OFFICE I2                     -      E01      -
J22    BRANCH OFFICE J2                     -      E01      -

  14 record(s) selected.
Try to insert the same row twice:
tiian@ubuntu:~/tmp$ ./example3_db2 insert dept
tiian@ubuntu:~/tmp$ ./example3_db2 insert dept
Unable to execute the SQL statement ('INSERT INTO DB2INST1.DEPT (DEPTNO, DEPTNAME, ADMRDEPT) VALUES('Z99', 'RESEARCH & DEVELOPMENT', 'E01')'): -1
Check the table content:
db2 => select * from DB2INST1.DEPT

DEPTNO DEPTNAME                             MGRNO  ADMRDEPT LOCATION
------ ------------------------------------ ------ -------- ----------------
A00    SPIFFY COMPUTER SERVICE DIV.         000010 A00      -
B01    PLANNING                             000020 A00      -
C01    INFORMATION CENTER                   000030 A00      -
D01    DEVELOPMENT CENTER                   -      A00      -
D11    MANUFACTURING SYSTEMS                000060 D01      -
D21    ADMINISTRATION SYSTEMS               000070 D01      -
E01    SUPPORT SERVICES                     000050 A00      -
E11    OPERATIONS                           000090 E01      -
E21    SOFTWARE SUPPORT                     000100 E01      -
F22    BRANCH OFFICE F2                     -      E01      -
G22    BRANCH OFFICE G2                     -      E01      -
H22    BRANCH OFFICE H2                     -      E01      -
I22    BRANCH OFFICE I2                     -      E01      -
J22    BRANCH OFFICE J2                     -      E01      -
Z99    RESEARCH & DEVELOPMENT               -      E01      -

  15 record(s) selected.
Only one record was inserted. As a final step, clean up both the tables:
tiian@ubuntu:~/tmp$ ./example3_db2 delete dept
tiian@ubuntu:~/tmp$ ./example3_db2 delete org
and check the tables were cleaned-up:
db2 => select * from DB2INST1.DEPT

DEPTNO DEPTNAME                             MGRNO  ADMRDEPT LOCATION
------ ------------------------------------ ------ -------- ----------------
A00    SPIFFY COMPUTER SERVICE DIV.         000010 A00      -
B01    PLANNING                             000020 A00      -
C01    INFORMATION CENTER                   000030 A00      -
D01    DEVELOPMENT CENTER                   -      A00      -
D11    MANUFACTURING SYSTEMS                000060 D01      -
D21    ADMINISTRATION SYSTEMS               000070 D01      -
E01    SUPPORT SERVICES                     000050 A00      -
E11    OPERATIONS                           000090 E01      -
E21    SOFTWARE SUPPORT                     000100 E01      -
F22    BRANCH OFFICE F2                     -      E01      -
G22    BRANCH OFFICE G2                     -      E01      -
H22    BRANCH OFFICE H2                     -      E01      -
I22    BRANCH OFFICE I2                     -      E01      -
J22    BRANCH OFFICE J2                     -      E01      -

  14 record(s) selected.

db2 => select * from DB2INST1.ORG

DEPTNUMB DEPTNAME       MANAGER DIVISION   LOCATION
-------- -------------- ------- ---------- -------------
      10 Head Office        160 Corporate  New York
      15 New England         50 Eastern    Boston
      20 Mid Atlantic        10 Eastern    Washington
      38 South Atlantic      30 Eastern    Atlanta
      42 Great Lakes        100 Midwest    Chicago
      51 Plains             140 Midwest    Dallas
      66 Pacific            270 Western    San Francisco
      84 Mountain           290 Western    Denver

  8 record(s) selected.
To verify the LIXA Transaction Manager and DB2 Resource Manager are using the dynamic transaction registration, you can inspect the trace produced by the LIXA client library:
tiian@ubuntu:~/tmp$ export LIXA_TRACE_MASK=0x00002000
tiian@ubuntu:~/tmp$ echo $LIXA_TRACE_MASK
0x00002000
tiian@ubuntu:~/tmp$ ./example3_db2 insert dept 2>&1 | grep ax_reg
2011-04-22 22:08:40.650458 [6654/3039381232] ax_reg: rmid=0, xid=0xbfcd65d0, flags=0x0
2011-04-22 22:08:40.650858 [6654/3039381232] ax_reg: the application program has started a transaction (TX states S3); this XID '1279875137.9a73b024b7ab4018915b54761d3dcd79.e41205820a9c722218578c0eeec6a27c' will be returned
2011-04-22 22:08:40.651156 [6654/3039381232] ax_reg: sending 153 bytes to the server for step 8
2011-04-22 22:08:40.651316 [6654/3039381232] ax_reg/excp=7/ret_cod=0/errno=2
I don't know how you can retrieve the same information on the DB2 side, but there probably is a way to do it. Clean-up again the table...
tiian@ubuntu:~/tmp$ ./example3_db2 delete dept
If you desire static transaction registration instead of the
dynamic one, you can switch the LIXA_PROFILE:
tiian@ubuntu:~/tmp$ export LIXA_PROFILE=DB2_STA
tiian@ubuntu:~/tmp$ echo $LIXA_PROFILE
DB2_STA
tiian@ubuntu:~/tmp$ export LIXA_TRACE_MASK=0x00002000
tiian@ubuntu:~/tmp$ echo $LIXA_TRACE_MASK
0x00002000
you can verify in file
/opt/lixa/etc/lixac_conf.xml
that “DB2_STA” is associated to static registration.
Execute the program:
tiian@ubuntu:~/tmp$ ./example3_db2 insert dept 2>&1 | grep xa_start
2011-04-22 22:19:45.717003 [6745/3038836464] lixa_xa_start
[...]
2011-04-22 22:19:45.758075 [6745/3038836464] lixa_xa_start: xa_start_entry(xid, 0, 0x0) = 0
2011-04-22 22:19:45.758321 [6745/3038836464] lixa_xa_start: sending 210 bytes to the server for step 24
2011-04-22 22:19:45.758681 [6745/3038836464] lixa_xa_start/excp=10/ret_cod=0/errno=2
Check the content of the table:
db2 => select * from DB2INST1.DEPT

DEPTNO DEPTNAME                             MGRNO  ADMRDEPT LOCATION
------ ------------------------------------ ------ -------- ----------------
A00    SPIFFY COMPUTER SERVICE DIV.         000010 A00      -
B01    PLANNING                             000020 A00      -
C01    INFORMATION CENTER                   000030 A00      -
D01    DEVELOPMENT CENTER                   -      A00      -
D11    MANUFACTURING SYSTEMS                000060 D01      -
D21    ADMINISTRATION SYSTEMS               000070 D01      -
E01    SUPPORT SERVICES                     000050 A00      -
E11    OPERATIONS                           000090 E01      -
E21    SOFTWARE SUPPORT                     000100 E01      -
F22    BRANCH OFFICE F2                     -      E01      -
G22    BRANCH OFFICE G2                     -      E01      -
H22    BRANCH OFFICE H2                     -      E01      -
I22    BRANCH OFFICE I2                     -      E01      -
J22    BRANCH OFFICE J2                     -      E01      -
Z99    RESEARCH & DEVELOPMENT               -      E01      -

  15 record(s) selected.
And clean the table again:
tiian@ubuntu:~/tmp$ unset LIXA_TRACE_MASK
tiian@ubuntu:~/tmp$ ./example3_db2 delete dept
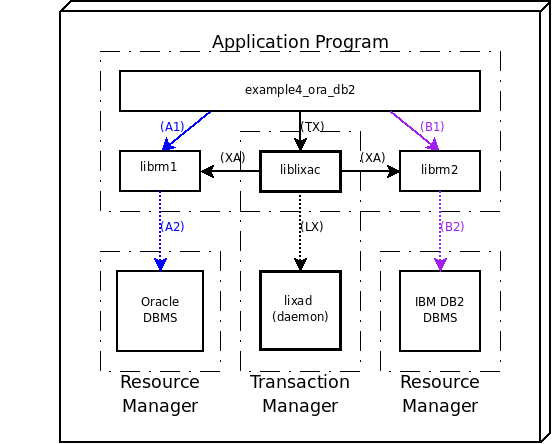
This example should be considered a milestone because it shows as you can implement DTP (Distributed Transaction Processing) with two Resource Managers (Oracle Database Server and IBM DB2 DBMS) coordinated by the LIXA Transaction Manager. It's strongly suggested you have played with the examples previously shown in this chapter (see Chapter 5, Developing C Application Programs using TX (Transaction Demarcation) interface) before starting this more complex one.
Note
If you did not yet installed the software provided by Oracle, please refer to the official Oracle site to download the software and to pick-up the information necessary to install and configure the database. This manual does not give you information related to Oracle technology: it is assumed you already installed and configured the database.
If you did not yet installed the software provided by IBM, please refer to the official IBM site to download the software and to pick-up the information necessary to install and configure the database. This manual does not give you information related to IBM DB2 technology: it is assumed you already installed and configured the database.
Important
The LIXA software must be configured to support the Oracle Database Server and the IBM DB2 resource managers as explained in the section called “Linking third party resource managers”. As a little hint, you should configure LIXA as below:
./configure --with-oracle=/usr/lib/oracle/xe/app/oracle/product/10.2.0/server --with-ibmdb2=/opt/ibm/db2/V9.7
Please don't forget you must compile and install every time you re-configure.
Please follow the instructions explained
in the section called “Oracle DMBS Configuration” to set-up a running environment for Oracle Database Server
in the section called “Set-up DB2 environment” to set-up a running environment for IBM DB2 server
in the section called “Starting the state server (lixad)” to start up the LIXA state server
Prepare the client (Application Program) using the below commands (gcc command was splitted on several lines using \ to help readability, but you may use a single line):
tiian@ubuntu:~$ mkdir tmp
tiian@ubuntu:~$ cd tmp
tiian@ubuntu:~/tmp$ cp /opt/lixa/share/doc/lixa-X.Y.Z/examples/example4_ora_db2.c .
tiian@ubuntu:~/tmp$ gcc example4_ora_db2.c $(/opt/lixa/bin/lixa-config -c -f -l -d) \
> -I/usr/lib/oracle/xe/app/oracle/product/10.2.0/server/rdbms/public \
> -L/usr/lib/oracle/xe/app/oracle/product/10.2.0/server/lib -l clntsh -l nnz10 \
> -I/opt/ibm/db2/V9.7/include -L/opt/ibm/db2/V9.7/lib32/ -ldb2 -o example4_ora_db2
Verify the executable produced by gcc:
tiian@ubuntu:~/tmp$ ldd example4_ora_db2
        linux-gate.so.1 =>  (0xb770e000)
        liblixac.so.0 => /opt/lixa/lib/liblixac.so.0 (0xb76f3000)
        libclntsh.so.10.1 => not found
        libnnz10.so => not found
        libdb2.so.1 => /usr/lib/libdb2.so.1 (0xb61b2000)
        libc.so.6 => /lib/tls/i686/cmov/libc.so.6 (0xb6063000)
        libgmodule-2.0.so.0 => /usr/lib/libgmodule-2.0.so.0 (0xb605f000)
        libdl.so.2 => /lib/tls/i686/cmov/libdl.so.2 (0xb605b000)
        libgthread-2.0.so.0 => /usr/lib/libgthread-2.0.so.0 (0xb6055000)
        librt.so.1 => /lib/tls/i686/cmov/librt.so.1 (0xb604c000)
        libglib-2.0.so.0 => /usr/lib/libglib-2.0.so.0 (0xb5f9b000)
        libxml2.so.2 => /usr/lib/libxml2.so.2 (0xb5e7b000)
        liblixab.so.0 => /opt/lixa/lib/liblixab.so.0 (0xb5e66000)
        libm.so.6 => /lib/tls/i686/cmov/libm.so.6 (0xb5e41000)
        libpthread.so.0 => /lib/tls/i686/cmov/libpthread.so.0 (0xb5e28000)
        libcrypt.so.1 => /lib/tls/i686/cmov/libcrypt.so.1 (0xb5df6000)
        libpam.so.0 => /lib/libpam.so.0 (0xb5dec000)
        libdb2dascmn.so.1 => /opt/ibm/db2/V9.7/lib32/libdb2dascmn.so.1 (0xb5dbe000)
        libdb2g11n.so.1 => /opt/ibm/db2/V9.7/lib32/libdb2g11n.so.1 (0xb5750000)
        libdb2genreg.so.1 => /opt/ibm/db2/V9.7/lib32/libdb2genreg.so.1 (0xb5710000)
        libdb2install.so.1 => /opt/ibm/db2/V9.7/lib32/libdb2install.so.1 (0xb5705000)
        libdb2locale.so.1 => /opt/ibm/db2/V9.7/lib32/libdb2locale.so.1 (0xb56f2000)
        libdb2osse.so.1 => /opt/ibm/db2/V9.7/lib32/libdb2osse.so.1 (0xb53ec000)
        libdb2osse_db2.so.1 => /opt/ibm/db2/V9.7/lib32/libdb2osse_db2.so.1 (0xb537c000)
        libdb2trcapi.so.1 => /opt/ibm/db2/V9.7/lib32/libdb2trcapi.so.1 (0xb5369000)
        libstdc++.so.6 => /usr/lib/libstdc++.so.6 (0xb5276000)
        libgcc_s.so.1 => /lib/libgcc_s.so.1 (0xb526b000)
        /lib/ld-linux.so.2 (0xb770f000)
        libpcre.so.3 => /usr/lib/libpcre.so.3 (0xb5243000)
        libz.so.1 => /usr/lib/libz.so.1 (0xb522e000)
        libuuid.so.1 => /lib/libuuid.so.1 (0xb522a000)
There are three unresolved references that can be fixed setting up
the environment properly; you can fix the environment manually or
using these scripts supplied by Oracle and IBM:
/home/db2inst1/sqllib/db2profile and
/usr/lib/oracle/xe/app/oracle/product/10.2.0/server/bin/oracle_env.sh
tiian@ubuntu:~$ echo $LD_LIBRARY_PATH

tiian@ubuntu:~$ . /home/db2inst1/sqllib/db2profile
tiian@ubuntu:~$ . /usr/lib/oracle/xe/app/oracle/product/10.2.0/server/bin/oracle_env.sh
tiian@ubuntu:~$ echo $LD_LIBRARY_PATH
/usr/lib/oracle/xe/app/oracle/product/10.2.0/server/lib:/home/db2inst1/sqllib/lib32
Check again the executable:
tiian@ubuntu:~/tmp$ ldd example4_ora_db2
        linux-gate.so.1 =>  (0xb777f000)
        liblixac.so.0 => /opt/lixa/lib/liblixac.so.0 (0xb7764000)
        libclntsh.so.10.1 => /usr/lib/oracle/xe/app/oracle/product/10.2.0/server/lib/libclntsh.so.10.1 (0xb69b0000)
        libnnz10.so => /usr/lib/oracle/xe/app/oracle/product/10.2.0/server/lib/libnnz10.so (0xb67aa000)
        libdb2.so.1 => /home/db2inst1/sqllib/lib32/libdb2.so.1 (0xb5278000)
        libc.so.6 => /lib/tls/i686/cmov/libc.so.6 (0xb511b000)
        libgmodule-2.0.so.0 => /usr/lib/libgmodule-2.0.so.0 (0xb5117000)
        libdl.so.2 => /lib/tls/i686/cmov/libdl.so.2 (0xb5113000)
        libgthread-2.0.so.0 => /usr/lib/libgthread-2.0.so.0 (0xb510d000)
        librt.so.1 => /lib/tls/i686/cmov/librt.so.1 (0xb5104000)
        libglib-2.0.so.0 => /usr/lib/libglib-2.0.so.0 (0xb5053000)
        libxml2.so.2 => /usr/lib/libxml2.so.2 (0xb4f33000)
        liblixab.so.0 => /opt/lixa/lib/liblixab.so.0 (0xb4f1e000)
        libm.so.6 => /lib/tls/i686/cmov/libm.so.6 (0xb4ef9000)
        libpthread.so.0 => /lib/tls/i686/cmov/libpthread.so.0 (0xb4ee0000)
        libnsl.so.1 => /lib/tls/i686/cmov/libnsl.so.1 (0xb4ec8000)
        libcrypt.so.1 => /lib/tls/i686/cmov/libcrypt.so.1 (0xb4e95000)
        libpam.so.0 => /lib/libpam.so.0 (0xb4e8b000)
        libdb2dascmn.so.1 => /home/db2inst1/sqllib/lib32/libdb2dascmn.so.1 (0xb4e5e000)
        libdb2g11n.so.1 => /home/db2inst1/sqllib/lib32/libdb2g11n.so.1 (0xb47f0000)
        libdb2genreg.so.1 => /home/db2inst1/sqllib/lib32/libdb2genreg.so.1 (0xb47b0000)
        libdb2install.so.1 => /home/db2inst1/sqllib/lib32/libdb2install.so.1 (0xb47a4000)
        libdb2locale.so.1 => /home/db2inst1/sqllib/lib32/libdb2locale.so.1 (0xb4791000)
        libdb2osse.so.1 => /home/db2inst1/sqllib/lib32/libdb2osse.so.1 (0xb448c000)
        libdb2osse_db2.so.1 => /home/db2inst1/sqllib/lib32/libdb2osse_db2.so.1 (0xb441c000)
        libdb2trcapi.so.1 => /home/db2inst1/sqllib/lib32/libdb2trcapi.so.1 (0xb4409000)
        libstdc++.so.6 => /usr/lib/libstdc++.so.6 (0xb4315000)
        libgcc_s.so.1 => /lib/libgcc_s.so.1 (0xb430a000)
        /lib/ld-linux.so.2 (0xb7780000)
        libpcre.so.3 => /usr/lib/libpcre.so.3 (0xb42e3000)
        libz.so.1 => /usr/lib/libz.so.1 (0xb42ce000)
        libuuid.so.1 => /lib/libuuid.so.1 (0xb42ca000)
Set-up the necessary environment variables:
tiian@ubuntu:~/tmp$ echo $LIXA_PROFILE

tiian@ubuntu:~/tmp$ export LIXA_PROFILE=ORA_DYN_DB2_DYN
tiian@ubuntu:~/tmp$ echo $LIXA_PROFILE
ORA_DYN_DB2_SYN
The below environment variables were set by the previous sourced script; take a look to them:
tiian@ubuntu:~/tmp$ echo $ORACLE_HOME
/usr/lib/oracle/xe/app/oracle/product/10.2.0/server
tiian@ubuntu:~/tmp$ echo $PATH
/usr/lib/oracle/xe/app/oracle/product/10.2.0/server/bin:/usr/local/sbin:/usr/local/bin:/usr/sbin:/usr/bin:/sbin:/bin:/usr/games:/home/db2inst1/sqllib/bin:/home/db2inst1/sqllib/adm:/home/db2inst1/sqllib/misc:/home/db2inst1/sqllib/db2tss/bin
tiian@ubuntu:~/tmp$ echo $ORACLE_SID
XE
It is suggested to set the necessary environment variables in your
profile if you are going to execute the programs many times.
This is the list of the suggested variables:
LD_LIBRARY_PATH,
LIXA_PROFILE,
ORACLE_HOME,
ORACLE_SID,
PATH.
We set LIXA_PROFILE to value
“ORA_DYN_DB2_DYN”, looking at
/opt/lixa/etc/lixac_conf.xml:
    <profile name="ORA_DYN_DB2_DYN">
      <sttsrvs>
        <sttsrv>local_1</sttsrv>
      </sttsrvs>
      <rsrmgrs>
        <rsrmgr>OracleXE_dynreg</rsrmgr>
        <rsrmgr>IBMDB2_stareg</rsrmgr>
      </rsrmgrs>
    </profile>
the profile references two Resource Managers: “OracleXE_dynreg” and “IBMDB2_stareg”, looking again at the config file:
    <rsrmgr name="OracleXE_dynreg" switch_file="/opt/lixa/lib/switch_oracle_dynreg.so" xa_open_info="Oracle_XA+Acc=P/hr/hr+SesTm=30+LogDir=/tmp+threads=true+DbgFl=7+Loose_Coupling=true" xa_close_info="" />
    <rsrmgr name="IBMDB2_dynreg" switch_file="/opt/lixa/lib/switch_ibmdb2_dynreg.so" xa_open_info="axlib=/opt/lixa/lib/liblixac.so,db=sample,tpm=lixa" xa_close_info="" />
we can discover how our application will access the resource managers [24]. Verify no (Oracle) trace file exists:
tiian@ubuntu:~/tmp$ ls -la /tmp/xa*
ls: cannot access /tmp/xa*: No such file or directory
It is suggested to open three different terminals: the first one connected to “SAMPLE” DB2 database, the second one connected to Oracle database and the third one pointing to the directory where the compiled program example4_ora_db2 lives.
| [IBM DB2 terminal session] |
tiian@ubuntu:~$ . /home/db2inst1/sqllib/db2profile
tiian@ubuntu:~$ db2
(c) Copyright IBM Corporation 1993,2007
Command Line Processor for DB2 Client 9.7.1

You can issue database manager commands and SQL statements from the command
prompt. For example:
    db2 => connect to sample
    db2 => bind sample.bnd

For general help, type: ?.
For command help, type: ? command, where command can be
the first few keywords of a database manager command. For example:
 ? CATALOG DATABASE for help on the CATALOG DATABASE command
 ? CATALOG          for help on all of the CATALOG commands.

To exit db2 interactive mode, type QUIT at the command prompt. Outside
interactive mode, all commands must be prefixed with 'db2'.
To list the current command option settings, type LIST COMMAND OPTIONS.

For more detailed help, refer to the Online Reference Manual.

db2 => connect to SAMPLE

   Database Connection Information

 Database server        = DB2/LINUX 9.7.1
 SQL authorization ID   = TIIAN
 Local database alias   = SAMPLE

db2 =>
|
| [Oracle terminal session] |
tiian@ubuntu:~$ . /usr/lib/oracle/xe/app/oracle/product/10.2.0/server/bin/oracle_env.sh tiian@ubuntu:~$ sqlplus "hr/hr" SQL*Plus: Release 10.2.0.1.0 - Production on Tue May 3 21:52:06 2011 Copyright (c) 1982, 2005, Oracle. All rights reserved. Connected to: Oracle Database 10g Express Edition Release 10.2.0.1.0 - Production SQL> |
| [Shell terminal session] |
tiian@ubuntu:~/tmp$ ls -la total 36 drwxr-xr-x 2 tiian tiian 4096 2011-05-03 21:53 . drwxr-xr-x 40 tiian tiian 4096 2011-05-03 21:04 .. -rwxr-xr-x 1 tiian tiian 14422 2011-05-02 21:53 example4_ora_db2 -rw-r--r-- 1 tiian tiian 11892 2011-05-02 21:52 example4_ora_db2.c |
Check the content of the Oracle table (“COUNTRIES”):
| [Oracle terminal session] |
SQL> select * from COUNTRIES where COUNTRY_ID = 'RS'; no rows selected |
Check the content of the DB2 tables (“DB2INST1.ORG” and “DB2INST1.DEPT”):
| [IBM DB2 terminal session] |
db2 => select * from DB2INST1.ORG where DEPTNUMB = 150 DEPTNUMB DEPTNAME MANAGER DIVISION LOCATION -------- -------------- ------- ---------- ------------- 0 record(s) selected. db2 => select * from DB2INST1.DEPT where DEPTNO='Z99' DEPTNO DEPTNAME MGRNO ADMRDEPT LOCATION ------ ------------------------------------ ------ -------- ---------------- 0 record(s) selected. |
example4_ora_db2 program accepts some arguments you can tune to experiment different transactions:
iorg: insert a row into “DB2INST1.ORG” tabledorg: delete rows from “DB2INST1.ORG” tableidept: insert a row into “DB2INST1.DEPT” tableddept: delete rows from “DB2INST1.DEPT” tableicountries: insert a row into “COUNTRIES” tabledcountries: delete rows from “COUNTRIES” tablerollback: force a transaction rollback (the default behavior is commit)
Insert a row in all the tables and check the contents of the tables after the transaction execution:
| [Third terminal session] |
tiian@ubuntu:~/tmp$ ./example4_ora_db2 iorg icountries idept INSERT INTO DB2INST1.ORG executed! INSERT INTO COUNTRIES executed! INSERT INTO DB2INST1.DEPT executed! COMMIT performed! |
Now you can verify the content of the tables after the transaction:
| [Oracle terminal session] |
SQL> select * from COUNTRIES where COUNTRY_ID = 'RS'; CO COUNTRY_NAME REGION_ID -- ---------------------------------------- ---------- RS Repubblica San Marino 1 |
| [IBM DB2 terminal session] |
db2 => select * from DB2INST1.ORG where DEPTNUMB = 150

DEPTNUMB DEPTNAME       MANAGER DIVISION   LOCATION
-------- -------------- ------- ---------- -------------
     150 Europe             231 R&D        Mojan

  1 record(s) selected.

db2 =>  select * from DB2INST1.DEPT where DEPTNO='Z99'

DEPTNO DEPTNAME                             MGRNO  ADMRDEPT LOCATION
------ ------------------------------------ ------ -------- ----------------
Z99    RESEARCH & DEVELOPMENT               -      E01      -

  1 record(s) selected.
|
With the opposite command you can remove the rows from the tables:
| [Shell terminal session] |
tiian@ubuntu:~/tmp$ ./example4_ora_db2 dorg dcountries ddept DELETE FROM DB2INST1.ORG executed! DELETE FROM COUNTRIES executed! DELETE FROM DB2INST1.DEPT executed! COMMIT performed! |
and check the content of the tables again:
| [Oracle terminal session] |
SQL> select * from COUNTRIES where COUNTRY_ID = 'RS'; no rows selected |
| [IBM DB2 terminal session] |
db2 => select * from DB2INST1.ORG where DEPTNUMB = 150 DEPTNUMB DEPTNAME MANAGER DIVISION LOCATION -------- -------------- ------- ---------- ------------- 0 record(s) selected. db2 => select * from DB2INST1.DEPT where DEPTNO='Z99' DEPTNO DEPTNAME MGRNO ADMRDEPT LOCATION ------ ------------------------------------ ------ -------- ---------------- 0 record(s) selected. |
This sequence shows what happens trying to insert a duplicated row in a table that does not allow duplicates:
| [Shell terminal session] |
tiian@ubuntu:~/tmp$ ./example4_ora_db2 iorg icountries idept INSERT INTO DB2INST1.ORG executed! INSERT INTO COUNTRIES executed! INSERT INTO DB2INST1.DEPT executed! COMMIT performed! tiian@ubuntu:~/tmp$ ./example4_ora_db2 iorg icountries idept INSERT INTO DB2INST1.ORG executed! OCIStmtExecute/Error while executing INSERT statement; ocirc = -1 ROLLBACK performed! |
Verify that table “DB2INST1.ORG” contains only one row because the second transaction was rolled back after the error occurred while inserting a duplicated row in “COUNTRIES” table:
| [IBM DB2 terminal session] |
db2 => select * from DB2INST1.ORG where DEPTNUMB = 150

DEPTNUMB DEPTNAME       MANAGER DIVISION   LOCATION
-------- -------------- ------- ---------- -------------
     150 Europe             231 R&D        Mojan

  1 record(s) selected.
|
Remove the rows from the tables:
| [Shell terminal session] |
tiian@ubuntu:~/tmp$ ./example4_ora_db2 dorg dcountries ddept DELETE FROM DB2INST1.ORG executed! DELETE FROM COUNTRIES executed! DELETE FROM DB2INST1.DEPT executed! COMMIT performed! |
We can introduce the usage of the rollback option
to check dynamic registration behavior:
| [Shell terminal session] |
tiian@ubuntu:~/tmp$ export LIXA_TRACE_MASK=0x00002000 tiian@ubuntu:~/tmp$ echo $LIXA_TRACE_MASK 0x00002000 tiian@ubuntu:~/tmp$ ./example4_ora_db2 iorg icountries idept rollback 2>&1 | grep ax_reg 2011-05-04 22:35:07.919522 [8962/3023124208] ax_reg: rmid=1, xid=0xbfe8d1f0, flags=0x0 2011-05-04 22:35:07.920026 [8962/3023124208] ax_reg: the application program has started a transaction (TX states S3); this XID '1279875137.47b3b61569764774bfc1e5f79ef725ae.818e85f29a0c09e22f0c75f89ca17658' will be returned 2011-05-04 22:35:07.920276 [8962/3023124208] ax_reg: sending 153 bytes to the server for step 8 2011-05-04 22:35:07.920527 [8962/3023124208] ax_reg/excp=7/ret_cod=0/errno=2 2011-05-04 22:35:07.921592 [8962/3023124208] ax_reg: rmid=0, xid=0xbfe8b09c, flags=0x0 2011-05-04 22:35:07.921812 [8962/3023124208] ax_reg: the application program has started a transaction (TX states S3); this XID '1279875137.47b3b61569764774bfc1e5f79ef725ae.818e85f29a0c09e22f0c75f89ca17658' will be returned 2011-05-04 22:35:07.921979 [8962/3023124208] ax_reg: sending 153 bytes to the server for step 8 2011-05-04 22:35:07.922128 [8962/3023124208] ax_reg/excp=7/ret_cod=0/errno=2 |
The second resource manager for profile
“ORA_DYN_DB2_DYN” is “IBMDB2_dynreg”
and it calls ax_reg with
rmid=1 before the first resource manager
that's “OracleXE_dynreg” and calls
ax_reg with rmid=0
later.
Switching to a different registration type is quite easy; we can start with dynamic registration for Oracle and static registration for IBM DB2:
| [Shell terminal session] |
tiian@ubuntu:~/tmp$ export LIXA_TRACE_MASK=0x00002000 tiian@ubuntu:~/tmp$ echo $LIXA_TRACE_MASK 0x00002000 tiian@ubuntu:~/tmp$ export LIXA_PROFILE=ORA_DYN_DB2_STA tiian@ubuntu:~/tmp$ echo $LIXA_PROFILE ORA_DYN_DB2_STA tiian@ubuntu:~/tmp$ ./example4_ora_db2 iorg icountries idept rollback 2>&1 | grep ax_reg 2011-05-04 22:47:11.812256 [9122/3022382832] ax_reg: rmid=0, xid=0xbfc0f59c, flags=0x0 2011-05-04 22:47:11.813114 [9122/3022382832] ax_reg: the application program has started a transaction (TX states S3); this XID '1279875137.a74508954f774509a939ad9580bca2b8.03460325a8fe89a8c8134b6dea4b782e' will be returned 2011-05-04 22:47:11.813631 [9122/3022382832] ax_reg: sending 153 bytes to the server for step 8 2011-05-04 22:47:11.814037 [9122/3022382832] ax_reg/excp=7/ret_cod=0/errno=2 tiian@ubuntu:~/tmp$ ./example4_ora_db2 iorg icountries idept rollback 2>&1 | grep xa_start 2011-05-04 22:47:38.081183 [9126/3022632688] lixa_xa_start [...] 2011-05-04 22:47:38.124749 [9126/3022632688] lixa_xa_start: resource manager # 0 registers dynamically, skipping... 2011-05-04 22:47:38.125154 [9126/3022632688] lixa_xa_start: xa_start_entry(xid, 1, 0x0) = 0 2011-05-04 22:47:38.125330 [9126/3022632688] lixa_xa_start: sending 210 bytes to the server for step 24 2011-05-04 22:47:38.125654 [9126/3022632688] lixa_xa_start/excp=10/ret_cod=0/errno=2 |
Oracle is defined as the first resource manager and calls
ax_reg using rmid=0.
IBM DB2 is defined as the second resource manager and its
xa_start function is called
from the LIXA transaction manager using rmid=1.
Note
The LIXA Transaction Manager skips the first resource manager because it is configured for dynamic registration.
Using static registration for Oracle and dynamic registration for IBM DB2 is easy as well:
| [Shell terminal session] |
tiian@ubuntu:~/tmp$ export LIXA_PROFILE=ORA_STA_DB2_DYN tiian@ubuntu:~/tmp$ echo $LIXA_PROFILE ORA_STA_DB2_DYN tiian@ubuntu:~/tmp$ ./example4_ora_db2 iorg icountries idept rollback 2>&1 | grep ax_reg 2011-05-04 22:57:37.235541 [9346/3023226608] ax_reg: rmid=1, xid=0xbfcf8880, flags=0x0 2011-05-04 22:57:37.236410 [9346/3023226608] ax_reg: the application program has started a transaction (TX states S3); this XID '1279875137.1bf330d60c0442e4b61539214a413ecb.79fecb55351db58295ebf99c9bf09a70' will be returned 2011-05-04 22:57:37.236859 [9346/3023226608] ax_reg: sending 153 bytes to the server for step 8 2011-05-04 22:57:37.237581 [9346/3023226608] ax_reg/excp=7/ret_cod=0/errno=2 tiian@ubuntu:~/tmp$ ./example4_ora_db2 iorg icountries idept rollback 2>&1 | grep xa_start 2011-05-04 22:58:10.258562 [9350/3022706416] lixa_xa_start [...] 2011-05-04 22:58:10.296182 [9350/3022706416] lixa_xa_start: xa_start_entry(xid, 0, 0x0) = 0 2011-05-04 22:58:10.296448 [9350/3022706416] lixa_xa_start: resource manager # 1 registers dynamically, skipping... 2011-05-04 22:58:10.296625 [9350/3022706416] lixa_xa_start: sending 210 bytes to the server for step 24 2011-05-04 22:58:10.296990 [9350/3022706416] lixa_xa_start/excp=10/ret_cod=0/errno=2 |
Now the roles of Oracle and IBM DB2 swapped. As a final example you can try the static registration for Oracle and IBM DB2 too:
| [Shell terminal session] |
tiian@ubuntu:~/tmp$ export LIXA_PROFILE=ORA_STA_DB2_STA tiian@ubuntu:~/tmp$ echo $LIXA_PROFILE ORA_STA_DB2_STA tiian@ubuntu:~/tmp$ ./example4_ora_db2 iorg icountries idept rollback 2>&1 | grep ax_reg tiian@ubuntu:~/tmp$ ./example4_ora_db2 iorg icountries idept rollback 2>&1 | grep xa_start 2011-05-04 23:00:27.871131 [9356/3022927600] lixa_xa_start [...] 2011-05-04 23:00:27.917087 [9356/3022927600] lixa_xa_start: xa_start_entry(xid, 0, 0x0) = 0 2011-05-04 23:00:27.918251 [9356/3022927600] lixa_xa_start: xa_start_entry(xid, 1, 0x0) = 0 2011-05-04 23:00:27.918741 [9356/3022927600] lixa_xa_start: sending 281 bytes to the server for step 24 2011-05-04 23:00:27.919389 [9356/3022927600] lixa_xa_start/excp=10/ret_cod=0/errno=2 |
No resource manager calls ax_reg with this
configuration: this is exactly what's expected.
As a final check, we can verify all the tables have no rows:
| [Oracle terminal session] |
SQL> select * from COUNTRIES where COUNTRY_ID = 'RS'; no rows selected |
| [IBM DB2 terminal session] |
db2 => select * from DB2INST1.ORG where DEPTNUMB = 150 DEPTNUMB DEPTNAME MANAGER DIVISION LOCATION -------- -------------- ------- ---------- ------------- 0 record(s) selected. db2 => select * from DB2INST1.DEPT where DEPTNO='Z99' DEPTNO DEPTNAME MGRNO ADMRDEPT LOCATION ------ ------------------------------------ ------ -------- ---------------- 0 record(s) selected. |
Congratulations! You have just completed a full discovery of a Distributed Transaction Processing example with a simple Application Program, LIXA Transaction Manager and two widespread Resource Managers: Oracle Database Server and IBM DB2 DBMS.
Please follow the instructions explained in the section called “PostgreSQL Configuration” to set-up a running environment for MySQL or MariaDB server.
Start the state server as shown below:
| [Shell terminal session] |
tiian@ubuntu1204-64:~$ sudo su - lixa lixa@ubuntu1204-64:~$ /opt/lixa/sbin/lixad --daemon lixa@ubuntu1204-64:~$ exit logout tiian@ubuntu1204-64:~$ ps -ef|grep lixad|grep -v grep lixa 12866 1 0 21:35 ? 00:00:00 /opt/lixa/sbin/lixad --daemon |
Prepare the client (Application Program) using the below commands (gcc command was splitted on several lines using \ to help readability, but you may use a single line):
| [Shell terminal session] |
tiian@ubuntu1204-64:~$ mkdir tmp tiian@ubuntu1204-64:~$ cd tmp tiian@ubuntu1204-64:~/tmp$ cp /opt/lixa/share/doc/lixa-X.Y.Z/examples/example5_pql.c . tiian@ubuntu1204-64:~/tmp$ gcc example5_pql.c $(/opt/lixa/bin/lixa-config -c -f -p -d) \ > -I /usr/include/postgresql -l pq -o example5_pql |
Verify the executable produced by gcc:
| [Shell terminal session] |
tiian@ubuntu1204-64:/tmp$ ldd example5_pql
        linux-vdso.so.1 =>  (0x00007fffc57fe000)
	liblixac.so.0 => /opt/lixa/lib/liblixac.so.0 (0x00007f7402314000)
	liblixapq.so.0 => /opt/lixa/lib/liblixapq.so.0 (0x00007f740210d000)
	libpq.so.5 => /usr/lib/libpq.so.5 (0x00007f7401ed8000)
	libc.so.6 => /lib/x86_64-linux-gnu/libc.so.6 (0x00007f7401b1a000)
	libgmodule-2.0.so.0 => /usr/lib/x86_64-linux-gnu/libgmodule-2.0.so.0 (0x00007f7401916000)
	libglib-2.0.so.0 => /lib/x86_64-linux-gnu/libglib-2.0.so.0 (0x00007f7401620000)
	libxml2.so.2 => /usr/lib/x86_64-linux-gnu/libxml2.so.2 (0x00007f74012c4000)
	liblixab.so.0 => /opt/lixa/lib/liblixab.so.0 (0x00007f74010aa000)
	libpthread.so.0 => /lib/x86_64-linux-gnu/libpthread.so.0 (0x00007f7400e8c000)
	libssl.so.1.0.0 => /lib/x86_64-linux-gnu/libssl.so.1.0.0 (0x00007f7400c2d000)
	libcrypto.so.1.0.0 => /lib/x86_64-linux-gnu/libcrypto.so.1.0.0 (0x00007f7400850000)
	libkrb5.so.3 => /usr/lib/x86_64-linux-gnu/libkrb5.so.3 (0x00007f7400581000)
	libcom_err.so.2 => /lib/x86_64-linux-gnu/libcom_err.so.2 (0x00007f740037d000)
	libgssapi_krb5.so.2 => /usr/lib/x86_64-linux-gnu/libgssapi_krb5.so.2 (0x00007f740013e000)
	libldap_r-2.4.so.2 => /usr/lib/x86_64-linux-gnu/libldap_r-2.4.so.2 (0x00007f73ffeee000)
	/lib64/ld-linux-x86-64.so.2 (0x00007f7402533000)
	libdl.so.2 => /lib/x86_64-linux-gnu/libdl.so.2 (0x00007f73ffcea000)
	libpcre.so.3 => /lib/x86_64-linux-gnu/libpcre.so.3 (0x00007f73ffaad000)
	librt.so.1 => /lib/x86_64-linux-gnu/librt.so.1 (0x00007f73ff8a4000)
	libz.so.1 => /lib/x86_64-linux-gnu/libz.so.1 (0x00007f73ff68d000)
	libm.so.6 => /lib/x86_64-linux-gnu/libm.so.6 (0x00007f73ff391000)
	libuuid.so.1 => /lib/x86_64-linux-gnu/libuuid.so.1 (0x00007f73ff18b000)
	libk5crypto.so.3 => /usr/lib/x86_64-linux-gnu/libk5crypto.so.3 (0x00007f73fef63000)
	libkrb5support.so.0 => /usr/lib/x86_64-linux-gnu/libkrb5support.so.0 (0x00007f73fed5b000)
	libkeyutils.so.1 => /lib/x86_64-linux-gnu/libkeyutils.so.1 (0x00007f73feb56000)
	libresolv.so.2 => /lib/x86_64-linux-gnu/libresolv.so.2 (0x00007f73fe93a000)
	liblber-2.4.so.2 => /usr/lib/x86_64-linux-gnu/liblber-2.4.so.2 (0x00007f73fe72c000)
	libsasl2.so.2 => /usr/lib/x86_64-linux-gnu/libsasl2.so.2 (0x00007f73fe510000)
	libgssapi.so.3 => /usr/lib/x86_64-linux-gnu/libgssapi.so.3 (0x00007f73fe2d2000)
	libgnutls.so.26 => /usr/lib/x86_64-linux-gnu/libgnutls.so.26 (0x00007f73fe016000)
	libgcrypt.so.11 => /lib/x86_64-linux-gnu/libgcrypt.so.11 (0x00007f73fdd96000)
	libheimntlm.so.0 => /usr/lib/x86_64-linux-gnu/libheimntlm.so.0 (0x00007f73fdb8f000)
	libkrb5.so.26 => /usr/lib/x86_64-linux-gnu/libkrb5.so.26 (0x00007f73fd908000)
	libasn1.so.8 => /usr/lib/x86_64-linux-gnu/libasn1.so.8 (0x00007f73fd668000)
	libhcrypto.so.4 => /usr/lib/x86_64-linux-gnu/libhcrypto.so.4 (0x00007f73fd434000)
	libroken.so.18 => /usr/lib/x86_64-linux-gnu/libroken.so.18 (0x00007f73fd21e000)
	libtasn1.so.3 => /usr/lib/x86_64-linux-gnu/libtasn1.so.3 (0x00007f73fd00d000)
	libp11-kit.so.0 => /usr/lib/x86_64-linux-gnu/libp11-kit.so.0 (0x00007f73fcdfb000)
	libgpg-error.so.0 => /lib/x86_64-linux-gnu/libgpg-error.so.0 (0x00007f73fcbf6000)
	libwind.so.0 => /usr/lib/x86_64-linux-gnu/libwind.so.0 (0x00007f73fc9cd000)
	libheimbase.so.1 => /usr/lib/x86_64-linux-gnu/libheimbase.so.1 (0x00007f73fc7be000)
	libhx509.so.5 => /usr/lib/x86_64-linux-gnu/libhx509.so.5 (0x00007f73fc573000)
	libsqlite3.so.0 => /usr/lib/x86_64-linux-gnu/libsqlite3.so.0 (0x00007f73fc2d0000)
	libcrypt.so.1 => /lib/x86_64-linux-gnu/libcrypt.so.1 (0x00007f73fc097000)
|
Set-up the LIXA_PROFILE environment variable:
| [Shell terminal session] |
tiian@ubuntu1204-64:~/tmp$ echo $LIXA_PROFILE tiian@ubuntu1204-64:~/tmp$ export LIXA_PROFILE=PQL_STA tiian@ubuntu1204-64:~/tmp$ echo $LIXA_PROFILE PQL_STA |
We set LIXA_PROFILE to value
“PQL_STA”, looking at
/opt/lixa/etc/lixac_conf.xml:
    <profile name="PQL_STA">
      <sttsrvs>
        <sttsrv>local_1</sttsrv>
      </sttsrvs>
      <rsrmgrs>
        <rsrmgr>PostgreSQL_stareg</rsrmgr>
      </rsrmgrs>
    </profile>
the profile references the Resource Manager named “PostgreSQL_stareg”, looking again at the config file:
<rsrmgr name="PostgreSQL_stareg" switch_file="/opt/lixa/lib/switch_postgresql_stareg.so" xa_open_info="dbname=testdb" xa_close_info="" />
we can discover how the PostgreSQL database is configured for XA [25].
It is suggested to open two different terminals: the first one
connected to “testdb” PostgreSQL database and the second
one pointing to the directory where the compiled program
example5_pql lives.
First teminal session:
| [PostgreSQL terminal session] |
tiian@ubuntu1204-64:~$ psql testdb psql (9.1.24) Type "help" for help. testdb=> |
Second teminal session:
| [Shell terminal session] |
tiian@ubuntu1204-64:~/tmp$ ls -la total 21 drwxr-xr-x 2 tiian tiian 112 2011-09-14 21:14 . drwxrwx--x 101 tiian tiian 5064 2011-09-14 21:13 .. -rwxr-xr-x 1 tiian tiian 8293 2011-09-13 21:27 example5_pql -rw-r--r-- 1 tiian tiian 3735 2011-09-13 21:26 example5_pql.c |
Check the content of “AUTHORS” table before program execution:
| [PostgreSQL terminal session] |
testdb=> select * from AUTHORS; id | last_name | first_name ----+-----------+------------ (0 rows) |
Execute the program:
| [Shell terminal session] |
tiian@ubuntu1204-64:~/tmp$ ./example5_pql insert Inserting a row in the table... |
Check the content of the table again:
| [PostgreSQL terminal session] |
testdb=> select * from AUTHORS; id | last_name | first_name ----+-----------+------------ 1 | Foo | Bar (1 rows) |
The example program inserted the row with id=1. You can not insert the same row twice because there is a unique constraint on this table, but you can remove the row using
| [Shell terminal session] |
tiian@ubuntu1204-64:~/tmp$ ./example5_pql delete Deleting a row from the table... |
Check the table content again:
| [PostgreSQL terminal session] |
testdb=> select * from AUTHORS; id | last_name | first_name ----+-----------+------------ (0 rows) |
you can verify in file
/opt/lixa/etc/lixac_conf.xml
that “PQL_STA” is associated to static registration
[26]
.
Execute the program:
| [Shell terminal session] |
tiian@ubuntu1204-64:~/tmp$ export LIXA_TRACE_MASK=0x00002000 tiian@ubuntu1204-64:~/tmp$ echo $LIXA_TRACE_MASK 0x00002000 tiian@ubuntu1204-64:~/tmp$ ./example5_pql insert 2>&1 | grep xa_start 2011-09-14 21:53:13.403943 [9766/3069609728] lixa_xa_start [...] 2011-09-14 21:53:13.448918 [9766/3069609728] lixa_xa_start: xa_start_entry(xid, 0, 0x0) = 0 2011-09-14 21:53:13.448977 [9766/3069609728] lixa_xa_start: sending 210 bytes to the server for step 24 2011-09-14 21:53:13.449104 [9766/3069609728] lixa_xa_start/excp=10/ret_cod=0/errno=0 |
Finally, clean up the table again:
| [Shell terminal session] |
tiian@ubuntu1204-64:~/tmp$ unset LIXA_TRACE_MASK tiian@ubuntu1204-64:~/tmp$ ./example5_pql delete Deleting a row from the table... |
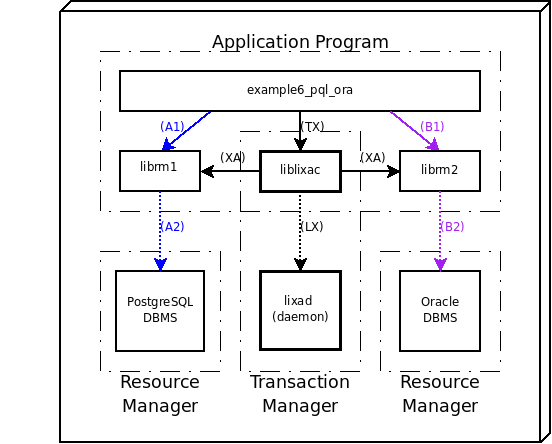
This example shows as you can implement DTP (Distributed Transaction Processing) with two Resource Managers (PostgreSQL and Oracle Database Server) coordinated by the LIXA Transaction Manager. It's strongly suggested you have played with the examples previously shown in this chapter (see Chapter 5, Developing C Application Programs using TX (Transaction Demarcation) interface) before starting this more complex one.
Note
If you did not yet installed the software provided by PostgreSQL, please refer to the official PostgreSQL site to download the software and to pick-up the information necessary to install and configure the database. This manual does not give you information related to PostgreSQL technology: it is assumed you already installed and configured the database.
If you did not yet installed the software provided by Oracle, please refer to the official Oracle site to download the software and to pick-up the information necessary to install and configure the database. This manual does not give you information related to Oracle technology: it is assumed you already installed and configured the database.
Important
The LIXA software must be configured to support the PostgreSQL and the Oracle Database Server resource managers as explained in the section called “Linking third party resource managers”. As a little hint, you should configure LIXA as below:
./configure --with-postgresql-include=/usr/include/postgresql --with-postgresql-lib=/usr/lib \
> --with-oracle=/usr/lib/oracle/xe/app/oracle/product/10.2.0/server
Please don't forget you must compile and install every time you re-configure.
Please follow the instructions explained
in the section called “PostgreSQL Configuration” to set-up a running environment for PostgreSQL server
in the section called “Oracle DMBS Configuration” to set-up a running environment for Oracle Database Server
in the section called “Starting the state server (lixad)” to start up the LIXA state server
Prepare the client (Application Program) using the below commands (gcc command was splitted on several lines using \ to help readability, but you may use a single line):
| [Shell terminal session] |
[tiian@centos8 ~]$ mkdir tmp [tiian@centos8 ~]$ cd tmp [tiian@centos8 tmp]$ cp /opt/lixa/share/doc/lixa-1.9.3-dev/examples/example6_pql_ora.c . [tiian@centos8 tmp]$ gcc example6_pql_ora.c $(/opt/lixa/bin/lixa-config -c -f -p -d) -I/opt/oracle/instantclient_19_8/sdk/include/ -L/opt/oracle/instantclient_19_8/ -l clntsh -l nnz19 -I/usr/include/postgresql -lpq -o example6_pql_ora |
Verify the executable produced by gcc:
| [Shell terminal session] |
[tiian@centos8 tmp]$ ldd example6_pql_ora linux-vdso.so.1 (0x00007fff0cd16000) liblixac.so.0 => /opt/lixa/lib/liblixac.so.0 (0x00007f69325c0000) liblixapq.so.0 => /opt/lixa/lib/liblixapq.so.0 (0x00007f69323b8000) libclntsh.so.19.1 => not found libnnz19.so => not found libpq.so.5 => /lib64/libpq.so.5 (0x00007f6932168000) libc.so.6 => /lib64/libc.so.6 (0x00007f6931da6000) libgmodule-2.0.so.0 => /lib64/libgmodule-2.0.so.0 (0x00007f6931ba2000) libgthread-2.0.so.0 => /lib64/libgthread-2.0.so.0 (0x00007f69319a0000) libxml2.so.2 => /lib64/libxml2.so.2 (0x00007f6931638000) liblixab.so.0 => /opt/lixa/lib/liblixab.so.0 (0x00007f6931416000) libglib-2.0.so.0 => /lib64/libglib-2.0.so.0 (0x00007f69310fd000) libpthread.so.0 => /lib64/libpthread.so.0 (0x00007f6930edd000) libuuid.so.1 => /lib64/libuuid.so.1 (0x00007f6930cd5000) libm.so.6 => /lib64/libm.so.6 (0x00007f6930953000) libssl.so.1.1 => /lib64/libssl.so.1.1 (0x00007f69306bf000) libcrypto.so.1.1 => /lib64/libcrypto.so.1.1 (0x00007f69301dc000) libgssapi_krb5.so.2 => /lib64/libgssapi_krb5.so.2 (0x00007f692ff8c000) libldap_r-2.4.so.2 => /lib64/libldap_r-2.4.so.2 (0x00007f692fd36000) /lib64/ld-linux-x86-64.so.2 (0x00007f69327e5000) libdl.so.2 => /lib64/libdl.so.2 (0x00007f692fb32000) libgnutls.so.30 => /lib64/libgnutls.so.30 (0x00007f692f776000) libpcre.so.1 => /lib64/libpcre.so.1 (0x00007f692f505000) libz.so.1 => /lib64/libz.so.1 (0x00007f692f2ee000) liblzma.so.5 => /lib64/liblzma.so.5 (0x00007f692f0c7000) libkrb5.so.3 => /lib64/libkrb5.so.3 (0x00007f692edd7000) libk5crypto.so.3 => /lib64/libk5crypto.so.3 (0x00007f692ebbb000) libcom_err.so.2 => /lib64/libcom_err.so.2 (0x00007f692e9b7000) libkrb5support.so.0 => /lib64/libkrb5support.so.0 (0x00007f692e7a6000) libkeyutils.so.1 => /lib64/libkeyutils.so.1 (0x00007f692e5a2000) libresolv.so.2 => /lib64/libresolv.so.2 (0x00007f692e38b000) liblber-2.4.so.2 => /lib64/liblber-2.4.so.2 (0x00007f692e17b000) libsasl2.so.3 => /lib64/libsasl2.so.3 (0x00007f692df5d000) libp11-kit.so.0 => /lib64/libp11-kit.so.0 (0x00007f692dc2a000) libidn2.so.0 => /lib64/libidn2.so.0 (0x00007f692da0c000) libunistring.so.2 => /lib64/libunistring.so.2 (0x00007f692d68b000) libtasn1.so.6 => /lib64/libtasn1.so.6 (0x00007f692d478000) libnettle.so.6 => /lib64/libnettle.so.6 (0x00007f692d23f000) libhogweed.so.4 => /lib64/libhogweed.so.4 (0x00007f692d00f000) libgmp.so.10 => /lib64/libgmp.so.10 (0x00007f692cd77000) libselinux.so.1 => /lib64/libselinux.so.1 (0x00007f692cb4c000) libcrypt.so.1 => /lib64/libcrypt.so.1 (0x00007f692c923000) libffi.so.6 => /lib64/libffi.so.6 (0x00007f692c71a000) libpcre2-8.so.0 => /lib64/libpcre2-8.so.0 (0x00007f692c496000) |
There are some unresolved references that can be fixed setting up
the environment properly; you can fix the environment manually or
using a script like:
/opt/oracle/instantclient_19_8/oracle_env.sh
| [Shell terminal session] |
[tiian@centos8 tmp]$ echo $LD_LIBRARY_PATH [tiian@centos8 tmp]$ . /opt/oracle/instantclient_19_8/oracle_env.sh [tiian@centos8 tmp]$ echo $LD_LIBRARY_PATH /opt/oracle/instantclient_19_8: |
Check again the executable:
| [Shell terminal session] |
[tiian@centos8 tmp]$ ldd example6_pql_ora linux-vdso.so.1 (0x00007fff67d87000) liblixac.so.0 => /opt/lixa/lib/liblixac.so.0 (0x00007f1f3f5da000) liblixapq.so.0 => /opt/lixa/lib/liblixapq.so.0 (0x00007f1f3f3d2000) libclntsh.so.19.1 => /opt/oracle/instantclient_19_8/libclntsh.so.19.1 (0x00007f1f3b308000) libnnz19.so => /opt/oracle/instantclient_19_8/libnnz19.so (0x00007f1f3abbe000) libpq.so.5 => /lib64/libpq.so.5 (0x00007f1f3a96e000) libc.so.6 => /lib64/libc.so.6 (0x00007f1f3a5ac000) libgmodule-2.0.so.0 => /lib64/libgmodule-2.0.so.0 (0x00007f1f3a3a8000) libgthread-2.0.so.0 => /lib64/libgthread-2.0.so.0 (0x00007f1f3a1a6000) libxml2.so.2 => /lib64/libxml2.so.2 (0x00007f1f39e3e000) liblixab.so.0 => /opt/lixa/lib/liblixab.so.0 (0x00007f1f39c1c000) libglib-2.0.so.0 => /lib64/libglib-2.0.so.0 (0x00007f1f39903000) libpthread.so.0 => /lib64/libpthread.so.0 (0x00007f1f396e3000) libuuid.so.1 => /lib64/libuuid.so.1 (0x00007f1f394db000) libm.so.6 => /lib64/libm.so.6 (0x00007f1f39159000) libdl.so.2 => /lib64/libdl.so.2 (0x00007f1f38f55000) libnsl.so.1 => /lib64/libnsl.so.1 (0x00007f1f38d3c000) librt.so.1 => /lib64/librt.so.1 (0x00007f1f38b33000) libaio.so.1 => /lib64/libaio.so.1 (0x00007f1f38930000) libresolv.so.2 => /lib64/libresolv.so.2 (0x00007f1f38719000) /lib64/ld-linux-x86-64.so.2 (0x00007f1f3f7ff000) libclntshcore.so.19.1 => /opt/oracle/instantclient_19_8/libclntshcore.so.19.1 (0x00007f1f38178000) libssl.so.1.1 => /lib64/libssl.so.1.1 (0x00007f1f37ee4000) libcrypto.so.1.1 => /lib64/libcrypto.so.1.1 (0x00007f1f37a01000) libgssapi_krb5.so.2 => /lib64/libgssapi_krb5.so.2 (0x00007f1f377b1000) libldap_r-2.4.so.2 => /lib64/libldap_r-2.4.so.2 (0x00007f1f3755b000) libgnutls.so.30 => /lib64/libgnutls.so.30 (0x00007f1f3719f000) libpcre.so.1 => /lib64/libpcre.so.1 (0x00007f1f36f2e000) libz.so.1 => /lib64/libz.so.1 (0x00007f1f36d17000) liblzma.so.5 => /lib64/liblzma.so.5 (0x00007f1f36af0000) libkrb5.so.3 => /lib64/libkrb5.so.3 (0x00007f1f36800000) libk5crypto.so.3 => /lib64/libk5crypto.so.3 (0x00007f1f365e4000) libcom_err.so.2 => /lib64/libcom_err.so.2 (0x00007f1f363e0000) libkrb5support.so.0 => /lib64/libkrb5support.so.0 (0x00007f1f361cf000) libkeyutils.so.1 => /lib64/libkeyutils.so.1 (0x00007f1f35fcb000) liblber-2.4.so.2 => /lib64/liblber-2.4.so.2 (0x00007f1f35dbb000) libsasl2.so.3 => /lib64/libsasl2.so.3 (0x00007f1f35b9d000) libp11-kit.so.0 => /lib64/libp11-kit.so.0 (0x00007f1f3586a000) libidn2.so.0 => /lib64/libidn2.so.0 (0x00007f1f3564c000) libunistring.so.2 => /lib64/libunistring.so.2 (0x00007f1f352cb000) libtasn1.so.6 => /lib64/libtasn1.so.6 (0x00007f1f350b8000) libnettle.so.6 => /lib64/libnettle.so.6 (0x00007f1f34e7f000) libhogweed.so.4 => /lib64/libhogweed.so.4 (0x00007f1f34c4f000) libgmp.so.10 => /lib64/libgmp.so.10 (0x00007f1f349b7000) libselinux.so.1 => /lib64/libselinux.so.1 (0x00007f1f3478c000) libcrypt.so.1 => /lib64/libcrypt.so.1 (0x00007f1f34563000) libffi.so.6 => /lib64/libffi.so.6 (0x00007f1f3435a000) libpcre2-8.so.0 => /lib64/libpcre2-8.so.0 (0x00007f1f340d6000) |
Set-up the necessary environment variables:
| [Shell terminal session] |
[tiian@centos8 tmp]$ echo $LIXA_PROFILE [tiian@centos8 tmp]$ export LIXA_PROFILE=PQL_STA_ORA_DYN [tiian@centos8 tmp]$ echo $LIXA_PROFILE |
The below environment variables were set by the previous sourced script; take a look to them:
| [Shell terminal session] |
[tiian@centos8 tmp]$ echo $ORACLE_HOME /opt/oracle/instantclient_19_8 [tiian@centos8 tmp]$ echo $PATH /opt/oracle/instantclient_19_8:/opt/oracle/instantclient_19_8/sdk:/opt/oracle/instantclient_19_8:/opt/oracle/instantclient_19_8/sdk:/opt/oracle/instantclient_19_8:/opt/oracle/instantclient_19_8/sdk:/home/tiian/.local/bin:/home/tiian/bin:/usr/local/bin:/usr/bin:/usr/local/sbin:/usr/sbin [tiian@centos8 tmp]$ echo $ORACLE_SID |
It is suggested to set the necessary environment variables in your
profile if you are going to execute the programs many times.
This is the list of the suggested variables:
LD_LIBRARY_PATH,
LIXA_PROFILE,
ORACLE_HOME,
ORACLE_SID,
PATH.
We set LIXA_PROFILE to value
“PQL_STA_ORA_DYN”, looking at
/opt/lixa/etc/lixac_conf.xml:
    <profile name="PQL_STA_ORA_DYN">
      <sttsrvs>
        <sttsrv>local_1</sttsrv>
      </sttsrvs>
      <rsrmgrs>
        <rsrmgr>PostgreSQL_stareg</rsrmgr>
        <rsrmgr>OracleXE_dynreg</rsrmgr>
      </rsrmgrs>
    </profile>
the profile references two Resource Managers: “PostgreSQL_stareg” and “OracleXE_dynreg”, looking again at the config file:
    <rsrmgr name="OracleXE_dynreg" switch_file="/opt/lixa/lib/switch_oracle_dynreg.so" xa_open_info="Oracle_XA+Acc=P/hr/hr+SesTm=30+LogDir=/tmp+threads=true+DbgFl=7+Loose_Coupling=true" xa_close_info="" />
    <rsrmgr name="PostgreSQL_stareg" switch_file="/opt/lixa/lib/switch_postgresql_stareg.so" xa_open_info="dbname=testdb" xa_close_info="" />
we can discover how our application will access the resource managers [27] [28].
Verify no (Oracle) trace file exists:
[tiian@centos8 tmp]$ ls -la /tmp/xa*
ls: cannot access '/tmp/xa*': No such file or directory
It is suggested to open three different terminals: the first one connected to “testdb” PostgreSQL database, the second one connected to Oracle database and the third one pointing to the directory where the compiled program example6_pql_ora lives.
| [PostgreSQL terminal session] |
[tiian@centos8 ~]$ psql testdb psql (10.14) Type "help" for help. testdb=> |
| [Oracle terminal session] |
[tiian@centos8 ~]$ . /opt/oracle/instantclient_19_8/oracle_env.sh [tiian@centos8 ~]$ sqlplus hr/hr@lixa_ora_db SQL*Plus: Release 19.0.0.0.0 - Production on Sun Oct 11 16:01:27 2020 Version 19.8.0.0.0 Copyright (c) 1982, 2020, Oracle. All rights reserved. Last Successful login time: Sun Oct 11 2020 16:01:01 +02:00 Connected to: Oracle Database 12c Standard Edition Release 12.1.0.2.0 - 64bit Production SQL> |
| [Shell terminal session] |
[tiian@centos8 tmp]$ ls -la example6_pql_ora* -rwxrwxr-x. 1 tiian tiian 17936 Oct 11 15:45 example6_pql_ora -rw-r--r--. 1 tiian tiian 7372 Oct 11 15:45 example6_pql_ora.c |
Check the content of the PostgreSQL table (“AUTHORS”):
| [PostgreSQL terminal session] |
testdb=> select * from authors; id | last_name | first_name ----+-----------+------------ (0 rows) |
Check the content of the Oracle table (“COUNTRIES”):
| [Oracle terminal session] |
SQL> select * from COUNTRIES where COUNTRY_ID = 'RS'; no rows selected |
Insert a row in all the tables and check the contents of the tables after the transaction execution:
| [Third terminal session] |
[tiian@centos8 tmp]$ ./example6_pql_ora insert Inserting a row in the tables... Oracle INSERT statement executed! |
Now you can verify the content of the tables after the transaction:
| [PostgreSQL terminal session] |
testdb=> select * from authors; id | last_name | first_name ----+-----------+------------ 1 | Foo | Bar (1 row) |
| [Oracle terminal session] |
SQL> select * from COUNTRIES where COUNTRY_ID = 'RS'; CO COUNTRY_NAME REGION_ID -- ---------------------------------------- ---------- RS Repubblica San Marino 1 |
With the opposite command you can remove the rows from the tables:
| [Shell terminal session] |
[tiian@centos8 tmp]$ ./example6_pql_ora delete Deleting a row from the tables... Oracle DELETE statement executed! |
and check the content of the tables again:
| [PostgreSQL terminal session] |
testdb=> select * from AUTHORS; id | last_name | first_name ----+-----------+------------ (0 rows) |
| [Oracle terminal session] |
SQL> select * from COUNTRIES where COUNTRY_ID = 'RS'; no rows selected |
We can verify the dynamic registration behavior of Oracle:
| [Shell terminal session] |
[tiian@centos8 tmp]$ export LIXA_TRACE_MASK=0x00002000 [tiian@centos8 tmp]$ echo $LIXA_TRACE_MASK 0x00002000 [tiian@centos8 tmp]$ ./example6_pql_ora insert 2>&1 | grep ax_reg 2020-10-11 16:06:14.167141 [3221/140307389743104] ax_reg: rmid=1, xid=0x7ffe3a8f2bb0, flags=0x0 2020-10-11 16:06:14.167156 [3221/140307389743104] ax_reg: the application program has started a transaction (TX states S3); this XID '1279875137.0d64d77b079d40f8bb56b61d20d663e4.f3bd465b408e93b1a16e319eb8ca64c1' will be returned 2020-10-11 16:06:14.167162 [3221/140307389743104] ax_reg: sending 153 bytes to the server for step 8 2020-10-11 16:06:14.167175 [3221/140307389743104] ax_reg/excp=7/ret_cod=0/errno=0 |
We can check the static registration behavior of Oracle with a different profile:
| [Shell terminal session] |
[tiian@centos8 tmp]$ export LIXA_PROFILE=PQL_STA_ORA_STA [tiian@centos8 tmp]$ echo $LIXA_TRACE_MASK 0x00002000 [tiian@centos8 tmp]$ ./example6_pql_ora delete 2>&1 | grep xa_start 2020-10-11 16:07:32.841598 [3228/140133343109120] lixa_xa_start: sessid='e1532fd' 2020-10-11 16:07:32.841613 [3228/140133343109120] lixa_xa_start: sending 246 bytes to the server for step 8 2020-10-11 16:07:32.841764 [3228/140133343109120] lixa_xa_start: receiving 95 bytes from the server |<?xml version="1.0" encoding="UTF-8" ?><msg level="4" verb="3" step="16"><answer rc="0"/></msg>| 2020-10-11 16:07:32.842039 [3228/140133343109120] lixa_xa_start: xa_start_entry(xid, 0, 0x0) = 0 2020-10-11 16:07:32.842588 [3228/140133343109120] lixa_xa_start: xa_start_entry(xid, 1, 0x0) = 0 2020-10-11 16:07:32.842604 [3228/140133343109120] lixa_xa_start: sending 281 bytes to the server for step 24 2020-10-11 16:07:32.842617 [3228/140133343109120] lixa_xa_start/excp=10/ret_cod=0/errno=0 |
and check the content of the tables again:
| [PostgreSQL terminal session] |
testdb=> select * from AUTHORS; id | last_name | first_name ----+-----------+------------ (0 rows) |
| [Oracle terminal session] |
SQL> select * from COUNTRIES where COUNTRY_ID = 'RS'; no rows selected |
The activity of the Oracle database can be analyzed in the trace file:
| [Shell terminal session] |
[tiian@centos8 tmp]$ ls -la /tmp/xa_* -rw-rw-r--. 1 tiian tiian 9980 Oct 11 16:07 /tmp/xa_NULL10112020.trc |
Figure 5.5. Deploy model of an example showing a distributed transaction with PostgreSQL and IBM DB2
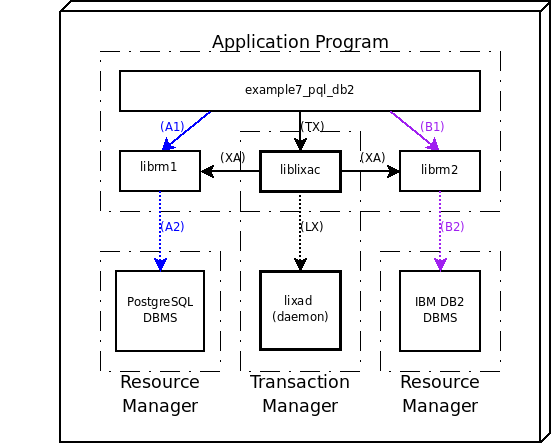
This example shows as you can implement DTP (Distributed Transaction Processing) with two Resource Managers (PostgreSQL and IBM DB2) coordinated by the LIXA Transaction Manager. It's strongly suggested you have played with the examples previously shown in this chapter (see Chapter 5, Developing C Application Programs using TX (Transaction Demarcation) interface) before starting this more complex one.
Note
If you did not yet installed the software provided by PostgreSQL, please refer to the official PostgreSQL site to download the software and to pick-up the information necessary to install and configure the database. This manual does not give you information related to PostgreSQL technology: it is assumed you already installed and configured the database.
If you did not yet installed the software provided by IBM, please refer to the official IBM site to download the software and to pick-up the information necessary to install and configure the database. This manual does not give you information related to IBM DB2 technology: it is assumed you already installed and configured the database.
Important
The LIXA software must be configured to support the PostgreSQL and the IBM DB2 resource managers as explained in the section called “Linking third party resource managers”. As a little hint, you should configure LIXA as below:
./configure --with-postgresql-include=/usr/include/postgresql --with-postgresql-lib=/usr/lib \
> --with-ibmdb2=/opt/ibm/db2/V9.7
Please don't forget you must compile and install every time you re-configure.
Please follow the instructions explained
in the section called “PostgreSQL Configuration” to set-up a running environment for PostgreSQL server
in the section called “Set-up DB2 environment” to set-up a running environment for IBM DB2
in the section called “Starting the state server (lixad)” to start up the LIXA state server
Prepare the client (Application Program) using the below commands (gcc command was splitted on several lines using \ to help readability, but you may use a single line):
| [Shell terminal session] |
tiian@ubuntu:~$ mkdir tmp tiian@ubuntu:~$ cd tmp tiian@ubuntu:~/tmp$ cp /opt/lixa/share/doc/lixa-X.Y.Z/examples/example7_pql_db2.c . tiian@ubuntu:~/tmp$ gcc example7_pql_db2.c $(/opt/lixa/bin/lixa-config -c -f -p -d) \ > -I/usr/include/postgresql -lpq \ > -I/opt/ibm/db2/V9.7/include -L/opt/ibm/db2/V9.7/lib32 -ldb2 \ > -o example7_pql_db2 |
Verify the executable produced by gcc:
| [Shell terminal session] |
tiian@ubuntu:~/tmp$ ldd example7_pql_db2
        linux-gate.so.1 =>  (0xb7780000)
        liblixac.so.0 => /opt/lixa/lib/liblixac.so.0 (0xb7765000)
        liblixapq.so.0 => /opt/lixa/lib/liblixapq.so.0 (0xb775e000)
        libpq.so.5 => /usr/lib/libpq.so.5 (0xb7730000)
        libdb2.so.1 => /usr/lib/libdb2.so.1 (0xb61fe000)
        libc.so.6 => /lib/tls/i686/cmov/libc.so.6 (0xb60af000)
        libgmodule-2.0.so.0 => /usr/lib/libgmodule-2.0.so.0 (0xb60ab000)
        libdl.so.2 => /lib/tls/i686/cmov/libdl.so.2 (0xb60a7000)
        libgthread-2.0.so.0 => /usr/lib/libgthread-2.0.so.0 (0xb60a2000)
        librt.so.1 => /lib/tls/i686/cmov/librt.so.1 (0xb6098000)
        libglib-2.0.so.0 => /usr/lib/libglib-2.0.so.0 (0xb5fe7000)
        libxml2.so.2 => /usr/lib/libxml2.so.2 (0xb5ec7000)
        liblixab.so.0 => /opt/lixa/lib/liblixab.so.0 (0xb5eb2000)
        libm.so.6 => /lib/tls/i686/cmov/libm.so.6 (0xb5e8d000)
        libpthread.so.0 => /lib/tls/i686/cmov/libpthread.so.0 (0xb5e74000)
        libssl.so.0.9.8 => /usr/lib/i686/cmov/libssl.so.0.9.8 (0xb5e2e000)
        libcrypto.so.0.9.8 => /usr/lib/i686/cmov/libcrypto.so.0.9.8 (0xb5cec000)
        libkrb5.so.3 => /usr/lib/libkrb5.so.3 (0xb5c5f000)
        libcom_err.so.2 => /lib/libcom_err.so.2 (0xb5c5c000)
        libgssapi_krb5.so.2 => /usr/lib/libgssapi_krb5.so.2 (0xb5c33000)
        libcrypt.so.1 => /lib/tls/i686/cmov/libcrypt.so.1 (0xb5c00000)
        libldap_r-2.4.so.2 => /usr/lib/libldap_r-2.4.so.2 (0xb5bc0000)
        libpam.so.0 => /lib/libpam.so.0 (0xb5bb6000)
        libdb2dascmn.so.1 => /opt/ibm/db2/V9.7/lib32/libdb2dascmn.so.1 (0xb5b88000)
        libdb2g11n.so.1 => /opt/ibm/db2/V9.7/lib32/libdb2g11n.so.1 (0xb551a000)
        libdb2genreg.so.1 => /opt/ibm/db2/V9.7/lib32/libdb2genreg.so.1 (0xb54da000)
        libdb2install.so.1 => /opt/ibm/db2/V9.7/lib32/libdb2install.so.1 (0xb54cf000)
        libdb2locale.so.1 => /opt/ibm/db2/V9.7/lib32/libdb2locale.so.1 (0xb54bc000)
        libdb2osse.so.1 => /opt/ibm/db2/V9.7/lib32/libdb2osse.so.1 (0xb51b6000)
        libdb2osse_db2.so.1 => /opt/ibm/db2/V9.7/lib32/libdb2osse_db2.so.1 (0xb5146000)
        libdb2trcapi.so.1 => /opt/ibm/db2/V9.7/lib32/libdb2trcapi.so.1 (0xb5133000)
        libstdc++.so.6 => /usr/lib/libstdc++.so.6 (0xb5040000)
        libgcc_s.so.1 => /lib/libgcc_s.so.1 (0xb5035000)
        /lib/ld-linux.so.2 (0xb7781000)
        libpcre.so.3 => /usr/lib/libpcre.so.3 (0xb500d000)
        libz.so.1 => /usr/lib/libz.so.1 (0xb4ff8000)
        libuuid.so.1 => /lib/libuuid.so.1 (0xb4ff4000)
        libk5crypto.so.3 => /usr/lib/libk5crypto.so.3 (0xb4fd1000)
        libkrb5support.so.0 => /usr/lib/libkrb5support.so.0 (0xb4fc9000)
        libkeyutils.so.1 => /lib/libkeyutils.so.1 (0xb4fc5000)
        libresolv.so.2 => /lib/tls/i686/cmov/libresolv.so.2 (0xb4fb2000)
        liblber-2.4.so.2 => /usr/lib/liblber-2.4.so.2 (0xb4fa5000)
        libsasl2.so.2 => /usr/lib/libsasl2.so.2 (0xb4f8e000)
        libgnutls.so.13 => /usr/lib/libgnutls.so.13 (0xb4f18000)
        libtasn1.so.3 => /usr/lib/libtasn1.so.3 (0xb4f07000)
        libgcrypt.so.11 => /lib/libgcrypt.so.11 (0xb4eba000)
        libgpg-error.so.0 => /lib/libgpg-error.so.0 (0xb4eb6000)
|
Set-up the necessary environment variables:
| [Shell terminal session] |
tiian@ubuntu:~/tmp$ echo $LIXA_PROFILE tiian@ubuntu:~/tmp$ export LIXA_PROFILE=PQL_STA_DB2_DYN tiian@ubuntu:~/tmp$ echo $LIXA_PROFILE PQL_STA_DB2_DYN |
It is suggested to set the necessary environment variables in your
profile if you are going to execute the programs many times.
This is the list of the suggested variables:
LIXA_PROFILE,
PATH.
We set LIXA_PROFILE to value
“PQL_STA_DB2_DYN”, looking at
/opt/lixa/etc/lixac_conf.xml:
    <profile name="PQL_STA_DB2_DYN">
      <sttsrvs>
        <sttsrv>local_1</sttsrv>
      </sttsrvs>
      <rsrmgrs>
        <rsrmgr>PostgreSQL_stareg</rsrmgr>
        <rsrmgr>IBMDB2_dynreg</rsrmgr>
      </rsrmgrs>
    </profile>
the profile references two Resource Managers: “PostgreSQL_stareg” and “IBMDB2_dynreg”, looking again at the config file:
    <rsrmgr name="PostgreSQL_stareg" switch_file="/opt/lixa/lib/switch_postgresql_stareg.so" xa_open_info="dbname=testdb" xa_close_info="" />
    <rsrmgr name="IBMDB2_dynreg" switch_file="/opt/lixa/lib/switch_ibmdb2_dynreg.so" xa_open_info="axlib=/opt/lixa/lib/liblixac.so,db=sample,tpm=lixa" xa_close_info="" />
we can discover how our application will access the resource managers [29] [30].
It is suggested to open three different terminals: the first one connected to “TESTDB” PostgreSQL database, the second one connected to “SAMPLE” DB2 database and the third one pointing to the directory where the compiled program example7_pql_db2 lives.
| [PostgreSQL terminal session] |
tiian@ubuntu:~$ psql testdb
Welcome to psql 8.3.15, the PostgreSQL interactive terminal.

Type:  \copyright for distribution terms
       \h for help with SQL commands
       \? for help with psql commands
       \g or terminate with semicolon to execute query
       \q to quit

testdb=>
|
| [IBM DB2 terminal session] |
tiian@ubuntu:~$ . /home/db2inst1/sqllib/db2profile
tiian@ubuntu:~$ db2
(c) Copyright IBM Corporation 1993,2007
Command Line Processor for DB2 Client 9.7.1

You can issue database manager commands and SQL statements from the command
prompt. For example:
    db2 => connect to sample
    db2 => bind sample.bnd

For general help, type: ?.
For command help, type: ? command, where command can be
the first few keywords of a database manager command. For example:
 ? CATALOG DATABASE for help on the CATALOG DATABASE command
 ? CATALOG          for help on all of the CATALOG commands.

To exit db2 interactive mode, type QUIT at the command prompt. Outside
interactive mode, all commands must be prefixed with 'db2'.
To list the current command option settings, type LIST COMMAND OPTIONS.

For more detailed help, refer to the Online Reference Manual.

db2 => connect to SAMPLE

   Database Connection Information

 Database server        = DB2/LINUX 9.7.1
 SQL authorization ID   = TIIAN
 Local database alias   = SAMPLE

db2 =>
|
| [Shell terminal session] |
tiian@ubuntu:~/tmp$ ls -la total 32 drwxr-xr-x 2 tiian tiian 4096 2011-09-25 17:11 . drwxr-xr-x 40 tiian tiian 4096 2011-09-22 22:24 .. -rwxr-xr-x 1 tiian tiian 12429 2011-09-22 22:47 example7_pql_db2 -rw-r--r-- 1 tiian tiian 7541 2011-09-22 22:46 example7_pql_db2.c |
Check the content of the PostgreSQL table (“AUTHORS”):
| [PostgreSQL terminal session] |
testdb=> select * from AUTHORS; id | last_name | first_name ----+-----------+------------ (0 rows) |
Check the content of the DB2 tables (“DB2INST1.ORG” and “DB2INST1.DEPT”):
| [IBM DB2 terminal session] |
db2 => select * from DB2INST1.ORG where DEPTNUMB = 150 DEPTNUMB DEPTNAME MANAGER DIVISION LOCATION -------- -------------- ------- ---------- ------------- 0 record(s) selected. db2 => select * from DB2INST1.DEPT where DEPTNO='Z99' DEPTNO DEPTNAME MGRNO ADMRDEPT LOCATION ------ ------------------------------------ ------ -------- ---------------- 0 record(s) selected. |
Insert a row in PostgreSQL “AUTHORS” table and in DB2 “ORG” table and check the contents of the tables after the transaction execution:
| [Third terminal session] |
tiian@ubuntu:~/tmp$ . /home/db2inst1/sqllib/db2profile tiian@ubuntu:~/tmp$ ./example7_pql_db2 insert org Executing DB2 statement 'INSERT INTO DB2INST1.ORG(DEPTNUMB, DEPTNAME, MANAGER, DIVISION, LOCATION) VALUES(150, 'Europe', 231, 'R&D', 'Mojan')'... Executing PostgreSQL statement 'INSERT INTO authors VALUES(1, 'Foo', 'Bar');'... |
Now you can verify the content of the tables after the transaction:
| [PostgreSQL terminal session] |
testdb=> select * from authors; id | last_name | first_name ----+-----------+------------ 1 | Foo | Bar (1 row) |
| [IBM DB2 terminal session] |
db2 => select * from DB2INST1.ORG where DEPTNUMB = 150

DEPTNUMB DEPTNAME       MANAGER DIVISION   LOCATION
-------- -------------- ------- ---------- -------------
     150 Europe             231 R&D        Mojan

  1 record(s) selected.
|
If you try to insert the same row again you can verify an automatic rollback due to an error thrown by the second resource manager:
| [Shell terminal session] |
tiian@ubuntu:~/tmp$ ./example7_pql_db2 insert org Executing DB2 statement 'INSERT INTO DB2INST1.ORG(DEPTNUMB, DEPTNAME, MANAGER, DIVISION, LOCATION) VALUES(150, 'Europe', 231, 'R&D', 'Mojan')'... Executing PostgreSQL statement 'INSERT INTO authors VALUES(1, 'Foo', 'Bar');'... PostgreSQL error: ERROR: duplicate key value violates unique constraint "authors_pkey" |
DB2 table (“ORG”) allows multiple rows, PostgreSQL table (“AUTHORS”) does not allow multiple rows: the error stops the program execution and the resource managers automatically rollback the changes. You can verify there is only one row in the tables:
| [PostgreSQL terminal session] |
testdb=> select * from authors; id | last_name | first_name ----+-----------+------------ 1 | Foo | Bar (1 row) |
| [IBM DB2 terminal session] |
db2 => select * from DB2INST1.ORG where DEPTNUMB = 150

DEPTNUMB DEPTNAME       MANAGER DIVISION   LOCATION
-------- -------------- ------- ---------- -------------
     150 Europe             231 R&D        Mojan

  1 record(s) selected.
|
You can easily verify there are no prepared transactions inside PostgreSQL database:
| [PostgreSQL terminal session] |
testdb=> select * from pg_prepared_xacts; transaction | gid | prepared | owner | database -------------+-----+----------+-------+---------- (0 rows) |
We can verify that DB2 is using dynamic registration:
| [Shell terminal session] |
tiian@ubuntu:~/tmp$ export LIXA_TRACE_MASK=0x00002000 tiian@ubuntu:~/tmp$ echo $LIXA_TRACE_MASK 0x00002000 tiian@ubuntu:~/tmp$ ./example7_pql_db2 delete org 2>&1 | grep ax_reg 2011-09-25 18:15:38.499702 [13586/3035527472] ax_reg: rmid=1, xid=0xbf9b2630, flags=0x0 2011-09-25 18:15:38.500405 [13586/3035527472] ax_reg: the application program has started a transaction (TX states S3); this XID '1279875137.0565b518222345ba852b4c4a09a660ae.725d0414e912e62f9ef42209ef693f36' will be returned 2011-09-25 18:15:38.500970 [13586/3035527472] ax_reg: sending 153 bytes to the server for step 8 2011-09-25 18:15:38.501415 [13586/3035527472] ax_reg/excp=7/ret_cod=0/errno=0 |
If you used “PQL_STA_DB2_STA” profile instead of “PQL_STA_DB2_DYN” you could switch the DB2 to static behavior.
Note
Combining the previous two examples you can realize a program that access 3 resource managers: PostgreSQL, Oracle and DB2. It is left as an exercise to the reader.
Please follow the instructions explained in the section called “MySQL/MariaDB Configuration” to set-up a running environment for MySQL or MariaDB server.
Start the state server as shown below:
| [Shell terminal session] |
tiian@ubuntu1204-64:/tmp$ sudo su - lixa lixa@ubuntu1204-64:~$ /opt/lixa/sbin/lixad --daemon lixa@ubuntu1204-64:~$ exit logout tiian@ubuntu1204-64:/tmp$ ps -ef|grep lixad|grep -v grep lixa 1804 1 0 22:45 ? 00:00:00 /opt/lixa/sbin/lixad --daemon |
Prepare the client (Application Program) using the below commands (gcc command was splitted on several lines using \ to help readability, but you may use a single line):
| [Shell terminal session] |
tiian@ubuntu1204-64:/tmp$ mkdir tmp tiian@ubuntu1204-64:/tmp$ cd tmp tiian@ubuntu1204-64:/tmp/tmp$ cp /opt/lixa/share/doc/lixa-1.3.2-dev/examples/example8_mys.c . tiian@ubuntu1204-64:/tmp/tmp$ gcc example8_mys.c $(/opt/lixa/bin/lixa-config -c -f -m -d) \ > $(mysql_config --include --libs_r) -o example8_mys |
Verify the executable produced by gcc:
| [Shell terminal session] |
tiian@ubuntu1204-64:/tmp/tmp$ ldd example8_mys
linux-vdso.so.1 => (0x00007fff37367000)
liblixac.so.0 => /opt/lixa/lib/liblixac.so.0 (0x00007fd64e935000)
liblixamy.so.0 => /opt/lixa/lib/liblixamy.so.0 (0x00007fd64e72d000)
libmysqlclient.so.18 => /usr/lib/x86_64-linux-gnu/libmysqlclient.so.18 (0x00007fd64e1db000)
libc.so.6 => /lib/x86_64-linux-gnu/libc.so.6 (0x00007fd64de1d000)
libgmodule-2.0.so.0 => /usr/lib/x86_64-linux-gnu/libgmodule-2.0.so.0 (0x00007fd64dc19000)
libglib-2.0.so.0 => /lib/x86_64-linux-gnu/libglib-2.0.so.0 (0x00007fd64d923000)
libxml2.so.2 => /usr/lib/x86_64-linux-gnu/libxml2.so.2 (0x00007fd64d5c7000)
liblixab.so.0 => /opt/lixa/lib/liblixab.so.0 (0x00007fd64d3ad000)
libpthread.so.0 => /lib/x86_64-linux-gnu/libpthread.so.0 (0x00007fd64d18f000)
libz.so.1 => /lib/x86_64-linux-gnu/libz.so.1 (0x00007fd64cf78000)
libdl.so.2 => /lib/x86_64-linux-gnu/libdl.so.2 (0x00007fd64cd74000)
librt.so.1 => /lib/x86_64-linux-gnu/librt.so.1 (0x00007fd64cb6b000)
libm.so.6 => /lib/x86_64-linux-gnu/libm.so.6 (0x00007fd64c86f000)
/lib64/ld-linux-x86-64.so.2 (0x00007fd64eb54000)
libpcre.so.3 => /lib/x86_64-linux-gnu/libpcre.so.3 (0x00007fd64c632000)
libuuid.so.1 => /lib/x86_64-linux-gnu/libuuid.so.1 (0x00007fd64c42c000)
|
Set-up the LIXA_PROFILE environment variable:
| [Shell terminal session] |
tiian@ubuntu1204-64:/tmp/tmp$ echo $LIXA_PROFILE tiian@ubuntu1204-64:/tmp/tmp$ export LIXA_PROFILE=MYS_STA tiian@ubuntu1204-64:/tmp/tmp$ echo $LIXA_PROFILE MYS_STA |
We set LIXA_PROFILE to value
“MYS_STA”, looking at
/opt/lixa/etc/lixac_conf.xml:
<profile name="MYS_STA">
<sttsrvs>
<sttsrv>local_1</sttsrv>
</sttsrvs>
<rsrmgrs>
<rsrmgr>MySQL_stareg</rsrmgr>
</rsrmgrs>
</profile>
the profile references the Resource Manager named “MySQL_stareg”, looking again at the config file:
<rsrmgr name="MySQL_stareg" switch_file="/opt/lixa/lib/switch_mysql_stareg.so" xa_open_info="host=localhost,user=lixa,passwd=,db=lixa,client_flag=0" xa_close_info="" />
we can discover how LIXA is configured to access the MySQL database.
The content of xa_open_info is passed to
mysql_real_connect
function after some parsing has occurred.
This is the prototype of the mysql_real_connect
function as described in the official manual
MYSQL *mysql_real_connect(const char *host, const char *passwd, const char *db, unsigned int port, const char *unix_socket, unsigned long client_flag);
and these are the tokens accepted by LIXA inside
xa_open_info:
host: a string of charactersuser: a string of characterspasswd: a string of charactersdb: a string of charactersport: a numberunix_socket: a string of charactersclient_flag: a number
As shown in the above example, this is the syntax that applies to
xa_open_info:
an element is composed by <token>=<value> where <token> is one of the keywords listed above
a comma “,” separates two elements
<value> may be empty (like
passwdin the above example): it will passed as an empty string ("") tomysql_real_connectif a <token> is not specified in
xa_open_info, LIXA will pass tomysql_real_connecta NULL pointer if the missing token refers to a character string and 0 value if the missing token refers to a numberif you must put an equal symbol ("=") inside <value> you must put two instead of one: "=="
if you must put a comma symbol (",") inside <value> you must put two instead of one: ",,"
all control characters like space, tab, newline and so on, are passed as is without any modification
Using this configuration:
xa_open_info="host=localhost,user=lixa,passwd=,db=lixa,client_flag=0"
LIXA will call mysql_real_connect as
mysql_real_connect(conn,
"localhost", "lixa",
"", "lixa",
0, NULL,
0)
You should refer to MySQL official documentation to discover how you
can configure xa_open_info.
Warning
xa_open_info can contain a maximum of 255
characters (plus \0 string terminator); if you need more space,
consider to move some parameters to mycnf file
(see MySQL official documentation to pick-up the details).
It is suggested to open two different terminals: the first one
connected to “lixa” MySQL database and the second
one pointing to the directory where the compiled program
example8_mys lives.
First teminal session:
| [MySQL terminal session] |
tiian@ubuntu1204-64:/tmp/tmp$ mysql -h localhost -u lixa lixa Reading table information for completion of table and column names You can turn off this feature to get a quicker startup with -A Welcome to the MySQL monitor. Commands end with ; or \g. Your MySQL connection id is 38 Server version: 5.5.54-0ubuntu0.12.04.1 (Ubuntu) Copyright (c) 2000, 2016, Oracle and/or its affiliates. All rights reserved. Oracle is a registered trademark of Oracle Corporation and/or its affiliates. Other names may be trademarks of their respective owners. Type 'help;' or '\h' for help. Type '\c' to clear the current input statement. mysql> |
Second teminal session:
| [Shell terminal session] |
tiian@ubuntu1204-64:/tmp/tmp$ ls -la total 28 drwxrwxr-x 2 tiian tiian 4096 mar 3 22:47 . drwxrwxrwt 5 root root 4096 mar 3 22:47 .. -rwxrwxr-x 1 tiian tiian 13052 mar 3 22:47 example8_mys -rw-r--r-- 1 tiian tiian 3374 mar 3 22:46 example8_mys.c |
Check the content of “authors” table before program execution:
| [MySQL terminal session] |
mysql> SELECT * FROM authors; Empty set (0.04 sec) |
Execute the program:
| [Shell terminal session] |
tiian@ubuntu1204-64:/tmp/tmp$ ./example8_mys insert Inserting a row in the table... |
Check the content of the table again:
| [MySQL terminal session] |
mysql> SELECT * FROM authors; +----+-----------+------------+ | id | last_name | first_name | +----+-----------+------------+ | 1 | Foo | Bar | +----+-----------+------------+ 1 row in set (0.00 sec) |
The example program inserted the row with id=1. You can not insert the same row twice because there is a unique constraint on this table, but you can remove the row using
| [Shell terminal session] |
tiian@ubuntu1204-64:/tmp/tmp$ ./example8_mys delete Deleting a row from the table... |
Check the table content again:
| [MySQL terminal session] |
mysql> SELECT * FROM authors; Empty set (0.00 sec) |
you can verify in file
/opt/lixa/etc/lixac_conf.xml
that “MYS_STA” is associated to static registration
[31]
.
Execute the program:
| [Shell terminal session] |
tiian@ubuntu1204-64:/tmp/tmp$ export LIXA_TRACE_MASK=0x00002000 tiian@ubuntu1204-64:/tmp/tmp$ echo $LIXA_TRACE_MASK 0x00002000 tiian@ubuntu1204-64:/tmp/tmp$ ./example8_mys insert 2>&1 | grep xa_start 2017-03-03 22:51:51.988732 [2030/140079512323904] lixa_xa_start 2017-03-03 22:51:51.988757 [2030/140079512323904] lixa_xa_start: sending 213 bytes to the server for step 8 2017-03-03 22:51:52.044451 [2030/140079512323904] lixa_xa_start: receiving 95 bytes from the server |<?xml version="1.0" encoding="UTF-8" ?><msg level="0" verb="3" step="16"><answer rc="0"/></msg>| 2017-03-03 22:51:52.044627 [2030/140079512323904] lixa_xa_start: xa_start_entry(xid, 0, 0x0) = 0 2017-03-03 22:51:52.044639 [2030/140079512323904] lixa_xa_start: sending 210 bytes to the server for step 24 2017-03-03 22:51:52.044713 [2030/140079512323904] lixa_xa_start/excp=10/ret_cod=0/errno=0 |
Finally, clean up the table again:
| [Shell terminal session] |
tiian@ubuntu1204-64:/tmp/tmp$ unset LIXA_TRACE_MASK tiian@ubuntu1204-64:/tmp/tmp$ ./example8_mys delete Deleting a row from the table... |
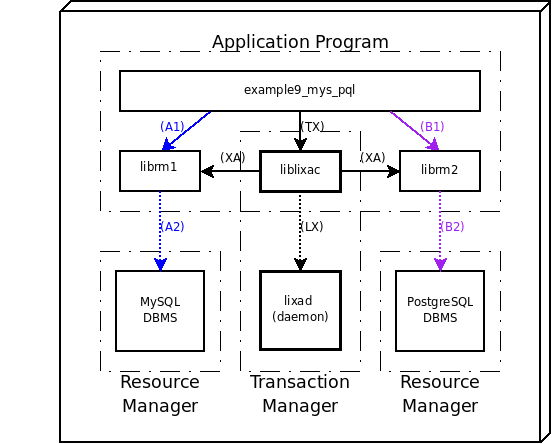
This example shows as you can implement DTP (Distributed Transaction Processing) with two Resource Managers (MySQL and PostgreSQL) coordinated by the LIXA Transaction Manager. It's strongly suggested you have played with the examples previously shown in this chapter (see Chapter 5, Developing C Application Programs using TX (Transaction Demarcation) interface) before starting this more complex one.
Note
If you did not yet installed the software provided by PostgreSQL, please refer to the official PostgreSQL site to download the software and to pick-up the information necessary to install and configure the database. This manual does not give you information related to PostgreSQL technology: it is assumed you already installed and configured the database.
If you did not yet installed the software provided by MySQL, please refer to the official MySQL site to download the software and to pick-up the information necessary to install and configure the database. This manual does not give you information related to MySQL technology: it is assumed you already installed and configured the database.
Important
The LIXA software must be configured to support the MySQL and PostgreSQL and resource managers as explained in the section called “Linking third party resource managers”. As a little hint, you should configure LIXA as below (Ubuntu):
./configure --with-mysql \ > --with-postgresql-include=/usr/include/postgresql --with-postgresql-lib=/usr/lib
or as below (Centos):
./configure --with-mysql \ > --with-postgresql-include=/usr/include/postgresql --with-postgresql-lib=/usr/lib
Please don't forget you must compile and install every time you re-configure.
Please follow the instructions explained
in the section called “MySQL/MariaDB Configuration” to set-up a running environment for MySQL server
in the section called “PostgreSQL Configuration” to set-up a running environment for PostgreSQL server
in the section called “Starting the state server (lixad)” to start up the LIXA state server
Prepare the client (Application Program) using the below commands (gcc command was splitted on several lines using \ to help readability, but you may use a single line):
| [Shell terminal session] |
tiian@ubuntu:~$ mkdir tmp tiian@ubuntu:~$ cd tmp tiian@ubuntu:~/tmp$ cp /opt/lixa/share/doc/lixa-X.Y.Z/examples/example9_mys_pql.c . tiian@ubuntu:~/tmp$ gcc example9_mys_pql.c $(/opt/lixa/bin/lixa-config -c -f -m -p -d) \ > $(mysql_config --include --libs_r) -I/usr/include/postgresql -lpq \ > -o example9_mys_pql |
Verify the executable produced by gcc:
| [Shell terminal session] |
tiian@ubuntu:~/tmp$ ldd example9_mys_pql
linux-gate.so.1 => (0xb76f6000)
liblixac.so.0 => /opt/lixa/lib/liblixac.so.0 (0xb76db000)
liblixamy.so.0 => /opt/lixa/lib/liblixamy.so.0 (0xb76d3000)
liblixapq.so.0 => /opt/lixa/lib/liblixapq.so.0 (0xb76cb000)
libmysqlclient_r.so.15 => /usr/lib/libmysqlclient_r.so.15 (0xb74db000)
libpq.so.5 => /usr/lib/libpq.so.5 (0xb74bc000)
libc.so.6 => /lib/tls/i686/cmov/libc.so.6 (0xb736d000)
libgmodule-2.0.so.0 => /usr/lib/libgmodule-2.0.so.0 (0xb7369000)
libdl.so.2 => /lib/tls/i686/cmov/libdl.so.2 (0xb7365000)
libgthread-2.0.so.0 => /usr/lib/libgthread-2.0.so.0 (0xb735f000)
librt.so.1 => /lib/tls/i686/cmov/librt.so.1 (0xb7356000)
libglib-2.0.so.0 => /usr/lib/libglib-2.0.so.0 (0xb72a5000)
libxml2.so.2 => /usr/lib/libxml2.so.2 (0xb7185000)
liblixab.so.0 => /opt/lixa/lib/liblixab.so.0 (0xb7170000)
libpthread.so.0 => /lib/tls/i686/cmov/libpthread.so.0 (0xb7157000)
libcrypt.so.1 => /lib/tls/i686/cmov/libcrypt.so.1 (0xb7125000)
libnsl.so.1 => /lib/tls/i686/cmov/libnsl.so.1 (0xb710d000)
libm.so.6 => /lib/tls/i686/cmov/libm.so.6 (0xb70e8000)
libz.so.1 => /usr/lib/libz.so.1 (0xb70d3000)
libssl.so.0.9.8 => /usr/lib/i686/cmov/libssl.so.0.9.8 (0xb708e000)
libcrypto.so.0.9.8 => /usr/lib/i686/cmov/libcrypto.so.0.9.8 (0xb6f4b000)
libkrb5.so.3 => /usr/lib/libkrb5.so.3 (0xb6ebe000)
libcom_err.so.2 => /lib/libcom_err.so.2 (0xb6ebb000)
libgssapi_krb5.so.2 => /usr/lib/libgssapi_krb5.so.2 (0xb6e92000)
libldap_r-2.4.so.2 => /usr/lib/libldap_r-2.4.so.2 (0xb6e52000)
/lib/ld-linux.so.2 (0xb76f7000)
libpcre.so.3 => /usr/lib/libpcre.so.3 (0xb6e2a000)
libuuid.so.1 => /lib/libuuid.so.1 (0xb6e26000)
libk5crypto.so.3 => /usr/lib/libk5crypto.so.3 (0xb6e03000)
libkrb5support.so.0 => /usr/lib/libkrb5support.so.0 (0xb6dfb000)
libkeyutils.so.1 => /lib/libkeyutils.so.1 (0xb6df8000)
libresolv.so.2 => /lib/tls/i686/cmov/libresolv.so.2 (0xb6de4000)
liblber-2.4.so.2 => /usr/lib/liblber-2.4.so.2 (0xb6dd7000)
libsasl2.so.2 => /usr/lib/libsasl2.so.2 (0xb6dc0000)
libgnutls.so.13 => /usr/lib/libgnutls.so.13 (0xb6d4a000)
libtasn1.so.3 => /usr/lib/libtasn1.so.3 (0xb6d3a000)
libgcrypt.so.11 => /lib/libgcrypt.so.11 (0xb6cec000)
libgpg-error.so.0 => /lib/libgpg-error.so.0 (0xb6ce8000)
|
Set-up the necessary environment variables:
| [Shell terminal session] |
tiian@ubuntu:~/tmp$ echo $LIXA_PROFILE tiian@ubuntu:~/tmp$ export LIXA_PROFILE=MYS_STA_PQL_STA tiian@ubuntu:~/tmp$ echo $LIXA_PROFILE MYS_STA_PQL_STA |
It is suggested to set the necessary environment variable
(LIXA_PROFILE) in your
profile if you are going to execute the programs many times.
We set LIXA_PROFILE to value
“MYS_STA_PQL_STA”, looking at
/opt/lixa/etc/lixac_conf.xml:
<profile name="MYS_STA_PQL_STA">
<sttsrvs>
<sttsrv>local_1</sttsrv>
</sttsrvs>
<rsrmgrs>
<rsrmgr>MySQL_stareg</rsrmgr>
<rsrmgr>PostgreSQL_stareg</rsrmgr>
</rsrmgrs>
</profile>
the profile references two Resource Managers: “MySQL_stareg” and “PostgreSQL_stareg”, looking again at the config file:
<rsrmgr name="MySQL_stareg" switch_file="/opt/lixa/lib/switch_mysql_stareg.so" xa_open_info="host=localhost,user=lixa,passwd=,db=lixa,client_flag=0" xa_close_info="" />
<rsrmgr name="PostgreSQL_stareg" switch_file="/opt/lixa/lib/switch_postgresql_stareg.so" xa_open_info="dbname=testdb" xa_close_info="" />
we can discover how our application will access the resource managers [32] [33].
It is suggested to open three different terminals: the first one connected to “lixa” MySQL database, the second one connected to “testdb” PostgreSQL database and the third one pointing to the directory where the compiled program example9_mys_pql lives.
| [MySQL terminal session] |
tiian@ubuntu:~$ mysql -h localhost -u lixa lixa Reading table information for completion of table and column names You can turn off this feature to get a quicker startup with -A Welcome to the MySQL monitor. Commands end with ; or \g. Your MySQL connection id is 37 Server version: 5.0.51a-3ubuntu5.8 (Ubuntu) Type 'help;' or '\h' for help. Type '\c' to clear the buffer. mysql> |
| [PostgreSQL terminal session] |
tiian@ubuntu:~$ psql testdb
Welcome to psql 8.3.15, the PostgreSQL interactive terminal.
Type: \copyright for distribution terms
\h for help with SQL commands
\? for help with psql commands
\g or terminate with semicolon to execute query
\q to quit
testdb=>
|
| [Shell terminal session] |
tiian@ubuntu:~/tmp$ ls -la total 28 drwxr-xr-x 2 tiian tiian 4096 2011-09-20 21:53 . drwxr-xr-x 40 tiian tiian 4096 2011-09-19 20:54 .. -rwxr-xr-x 1 tiian tiian 10096 2011-11-03 20:45 example9_mys_pql -rw-r--r-- 1 tiian tiian 4602 2011-11-03 20:45 example9_mys_pql.c |
Check the content of the MySQL table (“authors”):
| [MySQL terminal session] |
mysql> SELECT * FROM authors; Empty set (0.02 sec) |
Check the content of the PostgreSQL table (“AUTHORS”):
| [PostgreSQL terminal session] |
testdb=> select * from AUTHORS; id | last_name | first_name ----+-----------+------------ (0 rows) |
Insert a row in all the tables and check the contents of the tables after the transaction execution:
| [Third terminal session] |
tiian@ubuntu:~/tmp$ ./example9_mys_pql insert Inserting a row in MySQL table... Inserting a row in PostgreSQL table... |
Now you can verify the content of the tables after the transaction:
| [MySQL terminal session] |
mysql> SELECT * FROM authors; +----+-----------+------------+ | id | last_name | first_name | +----+-----------+------------+ | 1 | Foo | Bar | +----+-----------+------------+ 1 row in set (0.00 sec) |
| [PostgreSQL terminal session] |
testdb=> select * from AUTHORS; id | last_name | first_name ----+-----------+------------ 1 | Foo | Bar (1 row) |
With the opposite command you can remove the rows from the tables:
| [Shell terminal session] |
tiian@ubuntu:~/tmp$ ./example9_mys_pql delete Deleting a row from MySQL table... Deleting a row from PostgreSQL table... |
and check the content of the tables again:
| [MySQL terminal session] |
mysql> SELECT * FROM authors; Empty set (0.00 sec) |
| [PostgreSQL terminal session] |
testdb=> select * from AUTHORS; id | last_name | first_name ----+-----------+------------ (0 rows) |
Figure 5.7. Deploy model of an example showing a distributed transaction with MySQL, PostgreSQL and Oracle
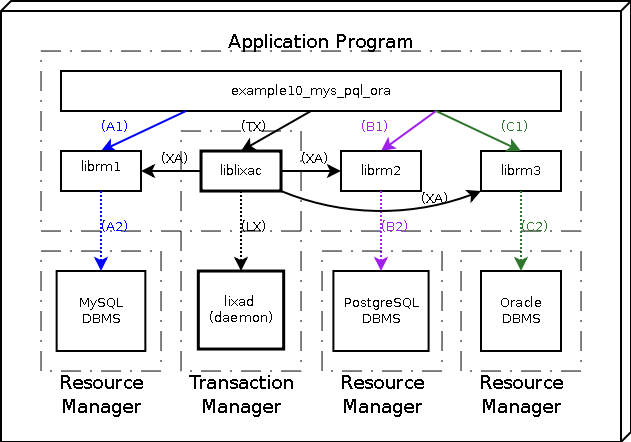
This example shows as you can implement DTP (Distributed Transaction Processing) with three Resource Managers (MySQL, PostgreSQL and Oracle) coordinated by the LIXA Transaction Manager. It's strongly suggested you have played with the examples previously shown in this chapter (see Chapter 5, Developing C Application Programs using TX (Transaction Demarcation) interface) before starting this more complex one.
Note
If you did not yet installed the software provided by MySQL, please refer to the official MySQL site to download the software and to pick-up the information necessary to install and configure the database. This manual does not give you information related to MySQL technology: it is assumed you already installed and configured the database.
If you did not yet installed the software provided by PostgreSQL, please refer to the official PostgreSQL site to download the software and to pick-up the information necessary to install and configure the database. This manual does not give you information related to PostgreSQL technology: it is assumed you already installed and configured the database.
If you did not yet installed the software provided by Oracle, please refer to the official Oracle site to download the software and to pick-up the information necessary to install and configure the database. This manual does not give you information related to Oracle technology: it is assumed you already installed and configured the database.
Important
The LIXA software must be configured to support the MySQL, PostgreSQL and Oracle resource managers as explained in the section called “Linking third party resource managers”. As a little hint, you should configure LIXA as below:
./configure --with-mysql \ > --with-postgresql-include=/usr/include/postgresql --with-postgresql-lib=/usr/lib \ > --with-oracle=/usr/lib/oracle/xe/app/oracle/product/10.2.0/server
Please don't forget you must compile and install every time you re-configure.
Please follow the instructions explained
in the section called “MySQL/MariaDB Configuration” to set-up a running environment for MySQL server
in the section called “PostgreSQL Configuration” to set-up a running environment for PostgreSQL server
in the section called “Oracle DMBS Configuration” to set-up a running environment for Oracle Database Server
in the section called “Starting the state server (lixad)” to start up the LIXA state server
Prepare the client (Application Program) using the below commands (gcc command was splitted on several lines using \ to help readability, but you may use a single line):
| [Shell terminal session] |
tiian@ubuntu:~$ mkdir tmp tiian@ubuntu:~$ cd tmp tiian@ubuntu:~/tmp$ cp /opt/lixa/share/doc/lixa-X.Y.Z/examples/example10_mys_pql_ora.c . tiian@ubuntu:~/tmp$ gcc example10_mys_pql_ora.c $(/opt/lixa/bin/lixa-config -c -f -m -p -d) \ > $(mysql_config --include --libs_r) -I/usr/include/postgresql -lpq \ > -I/usr/lib/oracle/xe/app/oracle/product/10.2.0/server/rdbms/public \ > -L/usr/lib/oracle/xe/app/oracle/product/10.2.0/server/lib -lclntsh -lnnz10 \ > -o example10_mys_pql_ora |
Verify the executable produced by gcc:
| [Shell terminal session] |
tiian@ubuntu:~/tmp$ ldd example10_mys_pql_ora
linux-gate.so.1 => (0xb774b000)
liblixac.so.0 => /opt/lixa/lib/liblixac.so.0 (0xb7730000)
liblixapq.so.0 => /opt/lixa/lib/liblixapq.so.0 (0xb7729000)
liblixamy.so.0 => /opt/lixa/lib/liblixamy.so.0 (0xb7720000)
libmysqlclient_r.so.15 => /usr/lib/libmysqlclient_r.so.15 (0xb7530000)
libpq.so.5 => /usr/lib/libpq.so.5 (0xb7511000)
libclntsh.so.10.1 => not found
libnnz10.so => not found
libc.so.6 => /lib/tls/i686/cmov/libc.so.6 (0xb73c1000)
libgmodule-2.0.so.0 => /usr/lib/libgmodule-2.0.so.0 (0xb73bd000)
libdl.so.2 => /lib/tls/i686/cmov/libdl.so.2 (0xb73b9000)
libgthread-2.0.so.0 => /usr/lib/libgthread-2.0.so.0 (0xb73b4000)
librt.so.1 => /lib/tls/i686/cmov/librt.so.1 (0xb73ab000)
libglib-2.0.so.0 => /usr/lib/libglib-2.0.so.0 (0xb72fa000)
libxml2.so.2 => /usr/lib/libxml2.so.2 (0xb71d9000)
liblixab.so.0 => /opt/lixa/lib/liblixab.so.0 (0xb71c4000)
libm.so.6 => /lib/tls/i686/cmov/libm.so.6 (0xb719f000)
libpthread.so.0 => /lib/tls/i686/cmov/libpthread.so.0 (0xb7187000)
libcrypt.so.1 => /lib/tls/i686/cmov/libcrypt.so.1 (0xb7155000)
libnsl.so.1 => /lib/tls/i686/cmov/libnsl.so.1 (0xb713c000)
libz.so.1 => /usr/lib/libz.so.1 (0xb7127000)
libssl.so.0.9.8 => /usr/lib/i686/cmov/libssl.so.0.9.8 (0xb70e1000)
libcrypto.so.0.9.8 => /usr/lib/i686/cmov/libcrypto.so.0.9.8 (0xb6f9f000)
libkrb5.so.3 => /usr/lib/libkrb5.so.3 (0xb6f12000)
libcom_err.so.2 => /lib/libcom_err.so.2 (0xb6f0e000)
libgssapi_krb5.so.2 => /usr/lib/libgssapi_krb5.so.2 (0xb6ee5000)
libldap_r-2.4.so.2 => /usr/lib/libldap_r-2.4.so.2 (0xb6ea5000)
/lib/ld-linux.so.2 (0xb774c000)
libpcre.so.3 => /usr/lib/libpcre.so.3 (0xb6e7e000)
libuuid.so.1 => /lib/libuuid.so.1 (0xb6e7a000)
libk5crypto.so.3 => /usr/lib/libk5crypto.so.3 (0xb6e56000)
libkrb5support.so.0 => /usr/lib/libkrb5support.so.0 (0xb6e4e000)
libkeyutils.so.1 => /lib/libkeyutils.so.1 (0xb6e4b000)
libresolv.so.2 => /lib/tls/i686/cmov/libresolv.so.2 (0xb6e38000)
liblber-2.4.so.2 => /usr/lib/liblber-2.4.so.2 (0xb6e2b000)
libsasl2.so.2 => /usr/lib/libsasl2.so.2 (0xb6e13000)
libgnutls.so.13 => /usr/lib/libgnutls.so.13 (0xb6d9d000)
libtasn1.so.3 => /usr/lib/libtasn1.so.3 (0xb6d8d000)
libgcrypt.so.11 => /lib/libgcrypt.so.11 (0xb6d40000)
libgpg-error.so.0 => /lib/libgpg-error.so.0 (0xb6d3c000)
|
There are five unresolved references that can be fixed setting up the environment properly:
| [Shell terminal session] |
tiian@ubuntu:~/tmp$ echo $LD_LIBRARY_PATH tiian@ubuntu:~/tmp$ . /usr/lib/oracle/xe/app/oracle/product/10.2.0/server/bin/oracle_env.sh tiian@ubuntu:~/tmp$ echo $LD_LIBRARY_PATH /usr/lib/oracle/xe/app/oracle/product/10.2.0/server/lib: |
Check again the executable:
| [Shell terminal session] |
tiian@ubuntu:~/tmp$ ldd example10_mys_pql_ora linux-gate.so.1 => (0xb77c3000)
liblixac.so.0 => /opt/lixa/lib/liblixac.so.0 (0xb77a8000)
liblixapq.so.0 => /opt/lixa/lib/liblixapq.so.0 (0xb77a1000)
liblixamy.so.0 => /opt/lixa/lib/liblixamy.so.0 (0xb7798000)
libmysqlclient_r.so.15 => /usr/lib/libmysqlclient_r.so.15 (0xb75a8000)
libpq.so.5 => /usr/lib/libpq.so.5 (0xb7589000)
libclntsh.so.10.1 => /usr/lib/oracle/xe/app/oracle/product/10.2.0/server/lib/libclntsh.so.10.1 (0xb67d5000)
libnnz10.so => /usr/lib/oracle/xe/app/oracle/product/10.2.0/server/lib/libnnz10.so (0xb65d0000)
libc.so.6 => /lib/tls/i686/cmov/libc.so.6 (0xb6480000)
libgmodule-2.0.so.0 => /usr/lib/libgmodule-2.0.so.0 (0xb647c000)
libdl.so.2 => /lib/tls/i686/cmov/libdl.so.2 (0xb6478000)
libgthread-2.0.so.0 => /usr/lib/libgthread-2.0.so.0 (0xb6473000)
librt.so.1 => /lib/tls/i686/cmov/librt.so.1 (0xb646a000)
libglib-2.0.so.0 => /usr/lib/libglib-2.0.so.0 (0xb63b9000)
libxml2.so.2 => /usr/lib/libxml2.so.2 (0xb6298000)
liblixab.so.0 => /opt/lixa/lib/liblixab.so.0 (0xb6283000)
libm.so.6 => /lib/tls/i686/cmov/libm.so.6 (0xb625e000)
libpthread.so.0 => /lib/tls/i686/cmov/libpthread.so.0 (0xb6246000)
libcrypt.so.1 => /lib/tls/i686/cmov/libcrypt.so.1 (0xb6214000)
libnsl.so.1 => /lib/tls/i686/cmov/libnsl.so.1 (0xb61fb000)
libz.so.1 => /usr/lib/libz.so.1 (0xb61e6000)
libssl.so.0.9.8 => /usr/lib/i686/cmov/libssl.so.0.9.8 (0xb61a0000)
libcrypto.so.0.9.8 => /usr/lib/i686/cmov/libcrypto.so.0.9.8 (0xb605e000)
libkrb5.so.3 => /usr/lib/libkrb5.so.3 (0xb5fd1000)
libcom_err.so.2 => /lib/libcom_err.so.2 (0xb5fcd000)
libgssapi_krb5.so.2 => /usr/lib/libgssapi_krb5.so.2 (0xb5fa4000)
libldap_r-2.4.so.2 => /usr/lib/libldap_r-2.4.so.2 (0xb5f64000)
/lib/ld-linux.so.2 (0xb77c4000)
libpcre.so.3 => /usr/lib/libpcre.so.3 (0xb5f3d000)
libuuid.so.1 => /lib/libuuid.so.1 (0xb5f39000)
libk5crypto.so.3 => /usr/lib/libk5crypto.so.3 (0xb5f15000)
libkrb5support.so.0 => /usr/lib/libkrb5support.so.0 (0xb5f0d000)
libkeyutils.so.1 => /lib/libkeyutils.so.1 (0xb5f0a000)
libresolv.so.2 => /lib/tls/i686/cmov/libresolv.so.2 (0xb5ef7000)
liblber-2.4.so.2 => /usr/lib/liblber-2.4.so.2 (0xb5eea000)
libsasl2.so.2 => /usr/lib/libsasl2.so.2 (0xb5ed2000)
libgnutls.so.13 => /usr/lib/libgnutls.so.13 (0xb5e5c000)
libtasn1.so.3 => /usr/lib/libtasn1.so.3 (0xb5e4c000)
libgcrypt.so.11 => /lib/libgcrypt.so.11 (0xb5dff000)
libgpg-error.so.0 => /lib/libgpg-error.so.0 (0xb5dfb000)
|
Set-up the necessary environment variables:
| [Shell terminal session] |
tiian@ubuntu:~/tmp$ echo $LIXA_PROFILE tiian@ubuntu:~/tmp$ export LIXA_PROFILE=MYS_STA_PQL_STA_ORA_DYN tiian@ubuntu:~/tmp$ echo $LIXA_PROFILE MYS_STA_PQL_STA_ORA_DYN |
It is suggested to set the necessary environment variables in your
profile if you are going to execute the programs many times.
This is the list of the suggested variables:
LD_LIBRARY_PATH,
LIXA_PROFILE,
ORACLE_HOME,
ORACLE_SID,
PATH.
We set LIXA_PROFILE to value
“MYS_STA_PQL_STA_ORA_DYN”, looking at
/opt/lixa/etc/lixac_conf.xml:
<profile name="MYS_STA_PQL_STA_ORA_DYN">
<sttsrvs>
<sttsrv>local_1</sttsrv>
</sttsrvs>
<rsrmgrs>
<rsrmgr>MySQL_stareg</rsrmgr>
<rsrmgr>PostgreSQL_stareg</rsrmgr>
<rsrmgr>OracleXE_dynreg</rsrmgr>
</rsrmgrs>
</profile>
the profile references three Resource Managers: “MySQL_stareg”, “PostgreSQL_stareg” and “OracleXE_dynreg”, looking again at the config file:
<rsrmgr name="MySQL_stareg" switch_file="/opt/lixa/lib/switch_mysql_stareg.so" xa_open_info="host=localhost,user=lixa,passwd=,db=lixa,client_flag=0" xa_close_info="" />
<rsrmgr name="PostgreSQL_stareg" switch_file="/opt/lixa/lib/switch_postgresql_stareg.so" xa_open_info="dbname=testdb" xa_close_info="" />
<rsrmgr name="OracleXE_dynreg" switch_file="/opt/lixa/lib/switch_oracle_dynreg.so" xa_open_info="Oracle_XA+Acc=P/hr/hr+SesTm=30+LogDir=/tmp+threads=true+DbgFl=7+Loose_Coupling=true" xa_close_info="" />
we can discover how our application will access the resource managers [34] [35] [36].
Verify no (Oracle) trace file exists:
tiian@ubuntu:~/tmp$ ls -la /tmp/xa* ls: cannot access /tmp/xa*: No such file or directory
It is suggested to open four different terminals: the first one connected to “lixa” MySQL database, the second one connected to “testdb” PostgreSQL database, the third one connected to Oracle database and the fourth one pointing to the directory where the compiled program example10_mys_pql_ora lives.
| [MySQL terminal session] |
tiian@ubuntu:~$ mysql -h localhost -u lixa lixa Reading table information for completion of table and column names You can turn off this feature to get a quicker startup with -A Welcome to the MySQL monitor. Commands end with ; or \g. Your MySQL connection id is 37 Server version: 5.0.51a-3ubuntu5.8 (Ubuntu) Type 'help;' or '\h' for help. Type '\c' to clear the buffer. mysql> |
| [PostgreSQL terminal session] |
tiian@ubuntu:~$ psql testdb
Welcome to psql 8.3.15, the PostgreSQL interactive terminal.
Type: \copyright for distribution terms
\h for help with SQL commands
\? for help with psql commands
\g or terminate with semicolon to execute query
\q to quit
testdb=>
|
| [Oracle terminal session] |
tiian@ubuntu:~$ . /usr/lib/oracle/xe/app/oracle/product/10.2.0/server/bin/oracle_env.sh tiian@ubuntu:~$ sqlplus "hr/hr" SQL*Plus: Release 10.2.0.1.0 - Production on Tue May 3 21:52:06 2011 Copyright (c) 1982, 2005, Oracle. All rights reserved. Connected to: Oracle Database 10g Express Edition Release 10.2.0.1.0 - Production SQL> |
| [Shell terminal session] |
tiian@ubuntu:~/tmp$ ls -la total 152 drwxr-xr-x 2 tiian tiian 4096 2011-11-11 21:06 . drwxr-xr-x 40 tiian tiian 4096 2011-11-11 15:47 .. -rwxr-xr-x 1 tiian tiian 12317 2011-11-11 21:06 example10_mys_pql_ora -rw-r--r-- 1 tiian tiian 8422 2011-11-11 21:05 example10_mys_pql_ora.c |
Check the content of the MySQL table (“authors”):
| [MySQL terminal session] |
mysql> SELECT * FROM authors; Empty set (0.02 sec) |
Check the content of the PostgreSQL table (“AUTHORS”):
| [PostgreSQL terminal session] |
testdb=> select * from AUTHORS; id | last_name | first_name ----+-----------+------------ (0 rows) |
Check the content of the Oracle table (“COUNTRIES”):
| [Oracle terminal session] |
SQL> select * from COUNTRIES where COUNTRY_ID = 'RS'; no rows selected |
Insert a row in all the tables and check the contents of the tables after the transaction execution:
| [Shell terminal session] |
tiian@ubuntu:~/tmp$ ./example10_mys_pql_ora insert Inserting a row in MySQL table... Inserting a row in PostgreSQL table... Inserting a row in Oracle table... |
Now you can verify the content of the tables after the transaction:
| [MySQL terminal session] |
mysql> SELECT * FROM authors; +----+-----------+------------+ | id | last_name | first_name | +----+-----------+------------+ | 1 | Foo | Bar | +----+-----------+------------+ 1 row in set (0.00 sec) |
| [PostgreSQL terminal session] |
testdb=> select * from AUTHORS; id | last_name | first_name ----+-----------+------------ 1 | Foo | Bar (1 row) |
| [Oracle terminal session] |
SQL> select * from COUNTRIES where COUNTRY_ID = 'RS'; CO COUNTRY_NAME REGION_ID -- ---------------------------------------- ---------- RS Repubblica San Marino 1 |
With the opposite command you can remove the rows from the tables:
| [Shell terminal session] |
tiian@ubuntu:~/tmp$ ./example10_mys_pql_ora delete Deleting a row from MySQL table... Deleting a row from PostgreSQL table... Deleting a row from Oracle table... |
and check the content of the tables again:
| [MySQL terminal session] |
mysql> SELECT * FROM authors; Empty set (0.00 sec) |
| [PostgreSQL terminal session] |
testdb=> select * from AUTHORS; id | last_name | first_name ----+-----------+------------ (0 rows) |
| [Oracle terminal session] |
SQL> select * from COUNTRIES where COUNTRY_ID = 'RS'; no rows selected |
We can verify the dynamic registration behavior of Oracle:
| [Shell terminal session] |
tiian@ubuntu:~/tmp$ export LIXA_TRACE_MASK=0x00002000 tiian@ubuntu:~/tmp$ echo $LIXA_TRACE_MASK 0x00002000 tiian@ubuntu:~/tmp$ ./example10_mys_pql_ora insert 2>&1 | grep ax_reg 2011-11-11 21:39:40.850356 [23176/3051161344] ax_reg: rmid=2, xid=0xbfecc68c, flags=0x0 2011-11-11 21:39:40.850451 [23176/3051161344] ax_reg: the application program has started a transaction (TX states S3); this XID '1279875137.0600c467d21b42b38f1c89d912fc125d.8be5bdb35ba638bb997258e6bd8b9d88' will be returned 2011-11-11 21:39:40.850565 [23176/3051161344] ax_reg: sending 153 bytes to the server for step 8 2011-11-11 21:39:40.850602 [23176/3051161344] ax_reg/excp=7/ret_cod=0/errno=0 |
We can check the static registration behavior of Oracle with a different profile:
| [Shell terminal session] |
tiian@ubuntu:~/tmp$ export LIXA_PROFILE=MYS_STA_PQL_STA_ORA_STA tiian@ubuntu:~/tmp$ echo $LIXA_PROFILE MYS_STA_PQL_STA_ORA_STA tiian@ubuntu:~/tmp$ ./example10_mys_pql_ora delete 2>&1 | grep xa_start 2011-11-11 21:41:52.953050 [23204/3050981120] lixa_xa_start [...] 2011-11-11 21:41:53.005001 [23204/3050981120] lixa_xa_start: xa_start_entry(xid, 0, 0x0) = 0 2011-11-11 21:41:53.007040 [23204/3050981120] lixa_xa_start: xa_start_entry(xid, 1, 0x0) = 0 2011-11-11 21:41:53.009927 [23204/3050981120] lixa_xa_start: xa_start_entry(xid, 2, 0x0) = 0 2011-11-11 21:41:53.010004 [23204/3050981120] lixa_xa_start: sending 352 bytes to the server for step 24 2011-11-11 21:41:53.010095 [23204/3050981120] lixa_xa_start/excp=10/ret_cod=0/errno=0 |
and check the content of the tables again:
| [MySQL terminal session] |
mysql> SELECT * FROM authors; Empty set (0.00 sec) |
| [PostgreSQL terminal session] |
testdb=> select * from AUTHORS; id | last_name | first_name ----+-----------+------------ (0 rows) |
| [Oracle terminal session] |
SQL> select * from COUNTRIES where COUNTRY_ID = 'RS'; no rows selected |
The activity of the Oracle database can be analyzed in the trace file:
| [Shell terminal session] |
tiian@ubuntu:~/tmp$ ls -la /tmp/xa_NULL11112011.trc -rw-r--r-- 1 tiian tiian 22112 2011-11-11 21:47 /tmp/xa_NULL11112011.trc |
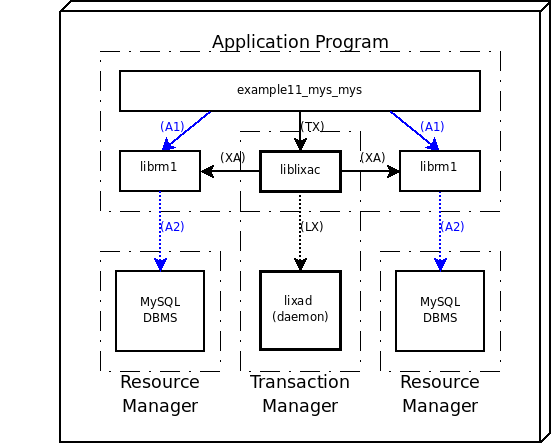
This example shows as you can implement DTP (Distributed Transaction Processing) with two Resource Managers of the same type (MySQL) coordinated by the LIXA Transaction Manager. It's strongly suggested you have played with the examples previously shown in this chapter (see Chapter 5, Developing C Application Programs using TX (Transaction Demarcation) interface) before starting this more complex one.
Note
If you did not yet installed the software provided by MySQL, please refer to the official MySQL site to download the software and to pick-up the information necessary to install and configure the database. This manual does not give you information related to MySQL technology: it is assumed you already installed and configured the database.
Important
The LIXA software must be configured to support the MySQL resource managers as explained in the section called “Linking third party resource managers”. As a little hint, you should configure LIXA as below:
./configure --with-mysql
Please don't forget you must compile and install every time you re-configure.
Please follow the instructions explained
in the section called “MySQL/MariaDB Configuration” to set-up a running environment for MySQL server
in the section called “Starting the state server (lixad)” to start up the LIXA state server
To address a remote MySQL server some additional steps must be completed. The example explained here uses this configuration:
IP address of the server running lixad (LIXA state server), application program and local MySQL server (reached using localhost
127.0.0.1address):192.168.1.2IP address of the server running the remote MySQL server:
192.168.1.3
Connect to server
192.168.1.3
and change the parameter
bind-address in the file
/etc/mysql/my.cnf to allow network reachability:
| [Host:192.168.1.3 /etc/mysql/my.cnf] |
# Instead of skip-networking the default is now to listen only on # localhost which is more compatible and is not less secure. #bind-address = 127.0.0.1 bind-address = 192.168.1.3 |
restart MySQL server:
| [Host:192.168.1.3 terminal session] |
tiian@ubuntu:~$ sudo /etc/init.d/mysql restart [sudo] password for tiian: * Stopping MySQL database server mysqld [ OK ] * Starting MySQL database server mysqld [ OK ] * Checking for corrupt, not cleanly closed and upgrade needing tables. |
connect to that MySQL server from the remote host and grant access to
user lixa from the server
192.168.1.2:
| [Host:192.168.1.3 terminal session] |
tiian@mojan:~$ mysql -u root -p Enter password: Welcome to the MySQL monitor. Commands end with ; or \g. Your MySQL connection id is 11 Server version: 5.0.51a-3ubuntu5.8 (Ubuntu) Type 'help;' or '\h' for help. Type '\c' to clear the buffer. mysql> GRANT ALL ON lixa.* TO 'lixa'@'192.168.1.2'; Query OK, 0 rows affected (0.00 sec) |
now you should be able to connect to the server running at
192.168.1.3
from the server
192.168.1.2:
| [Host:192.168.1.2 terminal session] |
tiian@ubuntu:~$ mysql -h 192.168.1.3 -u lixa lixa Reading table information for completion of table and column names You can turn off this feature to get a quicker startup with -A Welcome to the MySQL monitor. Commands end with ; or \g. Your MySQL connection id is 13 Server version: 5.0.51a-3ubuntu5.8 (Ubuntu) Type 'help;' or '\h' for help. Type '\c' to clear the buffer. |
and you must create the table necessary for the example program:
| [MySQL (remote) terminal session] |
mysql> CREATE TABLE authors (id INTEGER NOT NULL PRIMARY KEY, last_name TEXT, first_name TEXT) ENGINE=InnoDB; Query OK, 0 rows affected (0.01 sec) mysql> DESCRIBE authors; +------------+---------+------+-----+---------+-------+ | Field | Type | Null | Key | Default | Extra | +------------+---------+------+-----+---------+-------+ | id | int(11) | NO | PRI | NULL | | | last_name | text | YES | | NULL | | | first_name | text | YES | | NULL | | +------------+---------+------+-----+---------+-------+ 3 rows in set (0.01 sec) |
Prepare the client (Application Program) using the below commands (gcc command was splitted on several lines using \ to help readability, but you may use a single line):
| [Shell terminal session] |
tiian@ubuntu:~$ mkdir tmp tiian@ubuntu:~$ cd tmp tiian@ubuntu:~/tmp$ cp /opt/lixa/share/doc/lixa-X.Y.Z/examples/example11_mys_mys.c . tiian@ubuntu:~/tmp$ gcc example11_mys_mys.c $(/opt/lixa/bin/lixa-config -c -f -m -d) \ > $(mysql_config --include --libs_r) -o example11_mys_mys |
Verify the executable produced by gcc:
| [Shell terminal session] |
tiian@ubuntu:~/tmp$ ldd example11_mys_mys
linux-gate.so.1 => (0xb777d000)
liblixac.so.0 => /opt/lixa/lib/liblixac.so.0 (0xb7762000)
liblixamy.so.0 => /opt/lixa/lib/liblixamy.so.0 (0xb775a000)
libmysqlclient_r.so.15 => /usr/lib/libmysqlclient_r.so.15 (0xb7569000)
libc.so.6 => /lib/tls/i686/cmov/libc.so.6 (0xb741a000)
libgmodule-2.0.so.0 => /usr/lib/libgmodule-2.0.so.0 (0xb7416000)
libdl.so.2 => /lib/tls/i686/cmov/libdl.so.2 (0xb7412000)
libgthread-2.0.so.0 => /usr/lib/libgthread-2.0.so.0 (0xb740d000)
librt.so.1 => /lib/tls/i686/cmov/librt.so.1 (0xb7403000)
libglib-2.0.so.0 => /usr/lib/libglib-2.0.so.0 (0xb7352000)
libxml2.so.2 => /usr/lib/libxml2.so.2 (0xb7232000)
liblixab.so.0 => /opt/lixa/lib/liblixab.so.0 (0xb721d000)
libpthread.so.0 => /lib/tls/i686/cmov/libpthread.so.0 (0xb7205000)
libcrypt.so.1 => /lib/tls/i686/cmov/libcrypt.so.1 (0xb71d3000)
libnsl.so.1 => /lib/tls/i686/cmov/libnsl.so.1 (0xb71ba000)
libm.so.6 => /lib/tls/i686/cmov/libm.so.6 (0xb7195000)
libz.so.1 => /usr/lib/libz.so.1 (0xb7180000)
/lib/ld-linux.so.2 (0xb777e000)
libpcre.so.3 => /usr/lib/libpcre.so.3 (0xb7159000)
libuuid.so.1 => /lib/libuuid.so.1 (0xb7155000)
|
Set-up the necessary environment variables:
| [Shell terminal session] |
tiian@ubuntu:~/tmp$ echo $LIXA_PROFILE tiian@ubuntu:~/tmp$ export LIXA_PROFILE=MYS_STA_MYS_STA tiian@ubuntu:~/tmp$ echo $LIXA_PROFILE MYS_STA_MYS_STA |
It is suggested to set the necessary environment variable
(LIXA_PROFILE) in your
profile if you are going to execute the programs many times.
We set LIXA_PROFILE to value
“MYS_STA_MYS_STA”, looking at
/opt/lixa/etc/lixac_conf.xml:
<profile name="MYS_STA_MYS_STA">
<sttsrvs>
<sttsrv>local_1</sttsrv>
</sttsrvs>
<rsrmgrs>
<rsrmgr>MySQL_stareg</rsrmgr>
<rsrmgr>MySQL2_stareg</rsrmgr>
</rsrmgrs>
</profile>
the profile references two Resource Managers: “MySQL_stareg” and “MySQL2_stareg” looking again at the config file:
<rsrmgr name="MySQL_stareg" switch_file="/opt/lixa/lib/switch_mysql_stareg.so" xa_open_info="host=localhost,user=lixa,passwd=,db=lixa,client_flag=0" xa_close_info="" />
<rsrmgr name="MySQL2_stareg" switch_file="/opt/lixa/lib/switch_mysql_stareg.so" xa_open_info="host=192.168.1.3,user=lixa,passwd=,db=lixa,client_flag=0" xa_close_info="" />
we can discover how our application will access the resource managers [37].
It is suggested to open three different terminals: the first one connected to “lixa” local MySQL database, the second one connected to “lixa” remote MySQL database and the third one pointing to the directory where the compiled program example11_mys_mys lives.
| [MySQL (local) terminal session] |
tiian@ubuntu:~$ mysql -h localhost -u lixa lixa Reading table information for completion of table and column names You can turn off this feature to get a quicker startup with -A Welcome to the MySQL monitor. Commands end with ; or \g. Your MySQL connection id is 37 Server version: 5.0.51a-3ubuntu5.8 (Ubuntu) Type 'help;' or '\h' for help. Type '\c' to clear the buffer. mysql> |
| [MySQL (remote) terminal session] |
tiian@ubuntu:~$ mysql -h 192.168.1.3 -u lixa lixa Reading table information for completion of table and column names You can turn off this feature to get a quicker startup with -A Welcome to the MySQL monitor. Commands end with ; or \g. Your MySQL connection id is 7 Server version: 5.0.51a-3ubuntu5.8 (Ubuntu) Type 'help;' or '\h' for help. Type '\c' to clear the buffer. |
| [Shell terminal session] |
tiian@ubuntu:~/tmp$ ls -la total 168 drwxr-xr-x 2 tiian tiian 4096 2011-11-13 21:04 . drwxr-xr-x 40 tiian tiian 4096 2011-11-13 19:09 .. -rwxr-xr-x 1 tiian tiian 9201 2011-11-13 21:04 example11_mys_mys -rw-r--r-- 1 tiian tiian 3977 2011-11-13 21:04 example11_mys_mys.c |
Check the content of the (local) MySQL table (“authors”):
| [MySQL (local) terminal session] |
mysql> SELECT * FROM authors; Empty set (0.02 sec) |
Check the content of the (remote) MySQL table (“authors”):
| [MySQL (remote) terminal session] |
mysql> SELECT * FROM authors; Empty set (0.01 sec) |
Insert a row in all the tables and check the contents of the tables after the transaction execution:
| [Shell terminal session] |
tiian@ubuntu:~/tmp$ ./example11_mys_mys insert Inserting a row in MySQL(1) table... Inserting a row in MySQL(2) table... |
Now you can verify the content of the tables after the transaction:
| [MySQL (local) terminal session] |
mysql> SELECT * FROM authors; +----+-----------+------------+ | id | last_name | first_name | +----+-----------+------------+ | 1 | Foo | Bar | +----+-----------+------------+ 1 row in set (0.00 sec) |
| [MySQL (remote) terminal session] |
mysql> SELECT * FROM authors; +----+-----------+------------+ | id | last_name | first_name | +----+-----------+------------+ | 1 | Foo | Bar | +----+-----------+------------+ 1 row in set (0.01 sec) |
With the opposite command you can remove the rows from the tables:
| [Shell terminal session] |
tiian@ubuntu:~/tmp$ ./example11_mys_mys delete Deleting a row from MySQL(1) table... Deleting a row from MySQL(2) table... |
and check the content of the tables again:
| [MySQL (local) terminal session] |
mysql> SELECT * FROM authors; Empty set (0.00 sec) |
| [MySQL (remote) terminal session] |
mysql> SELECT * FROM authors; Empty set (0.00 sec) |
Finally, you can verify the two phase commit protocol is running as expected. Insert a row in all the tables:
| [Shell terminal session] |
tiian@ubuntu:~/tmp$ ./example11_mys_mys insert Inserting a row in MySQL(1) table... Inserting a row in MySQL(2) table... |
manually remove the row from the local MySQL server only:
| [MySQL (local) terminal session] |
mysql> SELECT * FROM authors; +----+-----------+------------+ | id | last_name | first_name | +----+-----------+------------+ | 1 | Foo | Bar | +----+-----------+------------+ 1 row in set (0.00 sec) mysql> DELETE FROM authors; Query OK, 1 row affected (0.01 sec) mysql> SELECT * FROM authors; Empty set (0.00 sec) |
try to insert the row again in all the tables:
| [Shell terminal session] |
tiian@ubuntu:~/tmp$ ./example11_mys_mys insert Inserting a row in MySQL(1) table... Inserting a row in MySQL(2) table... INSERT INTO authors: 1062/Duplicate entry '1' for key 1 |
the first (local) INSERT is ok, while the second one can not be performed due to a duplicated key. Check the content of the tables again:
| [MySQL (local) terminal session] |
mysql> SELECT * FROM authors; Empty set (0.00 sec) |
| [MySQL (remote) terminal session] |
mysql> SELECT * FROM authors; +----+-----------+------------+ | id | last_name | first_name | +----+-----------+------------+ | 1 | Foo | Bar | +----+-----------+------------+ 1 row in set (0.01 sec) |
If you inspect the program source code you will discover what the program will do:
example11_mys_mys.c |
[...]
printf("Inserting a row in MySQL(2) table...\n");
if (mysql_query(conn2,
"INSERT INTO authors VALUES(1, 'Foo', 'Bar')")) {
fprintf(stderr, "INSERT INTO authors: %u/%s\n",
mysql_errno(conn2), mysql_error(conn2));
exit_nicely(conn1, conn2);
}
[...]
|
in case of error the program exits closing the connections...
XA protocol is a “two phase commit with presumed
rollback”: if the transaction does not complete
xa_prepare, the transaction will be rolled back.
An alternative way is the usage of tx_rollback():
you can rollback the current transaction and start a new one without
program (and connection) termination.
Clean up the (remote) table:
| [MySQL (remote) terminal session] |
mysql> DELETE FROM authors; Query OK, 1 row affected (0.04 sec) mysql> SELECT * FROM authors; Empty set (0.00 sec) |
WebSphere MQ is a proprietary commercial product supplied by IBM Corporation: the LIXA project tested its behavior when managed by LIXA Transaction Manager using a trial copy. At the time of this writing, the author does not know if a reduced “express” or “community” edition exists. If you are interested in LIXA and WebSphere MQ you probably already have a valid license to run the software supplied by IBM.
WebSphere MQ is a special type of Resource Manager because:
it can work as a Transaction Manager as well as a Resource Manager; LIXA does not use WebSphere MQ as a Transaction Manager, but only as a Resource Manager. If you were interested in the Transaction Manager feature of WebSphere MQ, you should stop this reading and go to the IBM official documentation
the WebSphere MQ Resource Manager can be interfaced by a standard XA Transaction Manager using two different configurations: server (bind) and Extended Transactional Client
To use this mode, the WebSphere MQ queue manager used by your Application Program must reside inside the same host of your Application Program: the communication between your Application Program and the queue manager uses interprocess communication (UNIX System V IPC). The interface is really fast, but you can not travel a network (LAN/MAN/WAN) using it. If your Application Program and the queue manager are hosted by different systems, you will have to use the ETC mode.
You can use this mode every time your Application Program can reach the desired queue manager using a network: it's usually an IP network, but WebSphere MQ gives you different choices if you have to deal with some special non IP based environment like a SNA network.
You should pay attention the Extended Transactional Client (ETC) is not a basic client: you must install a specific package and you must pay a specific license to use it. This is not an IBM site, contact your IBM vendor to pick-up all the necessary information.
The basic/standard WebSphere MQ client can not be used in conjunction with LIXA because it does not support the XA protocol.
Important
You must not configure and build LIXA to use WebSphere with server/bind mode and build your Application Program to use WebSphere with ETC mode, or vice versa. If you did it, you would catch unexpected behaviors.
Important
The LIXA software must be configured to support the WebSphere MQ Resource Manager as explained in the section called “Linking third party resource managers”.
LIXA project provides lixa-config to retrieve how the LIXA was configured and built:
| [Shell terminal session] |
[tiian@centos lixa]$ /opt/lixa/bin/lixa-config --rsrc-mngrs DB2 no MySQL yes Oracle no PostgreSQL yes WebSphereMQ yes (ETC) |
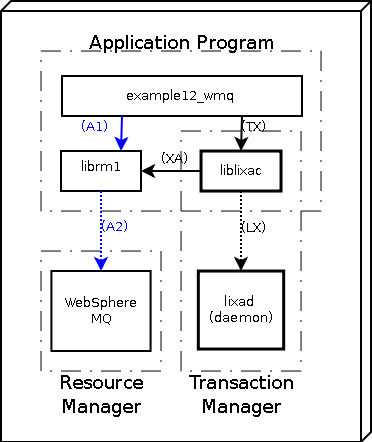
This example was developed using WebSphere MQ 7.1 for Linux (32 bit) and CentOS 6.2 (32 bit).
Note
If you did not yet installed the software, please refer to IBM official documentation. You should need at least these packages for server/bind mode:
MQSeriesServer
MQSeriesSDK
MQSeriesRuntime
You should need at least these packages for ETC mode:
MQSeriesTXClient
MQSeriesSDK
MQSeriesRuntime
MQSeriesJava
These are the necessary configuration steps to create the environment
to run the supplied example (example12_wmq.c).
First, you must set the correct environment for your shell:
| [Shell terminal session] |
[tiian@centos manuals]$ su - Password: [tiian@centos manuals]$ cd [tiian@centos ~]$ su - Password: [root@centos ~]# su - mqm -bash-4.1$ . /opt/mqm71/bin/setmqenv -s -bash-4.1$ dspmqver Name: WebSphere MQ Version: 7.1.0.0 Level: p000-L111024 BuildType: IKAP - (Production) Platform: WebSphere MQ for Linux (x86 platform) Mode: 32-bit O/S: Linux 2.6.32-220.el6.i686 InstName: Installation1 InstDesc: InstPath: /opt/mqm71 DataPath: /var/mqm Primary: No MaxCmdLevel: 710 |
Note
I installed the product in /opt/mqm71:
adjust the command to reflect your real installation path.
Create a queue manager named “LIXA” and start it:
| [Shell terminal session] |
-bash-4.1$ crtmqm LIXA There are 90 days left in the trial period for this copy of WebSphere MQ. WebSphere MQ queue manager created. Directory '/var/mqm/qmgrs/LIXA' created. The queue manager is associated with installation 'Installation1'. Creating or replacing default objects for queue manager 'LIXA'. Default objects statistics : 71 created. 0 replaced. 0 failed. Completing setup. Setup completed. -bash-4.1$ strmqm LIXA There are 90 days left in the trial period for this copy of WebSphere MQ. WebSphere MQ queue manager 'LIXA' starting. The queue manager is associated with installation 'Installation1'. 5 log records accessed on queue manager 'LIXA' during the log replay phase. Log replay for queue manager 'LIXA' complete. Transaction manager state recovered for queue manager 'LIXA'. WebSphere MQ queue manager 'LIXA' started using V7.1.0.0. |
Create a test queue named “LIXA.QLOCAL”
| [Shell terminal session] |
-bash-4.1$ runmqsc LIXA
5724-H72 (C) Copyright IBM Corp. 1994, 2011. ALL RIGHTS RESERVED.
Starting MQSC for queue manager LIXA.
DEFINE QLOCAL(LIXA.QLOCAL)
1 : DEFINE QLOCAL(LIXA.QLOCAL)
AMQ8006: WebSphere MQ queue created.
end
2 : end
One MQSC command read.
No commands have a syntax error.
All valid MQSC commands were processed.
|
try to put/get a message into/from it using your own user
(mine is lixa):
| [Shell terminal session] |
[tiian@centos ~]$ . /opt/mqm71/bin/setmqenv -s [tiian@centos ~]$ cd /opt/mqm71/samp/bin [tiian@centos bin]$ ./amqsput LIXA.QLOCAL LIXA Sample AMQSPUT0 start target queue is LIXA.QLOCAL This is a test message Sample AMQSPUT0 end [tiian@centos bin]$ ./amqsget LIXA.QLOCAL LIXA Sample AMQSGET0 start message <This is a test message> no more messages Sample AMQSGET0 end |
Please refer to IBM documentation for runmqsc, amqsput, amqsget commands.
Now you can create the definition necessary for WebSphere MQ client
mode. First, authorize your user to connect to the queue manager
using a user not connected to
mqm group
(change tiian with your
own user):
| [Shell terminal session] |
-bash-4.1$ runmqsc LIXA
5724-H72 (C) Copyright IBM Corp. 1994, 2011. ALL RIGHTS RESERVED.
Starting MQSC for queue manager LIXA.
DISPLAY QMGR CHLAUTH
1 : DISPLAY QMGR CHLAUTH
AMQ8408: Display Queue Manager details.
QMNAME(LIXA) CHLAUTH(ENABLED)
SET AUTHREC OBJTYPE(QMGR) PRINCIPAL('tiian') AUTHADD(CONNECT)
2 : SET AUTHREC OBJTYPE(QMGR) PRINCIPAL('tiian') AUTHADD(CONNECT)
AMQ8862: WebSphere MQ authority record set.
SET AUTHREC PROFILE(LIXA.QLOCAL) OBJTYPE(QUEUE) PRINCIPAL('tiian')
AUTHADD(PUT,GET)
3 : SET AUTHREC PROFILE(LIXA.QLOCAL) OBJTYPE(QUEUE) PRINCIPAL('tiian')
AUTHADD(PUT,GET)
AMQ8862: WebSphere MQ authority record set.
end
4 : end
3 MQSC commands read.
No commands have a syntax error.
All valid MQSC commands were processed.
|
Then create a connection channel, authorize it to your user
(change tiian) and
a listener:
| [Shell terminal session] |
-bash-4.1$ runmqsc LIXA
5724-H72 (C) Copyright IBM Corp. 1994, 2011. ALL RIGHTS RESERVED.
Starting MQSC for queue manager LIXA.
DEFINE CHANNEL (LIXA.CHANNEL) CHLTYPE (SVRCONN) TRPTYPE (TCP)
1 : DEFINE CHANNEL (LIXA.CHANNEL) CHLTYPE (SVRCONN) TRPTYPE (TCP)
AMQ8014: WebSphere MQ channel created.
SET CHLAUTH(LIXA.CHANNEL) TYPE(ADDRESSMAP) ADDRESS('127.0.0.1')
MCAUSER('tiian')
2 : SET CHLAUTH(LIXA.CHANNEL) TYPE(ADDRESSMAP) ADDRESS('127.0.0.1')
MCAUSER('tiian')
AMQ8877: WebSphere MQ channel authentication record set.
DEFINE LISTENER (LIXA.LISTENER) TRPTYPE (TCP) CONTROL (QMGR) PORT(1414)
3 : DEFINE LISTENER (LIXA.LISTENER) TRPTYPE (TCP) CONTROL (QMGR)
PORT(1414)
AMQ8626: WebSphere MQ listener created.
START LISTENER(LIXA.LISTENER)
4 : START LISTENER(LIXA.LISTENER)
AMQ8021: Request to start WebSphere MQ listener accepted.
end
5 : end
4 MQSC commands read.
No commands have a syntax error.
All valid MQSC commands were processed.
|
Now you can try the TCP/IP client connection using
your own user (mine is
tiian):
| [Shell terminal session] |
[tiian@centos ~]$ export MQSERVER=LIXA.CHANNEL/TCP/'127.0.0.1(1414)' [tiian@centos ~]$ echo $MQSERVER LIXA.CHANNEL/TCP/127.0.0.1(1414) [tiian@centos ~]$ cd /opt/mqm71/samp/bin [tiian@centos bin]$ . /opt/mqm71/bin/setmqenv -s [tiian@centos bin]$ ./amqsputc LIXA.QLOCAL LIXA Sample AMQSPUT0 start target queue is LIXA.QLOCAL This is a test message (from client) Sample AMQSPUT0 end [tiian@centos bin]$ ./amqsgetc LIXA.QLOCAL LIXA Sample AMQSGET0 start message <This is a test message (from client)> no more messages Sample AMQSGET0 end |
Please refer to IBM documentation for runmqsc, amqsputc, amqsgetc commands.
OK, the “LIXA.QLOCAL” local queue was created and it's usable. If something went wrong, you should refer to WebSphere MQ documentation to fix the issue before the next step because you would not be able to execute the sample program without a basic running installation.
Start the state server as shown below:
| [Shell terminal session] |
[tiian@centos ~]$ su - Password: [root@centos ~]# su - lixa [lixa@centos ~]$ /opt/lixa/sbin/lixad --daemon [lixa@centos ~]$ exit logout [root@centos ~]# exit logout [tiian@centos ~]$ ps -ef|grep lixad|grep -v grep lixa 3589 1 0 12:30 ? 00:00:00 /opt/lixa/sbin/lixad --daemon |
Prepare the client (Application Program) using the below commands (gcc command was splitted on several lines using \ to help readability, but you may use a single line):
| [Shell terminal session] |
[tiian@centos ~]$ mkdir tmp [tiian@centos ~]$ cd tmp [tiian@centos tmp]$ cp /opt/lixa/share/doc/lixa-X.Y.Z/examples/example12_wmq.c . [tiian@centos tmp]$ /opt/lixa/bin/lixa-config -r|grep WebSphereMQ WebSphereMQ yes (SRV) [tiian@centos tmp]$ gcc example12_wmq.c $(/opt/lixa/bin/lixa-config -c -f -l -d) \ > -I/opt/mqm71/inc -L/opt/mqm71/lib -Wl,-rpath=/opt/mqm71/lib \ > -lmqm_r -o example12_wmq |
Verify the executable produced by gcc:
| [Shell terminal session] |
[tiian@centos tmp]$ ldd example12_wmq
linux-gate.so.1 => (0x00852000)
liblixac.so.0 => /opt/lixa/lib/liblixac.so.0 (0x00cfc000)
libmqm_r.so => /opt/mqm71/lib/libmqm_r.so (0x00a7f000)
libc.so.6 => /lib/libc.so.6 (0x00110000)
libgmodule-2.0.so.0 => /lib/libgmodule-2.0.so.0 (0x00da2000)
libgthread-2.0.so.0 => /lib/libgthread-2.0.so.0 (0x00da8000)
librt.so.1 => /lib/librt.so.1 (0x00bca000)
libglib-2.0.so.0 => /lib/libglib-2.0.so.0 (0x00bd5000)
libxml2.so.2 => /usr/lib/libxml2.so.2 (0x02d3c000)
liblixab.so.0 => /opt/lixa/lib/liblixab.so.0 (0x00daf000)
libm.so.6 => /lib/libm.so.6 (0x00b9e000)
libpthread.so.0 => /lib/libpthread.so.0 (0x00b81000)
libmqe_r.so => /opt/mqm71/lib/libmqe_r.so (0xb6f70000)
libdl.so.2 => /lib/libdl.so.2 (0x00b7a000)
/lib/ld-linux.so.2 (0x009c2000)
libz.so.1 => /lib/libz.so.1 (0x00ce1000)
libuuid.so.1 => /lib/libuuid.so.1 (0x0076f000)
|
Set-up the LIXA_PROFILE environment variable:
| [Shell terminal session] |
[tiian@centos tmp]$ echo $LIXA_PROFILE [tiian@centos tmp]$ export LIXA_PROFILE=MQS_DYN [tiian@centos tmp]$ echo $LIXA_PROFILE MQS_DYN |
We set LIXA_PROFILE to value
“MQS_DYN”, looking at
/opt/lixa/etc/lixac_conf.xml:
<profile name="MQS_DYN">
<sttsrvs>
<sttsrv>local_1</sttsrv>
</sttsrvs>
<rsrmgrs>
<rsrmgr>WSMQ_SRV_dynreg</rsrmgr>
</rsrmgrs>
</profile>
the profile references the Resource Manager named “WSMQ_SRV_dynreg”, looking again at the config file:
<rsrmgr name="WSMQ_SRV_dynreg" switch_file="/opt/lixa/lib/switch_wsmq_dynreg.so" xa_open_info="axlib=/opt/lixa/lib/liblixac.so,qmname=LIXA,tpm=lixa" xa_close_info="" />
we can discover how the WebSphere MQ Resource Manager is configured for XA [38].
| [Shell terminal session] |
[tiian@centos tmp]$ ls -la total 116 drwxrwxr-x 2 tiian tiian 4096 Mar 16 17:04 . drwx------ 8 tiian tiian 4096 Mar 16 13:10 .. -rwxrwxr-x 1 tiian tiian 9587 Mar 16 17:04 example12_wmq -rw-r--r-- 1 tiian tiian 5342 Mar 16 13:13 example12_wmq.c |
Retrieve all the messages from “LIXA.QLOCAL” queue before program execution:
| [Shell terminal session] |
[tiian@centos tmp]$ . /opt/mqm71/bin/setmqenv -s [tiian@centos tmp]$ /opt/mqm71/samp/bin/amqsget LIXA.QLOCAL LIXA Sample AMQSGET0 start no more messages Sample AMQSGET0 end |
Execute the program:
| [Shell terminal session] |
[tiian@centos tmp]$ ./example12_wmq insert target queue is LIXA.QLOCAL Message inserted in queue LIXA.QLOCAL: 'Test message for LIXA' |
Check the content of the queue:
| [Shell terminal session] |
[tiian@centos tmp]$ /opt/mqm71/samp/bin/amqsget LIXA.QLOCAL LIXA Sample AMQSGET0 start message <Test message for LIXA> no more messages Sample AMQSGET0 end |
Now you can try to remove a message inserted with the standard utility:
| [Shell terminal session] |
[tiian@centos tmp]$ /opt/mqm71/samp/bin/amqsput LIXA.QLOCAL LIXA Sample AMQSPUT0 start target queue is LIXA.QLOCAL This is a sample message from the keyboard! Sample AMQSPUT0 end [tiian@centos tmp]$ ./example12_wmq delete target queue is LIXA.QLOCAL Message retrieved from queue LIXA.QLOCAL: 'This is a sample message from the keyboard!' |
you can verify in file
/opt/lixa/etc/lixac_conf.xml
that “MQS_DYN” is associated to dynamic registration.
Execute the program enabling trace:
| [Shell terminal session] |
[tiian@centos tmp]$ export LIXA_TRACE_MASK=0x00002000 [tiian@centos tmp]$ echo $LIXA_TRACE_MASK 0x00002000 [tiian@centos tmp]$ ./example12_wmq insert 2>&1 | grep ax_reg 2012-03-16 18:36:23.500382 [14774/3078875408] ax_reg: rmid=0, xid=0xbffaf630, flags=0x0 2012-03-16 18:36:23.500581 [14774/3078875408] ax_reg: the application program has started a transaction (TX states S3); this XID '1279875137.846a8fdfe2204b11ac85586a13fc0348.9a910775bb747f3c157021d6a03a7b31' will be returned 2012-03-16 18:36:23.501290 [14774/3078875408] ax_reg: sending 153 bytes to the server for step 8 2012-03-16 18:36:23.501965 [14774/3078875408] ax_reg/excp=7/ret_cod=0/errno=1 |
Changing LIXA_PROFILE you can try the static
registration as well:
| [Shell terminal session] |
[tiian@centos tmp]$ export LIXA_PROFILE=MQS_STA [tiian@centos tmp]$ echo $LIXA_PROFILE MQC_STA [tiian@centos tmp]$ ./example12_wmq delete 2>&1 | grep xa_start 2012-03-16 18:38:08.942458 [14784/3078269200] lixa_xa_start 2012-03-16 18:38:08.942644 [14784/3078269200] lixa_xa_start: sending 213 bytes to the server for step 8 [...] 2012-03-16 18:38:08.946569 [14784/3078269200] lixa_xa_start: xa_start_entry(xid, 0, 0x0) = 0 2012-03-16 18:38:08.947188 [14784/3078269200] lixa_xa_start: sending 210 bytes to the server for step 24 2012-03-16 18:38:08.947521 [14784/3078269200] lixa_xa_start/excp=10/ret_cod=0/errno=1 |
To try tx_rollback() you have to slightly
change the sample program:
| [original example12_wmq.c] |
[...]
if (TX_OK != (txrc = tx_commit())) {
fprintf(stderr, "tx_commit error: %d\n", txrc);
exit(txrc);
}
/*
if (TX_OK != (txrc = tx_rollback())) {
fprintf(stderr, "tx_rollback error: %d\n", txrc);
exit(txrc);
}
*/
[...]
|
move the comment from tx_rollback() function
block to tx_rollback() function block:
| [modified example12_wmq.c] |
[...]
/*
if (TX_OK != (txrc = tx_commit())) {
fprintf(stderr, "tx_commit error: %d\n", txrc);
exit(txrc);
}
*/
if (TX_OK != (txrc = tx_rollback())) {
fprintf(stderr, "tx_rollback error: %d\n", txrc);
exit(txrc);
}
[...]
|
Compile it again and try the modified example:
| [Shell terminal session] |
[tiian@centos tmp]$ gcc example12_wmq.c $(/opt/lixa/bin/lixa-config -c -f -l -d) \ > -I/opt/mqm71/inc -L/opt/mqm71/lib -Wl,-rpath=/opt/mqm71/lib \ > -lmqm_r -o example12_wmq |
Verify the queue is empty, execute the sample program, verify the queue is empty again:
| [Shell terminal session] |
[tiian@centos tmp]$ unset LIXA_TRACE_MASK [tiian@centos tmp]$ /opt/mqm71/samp/bin/amqsget LIXA.QLOCAL LIXA Sample AMQSGET0 start no more messages Sample AMQSGET0 end [tiian@centos tmp]$ ./example12_wmq insert target queue is LIXA.QLOCAL Message inserted in queue LIXA.QLOCAL: 'Test message for LIXA' [tiian@centos tmp]$ /opt/mqm71/samp/bin/amqsget LIXA.QLOCAL LIXA Sample AMQSGET0 start no more messages Sample AMQSGET0 end |
Restore example12_wmq.c to the original state.
Prepare the client (Application Program) using the below commands (gcc command was splitted on several lines using \ to help readability, but you may use a single line):
| [Shell terminal session] |
[tiian@centos ~]$ mkdir tmp [tiian@centos ~]$ cd tmp [tiian@centos tmp]$ cp /opt/lixa/share/doc/lixa-X.Y.Z/examples/example12_wmq.c . [tiian@centos tmp]$ /opt/lixa/bin/lixa-config -r|grep WebSphereMQ WebSphereMQ yes (ETC) [tiian@centos tmp]$ gcc example12_wmq.c $(/opt/lixa/bin/lixa-config -c -f -l -d) \ > -I/opt/mqm71/inc -L/opt/mqm71/lib -Wl,-rpath=/opt/mqm71/lib \ > -lmqic_r -o example12_wmq |
Verify the executable produced by gcc:
| [Shell terminal session] |
[tiian@centos tmp]$ ldd example12_wmq
linux-gate.so.1 => (0x00d50000)
liblixac.so.0 => /opt/lixa/lib/liblixac.so.0 (0x00dfd000)
libmqic_r.so => /opt/mqm71/lib/libmqic_r.so (0x0021a000)
libc.so.6 => /lib/libc.so.6 (0x009e8000)
libgmodule-2.0.so.0 => /lib/libgmodule-2.0.so.0 (0x00da2000)
libgthread-2.0.so.0 => /lib/libgthread-2.0.so.0 (0x00da8000)
librt.so.1 => /lib/librt.so.1 (0x00bca000)
libglib-2.0.so.0 => /lib/libglib-2.0.so.0 (0x00bd5000)
libxml2.so.2 => /usr/lib/libxml2.so.2 (0x02d3c000)
liblixab.so.0 => /opt/lixa/lib/liblixab.so.0 (0x008f3000)
libm.so.6 => /lib/libm.so.6 (0x00b9e000)
libpthread.so.0 => /lib/libpthread.so.0 (0x00b81000)
libmqe_r.so => /opt/mqm71/lib/libmqe_r.so (0x00e16000)
libdl.so.2 => /lib/libdl.so.2 (0x00b7a000)
/lib/ld-linux.so.2 (0x009c2000)
libz.so.1 => /lib/libz.so.1 (0x00ce1000)
libuuid.so.1 => /lib/libuuid.so.1 (0x0076f000)
|
Set-up the LIXA_PROFILE environment variable:
| [Shell terminal session] |
[tiian@centos tmp]$ echo $LIXA_PROFILE [tiian@centos tmp]$ export LIXA_PROFILE=MQC_DYN [tiian@centos tmp]$ echo $LIXA_PROFILE MQC_DYN |
We set LIXA_PROFILE to value
“MQC_DYN”, looking at
/opt/lixa/etc/lixac_conf.xml:
<profile name="MQC_DYN">
<sttsrvs>
<sttsrv>local_1</sttsrv>
</sttsrvs>
<rsrmgrs>
<rsrmgr>WSMQ_ETC_dynreg</rsrmgr>
</rsrmgrs>
</profile>
the profile references the Resource Manager named “WSMQ_ETC_dynreg”, looking again at the config file:
<rsrmgr name="WSMQ_ETC_dynreg" switch_file="/opt/lixa/lib/switch_wsmq_dynreg.so" xa_open_info="axlib=/opt/lixa/lib/liblixac.so,channel=LIXA.CHANNEL,trptype=tcp,conname=127.0.0.1(1414),qmname=LIXA,tpm=lixa" xa_close_info="" />
we can discover how the WebSphere MQ Resource Manager is configured for XA [39].
| [Shell terminal session] |
[tiian@centos tmp]$ ls -la total 116 drwxrwxr-x 2 tiian tiian 4096 Mar 16 17:04 . drwx------ 8 tiian tiian 4096 Mar 16 13:10 .. -rwxrwxr-x 1 tiian tiian 9587 Mar 16 17:04 example12_wmq -rw-r--r-- 1 tiian tiian 5342 Mar 16 13:13 example12_wmq.c |
Retrieve all the messages from “LIXA.QLOCAL” queue before program execution:
| [Shell terminal session] |
[tiian@centos tmp]$ . /opt/mqm71/bin/setmqenv -s [tiian@centos tmp]$ export MQSERVER=LIXA.CHANNEL/TCP/'127.0.0.1(1414)' [tiian@centos tmp]$ /opt/mqm71/samp/bin/amqsgetc LIXA.QLOCAL LIXA Sample AMQSGET0 start no more messages Sample AMQSGET0 end |
Execute the program:
| [Shell terminal session] |
[tiian@centos tmp]$ ./example12_wmq insert target queue is LIXA.QLOCAL Message inserted in queue LIXA.QLOCAL: 'Test message for LIXA' |
Check the content of the queue:
| [Shell terminal session] |
[tiian@centos tmp]$ /opt/mqm71/samp/bin/amqsgetc LIXA.QLOCAL LIXA Sample AMQSGET0 start message <Test message for LIXA> no more messages Sample AMQSGET0 end |
Now you can try to remove a message inserted with the standard utility:
| [Shell terminal session] |
[tiian@centos tmp]$ /opt/mqm71/samp/bin/amqsputc LIXA.QLOCAL LIXA Sample AMQSPUT0 start target queue is LIXA.QLOCAL This is a sample message from the keyboard! Sample AMQSPUT0 end [tiian@centos tmp]$ ./example12_wmq delete target queue is LIXA.QLOCAL Message retrieved from queue LIXA.QLOCAL: 'This is a sample message from the keyboard!' |
you can verify in file
/opt/lixa/etc/lixac_conf.xml
that “MQC_DYN” is associated to dynamic registration.
Execute the program:
| [Shell terminal session] |
[tiian@centos tmp]$ export LIXA_TRACE_MASK=0x00002000 [tiian@centos tmp]$ echo $LIXA_TRACE_MASK 0x00002000 [tiian@centos tmp]$ ./example12_wmq insert 2>&1 | grep ax_reg 2012-03-16 18:17:06.108362 [2793/3077654800] ax_reg: rmid=0, xid=0xbfb4d59c, flags=0x0 2012-03-16 18:17:06.108566 [2793/3077654800] ax_reg: the application program has started a transaction (TX states S3); this XID '1279875137.70797228836149378b6fd6a315481425.80e88a292250da8f8b2ee3a5959e8650' will be returned 2012-03-16 18:17:06.109221 [2793/3077654800] ax_reg: sending 153 bytes to the server for step 8 2012-03-16 18:17:06.109926 [2793/3077654800] ax_reg/excp=7/ret_cod=0/errno=2 |
Changing LIXA_PROFILE you can try the static
registration as well:
| [Shell terminal session] |
[tiian@centos tmp]$ export LIXA_PROFILE=MQC_STA [tiian@centos tmp]$ echo $LIXA_PROFILE MQC_STA [tiian@centos tmp]$ ./example12_wmq delete 2>&1 | grep xa_start 2012-03-16 18:18:59.302555 [2806/3078256912] lixa_xa_start 2012-03-16 18:18:59.302831 [2806/3078256912] lixa_xa_start: sending 213 bytes to the server for step 8 [...] 2012-03-16 18:18:59.307208 [2806/3078256912] lixa_xa_start: xa_start_entry(xid, 0, 0x0) = 0 2012-03-16 18:18:59.307373 [2806/3078256912] lixa_xa_start: sending 210 bytes to the server for step 24 2012-03-16 18:18:59.308103 [2806/3078256912] lixa_xa_start/excp=10/ret_cod=0/errno=2 |
The example of this paragraph is quite complex because it involves three distinct Resource Managers: WebSphere MQ that's a message oriented middleware, MySQL and PostgreSQL thar are database servers. The proposed example can be easily adapted for WebSphere MQ and MySQL or WebSphere MQ and PostgreSQL removing useless stuff.
It is strongly suggested you have yet tryed the examples described in the section called “An example with MySQL/MariaDB”, in the section called “” and in the section called “An example with WebSphere MQ”.
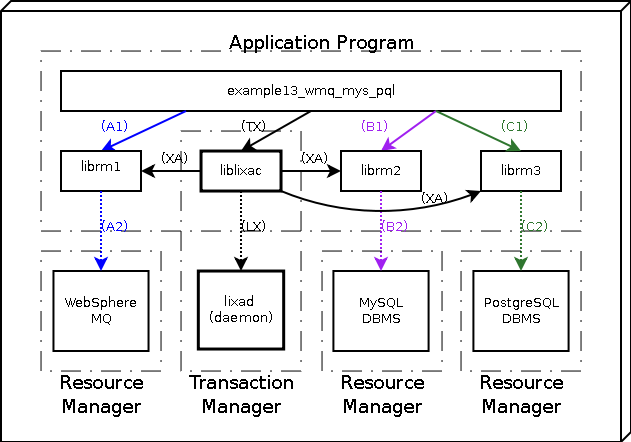
Please follow the instructions explained
in the section called “Set-up WebSphere MQ environment” to set-up a running environment for WebSphere MQ
in the section called “MySQL/MariaDB Configuration” to set-up a running environment for MySQL server
in the section called “PostgreSQL Configuration” to set-up a running environment for PostgreSQL server
in the section called “Starting the state server (lixad)” to start up the LIXA state server
Prepare the client (Application Program) using the below commands (gcc command was splitted on several lines using \ to help readability, but you may use a single line):
| [Shell terminal session] |
[tiian@centos ~]$ mkdir tmp [tiian@centos ~]$ cd tmp [tiian@centos tmp]$ cp /opt/lixa/share/doc/lixa-X.Y.Z/examples/example13_wmq_mys_pql.c . [tiian@centos tmp]$ /opt/lixa/bin/lixa-config -r|grep WebSphereMQ WebSphereMQ yes (SRV) [tiian@centos tmp]$ gcc example13_wmq_mys_pql.c \ > $(/opt/lixa/bin/lixa-config -c -f -m -p -d) \ > $(mysql_config --include --libs_r) -I/usr/include/postgresql -lpq \ > -I/opt/mqm71/inc -L/opt/mqm71/lib -Wl,-rpath -Wl,/opt/mqm71/lib \ > -lmqm_r -o example13_wmq_mys_pql |
Verify the executable produced by gcc:
| [Shell terminal session] |
[tiian@centos tmp]$ ldd example13_wmq_mys_pql
linux-gate.so.1 => (0x008bc000)
liblixac.so.0 => /opt/lixa/lib/liblixac.so.0 (0x00fe3000)
liblixapq.so.0 => /opt/lixa/lib/liblixapq.so.0 (0x00163000)
liblixamy.so.0 => /opt/lixa/lib/liblixamy.so.0 (0x00684000)
libmysqlclient_r.so.16 => /usr/lib/mysql/libmysqlclient_r.so.16 (0x0016a000)
libz.so.1 => /lib/libz.so.1 (0x00ce1000)
libpthread.so.0 => /lib/libpthread.so.0 (0x00b81000)
libcrypt.so.1 => /lib/libcrypt.so.1 (0x05144000)
libnsl.so.1 => /lib/libnsl.so.1 (0x0524e000)
libm.so.6 => /lib/libm.so.6 (0x00b9e000)
libssl.so.10 => /usr/lib/libssl.so.10 (0x053f2000)
libcrypto.so.10 => /usr/lib/libcrypto.so.10 (0x06344000)
libpq.so.5 => /usr/lib/libpq.so.5 (0x00110000)
libmqm_r.so => /opt/mqm71/lib/libmqm_r.so (0x00559000)
libc.so.6 => /lib/libc.so.6 (0x009e8000)
libgmodule-2.0.so.0 => /lib/libgmodule-2.0.so.0 (0x00da2000)
libgthread-2.0.so.0 => /lib/libgthread-2.0.so.0 (0x00da8000)
librt.so.1 => /lib/librt.so.1 (0x00bca000)
libglib-2.0.so.0 => /lib/libglib-2.0.so.0 (0x00bd5000)
libxml2.so.2 => /usr/lib/libxml2.so.2 (0x02d3c000)
liblixab.so.0 => /opt/lixa/lib/liblixab.so.0 (0x00137000)
/lib/ld-linux.so.2 (0x009c2000)
libfreebl3.so => /lib/libfreebl3.so (0x051d0000)
libgssapi_krb5.so.2 => /lib/libgssapi_krb5.so.2 (0x00950000)
libkrb5.so.3 => /lib/libkrb5.so.3 (0x064d3000)
libcom_err.so.2 => /lib/libcom_err.so.2 (0x0090e000)
libk5crypto.so.3 => /lib/libk5crypto.so.3 (0x00922000)
libresolv.so.2 => /lib/libresolv.so.2 (0x00d86000)
libdl.so.2 => /lib/libdl.so.2 (0x00b7a000)
libldap_r-2.4.so.2 => /lib/libldap_r-2.4.so.2 (0x002e1000)
libmqe_r.so => /opt/mqm71/lib/libmqe_r.so (0xb708f000)
libuuid.so.1 => /lib/libuuid.so.1 (0x0076f000)
libkrb5support.so.0 => /lib/libkrb5support.so.0 (0x00915000)
libkeyutils.so.1 => /lib/libkeyutils.so.1 (0x00991000)
liblber-2.4.so.2 => /lib/liblber-2.4.so.2 (0x04e6c000)
libssl3.so => /usr/lib/libssl3.so (0x055de000)
libsmime3.so => /usr/lib/libsmime3.so (0x05616000)
libnss3.so => /usr/lib/libnss3.so (0x05469000)
libnssutil3.so => /usr/lib/libnssutil3.so (0x055b6000)
libplds4.so => /lib/libplds4.so (0x055aa000)
libplc4.so => /lib/libplc4.so (0x053a3000)
libnspr4.so => /lib/libnspr4.so (0x053b2000)
libsasl2.so.2 => /usr/lib/libsasl2.so.2 (0x057d8000)
libselinux.so.1 => /lib/libselinux.so.1 (0x00cc0000)
|
Set-up the LIXA_PROFILE environment variable:
| [Shell terminal session] |
[tiian@centos tmp]$ echo $LIXA_PROFILE [tiian@centos tmp]$ export LIXA_PROFILE=MQS_DYN_MYS_STA_PQL_STA [tiian@centos tmp]$ echo $LIXA_PROFILE MQS_DYN_MYS_STA_PQL_STA |
We set LIXA_PROFILE to value
“MQS_DYN_MYS_STA_PQL_STA”, looking at
/opt/lixa/etc/lixac_conf.xml:
<profile name="MQS_DYN_MYS_STA_PQL_STA">
<sttsrvs>
<sttsrv>local_1</sttsrv>
</sttsrvs>
<rsrmgrs>
<rsrmgr>WSMQ_SRV_dynreg</rsrmgr>
<rsrmgr>MySQL_stareg</rsrmgr>
<rsrmgr>PostgreSQL_stareg</rsrmgr>
</rsrmgrs>
</profile>
the profile references the three Resource Managers named “WSMQ_SRV_dynreg”, “MySQL_stareg” and “PostgreSQL_stareg”; looking again at the config file:
<rsrmgr name="WSMQ_SRV_dynreg" switch_file="/opt/lixa/lib/switch_wsmq_dynreg.so" xa_open_info="axlib=/opt/lixa/lib/liblixac.so,qmname=LIXA,tpm=lixa" xa_close_info="" />
<rsrmgr name="MySQL_stareg" switch_file="/opt/lixa/lib/switch_mysql_stareg.so" xa_open_info="host=localhost,user=lixa,passwd=,db=lixa,client_flag=0" xa_close_info="" />
<rsrmgr name="PostgreSQL_stareg" switch_file="/opt/lixa/lib/switch_postgresql_stareg.so" xa_open_info="dbname=testdb" xa_close_info="" />
we can discover how the Resource Managers are configured for XA.
You should open three terminal sessions: one for the execution shell, one to check MySQL content and the last one to check PostgreSQL content.
Check the program is in place, set-up WebSphere MQ environment variables (you have previously set-up LIXA environment) and check the queue is empty:
| [Shell terminal session] |
[tiian@centos tmp]$ ls -la total 136 drwxrwxr-x 2 tiian tiian 4096 Mar 18 07:00 . drwx------ 8 tiian tiian 4096 Mar 17 17:58 .. -rwxrwxr-x 1 tiian tiian 11879 Mar 18 07:00 example13_wmq_mys_pql -rw-rw-r-- 1 tiian tiian 7843 Mar 18 06:59 example13_wmq_mys_pql.c [tiian@centos tmp]$ . /opt/mqm71/bin/setmqenv -s [tiian@centos tmp]$ /opt/mqm71/samp/bin/amqsget LIXA.QLOCAL LIXA Sample AMQSGET0 start no more messages Sample AMQSGET0 end |
Prepare a terminal session for MySQL and check the table is empty:
| [MySQL terminal session] |
[tiian@centos ~]$ mysql -h localhost -u lixa lixa Reading table information for completion of table and column names You can turn off this feature to get a quicker startup with -A Welcome to the MySQL monitor. Commands end with ; or \g. Your MySQL connection id is 2 Server version: 5.1.61 Source distribution Copyright (c) 2000, 2011, Oracle and/or its affiliates. All rights reserved. Oracle is a registered trademark of Oracle Corporation and/or its affiliates. Other names may be trademarks of their respective owners. Type 'help;' or '\h' for help. Type '\c' to clear the current input statement. mysql> SELECT * FROM authors; Empty set (0.00 sec) |
Prepare a terminal session for PostgreSQL and check the table is empty:
| [PostgreSQL terminal session] |
[tiian@centos ~]$ psql testdb psql (8.4.9) Type "help" for help. testdb=> SELECT * FROM authors; id | last_name | first_name ----+-----------+------------ (0 rows) |
OK, now you are ready to produce one message and insert one row in each database:
| [Shell terminal session] |
[tiian@centos tmp]$ ./example13_wmq_mys_pql insert target queue is LIXA.QLOCAL Message inserted in queue LIXA.QLOCAL: 'Test message for LIXA' Inserting a row in MySQL table... Inserting a row in PostgreSQL table... |
Check the content of MySQL:
| [MySQL terminal session] |
mysql> SELECT * FROM authors; +----+-----------+------------+ | id | last_name | first_name | +----+-----------+------------+ | 1 | Foo | Bar | +----+-----------+------------+ 1 row in set (0.00 sec) |
Check the content of PostgreSQL:
| [PostgreSQL terminal session] |
testdb=> SELECT * FROM authors; id | last_name | first_name ----+-----------+------------ 1 | Foo | Bar (1 row) |
We are leaving the message in the queue and testing the extraction:
| [Shell terminal session] |
[tiian@centos tmp]$ ./example13_wmq_mys_pql delete target queue is LIXA.QLOCAL Message retrieved from queue LIXA.QLOCAL: 'Test message for LIXA' Deleting a row from MySQL table... Deleting a row from PostgreSQL table... |
There was one message and the sample program picked it up; check the content of MySQL:
| [MySQL terminal session] |
mysql> SELECT * FROM authors; Empty set (0.00 sec) |
check the content of PostgreSQL:
| [PostgreSQL terminal session] |
testdb=> SELECT * FROM authors; id | last_name | first_name ----+-----------+------------ (0 rows) |
It's time to verify what's happen with
tx_rollback() instead of
tx_commit(); move the comments in the source
code from:
| [example13_wmq_mys_pql.c (before)] |
[...]
if (TX_OK != (txrc = tx_commit())) {
fprintf(stderr, "tx_commit error: %d\n", txrc);
exit(txrc);
}
/*
if (TX_OK != (txrc = tx_rollback())) {
fprintf(stderr, "tx_rollback error: %d\n", txrc);
exit(txrc);
}
*/
[...]
|
to:
| [example13_wmq_mys_pql.c (after)] |
[...]
/*
if (TX_OK != (txrc = tx_commit())) {
fprintf(stderr, "tx_commit error: %d\n", txrc);
exit(txrc);
}
*/
if (TX_OK != (txrc = tx_rollback())) {
fprintf(stderr, "tx_rollback error: %d\n", txrc);
exit(txrc);
}
[...]
|
and re-compile the program:
| [Shell terminal session] |
[tiian@centos tmp]$ gcc example13_wmq_mys_pql.c \ > $(/opt/lixa/bin/lixa-config -c -f -m -p -d) \ > $(mysql_config --include --libs_r) -I/usr/include/postgresql -lpq \ > -I/opt/mqm71/inc -L/opt/mqm71/lib -Wl,-rpath -Wl,/opt/mqm71/lib \ > -lmqm_r -o example13_wmq_mys_pql |
Now you are ready to insert again message and row, but the rollback will discard the operation:
| [Shell terminal session] |
[tiian@centos tmp]$ ./example13_wmq_mys_pql insert target queue is LIXA.QLOCAL Message inserted in queue LIXA.QLOCAL: 'Test message for LIXA' Inserting a row in MySQL table... Inserting a row in PostgreSQL table... |
Check the content of MySQL:
| [MySQL terminal session] |
mysql> SELECT * FROM authors; Empty set (0.00 sec) |
it's empty; check the content of PostgreSQL:
| [PostgreSQL terminal session] |
testdb=> SELECT * FROM authors; id | last_name | first_name ----+-----------+------------ (0 rows) |
it's empty; check the content of WebSphere MQ:
| [Shell terminal session] |
[tiian@centos tmp]$ /opt/mqm71/samp/bin/amqsget LIXA.QLOCAL LIXA Sample AMQSGET0 start no more messages Sample AMQSGET0 end |
it's empty. Now you can restore the comment around
tx_rollback() instead of
tx_commit().
If you want to use WebSphere MQ with static registration instead of dynamic registration you will use a different profile:
| [Shell terminal session] |
[tiian@centos tmp]$ echo $LIXA_PROFILE [tiian@centos tmp]$ export LIXA_PROFILE=MQS_STA_MYS_STA_PQL_STA [tiian@centos tmp]$ echo $LIXA_PROFILE MQS_STA_MYS_STA_PQL_STA |
To try this example using Extended Transactional Client (ETC) for WebSphere MQ, you must change these steps in the sequence previously described:
configure LIXA software using
--with-wsmq=ETCoption; clean the previous build (make clean) and install the build (su -c "make install")check the output of /opt/lixa/bin/lixa-config -r command
link library
mqic_rinstead of librarymqm_rto programexample13_wmq_mys_pqlset variable
LIXA_PROFILEtoMQC_DYN_MYS_STA_PQL_STA(dynamic registration) or toMQC_STA_MYS_STA_PQL_STA(static registration)use utilities amqsgetc, amqsputc instead of amqsget, amqsput
set variable
MQSERVERtoLIXA.CHANNEL/TCP/'127.0.0.1(1414)'
[21]
The content of xa_open_info string is
described in chapter 15 "Developing Applications with Oracle XA"
of the "Oracle Database Application Developer's Guide"
manual; please refer to the documentation published by
Oracle Corporation for further details.
[22]
The content of xa_open_info string is
described in chapter "Developing Applications with Oracle XA"
of the "Oracle Database Application Developer's Guide"
manual; please refer to the documentation published by
Oracle Corporation for further details.
[23]
The content of xa_open_info string is
documented at IBM Infocenter: search the string
“xa_open string formats” in the documentation
relevant to your installed version; this is a link
http://publib.boulder.ibm.com/infocenter/db2luw/v9r7/topic/com.ibm.db2.luw.admin.2pc.doc/doc/r0005080.html
but it may change in the future.
[24]
The content of xa_open_info string is
described in chapter 15 "Developing Applications with Oracle XA"
of the "Oracle Database Application Developer's Guide"
manual; please refer to the documentation published by
Oracle Corporation for further details.
The content of xa_open_info string is
documented at IBM Infocenter: search the string
“xa_open string formats” in the documentation
relevant to your installed version; this is a link
http://publib.boulder.ibm.com/infocenter/db2luw/v9r7/topic/com.ibm.db2.luw.admin.2pc.doc/doc/r0005080.html
but it may change in the future.
[25]
The content of xa_open_info is passed to
PQconnectdb function: you can refer to
PostgreSQL official
documentation to discover what you can pass to this function.
Please pay attention the xa_open_info can
contain a maximum of 255 characters: this limitation is
documented in [XAspec].
[26] The current implementation does not support dynamic registration for PostgreSQL.
[27]
The content of xa_open_info is passed to
PQconnectdb function: you can refer to
PostgreSQL official
documentation to discover what you can pass to this function.
Please pay attention the xa_open_info can
contain a maximum of 255 characters: this limitation is
documented in [XAspec].
[28]
The content of xa_open_info string is
described in chapter 15 "Developing Applications with Oracle XA"
of the "Oracle Database Application Developer's Guide"
manual; please refer to the documentation published by
Oracle Corporation for further details.
[29]
The content of xa_open_info is passed to
PQconnectdb function: you can refer to
PostgreSQL official
documentation to discover what you can pass to this function.
Please pay attention the xa_open_info can
contain a maximum of 255 characters: this limitation is
documented in [XAspec].
[30]
The content of xa_open_info string is
documented at IBM Infocenter: search the string
“xa_open string formats” in the documentation
relevant to your installed version; this is a link
http://publib.boulder.ibm.com/infocenter/db2luw/v9r7/topic/com.ibm.db2.luw.admin.2pc.doc/doc/r0005080.html
but it may change in the future.
[31] The current implementation does not support dynamic registration for MySQL.
[32]
The content of xa_open_info for MySQL is
described in
the section called “Some checks before program execution”.
[33]
The content of xa_open_info is passed to
PQconnectdb function: you can refer to
PostgreSQL official
documentation to discover what you can pass to this function.
Please pay attention the xa_open_info can
contain a maximum of 255 characters: this limitation is
documented in [XAspec].
[34]
The content of xa_open_info for MySQL is
described in
the section called “Some checks before program execution”.
[35]
The content of xa_open_info is passed to
PQconnectdb function: you can refer to
PostgreSQL official
documentation to discover what you can pass to this function.
Please pay attention the xa_open_info can
contain a maximum of 255 characters: this limitation is
documented in [XAspec].
[36]
The content of xa_open_info string is
described in chapter 15 "Developing Applications with Oracle XA"
of the "Oracle Database Application Developer's Guide"
manual; please refer to the documentation published by
Oracle Corporation for further details.
[37]
The content of xa_open_info for MySQL is
described in
the section called “Some checks before program execution”.
This chapter explains how you can develop your own COBOL application using the libraries and the tools supplied by LIXA project.
LIXA project ships some example COBOL programs you can find in
directory
/opt/lixa/share/doc/lixa-X.Y.Z/examples/cobol/ after
software installation (see Chapter 2, Installation).
Note
This chapter is focused on the COBOL programming language. The C programming language is addressed by another dedicated chapter.
LIXA supports only GnuCOBOL (formerly OpenCOBOL). GnuCOBOL can be retrieved from SourceForge.net or can be installed using the standard packages available for your Linux distribution. The support for GnuCOBOL requires at least version 1.1 that's available inside Ubuntu 14.04 and other distributions.
It cannot be excluded that LIXA may run using a different COBOL environment, but at this time the LIXA project does not have a development and test environment for something else than GnuCOBOL.
LIXA project adopts the standard described in [TXspec] as the API you should use when developing an Application Program.
The API is very easy, it supplies COBOL routines and C functions. The following COBOL example can be briefly explained:
IDENTIFICATION DIVISION.
PROGRAM-ID. EXAMPLE1.
DATA DIVISION.
WORKING-STORAGE SECTION.
* Include TX definitions using the provided copybook
01 TX-RETURN-STATUS.
COPY TXSTATUS.
01 TX-INFO-AREA.
COPY TXINFDEF.
* Include LIXA definitions using the provided copybook
COPY LIXAXID.
PROCEDURE DIVISION.
000-MAIN.
MOVE ZERO TO TX-RETURN-STATUS.
* Calling TXOPEN (tx_open)
CALL "TXOPEN" USING TX-RETURN-STATUS.
DISPLAY 'TXOPEN returned value ' TX-STATUS.
IF NOT TX-OK THEN
DISPLAY 'Exiting...'
STOP RUN RETURNING 1
END-IF.
*
* Put your code OUTSIDE the transaction boundary here
*
* Calling TXBEGIN (tx_begin): the transaction starts here
CALL "TXBEGIN" USING TX-RETURN-STATUS.
DISPLAY 'TXBEGIN returned value ' TX-STATUS.
IF NOT TX-OK THEN
DISPLAY 'Exiting...'
STOP RUN RETURNING 1
END-IF.
*
* Put your code INSIDE the transaction boundary here
*
* Calling TXCOMMIT (tx_commit): the transaction ends here with a
* commit
CALL "TXCOMMIT" USING TX-RETURN-STATUS.
DISPLAY 'TXCOMMIT returned value ' TX-STATUS.
IF NOT TX-OK THEN
DISPLAY 'Exiting...'
STOP RUN RETURNING 1
END-IF.
*
* You can use TXROLLBACK instead of TXCOMMIT if you decide that the
* work must be rolled back
*
* Put here other transactions if you need them
*
* Calling TXCLOSE (tx_close) to close ALL the Resource Managers
* associated to the current LIXA_PROFILE
*
CALL "TXCLOSE" USING TX-RETURN-STATUS.
DISPLAY 'TXCLOSE returned value ' TX-STATUS.
IF NOT TX-OK
STOP RUN RETURNING 1
STOP RUN.
These are the available COBOL routines (the descriptions come from [TXspec]):
TXBEGIN: begin a global transactionTXCLOSE: close a set of resource managersTXCOMMIT: commit a global transactionTXINFORM: return global transaction informationTXOPEN: open a set of resource managersTXROLLBACK: roll back a global transactionTXSETCOMMITRET: setcommit_returncharacteristicTXSETTRANCTL: settransaction_controlcharacteristicTXSETTIMEOUT: settransaction_timeoutcharacteristic
Refer to [TXspec] for the complete description.
A program developed for TX (Transaction Demarcation) Specification must access the resource managers coordinated by the transaction manager using specific functions. Unfortunately, the TX Specification does not specify a standard unified method to access a coordinated resource manager.
Tipically, every resource manager provides its own specific function(s) to retrieve one or more connection handler(s). Once you have got the right connection handler(s), you can use the resource manager as you use without a transaction manager.
The supplied examples (see doc/examples/cobol
directory) show the routines that must be used to
retrieve the connection handler(s) necessary to interact with
the resource managers.
Note
Special attention must be payed to commit and rollback operations: a well designed program developed for TX (Transaction Demarcation) Specification must not specify the resource manager native version of commit and rollback operations. If your software violates this rule, your environment will generate warning conditions related to euristically completed transaction. If your software forces a resource manager to commit or rollback outside the control of the transaction manager, the transaction manager will not be able to perform the opposite operation if asked to do it. These situations tend to generate inconsistencies.
The examples showed in this chapter use these linkage options:
-Wl,-rpath -Wl,/opt/lixa/lib
dynamically generated by
/opt/lixa/bin/lixa-config -d
(/opt/lixa/bin/lixa-config --ldflags).
The options are specific to gcc and
ld Linux linker.
Alternatively you can avoid these options and set
LD_LIBRARY_PATH environment variable.
Copy file EXAMPLE1.cob in your working dir:
| [Shell terminal session] |
tiian@ubuntu1404-64:/tmp$ cp /opt/lixa/share/doc/lixa-X.Y.Z/examples/cobol/EXAMPLE1.cob . |
Substitute “lixa-X.Y.Z” with the actual version of the software you installed.
Set up your shell environment:
| [Shell terminal session] |
tiian@ubuntu1404-64:/tmp$ export PATH=$PATH:/opt/lixa/bin tiian@ubuntu1404-64:/tmp$ export LD_LIBRARY_PATH=$LD_LIBRARY_PATH:/opt/lixa/lib tiian@ubuntu1404-64:/tmp$ export COB_LDFLAGS=-Wl,--no-as-needed |
Compile and link the COBOL example program:
| [Shell terminal session] |
tiian@ubuntu1404-64:/tmp$ cobc -x $(lixa-config -f -l) EXAMPLE1.cob |
Check the output of the linker:
| [Shell terminal session] |
tiian@ubuntu1404-64:/tmp$ ldd EXAMPLE1 linux-vdso.so.1 => (0x00007fffbd9fe000) libcob.so.1 => /usr/lib/libcob.so.1 (0x00007fe904068000) libm.so.6 => /lib/x86_64-linux-gnu/libm.so.6 (0x00007fe903d62000) libgmp.so.10 => /usr/lib/x86_64-linux-gnu/libgmp.so.10 (0x00007fe903aed000) libncurses.so.5 => /lib/x86_64-linux-gnu/libncurses.so.5 (0x00007fe9038ca000) libtinfo.so.5 => /lib/x86_64-linux-gnu/libtinfo.so.5 (0x00007fe9036a1000) libdb-5.3.so => /usr/lib/x86_64-linux-gnu/libdb-5.3.so (0x00007fe9032fe000) libdl.so.2 => /lib/x86_64-linux-gnu/libdl.so.2 (0x00007fe9030fa000) liblixac.so.0 => /opt/lixa/lib/liblixac.so.0 (0x00007fe902edf000) libc.so.6 => /lib/x86_64-linux-gnu/libc.so.6 (0x00007fe902b19000) libpthread.so.0 => /lib/x86_64-linux-gnu/libpthread.so.0 (0x00007fe9028fb000) /lib64/ld-linux-x86-64.so.2 (0x00007fe9042a6000) libgmodule-2.0.so.0 => /usr/lib/x86_64-linux-gnu/libgmodule-2.0.so.0 (0x00007fe9026f6000) libglib-2.0.so.0 => /lib/x86_64-linux-gnu/libglib-2.0.so.0 (0x00007fe9023ee000) libxml2.so.2 => /usr/lib/x86_64-linux-gnu/libxml2.so.2 (0x00007fe902087000) liblixab.so.0 => /opt/lixa/lib/liblixab.so.0 (0x00007fe901e6d000) libpcre.so.3 => /lib/x86_64-linux-gnu/libpcre.so.3 (0x00007fe901c2f000) libz.so.1 => /lib/x86_64-linux-gnu/libz.so.1 (0x00007fe901a16000) liblzma.so.5 => /lib/x86_64-linux-gnu/liblzma.so.5 (0x00007fe9017f3000) libuuid.so.1 => /lib/x86_64-linux-gnu/libuuid.so.1 (0x00007fe9015ee000) |
Now you are ready to start your first application:
| [Shell terminal session] |
tiian@ubuntu1404-64:/tmp$ ./EXAMPLE1 Executing EXAMPLE1 TXOPEN returned value -000000007 Exiting... |
The TXOPEN routine returned the value
“-7” (TX-FAIL)
because the state server is not running.
Start the state server (see the section called “Background (daemon) execution”)
and try again:
| [Shell terminal session (Ubuntu)] |
tiian@ubuntu1404-64:~/tmp$ sudo su - lixa
lixa@ubuntu1404-64:~$ /opt/lixa/sbin/lixad --daemon
lixa@ubuntu1404-64:~$ exit
logout
tiian@ubuntu1404-64:~/tmp$ ps -ef|grep lixad|grep -v grep
lixa 12866 1 0 21:35 ? 00:00:00 /opt/lixa/sbin/lixad --daemon
tiian@ubuntu1404-64:/tmp$ ./EXAMPLE1
Executing EXAMPLE1
TXOPEN returned value +000000000
TXBEGIN returned value +000000000
TXINFORM returned value +000000000
XID-REC/FORMAT-ID: +279875137
XID-REC/GTRID-LENGTH: +000000016
XID-REC/BRANCH-LENGTH: +000000016
XID-REC/XID (SERIAL.): 1279875137.9ce44ddff2274cd99924ae2721b66789.58f1d23a64e7f668c92c624bc096d075
TRANSACTION-MODE : +000000001
[TX-IN-TRAN]
COMMIT-RETURN : +000000000
[TX-COMMIT-COMPLETED]
TRANSACTION-CONTROL : +000000000
[TX-UNCHAINED]
TRANSACTION-TIMEOUT : +000000000
[NO-TIMEOUT]
TRANSACTION-STATE : +000000000
[TX-ACTIVE]
TXCOMMIT returned value +000000000
TXINFORM returned value +000000000
XID-REC/FORMAT-ID: -000000001
XID-REC/GTRID-LENGTH: +000000000
XID-REC/BRANCH-LENGTH: +000000000
XID-REC/XID (SERIAL.): -1..
TRANSACTION-MODE : +000000000
[TX-NOT-IN-TRAN]
COMMIT-RETURN : +000000000
[TX-COMMIT-COMPLETED]
TRANSACTION-CONTROL : +000000000
[TX-UNCHAINED]
TRANSACTION-TIMEOUT : +000000000
[NO-TIMEOUT]
TRANSACTION-STATE : +000000000
[TX-ACTIVE]
TXSETCOMMITRET returned value +000000001
TXSETTIMEOUT returned value +000000000
TXSETTRANCTL returned value +000000000
TXINFORM returned value +000000000
XID-REC/FORMAT-ID: -000000001
XID-REC/GTRID-LENGTH: +000000000
XID-REC/BRANCH-LENGTH: +000000000
XID-REC/XID (SERIAL.): -1..
TRANSACTION-MODE : +000000000
[TX-NOT-IN-TRAN]
COMMIT-RETURN : +000000000
[TX-COMMIT-COMPLETED]
TRANSACTION-CONTROL : +000000001
[TX-CHAINED]
TRANSACTION-TIMEOUT : +000000005
TRANSACTION-STATE : +000000000
[TX-ACTIVE]
TXSETTRANCTL returned value +000000000
TXINFORM returned value +000000000
XID-REC/FORMAT-ID: -000000001
XID-REC/GTRID-LENGTH: +000000000
XID-REC/BRANCH-LENGTH: +000000000
XID-REC/XID (SERIAL.): -1..
TRANSACTION-MODE : +000000000
[TX-NOT-IN-TRAN]
COMMIT-RETURN : +000000000
[TX-COMMIT-COMPLETED]
TRANSACTION-CONTROL : +000000000
[TX-UNCHAINED]
TRANSACTION-TIMEOUT : +000000005
TRANSACTION-STATE : +000000000
[TX-ACTIVE]
TXBEGIN returned value +000000000
TXROLLBACK returned value +000000000
TXCLOSE returned value +000000000
|
Your first COBOL Application Program has connected to the state server and has performed two dummy distributed transactions: commit and rollback.
Refer to the section called “Some details about the example” to get some further insights.

This example was developed using PostgreSQL 9.3.15 for Linux (Ubuntu). If you were using a different version you would need to adapt some commands to your environment.
Prepare the environment following the following steps:
Set-up PostgreSQL environment
Start the LIXA state server
as explained in the section called “”.
Prepare the client (Application Program) using the below commands:
| [Shell terminal session] |
tiian@ubuntu1404-64:/tmp$ cp /opt/lixa/share/doc/lixa-X.Y.Z/examples/cobol/EXAMPLE5_PQL.c . tiian@ubuntu1404-64:/tmp$ export PATH=$PATH:/opt/lixa/bin tiian@ubuntu1404-64:/tmp$ export LD_LIBRARY_PATH=$LD_LIBRARY_PATH:/opt/lixa/lib tiian@ubuntu1404-64:/tmp$ export COB_LDFLAGS=-Wl,--no-as-needed tiian@ubuntu1404-64:/tmp$ cobc -x $(lixa-config -f -p) EXAMPLE5_PQL.cob |
Verify the executable produced by cobc:
| [Shell terminal session] |
tiian@ubuntu1404-64:/tmp$ ldd EXAMPLE5_PQL linux-vdso.so.1 => (0x00007ffff21fe000) libcob.so.1 => /usr/lib/libcob.so.1 (0x00007f1a00df4000) libm.so.6 => /lib/x86_64-linux-gnu/libm.so.6 (0x00007f1a00aee000) libgmp.so.10 => /usr/lib/x86_64-linux-gnu/libgmp.so.10 (0x00007f1a00879000) libncurses.so.5 => /lib/x86_64-linux-gnu/libncurses.so.5 (0x00007f1a00656000) libtinfo.so.5 => /lib/x86_64-linux-gnu/libtinfo.so.5 (0x00007f1a0042d000) libdb-5.3.so => /usr/lib/x86_64-linux-gnu/libdb-5.3.so (0x00007f1a0008a000) libdl.so.2 => /lib/x86_64-linux-gnu/libdl.so.2 (0x00007f19ffe86000) liblixac.so.0 => /opt/lixa/lib/liblixac.so.0 (0x00007f19ffc6b000) liblixapq.so.0 => /opt/lixa/lib/liblixapq.so.0 (0x00007f19ffa63000) libc.so.6 => /lib/x86_64-linux-gnu/libc.so.6 (0x00007f19ff69e000) libpthread.so.0 => /lib/x86_64-linux-gnu/libpthread.so.0 (0x00007f19ff480000) /lib64/ld-linux-x86-64.so.2 (0x00007f1a01032000) libgmodule-2.0.so.0 => /usr/lib/x86_64-linux-gnu/libgmodule-2.0.so.0 (0x00007f19ff27b000) libglib-2.0.so.0 => /lib/x86_64-linux-gnu/libglib-2.0.so.0 (0x00007f19fef73000) libxml2.so.2 => /usr/lib/x86_64-linux-gnu/libxml2.so.2 (0x00007f19fec0c000) liblixab.so.0 => /opt/lixa/lib/liblixab.so.0 (0x00007f19fe9f2000) libpq.so.5 => /usr/lib/libpq.so.5 (0x00007f19fe7c3000) libpcre.so.3 => /lib/x86_64-linux-gnu/libpcre.so.3 (0x00007f19fe584000) libz.so.1 => /lib/x86_64-linux-gnu/libz.so.1 (0x00007f19fe36b000) liblzma.so.5 => /lib/x86_64-linux-gnu/liblzma.so.5 (0x00007f19fe149000) libuuid.so.1 => /lib/x86_64-linux-gnu/libuuid.so.1 (0x00007f19fdf44000) libssl.so.1.0.0 => /lib/x86_64-linux-gnu/libssl.so.1.0.0 (0x00007f19fdce4000) libcrypto.so.1.0.0 => /lib/x86_64-linux-gnu/libcrypto.so.1.0.0 (0x00007f19fd908000) libkrb5.so.3 => /usr/lib/x86_64-linux-gnu/libkrb5.so.3 (0x00007f19fd63d000) libcom_err.so.2 => /lib/x86_64-linux-gnu/libcom_err.so.2 (0x00007f19fd438000) libgssapi_krb5.so.2 => /usr/lib/x86_64-linux-gnu/libgssapi_krb5.so.2 (0x00007f19fd1f1000) libldap_r-2.4.so.2 => /usr/lib/x86_64-linux-gnu/libldap_r-2.4.so.2 (0x00007f19fcfa0000) libk5crypto.so.3 => /usr/lib/x86_64-linux-gnu/libk5crypto.so.3 (0x00007f19fcd70000) libkrb5support.so.0 => /usr/lib/x86_64-linux-gnu/libkrb5support.so.0 (0x00007f19fcb65000) libkeyutils.so.1 => /lib/x86_64-linux-gnu/libkeyutils.so.1 (0x00007f19fc961000) libresolv.so.2 => /lib/x86_64-linux-gnu/libresolv.so.2 (0x00007f19fc745000) liblber-2.4.so.2 => /usr/lib/x86_64-linux-gnu/liblber-2.4.so.2 (0x00007f19fc536000) libsasl2.so.2 => /usr/lib/x86_64-linux-gnu/libsasl2.so.2 (0x00007f19fc31b000) libgssapi.so.3 => /usr/lib/x86_64-linux-gnu/libgssapi.so.3 (0x00007f19fc0dc000) libgnutls.so.26 => /usr/lib/x86_64-linux-gnu/libgnutls.so.26 (0x00007f19fbe1e000) libgcrypt.so.11 => /lib/x86_64-linux-gnu/libgcrypt.so.11 (0x00007f19fbb9e000) libheimntlm.so.0 => /usr/lib/x86_64-linux-gnu/libheimntlm.so.0 (0x00007f19fb994000) libkrb5.so.26 => /usr/lib/x86_64-linux-gnu/libkrb5.so.26 (0x00007f19fb70c000) libasn1.so.8 => /usr/lib/x86_64-linux-gnu/libasn1.so.8 (0x00007f19fb46b000) libhcrypto.so.4 => /usr/lib/x86_64-linux-gnu/libhcrypto.so.4 (0x00007f19fb237000) libroken.so.18 => /usr/lib/x86_64-linux-gnu/libroken.so.18 (0x00007f19fb022000) libtasn1.so.6 => /usr/lib/x86_64-linux-gnu/libtasn1.so.6 (0x00007f19fae0e000) libp11-kit.so.0 => /usr/lib/x86_64-linux-gnu/libp11-kit.so.0 (0x00007f19fabcb000) libgpg-error.so.0 => /lib/x86_64-linux-gnu/libgpg-error.so.0 (0x00007f19fa9c6000) libwind.so.0 => /usr/lib/x86_64-linux-gnu/libwind.so.0 (0x00007f19fa79d000) libheimbase.so.1 => /usr/lib/x86_64-linux-gnu/libheimbase.so.1 (0x00007f19fa58e000) libhx509.so.5 => /usr/lib/x86_64-linux-gnu/libhx509.so.5 (0x00007f19fa345000) libsqlite3.so.0 => /usr/lib/x86_64-linux-gnu/libsqlite3.so.0 (0x00007f19fa08c000) libcrypt.so.1 => /lib/x86_64-linux-gnu/libcrypt.so.1 (0x00007f19f9e52000) libffi.so.6 => /usr/lib/x86_64-linux-gnu/libffi.so.6 (0x00007f19f9c4a000) |
Set-up the LIXA_PROFILE environment variable:
| [Shell terminal session] |
tiian@ubuntu1404-64:/tmp$ echo $LIXA_PROFILE tiian@ubuntu1404-64:/tmp$ export LIXA_PROFILE=PQL_STA tiian@ubuntu1404-64:/tmp$ echo $LIXA_PROFILE PQL_STA |
See the section called “Some checks before program execution” for additional details on the profile.
It is suggested to open two different terminals: the first one
connected to “testdb” PostgreSQL database and the second
one pointing to the directory where the compiled program
EXAMPLE5_PQL lives.
First teminal session:
| [PostgreSQL terminal session] |
tiian@ubuntu1404-64:~$ psql testdb psql (9.3.15) Type "help" for help. testdb=> |
Second teminal session:
| [Shell terminal session] |
tiian@ubuntu1404-64:/tmp$ ls -la EXAMPLE5_PQL* -rwxrwxr-x 1 tiian tiian 20170 gen 13 23:51 EXAMPLE5_PQL -rw-r--r-- 1 tiian tiian 6374 gen 13 23:47 EXAMPLE5_PQL.cob |
Check the content of “AUTHORS” table before program execution:
| [PostgreSQL terminal session] |
testdb=> select * from AUTHORS; id | last_name | first_name ----+-----------+------------ (0 rows) |
Execute the program:
| [Shell terminal session] |
tiian@ubuntu1404-64:/tmp$ ./EXAMPLE5_PQL INSERT Executing EXAMPLE5_PQL Inserting a row in the table... Status: +0000000000 PQexec INSERT Status: +0000000001 TXCOMMIT returned value +000000000 TXCLOSE returned value +000000000 |
Check the content of the table again:
| [PostgreSQL terminal session] |
testdb=> select * from AUTHORS; id | last_name | first_name ----+-----------+------------ 1 | Foo | Bar (1 rows) |
The example program inserted the row with id=1. You can not insert the same row twice because there is a unique constraint on this table, but you can remove the row using
| [Shell terminal session] |
tiian@ubuntu1404-64:/tmp$ ./EXAMPLE5_PQL DELETE Executing EXAMPLE5_PQL Deleting a row from the table... Status: +0000000000 PQexec DELETE Status: +0000000001 TXCOMMIT returned value +000000000 TXCLOSE returned value +000000000 |
Check the table content again:
| [PostgreSQL terminal session] |
testdb=> select * from AUTHORS; id | last_name | first_name ----+-----------+------------ (0 rows) |
This example was developed using the following configuration:
Oracle remote configuration with Instant Client 12.1
Oracle Pro*COBOL compiler as supplied by Oracle Instant Client 12.1
GnuCOBOL compiler and runtime as supplied by Ubuntu 14.04
If you were using a different version you would need to adapt some commands to your environment.
Prepare the environment following the following steps:
Set-up the Oracle environment as explained in the section called “Oracle DMBS Configuration” and adapt the command to your Oracle Database Server version
Configure Oracle listener for remote connection as explained in the section called “Configure Oracle Listener”
Install and configure Oracle Instant Client as explained in the section called “Install and configure Oracle Instant Client”
Start the LIXA state server as explained in the section called “Starting the state server (lixad)”
Create a shell script file, for example
oracle_env.sh
with some useful environment variables as below:
tiian@ubuntu1404-64:/tmp$ cat oracle_env.sh #!/bin/sh export LD_LIBRARY_PATH=/opt/oracle/instantclient_12_1:$LD_LIBRARY_PATH export PATH=/opt/oracle/instantclient_12_1:/opt/oracle/instantclient_12_1/sdk:$PATH export ORACLE_HOME=/opt/oracle/instantclient_12_1
source it and check the values:
tiian@ubuntu1404-64:/tmp$ . oracle_env.sh tiian@ubuntu1404-64:/tmp$ echo $LD_LIBRARY_PATH /opt/oracle/instantclient_12_1: tiian@ubuntu1404-64:/tmp$ echo $PATH /opt/oracle/instantclient_12_1:/opt/oracle/instantclient_12_1/sdk:/usr/local/sbin:/usr/local/bin:/usr/sbin:/usr/bin:/sbin:/bin:/usr/games:/usr/local/games tiian@ubuntu1404-64:/tmp$ echo $ORACLE_HOME /opt/oracle/instantclient_12_1
set LIXA environment variables:
tiian@ubuntu1404-64:/tmp$ export PATH=$PATH:/opt/lixa/bin tiian@ubuntu1404-64:/tmp$ echo $PATH /opt/oracle/instantclient_12_1:/opt/oracle/instantclient_12_1/sdk:/usr/local/sbin:/usr/local/bin:/usr/sbin:/usr/bin:/sbin:/bin:/usr/games:/usr/local/games:/opt/lixa/bin tiian@ubuntu1404-64:/tmp$ export LD_LIBRARY_PATH=$LD_LIBRARY_PATH:/opt/lixa/lib tiian@ubuntu1404-64:/tmp$ echo $LD_LIBRARY_PATH /opt/oracle/instantclient_12_1::/opt/lixa/lib
Prepare the client (Application Program) using the below commands:
| [Shell terminal session] |
tiian@ubuntu1404-64:/tmp$ cp /opt/lixa/share/doc/lixa-X.Y.Z/examples/cobol/EXAMPLE2_ORA.pco . tiian@ubuntu1404-64:/tmp$ procob EXAMPLE2_ORA.pco Pro*COBOL: Release 12.1.0.2.0 - Production on Thu Jan 19 23:20:07 2017 Copyright (c) 1982, 2014, Oracle and/or its affiliates. All rights reserved. System default option values taken from: /opt/oracle/instantclient_12_1/precomp/admin/pcbcfg.cfg tiian@ubuntu1404-64:/tmp$ export COB_LDFLAGS=-Wl,--no-as-needed tiian@ubuntu1404-64:/tmp$ cobc -x $(lixa-config -f -l) \ > -L$ORACLE_HOME -lclntsh \ > EXAMPLE2_ORA.cob \ > $ORACLE_HOME/cobsqlintf.o |
Note
The above commands should work even with very old cobc versions like OpenCOBOL 1.1.0; with recent versions a smarter command line should also work:| [Shell terminal session] |
... tiian@ubuntu1404-64:/tmp$ cobc -x $(lixa-config -f -l) -L$ORACLE_HOME -lclntsh \ > EXAMPLE2_ORA.cob $ORACLE_HOME/cobsqlintf.o -Q "-Wl,--no-as-needed" |
Verify the executable produced by cobc:
| [Shell terminal session] |
tiian@ubuntu1404-64:/tmp$ ldd EXAMPLE2_ORA linux-vdso.so.1 => (0x00007ffc15bfe000) libcob.so.1 => /usr/lib/libcob.so.1 (0x00007fd00ecea000) libm.so.6 => /lib/x86_64-linux-gnu/libm.so.6 (0x00007fd00e9e4000) libgmp.so.10 => /usr/lib/x86_64-linux-gnu/libgmp.so.10 (0x00007fd00e770000) libncurses.so.5 => /lib/x86_64-linux-gnu/libncurses.so.5 (0x00007fd00e54d000) libtinfo.so.5 => /lib/x86_64-linux-gnu/libtinfo.so.5 (0x00007fd00e324000) libdb-5.3.so => /usr/lib/x86_64-linux-gnu/libdb-5.3.so (0x00007fd00df82000) libdl.so.2 => /lib/x86_64-linux-gnu/libdl.so.2 (0x00007fd00dd7e000) liblixac.so.0 => /opt/lixa/lib/liblixac.so.0 (0x00007fd00db58000) liblixab.so.0 => /opt/lixa/lib/liblixab.so.0 (0x00007fd00d936000) libclntsh.so.12.1 => /opt/oracle/instantclient_12_1/libclntsh.so.12.1 (0x00007fd00a979000) libc.so.6 => /lib/x86_64-linux-gnu/libc.so.6 (0x00007fd00a5b0000) libpthread.so.0 => /lib/x86_64-linux-gnu/libpthread.so.0 (0x00007fd00a392000) /lib64/ld-linux-x86-64.so.2 (0x00007fd00ef1c000) libgmodule-2.0.so.0 => /usr/lib/x86_64-linux-gnu/libgmodule-2.0.so.0 (0x00007fd00a18e000) libglib-2.0.so.0 => /lib/x86_64-linux-gnu/libglib-2.0.so.0 (0x00007fd009e86000) libxml2.so.2 => /usr/lib/x86_64-linux-gnu/libxml2.so.2 (0x00007fd009b1f000) libuuid.so.1 => /lib/x86_64-linux-gnu/libuuid.so.1 (0x00007fd00991a000) libmql1.so => /opt/oracle/instantclient_12_1/libmql1.so (0x00007fd0096a4000) libipc1.so => /opt/oracle/instantclient_12_1/libipc1.so (0x00007fd009326000) libnnz12.so => /opt/oracle/instantclient_12_1/libnnz12.so (0x00007fd008c1c000) libons.so => /opt/oracle/instantclient_12_1/libons.so (0x00007fd0089d7000) libnsl.so.1 => /lib/x86_64-linux-gnu/libnsl.so.1 (0x00007fd0087bd000) librt.so.1 => /lib/x86_64-linux-gnu/librt.so.1 (0x00007fd0085b5000) libaio.so.1 => /lib/x86_64-linux-gnu/libaio.so.1 (0x00007fd0083b3000) libclntshcore.so.12.1 => /opt/oracle/instantclient_12_1/libclntshcore.so.12.1 (0x00007fd007e41000) libpcre.so.3 => /lib/x86_64-linux-gnu/libpcre.so.3 (0x00007fd007c03000) libz.so.1 => /lib/x86_64-linux-gnu/libz.so.1 (0x00007fd0079ea000) liblzma.so.5 => /lib/x86_64-linux-gnu/liblzma.so.5 (0x00007fd0077c8000) |
Set-up the LIXA_PROFILE environment variable:
| [Shell terminal session] |
tiian@ubuntu1404-64:/tmp$ echo $LIXA_PROFILE tiian@ubuntu1404-64:/tmp$ export LIXA_PROFILE=ORAIC_DYN tiian@ubuntu1404-64:/tmp$ echo $LIXA_PROFILE ORAIC_DYN |
See the section called “Some checks before program execution” for additional details on the profile.
It is suggested to open two different terminals: the first one
connected to Oracle database and the second
one pointing to the directory where the compiled program
EXAMPLE2_ORA lives.
First teminal session:
| [Sqlplus terminal session] |
tiian@ubuntu1404-64:~$ sqlplus hr/hr@lixa_ora_db SQL*Plus: Release 12.1.0.2.0 Production on Thu Jan 19 23:27:34 2017 Copyright (c) 1982, 2014, Oracle. All rights reserved. Last Successful login time: Thu Jan 19 2017 23:26:19 +01:00 Connected to: Oracle Database 12c Standard Edition Release 12.1.0.2.0 - 64bit Production SQL> |
Second teminal session:
| [Shell terminal session] |
tiian@ubuntu1404-64:/tmp$ ls -la EXAMPLE2_ORA* -rwxrwxr-x 1 tiian tiian 36793 gen 19 23:22 EXAMPLE2_ORA -rw-rw-r-- 1 tiian tiian 11504 gen 19 23:20 EXAMPLE2_ORA.cob -rw-rw-r-- 1 tiian tiian 12719 gen 19 23:20 EXAMPLE2_ORA.lis -rw-rw-r-- 1 tiian tiian 4528 gen 19 23:10 EXAMPLE2_ORA.pco |
Check the content of “COUNTRIES” table before program execution:
| [Sqlplus terminal session] |
SQL> select * from COUNTRIES where COUNTRY_ID = 'RS'; no rows selected |
Execute the program:
| [Shell terminal session] |
tiian@ubuntu1404-64:/tmp$ ./EXAMPLE2_ORA INSERT Executing EXAMPLE2_ORA Inserting a row in the table... Execution terminated! |
Check the content of the table again:
| [Sqlplus terminal session] |
SQL> select * from COUNTRIES where COUNTRY_ID = 'RS'; CO COUNTRY_NAME REGION_ID -- ---------------------------------------- ---------- RS Repubblica San Marino 1 |
The example program inserted the row with REGION_ID=1. You can not insert the same row twice because there is a unique constraint on this table,
| [Shell terminal session] |
tiian@ubuntu1404-64:/tmp$ ./EXAMPLE2_ORA INSERT Executing EXAMPLE2_ORA Inserting a row in the table... Error reported by Oracle: ORA-00001: unique constraint (HR.COUNTRY_C_ID_PK) violated |
but you can remove the row using
| [Shell terminal session] |
tiian@ubuntu1404-64:/tmp$ ./EXAMPLE2_ORA DELETE Executing EXAMPLE2_ORA Deleting a row from the table... Execution terminated! |
Check the table content again:
| [Sqlplus terminal session] |
SQL> select * from COUNTRIES where COUNTRY_ID = 'RS'; no rows selected |
You can check the trace produced by Oracle XA client with 2 completed transaction and an interrupted one (unique constraint error):
*** COMPLETED INSERT TRANSACTION ***
ORACLE XA: Version 12.1.0.2.0. RM name = 'Oracle_XA'.
232955.15623.4050298496.0:
xaoopen: xa_info=ORACLE_XA+Acc=P/hr/**+SesTm=30+LogDir=/tmp+threads=true+DbgFl=7+SqlNet=lixa_ora_db+Loose_Coupling=true,rmid=0,flags=0x0
232955.15623.4050298496.0:
xaolgn_help: version#: 185597952 banner: Oracle Database 11g Release 11.1.0.0.0 - Production
232955.15623.4050298496.0:
xaolgn: sqlxrc/sqlxss completed
232955.15623.4050298496.0:
xaolgn2: return XA_OK
232955.15623.4050298496.0:
xaoopen: xaolgn completed
232955.15623.4050298496.0:
xaoopen: return 0
232955.15623.4050298496.0:
ax_reg: xid=0x4c495841-57511f3ca5bd4f70890f31a467c8ff68-54bfbba0e21ccc50c05577130f0b2f6f, rmid=0, flags=0x0
232955.15623.4050298496.0:
OCITransStart: Attempting
232955.15623.4050298496.0:
OCITransStart: Succeeded
232955.15623.4050298496.0:
xaodynpo 2: rmid=0, state=131
232955.15623.4050298496.0:
xaoend: xid=0x4c495841-57511f3ca5bd4f70890f31a467c8ff68-54bfbba0e21ccc50c05577130f0b2f6f, rmid=0, flags=0x4000000
232955.15623.4050298496.0:
OCITransDetach: Attempting
232955.15623.4050298496.0:
OCITransDetach: Succeeded
232955.15623.4050298496.0:
xaoend: return 0
232955.15623.4050298496.0:
xaocommit: xid=0x4c495841-57511f3ca5bd4f70890f31a467c8ff68-54bfbba0e21ccc50c05577130f0b2f6f, rmid=0, flags=0x40000000
232955.15623.4050298496.0:
OCITransCommit: Attempting
232955.15623.4050298496.0:
xaodynpo 2: rmid=0, state=129
232955.15623.4050298496.0:
OCITransCommit: Succeeded
232955.15623.4050298496.0:
xaocommit: rtn 0
232955.15623.4050298496.0:
xaoclose: xa_info=, rmid=0, flags=0x0
232955.15623.4050298496.0:
OCIServerDetach: Attempting
232955.15623.4050298496.0:
OCIServerDetach: Succeeded
232955.15623.4050298496.0:
xaoclose: rtn 0
*** INTERRUPTED INSERT TRANSACTION ***
ORACLE XA: Version 12.1.0.2.0. RM name = 'Oracle_XA'.
233203.15629.223495808.0:
xaoopen: xa_info=ORACLE_XA+Acc=P/hr/**+SesTm=30+LogDir=/tmp+threads=true+DbgFl=7+SqlNet=lixa_ora_db+Loose_Coupling=true,rmid=0,flags=0x0
233203.15629.223495808.0:
xaolgn_help: version#: 185597952 banner: Oracle Database 11g Release 11.1.0.0.0 - Production
233203.15629.223495808.0:
xaolgn: sqlxrc/sqlxss completed
233203.15629.223495808.0:
xaolgn2: return XA_OK
233203.15629.223495808.0:
xaoopen: xaolgn completed
233203.15629.223495808.0:
xaoopen: return 0
233203.15629.223495808.0:
ax_reg: xid=0x4c495841-39f318a6af324a4782d5fe9988e7f7dd-54bfbba0e21ccc50c05577130f0b2f6f, rmid=0, flags=0x0
233203.15629.223495808.0:
OCITransStart: Attempting
233203.15629.223495808.0:
OCITransStart: Succeeded
233203.15629.223495808.0:
xaodynpo 2: rmid=0, state=131
*** COMPLETED DELETE TRANSACTION ***
ORACLE XA: Version 12.1.0.2.0. RM name = 'Oracle_XA'.
233222.15630.4127786624.0:
xaoopen: xa_info=ORACLE_XA+Acc=P/hr/**+SesTm=30+LogDir=/tmp+threads=true+DbgFl=7+SqlNet=lixa_ora_db+Loose_Coupling=true,rmid=0,flags=0x0
233222.15630.4127786624.0:
xaolgn_help: version#: 185597952 banner: Oracle Database 11g Release 11.1.0.0.0 - Production
233222.15630.4127786624.0:
xaolgn: sqlxrc/sqlxss completed
233222.15630.4127786624.0:
xaolgn2: return XA_OK
233222.15630.4127786624.0:
xaoopen: xaolgn completed
233222.15630.4127786624.0:
xaoopen: return 0
233222.15630.4127786624.0:
ax_reg: xid=0x4c495841-3bdca359b8fd4364b425bd6284ec1ceb-54bfbba0e21ccc50c05577130f0b2f6f, rmid=0, flags=0x0
233222.15630.4127786624.0:
OCITransStart: Attempting
233222.15630.4127786624.0:
OCITransStart: Succeeded
233222.15630.4127786624.0:
xaodynpo 2: rmid=0, state=131
233222.15630.4127786624.0:
xaoend: xid=0x4c495841-3bdca359b8fd4364b425bd6284ec1ceb-54bfbba0e21ccc50c05577130f0b2f6f, rmid=0, flags=0x4000000
233222.15630.4127786624.0:
OCITransDetach: Attempting
233222.15630.4127786624.0:
OCITransDetach: Succeeded
233222.15630.4127786624.0:
xaoend: return 0
233222.15630.4127786624.0:
xaocommit: xid=0x4c495841-3bdca359b8fd4364b425bd6284ec1ceb-54bfbba0e21ccc50c05577130f0b2f6f, rmid=0, flags=0x40000000
233222.15630.4127786624.0:
OCITransCommit: Attempting
233222.15630.4127786624.0:
xaodynpo 2: rmid=0, state=129
233222.15630.4127786624.0:
OCITransCommit: Succeeded
233222.15630.4127786624.0:
xaocommit: rtn 0
233222.15630.4127786624.0:
xaoclose: xa_info=, rmid=0, flags=0x0
233222.15630.4127786624.0:
OCIServerDetach: Attempting
233222.15630.4127786624.0:
OCIServerDetach: Succeeded
233222.15630.4127786624.0:
xaoclose: rtn 0
This example shows as you can implement DTP (Distributed Transaction Processing) with two Resource Managers (PostgreSQL and Oracle Database Server) coordinated by the LIXA Transaction Manager. It's strongly suggested you have played with the examples previously shown in this chapter (see Chapter 6, Developing COBOL Application Programs using TX (Transaction Demarcation) interface) before starting this more complex one.
This example was developed using the following configuration:
PostgreSQL 9.3.15 (client and server)
Oracle remote configuration with Instant Client 12.1
Oracle Pro*COBOL compiler as supplied by Oracle Instant Client 12.1
GnuCOBOL compiler and runtime as supplied by Ubuntu 14.04
If you were using a different version you would need to adapt some commands to your environment.
Note
If you did not yet installed the software provided by PostgreSQL, please refer to the official PostgreSQL site to download the software and to pick-up the information necessary to install and configure the database. This manual does not give you information related to PostgreSQL technology: it is assumed you already installed and configured the database.
If you did not yet installed the software provided by Oracle, please refer to the official Oracle site to download the software and to pick-up the information necessary to install and configure the database. This manual does not give you information related to Oracle technology: it is assumed you already installed and configured the database.
Important
The LIXA software must be configured to support the PostgreSQL and the Oracle Database Server resource managers as explained in the section called “Linking third party resource managers”. As a little hint, you should configure LIXA as below:
./configure --with-oracle-lib=/opt/oracle/instantclient_12_1 \ > --with-oracle-include=/opt/oracle/instantclient_12_1/sdk/include \ > --with-postgresql
Please don't forget you must compile and install every time you re-configure.
Prepare the environment following the following steps:
Set-up PostgreSQL environment as explained in the section called “”
Set-up the Oracle environment as explained in the section called “Oracle DMBS Configuration” and adapt the command to your Oracle Database Server version
Configure Oracle listener for remote connection as explained in the section called “Configure Oracle Listener”
Install and configure Oracle Instant Client as explained in the section called “Install and configure Oracle Instant Client”
Start the LIXA state server as explained in the section called “”
Create a shell script file, for example
oracle_env.sh
with some useful environment variables as below:
tiian@ubuntu1404-64:/tmp$ cat oracle_env.sh #!/bin/sh export LD_LIBRARY_PATH=/opt/oracle/instantclient_12_1:$LD_LIBRARY_PATH export PATH=/opt/oracle/instantclient_12_1:/opt/oracle/instantclient_12_1/sdk:$PATH export ORACLE_HOME=/opt/oracle/instantclient_12_1
source it and check the values:
tiian@ubuntu1404-64:/tmp$ . oracle_env.sh tiian@ubuntu1404-64:/tmp$ echo $LD_LIBRARY_PATH /opt/oracle/instantclient_12_1: tiian@ubuntu1404-64:/tmp$ echo $PATH /opt/oracle/instantclient_12_1:/opt/oracle/instantclient_12_1/sdk:/usr/local/sbin:/usr/local/bin:/usr/sbin:/usr/bin:/sbin:/bin:/usr/games:/usr/local/games tiian@ubuntu1404-64:/tmp$ echo $ORACLE_HOME /opt/oracle/instantclient_12_1
set LIXA environment variables:
tiian@ubuntu1404-64:/tmp$ export PATH=$PATH:/opt/lixa/bin tiian@ubuntu1404-64:/tmp$ echo $PATH /opt/oracle/instantclient_12_1:/opt/oracle/instantclient_12_1/sdk:/usr/local/sbin:/usr/local/bin:/usr/sbin:/usr/bin:/sbin:/bin:/usr/games:/usr/local/games:/opt/lixa/bin tiian@ubuntu1404-64:/tmp$ export LD_LIBRARY_PATH=$LD_LIBRARY_PATH:/opt/lixa/lib tiian@ubuntu1404-64:/tmp$ echo $LD_LIBRARY_PATH /opt/oracle/instantclient_12_1::/opt/lixa/lib
Prepare the client (Application Program) using the below commands:
| [Shell terminal session] |
tiian@ubuntu1404-64:/tmp$ cp /opt/lixa/share/doc/lixa-X.Y.Z/examples/cobol/EXAMPLE6_PQL_ORA.pco . tiian@ubuntu1404-64:/tmp$ procob EXAMPLE6_PQL_ORA.pco Pro*COBOL: Release 12.1.0.2.0 - Production on Sat Jan 21 20:01:52 2017 Copyright (c) 1982, 2014, Oracle and/or its affiliates. All rights reserved. System default option values taken from: /opt/oracle/instantclient_12_1/precomp/admin/pcbcfg.cfg tiian@ubuntu1404-64:/tmp$ export COB_LDFLAGS=-Wl,--no-as-needed tiian@ubuntu1404-64:/tmp$ cobc -x $(lixa-config -f -p) \ > -L/opt/oracle/instantclient_12_1 -lclntsh -lnnz12 \ > EXAMPLE6_PQL_ORA.cob /opt/oracle/instantclient_12_1/cobsqlintf.o |
Verify the executable produced by cobc:
| [Shell terminal session] |
tiian@ubuntu1404-64:/tmp$ ldd EXAMPLE6_PQL_ORA
linux-vdso.so.1 => (0x00007fffdf3fe000)
libcob.so.1 => /usr/lib/libcob.so.1 (0x00007eff28bed000)
libm.so.6 => /lib/x86_64-linux-gnu/libm.so.6 (0x00007eff288e7000)
libgmp.so.10 => /usr/lib/x86_64-linux-gnu/libgmp.so.10 (0x00007eff28672000)
libncurses.so.5 => /lib/x86_64-linux-gnu/libncurses.so.5 (0x00007eff2844f000)
libtinfo.so.5 => /lib/x86_64-linux-gnu/libtinfo.so.5 (0x00007eff28226000)
libdb-5.3.so => /usr/lib/x86_64-linux-gnu/libdb-5.3.so (0x00007eff27e83000)
libdl.so.2 => /lib/x86_64-linux-gnu/libdl.so.2 (0x00007eff27c7f000)
liblixac.so.0 => /opt/lixa/lib/liblixac.so.0 (0x00007eff27a64000)
liblixapq.so.0 => /opt/lixa/lib/liblixapq.so.0 (0x00007eff2785c000)
libclntsh.so.12.1 => /opt/oracle/instantclient_12_1/libclntsh.so.12.1 (0x00007eff2489f000)
libnnz12.so => /opt/oracle/instantclient_12_1/libnnz12.so (0x00007eff24195000)
libc.so.6 => /lib/x86_64-linux-gnu/libc.so.6 (0x00007eff23dcf000)
libpthread.so.0 => /lib/x86_64-linux-gnu/libpthread.so.0 (0x00007eff23bb1000)
/lib64/ld-linux-x86-64.so.2 (0x00007eff28e2b000)
libgmodule-2.0.so.0 => /usr/lib/x86_64-linux-gnu/libgmodule-2.0.so.0 (0x00007eff239ac000)
libglib-2.0.so.0 => /lib/x86_64-linux-gnu/libglib-2.0.so.0 (0x00007eff236a4000)
libxml2.so.2 => /usr/lib/x86_64-linux-gnu/libxml2.so.2 (0x00007eff2333d000)
liblixab.so.0 => /opt/lixa/lib/liblixab.so.0 (0x00007eff23123000)
libpq.so.5 => /usr/lib/libpq.so.5 (0x00007eff22ef4000)
libmql1.so => /opt/oracle/instantclient_12_1/libmql1.so (0x00007eff22c7e000)
libipc1.so => /opt/oracle/instantclient_12_1/libipc1.so (0x00007eff228ff000)
libons.so => /opt/oracle/instantclient_12_1/libons.so (0x00007eff226ba000)
libnsl.so.1 => /lib/x86_64-linux-gnu/libnsl.so.1 (0x00007eff224a0000)
librt.so.1 => /lib/x86_64-linux-gnu/librt.so.1 (0x00007eff22297000)
libaio.so.1 => /lib/x86_64-linux-gnu/libaio.so.1 (0x00007eff22095000)
libclntshcore.so.12.1 => /opt/oracle/instantclient_12_1/libclntshcore.so.12.1 (0x00007eff21b23000)
libpcre.so.3 => /lib/x86_64-linux-gnu/libpcre.so.3 (0x00007eff218e4000)
libz.so.1 => /lib/x86_64-linux-gnu/libz.so.1 (0x00007eff216cb000)
liblzma.so.5 => /lib/x86_64-linux-gnu/liblzma.so.5 (0x00007eff214a9000)
libuuid.so.1 => /lib/x86_64-linux-gnu/libuuid.so.1 (0x00007eff212a3000)
libssl.so.1.0.0 => /lib/x86_64-linux-gnu/libssl.so.1.0.0 (0x00007eff21044000)
libcrypto.so.1.0.0 => /lib/x86_64-linux-gnu/libcrypto.so.1.0.0 (0x00007eff20c68000)
libkrb5.so.3 => /usr/lib/x86_64-linux-gnu/libkrb5.so.3 (0x00007eff2099c000)
libcom_err.so.2 => /lib/x86_64-linux-gnu/libcom_err.so.2 (0x00007eff20798000)
libgssapi_krb5.so.2 => /usr/lib/x86_64-linux-gnu/libgssapi_krb5.so.2 (0x00007eff20551000)
libldap_r-2.4.so.2 => /usr/lib/x86_64-linux-gnu/libldap_r-2.4.so.2 (0x00007eff202ff000)
libk5crypto.so.3 => /usr/lib/x86_64-linux-gnu/libk5crypto.so.3 (0x00007eff200d0000)
libkrb5support.so.0 => /usr/lib/x86_64-linux-gnu/libkrb5support.so.0 (0x00007eff1fec4000)
libkeyutils.so.1 => /lib/x86_64-linux-gnu/libkeyutils.so.1 (0x00007eff1fcc0000)
libresolv.so.2 => /lib/x86_64-linux-gnu/libresolv.so.2 (0x00007eff1faa5000)
liblber-2.4.so.2 => /usr/lib/x86_64-linux-gnu/liblber-2.4.so.2 (0x00007eff1f895000)
libsasl2.so.2 => /usr/lib/x86_64-linux-gnu/libsasl2.so.2 (0x00007eff1f67a000)
libgssapi.so.3 => /usr/lib/x86_64-linux-gnu/libgssapi.so.3 (0x00007eff1f43c000)
libgnutls.so.26 => /usr/lib/x86_64-linux-gnu/libgnutls.so.26 (0x00007eff1f17d000)
libgcrypt.so.11 => /lib/x86_64-linux-gnu/libgcrypt.so.11 (0x00007eff1eefd000)
libheimntlm.so.0 => /usr/lib/x86_64-linux-gnu/libheimntlm.so.0 (0x00007eff1ecf3000)
libkrb5.so.26 => /usr/lib/x86_64-linux-gnu/libkrb5.so.26 (0x00007eff1ea6b000)
libasn1.so.8 => /usr/lib/x86_64-linux-gnu/libasn1.so.8 (0x00007eff1e7ca000)
libhcrypto.so.4 => /usr/lib/x86_64-linux-gnu/libhcrypto.so.4 (0x00007eff1e596000)
libroken.so.18 => /usr/lib/x86_64-linux-gnu/libroken.so.18 (0x00007eff1e381000)
libtasn1.so.6 => /usr/lib/x86_64-linux-gnu/libtasn1.so.6 (0x00007eff1e16d000)
libp11-kit.so.0 => /usr/lib/x86_64-linux-gnu/libp11-kit.so.0 (0x00007eff1df2a000)
libgpg-error.so.0 => /lib/x86_64-linux-gnu/libgpg-error.so.0 (0x00007eff1dd25000)
libwind.so.0 => /usr/lib/x86_64-linux-gnu/libwind.so.0 (0x00007eff1dafc000)
libheimbase.so.1 => /usr/lib/x86_64-linux-gnu/libheimbase.so.1 (0x00007eff1d8ed000)
libhx509.so.5 => /usr/lib/x86_64-linux-gnu/libhx509.so.5 (0x00007eff1d6a4000)
libsqlite3.so.0 => /usr/lib/x86_64-linux-gnu/libsqlite3.so.0 (0x00007eff1d3eb000)
libcrypt.so.1 => /lib/x86_64-linux-gnu/libcrypt.so.1 (0x00007eff1d1b1000)
libffi.so.6 => /usr/lib/x86_64-linux-gnu/libffi.so.6 (0x00007eff1cfa9000)
|
Set-up the LIXA_PROFILE environment variable:
| [Shell terminal session] |
tiian@ubuntu1404-64:/tmp$ export LIXA_PROFILE=PQL_STA_ORAIC_STA tiian@ubuntu1404-64:/tmp$ echo $LIXA_PROFILE PQL_STA_ORAIC_STA |
See the section called “Some checks before program execution” for additional details on the profile.
This example behaves has the sum of
EXAMPLE2_ORA explained in
the section called “An example with Oracle Pro*COBOL” and of
EXAMPLE5_PQL explained in
the section called “An example with PostgreSQL”:
the program tries to insert a row inside the Oracle database and a
row inside the PostgreSQL database.
The following paragraphs show the type of behavior that you try.
Both databases can insert the row:
| [Shell terminal session] |
tiian@ubuntu1404-64:/tmp$ ./EXAMPLE6_PQL_ORA INSERT Executing EXAMPLE6_PQL_ORA Inserting a row in the table... Status: +0000000000 PQexec INSERT Status: +0000000001 Execution terminated! |
Both databases can delete the row:
| [Shell terminal session] |
tiian@ubuntu1404-64:/tmp$ ./EXAMPLE6_PQL_ORA DELETE Executing EXAMPLE6_PQL_ORA Deleting a row from the table... Status: +0000000000 PQexec DELETE Status: +0000000001 Execution terminated! |
Oracle database can not insert the row:
| [Shell terminal session] |
tiian@ubuntu1404-64:/tmp$ ./EXAMPLE6_PQL_ORA INSERT
Executing EXAMPLE6_PQL_ORA
Inserting a row in the table...
Status: +0000000000
Error reported by Oracle: ORA-00001: unique constraint (HR.COUNTRY_C_ID_PK) violated
Rolling back due to SQL errors...
TXROLLBACK returned value +000000000
TXCLOSE returned value +000000000
|
and PostgreSQL has not inserted its row due to TXROLLBACK:
| [Shell terminal session] |
tiian@ubuntu1404-64:~$ psql testdb psql (9.3.15) Type "help" for help. testdb=> select * from AUTHORS; id | last_name | first_name ----+-----------+------------ (0 rows) |
PostgreSQL database can not insert the row:
| [Shell terminal session] |
tiian@ubuntu1404-64:/tmp$ ./EXAMPLE6_PQL_ORA INSERT Executing EXAMPLE6_PQL_ORA Inserting a row in the table... Status: +0000000000 PQexec INSERT Error in PQexec statement: ERROR: duplicate key value violates unique constraint "authors_pkey" DETAIL: Key (id)=(1) already exists. Rolling back due to SQL errors... TXROLLBACK returned value +000000000 TXCLOSE returned value +000000000 |
and Oracle has not inserted its row due to TXROLLBACK:
| [Shell terminal session] |
tiian@ubuntu1404-64:~$ sqlplus hr/hr@lixa_ora_db SQL*Plus: Release 12.1.0.2.0 Production on Sat Jan 21 21:44:23 2017 Copyright (c) 1982, 2014, Oracle. All rights reserved. Last Successful login time: Sat Jan 21 2017 21:42:12 +01:00 Connected to: Oracle Database 12c Standard Edition Release 12.1.0.2.0 - 64bit Production SQL> select * from COUNTRIES where COUNTRY_ID = 'RS'; no rows selected |
This chapter explains how you can develop your own C application using the libraries and tools supplied by the LIXA project.
The LIXA project ships with some example C programs that you can find in the /opt/lixa/share/doc/lixa-X.Y.Z/examples folder after software installation (see Chapter 2, Installation).
Note
This chapter is focused on the C programming language for the non-standard extensions that has been added to the TX specification to expose some of the XA interface capabilities. All the information supplied in Chapter 5, Developing C Application Programs using TX (Transaction Demarcation) interface still applies.
The LIXA project provides extensions to the [TXspec], named Transaction Coupling (TC) [40], which can be used in addition to the standard API when developing distributed Application Programs.
The API extensions are easy to use and the following C example briefly explains it:
#include <tx.h>
/* your includes */
int main(int argc, char *argv[])
{
int rc;
if (TX_OK != (rc = tx_open()))
/* handle error */
if (TX_OK != (rc = tx_begin()))
/* handle error */
/* do local work against Resource Manager here */
/* suspend the transaction so that work can continue elsewhere */
if (TX_OK != (rc = tx_end(TX_TMSUSPEND)))
/* handle error */
/* in another thread or another Application Program work can continue on the same transaction */
TXINFO txinfo;
if (TX_OK != (rc = tx_info(&txinfo)))
/* handle error */
if (TX_OK != (rc = tx_join(&txinfo.xid)))
/* handle error */
if (TX_OK != (rc = tx_end(TX_TMSUCCESS)))
/* handle error */
/* take up transaction again */
if (TX_OK != (rc = tx_resume(&txinfo.xid)))
/* handle error */
/* commit or roll back transaction */
if (TX_OK != (rc = tx_commit()))
/* handle errror */
/* shut down */
tx_close();
}
These are the available C functions:
tx_end: manage the global transaction withflags:TX_TMSUSPEND: suspend the transactionTX_TMSUCCESS: mark the portion of work on the global transaction as successfulTX_TMFAIL: mark the portion of work on the global transaction as failed
tx_join: join a suspended global transaction and continue worktx_resume: resume a suspended global transaction - only from the thread that suspended the original transaction

This example shows how two application programs can take part in the same global transaction when using the same Resource Manager coordinated by the LIXA Transaction Manager. Please make sure that you are comfortable with previous sections and examples before setting this up.
The following relates to the figure above:
Application Program 1: an application developed in C that is able to call functionality exposed by Application Program 2Application Program 2: an application developed in C that is able to fulfil service functionality when called by Application Program 1A1 and B1: includes Resource Manager specific calls during program executionC1: this is any custom protocol developed or used for communication between Application Program 1 and Application Program 2 - it is important to note that to make use of the Transaction Coupling extensions, one would have to share the XID between the programs.
This example was developed using the following configuration:
Oracle client and server with Oracle XE 11.2
GNU C compiler supplied with CentOS 7.3.1611:
[pieter.jvrensburg@centos-linux tmp]$ cc --version cc (GCC) 4.8.5 20150623 (Red Hat 4.8.5-11)
The environment should be prepared following these steps:
The Oracle environment as explained in the section called “Oracle DMBS Configuration”. Please adapt to your version of Oracle installed.
Configuration of the Oracle listener for remote connections as explained in the section called “Configure Oracle Listener”.
Installation and configuration of the Oracle Instance Client (if required) as explained in the section called “Install and configure Oracle Instant Client”.
Important
LIXA must be configured to support the Oracle Resource Manager as explained in the section called “Linking third party resource managers”.
Set up the required environment variables:
| [Shell terminal session] |
[pieter.jvrensburg@centos-linux ~]$ export ORACLE_HOME=/u01/app/oracle/product/11.2.0/xe
[pieter.jvrensburg@centos-linux ~]$ export ORACLE_SID=XE
[pieter.jvrensburg@centos-linux ~]$ export NLS_LANG=`$ORACLE_HOME/bin/nls_lang.sh`
[pieter.jvrensburg@centos-linux ~]$ export PATH=$ORACLE_HOME/bin:$PATH
[pieter.jvrensburg@centos-linux ~]$ export LD_LIBRARY_PATH=$ORACLE_HOME/lib:$LD_LIBRARY_PATH
And for LIXA:
[pieter.jvrensburg@centos-linux ~]$ export PATH=/opt/lixa/bin:/opt/lixa/sbin:$PATH
[pieter.jvrensburg@centos-linux ~]$ export LD_LIBRARY_PATH=/opt/lixa/lib:$LD_LIBRARY_PATH
|
Prepare the client (Application Program) using the below commands:
| [Shell terminal session] |
[pieter.jvrensburg@centos-linux tmp]$ cp /opt/lixa/share/doc/lixa/X.Y.Z/examples/example15_transaction_coupling.c .
[pieter.jvrensburg@centos-linux tmp]$ cc $(lixa-config -c -f -l) -L$ORACLE_HOME/lib -lclntsh -lnnz11 example15_transaction_coupling.c
|
Next, verify the executable produced by cc:
| [Shell terminal session] |
[pieter.jvrensburg@centos-linux tmp]$ ldd a.out
linux-vdso.so.1 => (0x00007ffce4b13000)
liblixac.so.0 => /opt/lixa/lib/liblixac.so.0 (0x00007f39938f6000)
libclntsh.so.11.1 => /u01/app/oracle/product/11.2.0/xe/lib/libclntsh.so.11.1 (0x00007f39910aa000)
libnnz11.so => /u01/app/oracle/product/11.2.0/xe/lib/libnnz11.so (0x00007f3990ce2000)
libc.so.6 => /lib64/libc.so.6 (0x00007f3990919000)
libgmodule-2.0.so.0 => /lib64/libgmodule-2.0.so.0 (0x00007f3990714000)
libgthread-2.0.so.0 => /lib64/libgthread-2.0.so.0 (0x00007f3990512000)
libxml2.so.2 => /lib64/libxml2.so.2 (0x00007f39901a8000)
liblixab.so.0 => /opt/lixa/lib/liblixab.so.0 (0x00007f398ff8a000)
libglib-2.0.so.0 => /lib64/libglib-2.0.so.0 (0x00007f398fc53000)
libpthread.so.0 => /lib64/libpthread.so.0 (0x00007f398fa37000)
libuuid.so.1 => /lib64/libuuid.so.1 (0x00007f398f831000)
libm.so.6 => /lib64/libm.so.6 (0x00007f398f52f000)
libdl.so.2 => /lib64/libdl.so.2 (0x00007f398f32b000)
libnsl.so.1 => /lib64/libnsl.so.1 (0x00007f398f111000)
libaio.so.1 => /lib64/libaio.so.1 (0x00007f398ef0f000)
/lib64/ld-linux-x86-64.so.2 (0x00007f3993b17000)
libz.so.1 => /lib64/libz.so.1 (0x00007f398ecf9000)
liblzma.so.5 => /lib64/liblzma.so.5 (0x00007f398ead2000)
|
Set up the LIXA_PROFILE environment variable:
| [Shell terminal session] |
[pieter.jvrensburg@centos-linux ~]$ export LIXA_PROFILE=ORA_STA
[pieter.jvrensburg@centos-linux ~]$ echo $LIXA_PROFILE
ORA_STA
|
See the section called “Some checks before program execution” for additional information on creating the profile configuration file.
This shows how a transaction was suspended and resumed within the same thread of control. The example in example15_transaction_coupling.c does not interact with the actual Oracle database, but loads the switch file.
Important
Make sure that the LIXA state server (lixad) is
running before executing the example application, as explained in
the section called “Starting the state server (lixad)”.
The transaction is suspended, resumed and then rolled back:
| [Shell terminal session] |
[pieter.jvrensburg@centos-linux tmp]$ LIXA_CONFIG_FILE=./lixac_conf.xml LIXA_PROFILE=ORA_STA ./a.out
tx_open(): 0
tx_begin(): 0
tx_end(TMSUSPEND): 0
tx_info(): 1
tx_resume(): 0
tx_commit(): 0
tx_begin(): 0
tx_end(TMSUSPEND): 0
tx_info(): 1
tx_resume(): 0
tx_rollback(): 0
tx_close(): 0
|
This example shows a basic usage of the extended TX interface API calls. A more elaborate use case will include developing two application programs that communicate with each other and share the XID obtained from tx_info so that the second application program can join the existing transaction.
This chapter explains what XTA is and how it can be used to develop applications that require to perform two phase commit ACID transactions.
XTA is a modern Application Programming Interface that has been specifically designed to enable two phase commit ACID transactions for polyglot microservice oriented applications.
Some interfaces, like TX Transaction Demarcation Specification [41], are today relegated to legacy applications and legacy use cases.
Other interfaces, like JTA Java Transaction API [42], are specific to a single language and/or a single runtime environment (Java/JRE).
XTA aims to provide TXaaS (Transaction as a Service) backend services that can be used by cloud native applications that, for one reason or another, require two phase commit ACID transactions among distributed applications [43].

The above picture explains the software stack architecture for an XTA
application: the Application Program interacts
with XA Resource Managers, like PostgreSQL and
MySQL, and with XTA.
XTA wraps LIXA libraries that
interact with the Resource Managers and implement
the client side part of the transaction management logic.

The simplest deployment of an XTA application consists of a single
Application Program that uses one or more
Resource Managers in a distributed transaction.
XTA connects to LIXA state server
(lixad) to coordinate the XA two phase
commit protocol.
Application Program,
Resource Managers and
LIXA state server don't have to reside in the
same system: they can be distributed in different systems that
communicate by mean of the TCP/IP protocol.

XTA allows deployment of multiple
Application Programs that use one or more
Resource Managers in a distributed transaction.
XTA connects to LIXA state server
(lixad) to coordinate the XA two phase
commit protocol.
Application Programs,
Resource Managers and
LIXA state server don't have to reside in the
same system: they can be distributed in different systems that
communicate by mean of the TCP/IP protocol.
Note
XTA implements the logic necessary to distribute a global transaction between two or more Application Programs but it does not provide the communication protocol between them. Using the above picture as an example, it's in charge of Application Program 1 to exchange information with Application Program 2: any synchronous or asynchronous protocol can be used.
Anyway, two constraints can't be violated:
all the Application Programs that participate in the same global transaction, must connect to the same LIXA state server
the Application Programs must call XTA functions in the proper order to participate in the same global transaction
XTA does not constraint many other aspects:
Application Programs don't have to be developed using the same programming language
Application Programs don't have to be executed inside the same sort of application container or server; example: one Application Program can be executed inside a shell script, another one can be executed under the supervision of an HTTP server
Application Programs can use any sort of communication channel to transfer the transaction identifier (XID): it can be REST over HTTP, it can be a message queueing system, it can be a POSIX pipe and so on. Any communication channel that can send an ASCII string is eligible for passing the transaction identifier (XID)
Application Programs can be called using consecutive calls or can run in concurrent branches
Important
Not all Resource Managers can be used in all the possible configurations that can be inferred from Figure 8.3, “Multiple applications layout”; further details will be provided in the next sections of this chapter.
XTA strongly depends from the type of XA support provided by the different Resource Managers and from the language bindings supplied with the Resource Managers' libraries. The following table is updated with the tested configurations: [44]
Table 8.1. Resouce Managers and Programming Languages for XTA
| Resource Manager | C | C++ | Java [a] | PHP[b] | Python |
|---|---|---|---|---|---|
| MySQL, MariaDB[c] | Y | Y | Y | - | Y[d] |
| Oracle DBMS | Y | Y | Y | N[e] | N[f] |
| PostgreSQL[g] | Y | Y | Y | - | Y[h] |
[a]
Every Resource Manager that supplies a proper
implementation of the
[b] Planned a SWIG wrapper, not yet implemented [c] “Multiple Applications, Consecutive Calls” pattern is not available because MySQL/MariaDB doesn't support TMSUSPEND and TMRESUME standard XA flags [e] No known way to re-use a standard OCI connection as an XA OCI connection; possibly not implementable [f] No known way to re-use a standard OCI connection as an XA OCI connection; possibly not implementable [g] “Multiple Applications, Consecutive Calls” pattern is not available because PostgreSQL doesn't support TMSUSPEND and TMRESUME standard XA flags | |||||
XTA support 4 different patterns:
“Single Application”: single Application Program with single or multiple Resource Managers as supported by the TX Transaction Demarcation Specification. An implementation example is described in the section called “The “Single Application” Pattern”.
“Multiple Applications, Consecutive Calls”: multiple Application Programs with single or multiple Resource Managers, only one Application Program is working as part of a transaction at a specified time, the XA global transaction is composed by a single transaction branch. An implementation example is described in the section called “The “Multiple Applications, Consecutive Calls” Pattern”.
“Multiple Applications, Concurrent Branches/Pseudo Synchronous”: multiple Application Programs with single or multiple Resource Managers, many Application Programs are concurrently working as part of a transaction at a specified time, the XA global transaction is composed by multiple transaction branches, the type of interaction among the Application Programs is “Pseudo Synchronous”. An implementation example is described in the section called “The “Multiple Applications, Concurrent Branches/Pseudo Synchronous” Pattern”.
“Multiple Applications, Concurrent Branches/Pseudo Asynchronous”: multiple Application Programs with single or multiple Resource Managers, many Application Programs are concurrently working as part of a transaction at a specified time, the XA global transaction is composed by multiple transaction branches, the type of interaction among the Application Programs is “Pseudo Asynchronous”. An implementation example is described in the section called “The “Multiple Applications, Concurrent Branches/Pseudo Asynchronous” Pattern”.
Important
This section refers to concepts that are linked with deep technical details of the [XAspec]: they are not trivial and sometimes they could even sound strange due to the epoch of XA standard design. XTA tries to provide an easy and modern interface for working with XA, but some caveats still remain at least for these reasons:
XA was designed as a protocol between one Transaction Manager and one or more Resource Managers; the designers probably didn't imagine the usage of XA inside something like XTA
XA standard predated the free software and open source initiatives and the design had to cope with commercial closed source softwares. Furthermore, XA didn't introduce changes in the proprietary protocols between Application Programs and Resource Managers, but “sidecar” approach was choosen.
Note
XTA is compatible with some interfaces (and classes) defined inside
the JTA (Java Transaction API) Version 1.2. Specifically, XTA
supports the Xid interface, it's compatible with
the XAException class and it's compatible with
classes that implement XAResource interface.
XTA is not an implementation of the JTA standard and it can't be used to replace a JTA implementation: XTA provides a different set of functions that are designed to support a different set of use cases. XTA reuses some interfaces and classes defined by JTA to leverage the huge amount of available JTA compliant Resource Managers.
[XAspec] defines the interface that must be
implemented by an “XA standard compliant”
Resource Manager: it's described in file
xa.h by struct xa_switch_t.
One tricky point is a consequence of xa_open()
and xa_close() functions: they must be called to
“open” and “close” the
Resource Manager.
Non XA applications use native functions to open and close the connections with the resource managers.
Application Programs that run in a XA context, must retrieve the connections with the Resource Managers previously opened by the Transaction Manager.
During LIXA development, 3 different type of Resource Managers have been discovered:
XA standard compliant Resource Managers that implement
xa_switch_tinterface and use the exact same functions to open a new connection and to retrieve a connection previously opened by the Transaction Manager: IBM DB2 and IBM MQ (previously MQSeries and WebSphere MQ) belong to this category [45]XA standard compliant Resource Managers that implement
xa_switch_tinterface and use different functions to open a new connection and to retrieve a connection previously opened by the Transaction Manager: Oracle Database Server belongs to this category [46]Non XA standard compliant Resource Managers that don't implement
xa_switch_tinterface and provide some XA equivalent functions by mean of special commands: MySQL[47], MariaDB and PostgreSQL belong to this category
The second type of Resource Managers is the most difficult to integrate from XTA perspective: next paragraphs explain why.
To cope with the different implementations of XA Resource Managers, XTA introduces a specific hierarchy for resources as depicted in the below image:

XAResource is an abstract class that can't be used to map a real Resource Manager, but useful to pass an object reference.
NativeXAResource is the concrete class that must be used for all the Resource Managers that provide XA standard interface.
AcquiredXAResource is a partially abstract class with basically no practical use (only conceptual).
MySQLXAResource is the concrete class that must be used for MySQL and MariaDB Resource Managers: it implements a specific constructor that accepts a MYSQL type connection.
PostgreSQLXAResource is the concrete class that must be used for PostgreSQL Resource Manager: it implements a specific constructor that accepts a PGconn type connection.
XtaJavaXAResource is a shadow class used to interface Java XAResource classes with XTA C libraries by mean of JNI (Java Native Interface). It's a type of resource the Application Program developer will never use.
Further non XA standard Resource Managers will require specialized somethingXAResource.
Due to the above explanation, the usage of the different XTA resource types present some differences:
NativeXAResource can be statically defined inside
lixac_conf.xmlor can be dynamically defined at run time using the class constructor.statically defined NativeXAResource must be created (method
new) after Transaction Manager object creationdynamically defined NativeXAResource must be created (method
new) before Transaction Manager object creationstatically defined NativeXAResource can be enlisted (method
enlist_resource), but it's not necessarydynamically defined NativeXAResource and AcquiredXAResource must be enlisted (method
enlist_resource) to participate in a distributed Transaction
XAResource must be created as standard
Java XAResource and must be enlisted with method
Transaction.enlistResource().
Java resources must be explicitly imported by the Application Program
and the necessary jar files must be put in
classpath as usual.
See the section called “Configuring Resource Managers for XTA Java” for additional information related to XTA for Java and Resource Managers.
XTA API Reference is extracted from source code using
Doxygen tool.
If you install doxygen, it will be produced
during build phase and stored in directory
doc/api/xta/html.
XTA API Reference can be consulted online:
C language: http://www.tiian.org/lixa/manuals/xta/C/
C++ language: http://www.tiian.org/lixa/manuals/xta/CPP/
Java language: http://www.tiian.org/lixa/manuals/xta/Java/
Python language: the client binding is produced by SWIG from the C++ interface; please look at C++ interface
XTA supplies a set of ready to use Docker images than can be downloaded from DockerHub or build from source code.
| The pattern in brief: | |
| Architecture: | see Figure 8.2, “Single application layout” |
| Number of Application Programs: | exactly 1 |
| Number of Resource Managers: | many, if 1 single phase commit will be used |
| Number of Branches in the Gloabal Transaction: | exactly 1 |
| Concurrency among Application Programs: | not applicable |
This is a traditional Distributed Transaction Processing pattern: a single Application Program uses two or more Resource Managers and performs a transaction that change the state of both. Here is a list of examples:
RM1 and RM2 are two different databases, for example PostgreSQL and MySQL (or MariaDB): the Application Program moves a record from RM1 (PostgreSQL) to RM2 (MySQL)
RM1 and RM2 are a messaging system and a database, for example IBM MQ and Oracle Databae Server: the Application Program get a message from a queue, insert a row in a table, remove the message from the queue
RM1 and RM2 are two different types of database and the Application Program inserts exactly the same data in both, maybe using a different format
The pattern can be implemented even using the standard TX Transaction Demarcation interface, but XTA is much more object oriented.

The above figure shows the logic necessary to build this type of application; it's not a formally correct UML sequence diagram (all the XTA objects are in the same lifeline), but it should be clear enough to understand the proper operations sequence:
The Application Program (AP) creates the native objects/connections/handles [48] that are necessary to operate with the Resource Managers [49]
The AP creates some XTA objects: a
TransactionManager, twoXaResourceand oneTransactionThe AP “enlists” the XA resources that must be controlled by the transaction using
EnlistResource()methodThe AP uses the
Open()method to initialize theXaResourceobjectsThe AP uses the
Start()method to start a new XA distributed transactionThe AP interacts with the Resource Managers, using the native objects/connections/handles to operate (“doSomething” method in the diagram)
The AP uses the
Commit()method to commit the distributed transaction, or theRollback()method to rollback all the changes sinceStart()The AP cleans-up the environment
Note
The dashed red rectangle highlights the XA global transaction.
Note
The methods listed in the above description must be considered “pseudo-code”: the real name and signature is language dependent. As an example,
tm = new TransactionManager()
translates to
tm = xta_transaction_manager_new()
and
tx.Commit()
translates to
xta_transaction_commit(tx, FALSE)
in C.
The supplied example (example_xta_sa01.c) uses
PostgreSQL in the role of “Resource Manager 1” and MySQL
(or MariaDB) in the role of “Resource Manager 2”; please
refer to the instructions explained :
in the section called “MySQL/MariaDB Configuration” to set-up a running environment for MySQL server
in the section called “PostgreSQL Configuration” to set-up a running environment for PostgreSQL server
in the section called “Starting the state server (lixad)” to start up the LIXA state server
Create a working directory in a place you are comfortable with:
| [Shell terminal session] |
tiian@ubuntu1404-64:~$ cd tiian@ubuntu1404-64:~$ mkdir tmp tiian@ubuntu1404-64:~$ cd tmp tiian@ubuntu1404-64:~/tmp$ |
Copy file example_xta_sa01.c in your working dir:
| [Shell terminal session] |
tiian@ubuntu:~/tmp$ cp /opt/lixa/share/doc/lixa-X.Y.Z/examples/xta/example_xta_sa01.c . |
Substitute “X.Y.Z” with the actual version of the software you installed.
Compile and link the C example program:
| [Shell terminal session] |
tiian@ubuntu1404-64:~/tmp$ . /opt/lixa/bin/lixa_env.sh tiian@ubuntu1404-64:~/tmp$ gcc example_xta_sa01.c $(lixa-config -x -c -f -l -d) -lpq $(mysql_config --libs_r) -o example_xta_sa01 |
If the previous steps worked for you, you should have an executable
file of name example_xta_sa01 in your current
directory:
| [Shell terminal session] |
tiian@ubuntu1404-64:/tmp$ ls -l total 32 -rwxrwxr-x 1 tiian tiian 18603 mar 20 22:56 example_xta_sa01 -rw-r--r-- 1 tiian tiian 8302 mar 20 22:50 example_xta_sa01.c |
The example program accepts two arguments:
commit (or rollback): use “1” if you want to perform a global commit or “0” if you want to perform a global rollback
insert (or delete): use “1” if you want to insert rows in databases or “0” if you want to delete rows from databases
Open three terminal sessions: one for example execution,
| [Shell terminal session - AP] |
tiian@ubuntu1404-64:~/tmp$ ls -la total 40 drwxrwxr-x 2 tiian tiian 4096 mar 20 23:13 . drwxr-xr-x 12 tiian tiian 4096 mar 21 22:17 .. -rwxrwxr-x 1 tiian tiian 18603 mar 20 23:13 example_xta_sa01 -rw-r--r-- 1 tiian tiian 8302 mar 20 23:08 example_xta_sa01.c |
one for PostgreSQL queries
| [Shell terminal session - PostgreSQL] |
tiian@ubuntu1404-64:~$ psql testdb psql (9.3.22) Type "help" for help. testdb=> |
and one for MySQL queries
| [Shell terminal session - MySQL] |
tiian@ubuntu1404-64:~$ mysql -h localhost -u lixa lixa Reading table information for completion of table and column names You can turn off this feature to get a quicker startup with -A Welcome to the MySQL monitor. Commands end with ; or \g. Your MySQL connection id is 36 Server version: 5.5.59-0ubuntu0.14.04.1 (Ubuntu) Copyright (c) 2000, 2018, Oracle and/or its affiliates. All rights reserved. Oracle is a registered trademark of Oracle Corporation and/or its affiliates. Other names may be trademarks of their respective owners. Type 'help;' or '\h' for help. Type '\c' to clear the current input statement. mysql> |
set LIXA_PROFILE environment variable to
XTA_DYN
a profile without static Resource Managers defined in
lixac_conf.xml:
| [Shell terminal session - AP] |
tiian@ubuntu1404-64:~/tmp$ export LIXA_PROFILE=XTA_DYN tiian@ubuntu1404-64:~/tmp$ echo $LIXA_PROFILE XTA_DYN |
insert rows in tables and commit:
| [Shell terminal session - AP] |
tiian@ubuntu1404-64:~/tmp$ ./example_xta_sa01 1 1 PostgreSQL, executing >INSERT INTO authors VALUES(1921, 'Rigoni Stern', 'Mario')< MySQL, executing >INSERT INTO authors VALUES(1919, 'Levi', 'Primo')< tiian@ubuntu1404-64:~/tmp$ |
check PostgreSQL table content:
| [Shell terminal session - PostgreSQL] |
testdb=> select * from authors; id | last_name | first_name ------+--------------+------------ 1921 | Rigoni Stern | Mario (1 row) testdb=> |
check MySQL table content:
| [Shell terminal session - MySQL] |
mysql> select * from authors; +------+-----------+------------+ | id | last_name | first_name | +------+-----------+------------+ | 1919 | Levi | Primo | +------+-----------+------------+ 1 row in set (0.00 sec) mysql> |
delete rows from tables, but rollback:
| [Shell terminal session - AP] |
tiian@ubuntu1404-64:~/tmp$ ./example_xta_sa01 0 0 PostgreSQL, executing >DELETE FROM authors WHERE id=1921< MySQL, executing >DELETE FROM authors WHERE id=1919< tiian@ubuntu1404-64:~/tmp$ |
check PostgreSQL table content:
| [Shell terminal session - PostgreSQL] |
testdb=> select * from authors; id | last_name | first_name ------+--------------+------------ 1921 | Rigoni Stern | Mario (1 row) testdb=> |
check MySQL table content:
| [Shell terminal session - MySQL] |
mysql> select * from authors; +------+-----------+------------+ | id | last_name | first_name | +------+-----------+------------+ | 1919 | Levi | Primo | +------+-----------+------------+ 1 row in set (0.00 sec) mysql> |
delete rows and commit:
| [Shell terminal session - AP] |
tiian@ubuntu1404-64:~/tmp$ ./example_xta_sa01 1 0 PostgreSQL, executing >DELETE FROM authors WHERE id=1921< MySQL, executing >DELETE FROM authors WHERE id=1919< tiian@ubuntu1404-64:~/tmp$ |
check PostgreSQL table content:
| [Shell terminal session - PostgreSQL] |
testdb=> select * from authors; id | last_name | first_name ----+-----------+------------ (0 rows) testdb=> |
check MySQL table content:
| [Shell terminal session - MySQL] |
mysql> select * from authors; Empty set (0.00 sec) mysql> |
Source code for program example_xta_sa01.c is
installed in directory
/opt/lixa/share/doc/lixa-X.Y.Z/examples/xta and
is available on GitHub. Source code is fully
commented for readability.
The supplied example (example_xta_sa11.cpp) uses
PostgreSQL in the role of “Resource Manager 1” and MySQL
(or MariaDB) in the role of “Resource Manager 2”; please
refer to the instructions explained:
in the section called “MySQL/MariaDB Configuration” to set-up a running environment for MySQL server
in the section called “PostgreSQL Configuration” to set-up a running environment for PostgreSQL server
in the section called “Starting the state server (lixad)” to start up the LIXA state server
Create a working directory in a place you are comfortable with:
| [Shell terminal session] |
tiian@ubuntu1404-64:~$ cd tiian@ubuntu1404-64:~$ mkdir tmp tiian@ubuntu1404-64:~$ cd tmp tiian@ubuntu1404-64:~/tmp$ |
Copy file example_xta_sa11.cpp in your working
dir:
| [Shell terminal session] |
tiian@ubuntu:~/tmp$ cp /opt/lixa/share/doc/lixa-X.Y.Z/examples/xta/cpp/example_xta_sa11.cpp . |
Substitute “X.Y.Z” with the actual version of the software you installed.
Compile and link the C++ example program:
| [Shell terminal session] |
tiian@ubuntu1404-64:~/tmp$ . /opt/lixa/bin/lixa_env.sh tiian@ubuntu1404-64:~/tmp$ g++ example_xta_sa11.cpp $(lixa-config -c -f -l -d --xta --language-cpp) -lpq $(mysql_config --libs_r) -o example_xta_sa11 |
If the previous steps worked for you, you should have an executable
file of name example_xta_sa11 in your current
directory:
| [Shell terminal session] |
tiian@ubuntu1404-64:~/tmp$ ls -l total 36 -rwxrwxr-x 1 tiian tiian 25613 ago 24 22:19 example_xta_sa11 -rw-r--r-- 1 tiian tiian 7748 ago 24 22:19 example_xta_sa11.cpp |
The example program accepts two arguments:
commit (or rollback): use “1” if you want to perform a global commit or “0” if you want to perform a global rollback
insert (or delete): use “1” if you want to insert rows in databases or “0” if you want to delete rows from databases
Open three terminal sessions: one for example execution,
| [Shell terminal session - AP] |
tiian@ubuntu1404-64:~/tmp$ ls -la total 44 drwxrwxr-x 2 tiian tiian 4096 ago 24 22:19 . drwxr-xr-x 12 tiian tiian 4096 ago 24 22:02 .. -rwxrwxr-x 1 tiian tiian 25613 ago 24 22:19 example_xta_sa11 -rw-r--r-- 1 tiian tiian 7748 ago 24 22:19 example_xta_sa11.cpp |
one for PostgreSQL queries
| [Shell terminal session - PostgreSQL] |
tiian@ubuntu1404-64:~$ psql testdb psql (9.3.23) Type "help" for help. testdb=> |
and one for MySQL queries
| [Shell terminal session - MySQL] |
tiian@ubuntu1404-64:~$ mysql -h localhost -u lixa lixa Reading table information for completion of table and column names You can turn off this feature to get a quicker startup with -A Welcome to the MySQL monitor. Commands end with ; or \g. Your MySQL connection id is 44 Server version: 5.5.61-0ubuntu0.14.04.1 (Ubuntu) Copyright (c) 2000, 2018, Oracle and/or its affiliates. All rights reserved. Oracle is a registered trademark of Oracle Corporation and/or its affiliates. Other names may be trademarks of their respective owners. Type 'help;' or '\h' for help. Type '\c' to clear the current input statement. mysql> |
set LIXA_PROFILE environment variable to
XTA_DYN
a profile without static Resource Managers defined in
lixac_conf.xml:
| [Shell terminal session - AP] |
tiian@ubuntu1404-64:~/tmp$ export LIXA_PROFILE=XTA_DYN tiian@ubuntu1404-64:~/tmp$ echo $LIXA_PROFILE XTA_DYN |
insert rows in tables and commit:
| [Shell terminal session - AP] |
tiian@ubuntu1404-64:~/tmp$ ./example_xta_sa11 1 1 PostgreSQL, executing >INSERT INTO authors VALUES(1921, 'Rigoni Stern', 'Mario')< MySQL, executing >INSERT INTO authors VALUES(1919, 'Levi', 'Primo')< tiian@ubuntu1404-64:~/tmp$ |
check PostgreSQL table content:
| [Shell terminal session - PostgreSQL] |
testdb=> select * from authors; id | last_name | first_name ------+--------------+------------ 1921 | Rigoni Stern | Mario (1 row) testdb=> |
check MySQL table content:
| [Shell terminal session - MySQL] |
mysql> select * from authors; +------+-----------+------------+ | id | last_name | first_name | +------+-----------+------------+ | 1919 | Levi | Primo | +------+-----------+------------+ 1 row in set (0.00 sec) mysql> |
delete rows from tables, but rollback:
| [Shell terminal session - AP] |
tiian@ubuntu1404-64:~/tmp$ ./example_xta_sa11 0 0 PostgreSQL, executing >DELETE FROM authors WHERE id=1921< MySQL, executing >DELETE FROM authors WHERE id=1919< tiian@ubuntu1404-64:~/tmp$ |
check PostgreSQL table content:
| [Shell terminal session - PostgreSQL] |
testdb=> select * from authors; id | last_name | first_name ------+--------------+------------ 1921 | Rigoni Stern | Mario (1 row) testdb=> |
check MySQL table content:
| [Shell terminal session - MySQL] |
mysql> select * from authors; +------+-----------+------------+ | id | last_name | first_name | +------+-----------+------------+ | 1919 | Levi | Primo | +------+-----------+------------+ 1 row in set (0.00 sec) mysql> |
delete rows and commit:
| [Shell terminal session - AP] |
tiian@ubuntu1404-64:~/tmp$ ./example_xta_sa11 1 0 PostgreSQL, executing >DELETE FROM authors WHERE id=1921< MySQL, executing >DELETE FROM authors WHERE id=1919< tiian@ubuntu1404-64:~/tmp$ |
check PostgreSQL table content:
| [Shell terminal session - PostgreSQL] |
testdb=> select * from authors; id | last_name | first_name ----+-----------+------------ (0 rows) testdb=> |
check MySQL table content:
| [Shell terminal session - MySQL] |
mysql> select * from authors; Empty set (0.00 sec) mysql> |
Source code for program example_xta_sa11.cpp is
installed in directory
/opt/lixa/share/doc/lixa-X.Y.Z/examples/xta/cpp and
is available on GitHub.
Source code is fully commented for readability.
The supplied example (ExampleXtaSA31.java) uses
PostgreSQL in the role of “Resource Manager 1” and MySQL
(or MariaDB) in the role of “Resource Manager 2”; please
refer to the instructions explained:
in the section called “MySQL/MariaDB Configuration” to set-up a running environment for MySQL server
in the section called “PostgreSQL Configuration” to set-up a running environment for PostgreSQL server
in the section called “Starting the state server (lixad)” to start up the LIXA state server
Create a working directory in a place you are comfortable with:
| [Shell terminal session] |
tiian@ubuntu1404-64:~$ cd tiian@ubuntu1404-64:~$ mkdir tmp tiian@ubuntu1404-64:~$ cd tmp tiian@ubuntu1404-64:~/tmp$ |
Copy file ExampleXtaSA31.java in your working
dir:
| [Shell terminal session] |
tiian@ubuntu:~/tmp$ cp /opt/lixa/share/doc/lixa-X.Y.Z/examples/xta/java/ExampleXtaSA31.java . |
Substitute “X.Y.Z” with the actual version of the software you installed.
Use the proper paths for MySQL and PostgreSQL jars, then compile the Java example program with something like:
| [Shell terminal session] |
tiian@ubuntu1404-64:~/tmp$ javac -cp /opt/lixa/share/lixa/java/xta.jar:/usr/share/java/mysql.jar:/opt/postgresql/postgresql.jar ExampleXtaSA31.java |
If the previous steps worked for you, you should have a class
file of name ExampleXtaSA31.class in your current
directory:
| [Shell terminal session] |
tiian@ubuntu1404-64:~/tmp$ ls -l total 16 -rw-rw-r-- 1 tiian tiian 4169 gen 13 22:24 ExampleXtaSA31.class -rw-r--r-- 1 tiian tiian 8065 gen 13 22:22 ExampleXtaSA31.java |
The example program accepts two arguments:
commit (or rollback): use “1” if you want to perform a global commit or “0” if you want to perform a global rollback
insert (or delete): use “1” if you want to insert rows in databases or “0” if you want to delete rows from databases
Open three terminal sessions: one for example execution,
| [Shell terminal session - AP] |
tiian@ubuntu1404-64:~/tmp$ ls -la total 24 drwxrwxr-x 2 tiian tiian 4096 gen 13 22:24 . drwxr-xr-x 17 tiian tiian 4096 gen 13 22:23 .. -rw-rw-r-- 1 tiian tiian 4169 gen 13 22:24 ExampleXtaSA31.class -rw-r--r-- 1 tiian tiian 8065 gen 13 22:22 ExampleXtaSA31.java |
one for PostgreSQL queries
| [Shell terminal session - PostgreSQL] |
tiian@ubuntu1404-64:~$ psql testdb psql (9.3.24) Type "help" for help. testdb=> |
and one for MySQL queries
| [Shell terminal session - MySQL] |
tiian@ubuntu1404-64:~$ mysql -h localhost -u lixa lixa Reading table information for completion of table and column names You can turn off this feature to get a quicker startup with -A Welcome to the MySQL monitor. Commands end with ; or \g. Your MySQL connection id is 44 Server version: 5.5.62-0ubuntu0.14.04.1 (Ubuntu) Copyright (c) 2000, 2018, Oracle and/or its affiliates. All rights reserved. Oracle is a registered trademark of Oracle Corporation and/or its affiliates. Other names may be trademarks of their respective owners. Type 'help;' or '\h' for help. Type '\c' to clear the current input statement. mysql> |
set LIXA_PROFILE environment variable to
XTA_DYN
a profile without static Resource Managers defined in
lixac_conf.xml:
| [Shell terminal session - AP] |
tiian@ubuntu1404-64:~/tmp$ export LIXA_PROFILE=XTA_DYN tiian@ubuntu1404-64:~/tmp$ echo $LIXA_PROFILE XTA_DYN |
insert rows in tables and commit:
| [Shell terminal session - AP] |
tiian@ubuntu1404-64:~/tmp$ java -Djava.library.path=/opt/lixa/lib -cp /opt/lixa/share/lixa/java/xta.jar:/usr/share/java/mysql.jar:/opt/postgresql/postgresql.jar:. ExampleXtaSA31 1 1 PostgreSQL, executing >INSERT INTO authors VALUES(1921, 'Rigoni Stern', 'Mario')< MySQL, executing >INSERT INTO authors VALUES(1919, 'Levi', 'Primo')< tiian@ubuntu1404-64:~/tmp$ |
check PostgreSQL table content:
| [Shell terminal session - PostgreSQL] |
testdb=> select * from authors; id | last_name | first_name ------+--------------+------------ 1921 | Rigoni Stern | Mario (1 row) testdb=> |
check MySQL table content:
| [Shell terminal session - MySQL] |
mysql> select * from authors; +------+-----------+------------+ | id | last_name | first_name | +------+-----------+------------+ | 1919 | Levi | Primo | +------+-----------+------------+ 1 row in set (0.00 sec) mysql> |
delete rows from tables, but rollback:
| [Shell terminal session - AP] |
tiian@ubuntu1404-64:~/tmp$ java -Djava.library.path=/opt/lixa/lib -cp /opt/lixa/share/lixa/java/xta.jar:/usr/share/java/mysql.jar:/opt/postgresql/postgresql.jar:. ExampleXtaSA31 0 0 PostgreSQL, executing >DELETE FROM authors WHERE id=1921< MySQL, executing >DELETE FROM authors WHERE id=1919< tiian@ubuntu1404-64:~/tmp$ |
check PostgreSQL table content:
| [Shell terminal session - PostgreSQL] |
testdb=> select * from authors; id | last_name | first_name ------+--------------+------------ 1921 | Rigoni Stern | Mario (1 row) testdb=> |
check MySQL table content:
| [Shell terminal session - MySQL] |
mysql> select * from authors; +------+-----------+------------+ | id | last_name | first_name | +------+-----------+------------+ | 1919 | Levi | Primo | +------+-----------+------------+ 1 row in set (0.00 sec) mysql> |
delete rows and commit:
| [Shell terminal session - AP] |
tiian@ubuntu1404-64:~/tmp$ java -Djava.library.path=/opt/lixa/lib -cp /opt/lixa/share/lixa/java/xta.jar:/usr/share/java/mysql.jar:/opt/postgresql/postgresql.jar:. ExampleXtaSA31 1 0 PostgreSQL, executing >DELETE FROM authors WHERE id=1921< MySQL, executing >DELETE FROM authors WHERE id=1919< tiian@ubuntu1404-64:~/tmp$ |
check PostgreSQL table content:
| [Shell terminal session - PostgreSQL] |
testdb=> select * from authors; id | last_name | first_name ----+-----------+------------ (0 rows) testdb=> |
check MySQL table content:
| [Shell terminal session - MySQL] |
mysql> select * from authors; Empty set (0.00 sec) mysql> |
Source code for program ExampleXtaSA31.java is
installed in directory
/opt/lixa/share/doc/lixa-X.Y.Z/examples/xta/java and
is available on GitHub.
Source code is fully commented for readability.
The supplied example (example_xta_sa21.py) uses
PostgreSQL in the role of “Resource Manager 1” and MySQL
(or MariaDB) in the role of “Resource Manager 2”; please
refer to the instructions explained :
in the section called “XTA Technology Matrix” to build and install the Python database drivers that can be used with XTA
in the section called “MySQL/MariaDB Configuration” to set-up a running environment for MySQL server
in the section called “PostgreSQL Configuration” to set-up a running environment for PostgreSQL server
in the section called “Starting the state server (lixad)” to start up the LIXA state server
The example can be used with Python 2 and Python 3.
Create a working directory in a place you are comfortable with:
| [Shell terminal session] |
tiian@ubuntu1404-64:~$ cd tiian@ubuntu1404-64:~$ mkdir tmp tiian@ubuntu1404-64:~$ cd tmp tiian@ubuntu1404-64:~/tmp$ |
Copy file example_xta_sa21.py in your working
dir:
| [Shell terminal session] |
tiian@ubuntu:~/tmp$ cp /opt/lixa/share/doc/lixa-X.Y.Z/examples/xta/python/example_xta_sa21.py . |
Substitute “X.Y.Z” with the actual version of the software you installed.
The example program accepts two arguments:
commit (or rollback): use “1” if you want to perform a global commit or “0” if you want to perform a global rollback
insert (or delete): use “1” if you want to insert rows in databases or “0” if you want to delete rows from databases
Open three terminal sessions: one for example execution,
| [Shell terminal session - AP] |
tiian@ubuntu1404-64:~/tmp$ ls -la total 12 drwxrwxr-x 2 tiian tiian 4096 ott 15 22:08 . drwxr-xr-x 16 tiian tiian 4096 ott 15 22:06 .. -rw-r--r-- 1 tiian tiian 3980 ott 15 22:08 example_xta_sa21.py |
one for PostgreSQL queries
| [Shell terminal session - PostgreSQL] |
tiian@ubuntu1404-64:~$ psql testdb psql (9.3.24) Type "help" for help. testdb=> |
and one for MySQL queries
| [Shell terminal session - MySQL] |
tiian@ubuntu1404-64:~$ mysql -h localhost -u lixa lixa Reading table information for completion of table and column names You can turn off this feature to get a quicker startup with -A Welcome to the MySQL monitor. Commands end with ; or \g. Your MySQL connection id is 44 Server version: 5.5.61-0ubuntu0.14.04.1 (Ubuntu) Copyright (c) 2000, 2018, Oracle and/or its affiliates. All rights reserved. Oracle is a registered trademark of Oracle Corporation and/or its affiliates. Other names may be trademarks of their respective owners. Type 'help;' or '\h' for help. Type '\c' to clear the current input statement. mysql> |
set LIXA_PROFILE environment variable to
XTA_DYN
a profile without static Resource Managers defined in
lixac_conf.xml:
| [Shell terminal session - AP] |
tiian@ubuntu1404-64:~/tmp$ export LIXA_PROFILE=XTA_DYN tiian@ubuntu1404-64:~/tmp$ echo $LIXA_PROFILE XTA_DYN |
insert rows in tables and commit:
| [Shell terminal session - AP] |
tiian@ubuntu1404-64:~/tmp$ python example_xta_sa21.py 1 1 PostgreSQL, executing >INSERT INTO authors VALUES(1921, 'Rigoni Stern', 'Mario')< MySQL, executing >INSERT INTO authors VALUES(1919, 'Levi', 'Primo')< tiian@ubuntu1404-64:~/tmp$ |
check PostgreSQL table content:
| [Shell terminal session - PostgreSQL] |
testdb=> select * from authors; id | last_name | first_name ------+--------------+------------ 1921 | Rigoni Stern | Mario (1 row) testdb=> |
check MySQL table content:
| [Shell terminal session - MySQL] |
mysql> select * from authors; +------+-----------+------------+ | id | last_name | first_name | +------+-----------+------------+ | 1919 | Levi | Primo | +------+-----------+------------+ 1 row in set (0.00 sec) mysql> |
delete rows from tables, but rollback:
| [Shell terminal session - AP] |
tiian@ubuntu1404-64:~/tmp$ python example_xta_sa21.py 0 0 PostgreSQL, executing >DELETE FROM authors WHERE id=1921< MySQL, executing >DELETE FROM authors WHERE id=1919< tiian@ubuntu1404-64:~/tmp$ |
check PostgreSQL table content:
| [Shell terminal session - PostgreSQL] |
testdb=> select * from authors; id | last_name | first_name ------+--------------+------------ 1921 | Rigoni Stern | Mario (1 row) testdb=> |
check MySQL table content:
| [Shell terminal session - MySQL] |
mysql> select * from authors; +------+-----------+------------+ | id | last_name | first_name | +------+-----------+------------+ | 1919 | Levi | Primo | +------+-----------+------------+ 1 row in set (0.00 sec) mysql> |
delete rows and commit:
| [Shell terminal session - AP] |
tiian@ubuntu1404-64:~/tmp$ python example_xta_sa21.py 1 0 PostgreSQL, executing >DELETE FROM authors WHERE id=1921< MySQL, executing >DELETE FROM authors WHERE id=1919< tiian@ubuntu1404-64:~/tmp$ |
check PostgreSQL table content:
| [Shell terminal session - PostgreSQL] |
testdb=> select * from authors; id | last_name | first_name ----+-----------+------------ (0 rows) testdb=> |
check MySQL table content:
| [Shell terminal session - MySQL] |
mysql> select * from authors; Empty set (0.00 sec) mysql> |
Source code for program example_xta_sa21.py is
installed in directory
/opt/lixa/share/doc/lixa-X.Y.Z/examples/xta/python and
is available on GitHub.
Source code is fully commented for readability.
| The pattern in brief: | |
| Architecture: | see Figure 8.3, “Multiple applications layout” |
| Number of Application Programs: | 2 or more |
| Number of Resource Managers: | 1 or more for every Application Program |
| Number of Branches in the Gloabal Transaction: | 1 for every Application Program |
| Concurrency among Application Programs: | no, strictly consecutive executive |
This is a Distributed Transaction Processing pattern introduced by XTA: two or more Application Programs use the same Resource Manager(s) and perform consecutive operations inside a single XA global transaction. The Resource Manager(s) must be able to suspend and resume the thread's association with the transaction branch: this feature is part of the XA standard, but some resource managers don't support it (for example MySQL, MariaDB and PostgreSQL).
The following picture shows an example that can be implemented using Oracle RDBMS.
Figure 8.6. Example of “Multiple Applications, Consecutive Calls” with two Application Programs and one Resource Manager

The pattern can not be implemented using the
standard TX Transaction Demarcation interface
[50].

The above figure shows the logic necessary to build this type of applications; it's not a formally correct UML sequence diagram (all the XTA objects are in the same lifeline), but it should be clear enough to understand the proper operations sequence:
The first AP creates some XTA objects: a
XaResource, aTransactionManager, and oneTransactionThe first AP “enlists” the XA resource that must be controlled by the transaction using
EnlistResource()methodThe first AP uses the
Open()method to initialize theXaResourceobjectsThe first AP uses the
Start()method to start a new XA distributed transactionThe first AP interacts with the Resource Manager using the native objects/connections/handles to operate (“doSomething” method in the diagram). The example is based on Oracle DBMS: environment is retrieved with
xaoEnv(), context is retrieved withxaoSvcCtx()and connection handle is retrieved withOCIHandleAllocThe first AP suspends its thread's association with the transaction using
Suspend()method and then it retrieves the Transaction Id (XID) usingGetXid()methodThe first AP is now able to pass the Transaction Id (XID) to the second AP: it can use any type of communication protocol able to send an ASCII string
At this point, first AP terminates its processing and the second AP takes the control of the transaction using
Resume()methodThe second AP interacts with the Resource Manager using the native objects/connections/handles to operate (“doSomething” method in the diagram)
The second AP commit the transaction using
Commit()method (alternatively it could rollback the transaction usingRollback()method)The second AP terminates its processing
Note
The dashed red rectangle highlights the XA global transaction.
Important
These are the relevant elements of this pattern:
The first Application Program starts a new Transaction, performs some activities with the Resource Manager(s), suspends its association with the Transaction and passes the XID to the second Application Program
The second Application Program sets up its XTA objects, but it does not start a new Transaction: it must wait the XID from the first Application Program, resumes the Transaction and completes the work
The pattern does not allow concurrent access to the same Resource Manager(s): only one Application Program at a time can be associated to the same global transaction
There's basically no limit to the number of different Application Programs that consecutively participate into the Transaction
There's no constraint to the number of different programming languages used: every Application Program can be developed using a different programming language supported by XTA
There's no constraint to communication protocol used by Application Programs to exchange information: REST API, SOAP based web services, CORBA, RPC, any network protocol, any inter process communication, etc... XTA does not force the developer to use a specific communication protocol: any technique suitable to send an ASCII string can be used
Note
The methods listed in the above description must be considered “pseudo-code”: the real name and signature is language dependent. As an example,
tm = new TransactionManager()
translates to
tm = xta_transaction_manager_new()
and
tx.Commit()
translates to
xta_transaction_commit(tx, FALSE)
in C.
Note
Not all the Resource Managers have implemented the XA specifications in the same way. This section tracks some limitations that have been reported by the LIXA project.
All the three databases do not support the XA specification part that describe as a transaction can be suspended and resumed. This pattern can't be used with those Resource Managers. The limitation currently applies to all the provided APIs: C, Java, etc...
The supplied example (example_xta_macc01.c) uses
Oracle in the role of “Resource Manager 1”; please
refer to the instructions explained:
in the section called “Remote configuration (Instant Client) and OCI” to set-up the correct client/server configuration for Oracle
in the section called “Starting the state server (lixad)” to start up the LIXA state server
Create a working directory in a place you are comfortable with:
| [Shell terminal session] |
tiian@ubuntu1404-64:~$ cd tiian@ubuntu1404-64:~$ mkdir tmp tiian@ubuntu1404-64:~$ cd tmp tiian@ubuntu1404-64:~/tmp$ |
Copy file example_xta_macc01.c in your working
dir:
| [Shell terminal session] |
tiian@ubuntu:~/tmp$ cp /opt/lixa/share/doc/lixa-X.Y.Z/examples/xta/example_xta_macc01.c . |
Substitute “X.Y.Z” with the actual version of the software you installed.
Compile and link the C example program:
| [Shell terminal session] |
tiian@ubuntu1404-64:~/tmp$ . /opt/lixa/bin/lixa_env.sh tiian@ubuntu1404-64:~/tmp$ gcc example_xta_macc01.c $(lixa-config -x -c -f -l -d) \ > -I/opt/oracle/instantclient_12_1/sdk/include \ > -L/opt/oracle/instantclient_12_1 \ > -Wl,-rpath -Wl,/opt/oracle/instantclient_12_1 \ > -l clntsh -l nnz12 -o example_xta_macc01 |
If the previous steps worked for you, you should have an executable file
of name example_xta_sa01 in your current
directory:
| [Shell terminal session] |
tiian@ubuntu1404-64:~/tmp$ ls -l total 36 -rwxrwxr-x 1 tiian tiian 18647 mar 27 21:51 example_xta_macc01 -rw-r--r-- 1 tiian tiian 12828 mar 27 21:50 example_xta_macc01.c |
The example program accepts four arguments:
commit (or rollback): use “1” if you want to perform a global commit or “0” if you want to perform a global rollback
insert (or delete): use “1” if you want to insert rows in databases or “0” if you want to delete rows from databases
superior (or subordinate): use “1” if you want to execute the “superior” part depicted in the sequence diagram (“Application Program 1”) or “0” if you want to execute the “subordinate” part depicted in the sequence diagram (“Application Program 2”)
XIDfilename: a valid name for a file that must be used to transfer XID (Transaction ID) from “Application Program 1” to “Application Program 2”; XIDfilename can be the name of a regular file or of a FIFO (named pipe)
Open three terminal sessions: one for Application Program 1
| [Shell terminal session - AP1] |
tiian@ubuntu1404-64:~/tmp$ ls -la total 44 drwxrwxr-x 2 tiian tiian 4096 mar 27 22:06 . drwxr-xr-x 12 tiian tiian 4096 mar 27 21:52 .. -rwxrwxr-x 1 tiian tiian 18647 mar 27 21:51 example_xta_macc01 -rw-r--r-- 1 tiian tiian 12828 mar 27 21:50 example_xta_macc01.c |
another one for Application Program 2
| [Shell terminal session - AP2] |
tiian@ubuntu1404-64:~/tmp$ ls -la total 44 drwxrwxr-x 2 tiian tiian 4096 mar 27 22:06 . drwxr-xr-x 12 tiian tiian 4096 mar 27 21:52 .. -rwxrwxr-x 1 tiian tiian 18647 mar 27 21:51 example_xta_macc01 -rw-r--r-- 1 tiian tiian 12828 mar 27 21:50 example_xta_macc01.c |
and the last one for Oracle sqlplus client
| [Shell terminal session - Oracle] |
tiian@ubuntu1404-64:~$ . ./oracle_env.sh tiian@ubuntu1404-64:~$ sqlplus hr/hr@lixa_ora_db SQL*Plus: Release 12.1.0.2.0 Production on Tue Mar 27 22:08:39 2018 Copyright (c) 1982, 2014, Oracle. All rights reserved. Last Successful login time: Tue Mar 27 2018 22:00:12 +02:00 Connected to: Oracle Database 12c Standard Edition Release 12.1.0.2.0 - 64bit Production SQL> |
create a FIFO (named pipe) in current directory:
| [Shell terminal session - AP1] |
tiian@ubuntu1404-64:~/tmp$ mkfifo xid.fifo tiian@ubuntu1404-64:~/tmp$ ls -la total 44 drwxrwxr-x 2 tiian tiian 4096 mar 27 22:10 . drwxr-xr-x 12 tiian tiian 4096 mar 27 21:52 .. -rwxrwxr-x 1 tiian tiian 18647 mar 27 21:51 example_xta_macc01 -rw-r--r-- 1 tiian tiian 12828 mar 27 21:50 example_xta_macc01.c prw-rw-r-- 1 tiian tiian 0 mar 27 22:10 xid.fifo |
set LIXA_PROFILE environment variable to
XTA_DYN a profile without static
Resource Managers defined in
lixac_conf.xml:
| [Shell terminal session - AP1] |
tiian@ubuntu1404-64:~/tmp$ export LIXA_PROFILE=XTA_DYN tiian@ubuntu1404-64:~/tmp$ echo $LIXA_PROFILE XTA_DYN |
| [Shell terminal session - AP2] |
tiian@ubuntu1404-64:~/tmp$ export LIXA_PROFILE=XTA_DYN tiian@ubuntu1404-64:~/tmp$ echo $LIXA_PROFILE XTA_DYN |
in the first terminal session, start example_xta_macc01 in the role of AP1 and in the second terminal session, start example_xta_macc01 in the role of AP2
| [Shell terminal session - AP1] |
tiian@ubuntu1404-64:~/tmp$ ./example_xta_macc01 1 1 1 xid.fifo OCI statement >INSERT INTO authors (ID, LAST_NAME, FIRST_NAME) VALUES(1930, 'Bonatti', 'Walter')< completed XID='1279875137.67f9ed180b7f4fe8a9d0f749a0f9e90b.5ed2d6ffa60ad419517220dd5ab2719e' has been written in file 'xid.fifo' |
| [Shell terminal session - AP2] |
tiian@ubuntu1404-64:~/tmp$ ./example_xta_macc01 1 1 0 xid.fifo XID='1279875137.67f9ed180b7f4fe8a9d0f749a0f9e90b.5ed2d6ffa60ad419517220dd5ab2719e' has been read from file 'xid.fifo' OCI statement >INSERT INTO authors (ID, LAST_NAME, FIRST_NAME) VALUES(1948, 'Casarotto', 'Renato')< completed |
Note
Application Program 1 suspends its execution and waits Application Program 2 start: this is a consequence of the FIFO behavior
check Oracle table content:
| [Shell terminal session - Oracle] |
SQL> select * from authors; ID LAST_NAME FIRST_NAME ---------- -------------------- -------------------- 1930 Bonatti Walter 1948 Casarotto Renato |
if you start the superior and subordinate Application Program in the right order you can use even a regular file instead of the named FIFO (pipe); try to perform a SQL DELETE followed by a rollback using the name of a temporary file to use:
| [Shell terminal session - AP1] |
tiian@ubuntu1404-64:~/tmp$ ./example_xta_macc01 0 0 1 xid2.fifo OCI statement >DELETE FROM authors WHERE ID=1930< completed XID='1279875137.1f31836dab1a4081b488a9b3565faaa4.7b4180ecb8fee8c12cbc13637ab4eabb' has been written in file 'xid2.fifo' |
| [Shell terminal session - AP2] |
tiian@ubuntu1404-64:~/tmp$ ./example_xta_macc01 0 0 0 xid2.fifo XID='1279875137.1f31836dab1a4081b488a9b3565faaa4.7b4180ecb8fee8c12cbc13637ab4eabb' has been read from file 'xid2.fifo' OCI statement >DELETE FROM authors WHERE ID=1948< completed |
Note
Application Program 1 ends its execution without waiting for Application Program 2 start: this is a consequence of the regular file behavior
check Oracle table content:
| [Shell terminal session - Oracle] |
SQL> select * from authors; ID LAST_NAME FIRST_NAME ---------- -------------------- -------------------- 1930 Bonatti Walter 1948 Casarotto Renato |
as expected, the two rows are still in the table because the XA global transaction has been rolled back by Application Program 2; XA functions executed by Oracle can be inspected in its trace file:
| [Shell terminal session - AP1] |
tiian@ubuntu1404-64:~/tmp$ tail -n 30 /tmp/xa_NULL03272018.trc 224024.9416.4016678528.2: xaorollback: xid=0x4c495841-1f31836dab1a4081b488a9b3565faaa4-7b4180ecb8fee8c12cbc13637ab4eabb, rmid=0, flags=0x0 224024.9416.4016678528.2: OCITransRollback: Attempting 224024.9416.4016678528.2: OCITransRollback: Succeeded 224024.9416.4016678528.2: xaorollback: rtn 0 224024.9416.4016678528.2: xaoclose: xa_info=, rmid=0, flags=0x0 224024.9416.4016678528.2: OCIServerDetach: Attempting 224024.9416.4016678528.2: OCIServerDetach: Succeeded 224024.9416.4016678528.2: xaoclose: rtn 0 |
to complete the exercise, perform a SQL DELETE followed by a commit:
| [Shell terminal session - AP1] |
tiian@ubuntu1404-64:~/tmp$ ./example_xta_macc01 1 0 1 xid.fifo OCI statement >DELETE FROM authors WHERE ID=1930< completed XID='1279875137.bfd10e4a5fc541f587727304ae34cccf.7b4180ecb8fee8c12cbc13637ab4eabb' has been written in file 'xid.fifo' |
| [Shell terminal session - AP2] |
tiian@ubuntu1404-64:~/tmp$ ./example_xta_macc01 1 0 0 xid.fifo XID='1279875137.bfd10e4a5fc541f587727304ae34cccf.7b4180ecb8fee8c12cbc13637ab4eabb' has been read from file 'xid.fifo' OCI statement >DELETE FROM authors WHERE ID=1948< completed |
check Oracle table content:
| [Shell terminal session - Oracle] |
SQL> select * from authors; no rows selected |
Finally the table is empty; XA functions executed by Oracle can be inspected in its trace file:
| [Shell terminal session - AP1] |
tiian@ubuntu1404-64:~/tmp$ tail -n 50 /tmp/xa_NULL03272018.trc 225247.14985.1108846208.0: xaostart: return XA_OK 225247.14985.1108846208.0: xaoend: xid=0x4c495841-bfd10e4a5fc541f587727304ae34cccf-7b4180ecb8fee8c12cbc13637ab4eabb, rmid=0, flags=0x4000000 225247.14985.1108846208.0: OCITransDetach: Attempting 225247.14985.1108846208.0: OCITransDetach: Succeeded 225247.14985.1108846208.0: xaoend: return 0 225247.14985.1108846208.0: xaocommit: xid=0x4c495841-bfd10e4a5fc541f587727304ae34cccf-7b4180ecb8fee8c12cbc13637ab4eabb, rmid=0, flags=0x40000000 225247.14985.1108846208.0: OCITransCommit: Attempting 225247.14985.1108846208.0: OCITransCommit: Succeeded 225247.14985.1108846208.0: xaocommit: rtn 0 225247.14985.1108846208.0: xaoclose: xa_info=, rmid=0, flags=0x0 225247.14985.1108846208.0: OCIServerDetach: Attempting 225247.14985.1108846208.0: OCIServerDetach: Succeeded 225247.14985.1108846208.0: xaoclose: rtn 0 |
The trace shows that XTA performed a “one phase commit”
instead of a “two phase commit” because there's only one
Resource Manager (hint: function xaoprepare has
not been called by the Transaction Manager).
Source code for program example_xta_macc01.c is
installed in directory
/opt/lixa/share/doc/lixa-X.Y.Z/examples/xta
and is available on GitHub.
Source code is fully commented for readability.
The supplied example (example_xta_macc11.cpp) uses
Oracle in the role of “Resource Manager 1”; please
refer to the instructions explained:
in the section called “Remote configuration (Instant Client) and OCI” to set-up the correct client/server configuration for Oracle
in the section called “Starting the state server (lixad)” to start up the LIXA state server
Create a working directory in a place you are comfortable with:
| [Shell terminal session] |
tiian@ubuntu1404-64:~$ cd tiian@ubuntu1404-64:~$ mkdir tmp tiian@ubuntu1404-64:~$ cd tmp tiian@ubuntu1404-64:~/tmp$ |
Copy file example_xta_macc11.cpp in your working
dir:
| [Shell terminal session] |
tiian@ubuntu:~/tmp$ cp /opt/lixa/share/doc/lixa-X.Y.Z/examples/xta/cpp/example_xta_macc11.cpp . |
Substitute “X.Y.Z” with the actual version of the software you installed.
Compile and link the C++ example program:
| [Shell terminal session] |
tiian@ubuntu1404-64:~/tmp$ . /opt/lixa/bin/lixa_env.sh tiian@ubuntu1404-64:~/tmp$ g++ example_xta_macc11.cpp \ > $(lixa-config -c -f -l -d --xta --language-cpp) \ > -I/opt/oracle/instantclient_12_1/sdk/include \ > -L/opt/oracle/instantclient_12_1 -Wl,-rpath \ > -Wl,/opt/oracle/instantclient_12_1 -l clntsh -l nnz12 -o example_xta_macc11 |
If the previous steps worked for you, you should have an executable
file of name example_xta_macc11 in your current
directory:
| [Shell terminal session] |
tiian@ubuntu1404-64:~/tmp$ ls -l total 40 -rwxrwxr-x 1 tiian tiian 26479 ago 26 11:54 example_xta_macc11 -rw-r--r-- 1 tiian tiian 11440 ago 26 11:43 example_xta_macc11.cpp |
The example program accepts four arguments:
commit (or rollback): use “1” if you want to perform a global commit or “0” if you want to perform a global rollback
insert (or delete): use “1” if you want to insert rows in databases or “0” if you want to delete rows from databases
superior (or subordinate): use “1” if you want to execute the “superior” part depicted in the sequence diagram (“Application Program 1”) or “0” if you want to execute the “subordinate” part depicted in the sequence diagram (“Application Program 2”)
XIDfilename: a valid name for a file that must be used to transfer XID (Transaction ID) from “Application Program 1” to “Application Program 2”; XIDfilename can be the name of a regular file or of a FIFO (named pipe)
Open three terminal sessions: one for Application Program 1
| [Shell terminal session - AP1] |
tiian@ubuntu1404-64:~/tmp$ ls -la total 48 drwxrwxr-x 2 tiian tiian 4096 ago 26 11:55 . drwxr-xr-x 12 tiian tiian 4096 ago 26 11:43 .. -rwxrwxr-x 1 tiian tiian 26479 ago 26 11:54 example_xta_macc11 -rw-r--r-- 1 tiian tiian 11440 ago 26 11:43 example_xta_macc11.cpp |
another one for Application Program 2
| [Shell terminal session - AP2] |
tiian@ubuntu1404-64:~/tmp$ ls -la total 48 drwxrwxr-x 2 tiian tiian 4096 ago 26 11:55 . drwxr-xr-x 12 tiian tiian 4096 ago 26 11:43 .. -rwxrwxr-x 1 tiian tiian 26479 ago 26 11:54 example_xta_macc11 -rw-r--r-- 1 tiian tiian 11440 ago 26 11:43 example_xta_macc11.cpp |
and the last one for Oracle sqlplus client
| [Shell terminal session - Oracle] |
tiian@ubuntu1404-64:~$ . ./oracle_env.sh tiian@ubuntu1404-64:~$ sqlplus hr/hr@lixa_ora_db SQL*Plus: Release 12.1.0.2.0 Production on Tue Mar 27 22:08:39 2018 Copyright (c) 1982, 2014, Oracle. All rights reserved. Last Successful login time: Sun Aug 26 2018 11:42:15 +02:00 Connected to: Oracle Database 12c Standard Edition Release 12.1.0.2.0 - 64bit Production SQL> |
create a FIFO (named pipe) in current directory:
| [Shell terminal session - AP1] |
tiian@ubuntu1404-64:~/tmp$ mkfifo xid.fifo tiian@ubuntu1404-64:~/tmp$ ls -la total 48 drwxrwxr-x 2 tiian tiian 4096 ago 26 11:58 . drwxr-xr-x 12 tiian tiian 4096 ago 26 11:57 .. -rwxrwxr-x 1 tiian tiian 26479 ago 26 11:54 example_xta_macc11 -rw-r--r-- 1 tiian tiian 11440 ago 26 11:43 example_xta_macc11.cpp prw-rw-r-- 1 tiian tiian 0 ago 26 11:58 xid.fifo |
set LIXA_PROFILE environment variable to
XTA_DYN a profile without static
Resource Managers defined in
lixac_conf.xml:
| [Shell terminal session - AP1] |
tiian@ubuntu1404-64:~/tmp$ export LIXA_PROFILE=XTA_DYN tiian@ubuntu1404-64:~/tmp$ echo $LIXA_PROFILE XTA_DYN |
| [Shell terminal session - AP2] |
tiian@ubuntu1404-64:~/tmp$ export LIXA_PROFILE=XTA_DYN tiian@ubuntu1404-64:~/tmp$ echo $LIXA_PROFILE XTA_DYN |
in the first terminal session, start example_xta_macc11 in the role of AP1 and in the second terminal session, start example_xta_macc11 in the role of AP2
| [Shell terminal session - AP1] |
tiian@ubuntu1404-64:~/tmp$ ./example_xta_macc11 1 1 1 xid.fifo OCI statement >INSERT INTO authors (ID, LAST_NAME, FIRST_NAME) VALUES(1930, 'Bonatti', 'Walter')< completed XID='1279875137.bd729d47f71b408e92c332a64502e068.7b4180ecb8fee8c12cbc13637ab4eabb' has been written to file 'xid.fifo' |
| [Shell terminal session - AP2] |
tiian@ubuntu1404-64:~/tmp$ ./example_xta_macc11 1 1 0 xid.fifo XID='1279875137.bd729d47f71b408e92c332a64502e068.7b4180ecb8fee8c12cbc13637ab4eabb' has been read from file 'xid.fifo' OCI statement >INSERT INTO authors (ID, LAST_NAME, FIRST_NAME) VALUES(1948, 'Casarotto', 'Renato')< completed |
Note
Application Program 1 suspends its execution and waits Application Program 2 start: this is a consequence of the FIFO behavior
check Oracle table content:
| [Shell terminal session - Oracle] |
SQL> select * from authors; ID LAST_NAME FIRST_NAME ---------- -------------------- -------------------- 1930 Bonatti Walter 1948 Casarotto Renato |
if you start the superior and subordinate Application Program in the right order you can use even a regular file instead of the named FIFO (pipe); try to perform a SQL DELETE followed by a rollback using the name of a temporary file to use:
| [Shell terminal session - AP1] |
tiian@ubuntu1404-64:~/tmp$ ./example_xta_macc11 0 0 1 xid2.fifo OCI statement >DELETE FROM authors WHERE ID=1930< completed XID='1279875137.f54399449c1d409c999dc8010e7d6e9f.7b4180ecb8fee8c12cbc13637ab4eabb' has been written to file 'xid2.fifo' |
| [Shell terminal session - AP2] |
tiian@ubuntu1404-64:~/tmp$ ./example_xta_macc11 0 0 0 xid2.fifo XID='1279875137.f54399449c1d409c999dc8010e7d6e9f.7b4180ecb8fee8c12cbc13637ab4eabb' has been read from file 'xid2.fifo' OCI statement >DELETE FROM authors WHERE ID=1948< completed |
Note
Application Program 1 ends its execution without waiting for Application Program 2 start: this is a consequence of the regular file behavior
check Oracle table content:
| [Shell terminal session - Oracle] |
SQL> select * from authors; ID LAST_NAME FIRST_NAME ---------- -------------------- -------------------- 1930 Bonatti Walter 1948 Casarotto Renato |
as expected, the two rows are still in the table because the XA global transaction has been rolled back by Application Program 2; XA functions executed by Oracle can be inspected in its trace file:
| [Shell terminal session - AP1] |
tiian@ubuntu1404-64:~/tmp$ tail -n 30 /tmp/xa_NULL08262018.trc 120438.18832.1685579456.0: xaorollback: xid=0x4c495841-f54399449c1d409c999dc8010e7d6e9f-7b4180ecb8fee8c12cbc13637ab4eabb, rmid=0, flags=0x0 120438.18832.1685579456.0: OCITransRollback: Attempting 120438.18832.1685579456.0: OCITransRollback: Succeeded 120438.18832.1685579456.0: xaorollback: rtn 0 120438.18832.1685579456.0: xaoclose: xa_info=, rmid=0, flags=0x0 120438.18832.1685579456.0: OCIServerDetach: Attempting 120438.18832.1685579456.0: OCIServerDetach: Succeeded 120438.18832.1685579456.0: xaoclose: rtn 0 |
to complete the exercise, perform a SQL DELETE followed by a commit:
| [Shell terminal session - AP1] |
tiian@ubuntu1404-64:~/tmp$ ./example_xta_macc11 1 0 1 xid.fifo OCI statement >DELETE FROM authors WHERE ID=1930< completed XID='1279875137.d1c98d095a64415eb7370fc781af25d9.7b4180ecb8fee8c12cbc13637ab4eabb' has been written to file 'xid.fifo' |
| [Shell terminal session - AP2] |
tiian@ubuntu1404-64:~/tmp$ ./example_xta_macc11 1 0 0 xid.fifo XID='1279875137.d1c98d095a64415eb7370fc781af25d9.7b4180ecb8fee8c12cbc13637ab4eabb' has been read from file 'xid.fifo' OCI statement >DELETE FROM authors WHERE ID=1948< completed |
check Oracle table content:
| [Shell terminal session - Oracle] |
SQL> select * from authors; no rows selected |
Finally the table is empty; XA functions executed by Oracle can be inspected in its trace file:
| [Shell terminal session - AP1] |
tiian@ubuntu1404-64:~/tmp$ tail -n 50 /tmp/xa_NULL08262018.trc 120832.23393.3240638144.0: xaoclose: rtn 0 120832.23394.1448613568.0: xaoend: xid=0x4c495841-d1c98d095a64415eb7370fc781af25d9-7b4180ecb8fee8c12cbc13637ab4eabb, rmid=0, flags=0x4000000 120832.23394.1448613568.0: OCITransDetach: Attempting 120832.23394.1448613568.0: OCITransDetach: Succeeded 120832.23394.1448613568.0: xaoend: return 0 120832.23394.1448613568.0: xaocommit: xid=0x4c495841-d1c98d095a64415eb7370fc781af25d9-7b4180ecb8fee8c12cbc13637ab4eabb, rmid=0, flags=0x40000000 120832.23394.1448613568.0: OCITransCommit: Attempting 120832.23394.1448613568.0: OCITransCommit: Succeeded 120832.23394.1448613568.0: xaocommit: rtn 0 120832.23394.1448613568.0: xaoclose: xa_info=, rmid=0, flags=0x0 120832.23394.1448613568.0: OCIServerDetach: Attempting 120832.23394.1448613568.0: OCIServerDetach: Succeeded 120832.23394.1448613568.0: xaoclose: rtn 0 |
The trace shows that XTA performed a “one phase commit”
instead of a “two phase commit” because there's only one
Resource Manager (hint: function xaoprepare has
not been called by the Transaction Manager).
Source code for program example_xta_macc11.cpp
is installed in directory
/opt/lixa/share/doc/lixa-X.Y.Z/examples/xta/cpp
and is available on GitHub.
Source code is fully commented for readability.
The supplied example (ExampleXtaMACC31.java) uses
Oracle in the role of “Resource Manager 1”; please
refer to the instructions explained:
in the section called “Remote configuration (Instant Client) and OCI” to set-up the correct client/server configuration for Oracle
in the section called “Starting the state server (lixad)” to start up the LIXA state server
Create a working directory in a place you are comfortable with:
| [Shell terminal session] |
tiian@ubuntu1404-64:~$ cd tiian@ubuntu1404-64:~$ mkdir tmp tiian@ubuntu1404-64:~$ cd tmp tiian@ubuntu1404-64:~/tmp$ |
Copy file ExampleXtaMACC31.java in your working
dir:
| [Shell terminal session] |
tiian@ubuntu:~/tmp$ cp /opt/lixa/share/doc/lixa-X.Y.Z/examples/xta/java/ExampleXtaMACC31.java . |
Substitute “X.Y.Z” with the actual version of the software you installed.
Use the proper path for the Oracle Database jar file, then compile the Java example program with something like:
| [Shell terminal session] |
tiian@ubuntu1404-64:~/tmp$ javac -cp /opt/lixa/share/lixa/java/xta.jar:/opt/oracle/OJDBC-Full/ojdbc7.jar ExampleXtaMACC31.java |
If the previous steps worked for you, you should have a class file of
name ExampleXtaMACC31.class in your current
directory:
| [Shell terminal session] |
tiian@ubuntu1404-64:~/tmp$ ls -l total 20 -rw-rw-r-- 1 tiian tiian 4361 gen 15 22:00 ExampleXtaMACC31.class -rw-r--r-- 1 tiian tiian 9655 gen 15 21:57 ExampleXtaMACC31.java |
The example program accepts four arguments:
commit (or rollback): use “1” if you want to perform a global commit or “0” if you want to perform a global rollback
insert (or delete): use “1” if you want to insert rows in databases or “0” if you want to delete rows from databases
superior (or subordinate): use “1” if you want to execute the “superior” part depicted in the sequence diagram (“Application Program 1”) or “0” if you want to execute the “subordinate” part depicted in the sequence diagram (“Application Program 2”)
XIDfilename: a valid name for a file that must be used to transfer XID (Transaction ID) from “Application Program 1” to “Application Program 2”; XIDfilename can be the name of a regular file or of a FIFO (named pipe)
Open three terminal sessions: one for Application Program 1
| [Shell terminal session - AP1] |
tiian@ubuntu1404-64:~/tmp$ ls -la total 28 drwxrwxr-x 2 tiian tiian 4096 gen 15 21:59 . drwxr-xr-x 17 tiian tiian 4096 gen 15 21:52 .. -rw-rw-r-- 1 tiian tiian 4361 gen 15 22:00 ExampleXtaMACC31.class -rw-r--r-- 1 tiian tiian 9655 gen 15 21:57 ExampleXtaMACC31.java |
another one for Application Program 2
| [Shell terminal session - AP2] |
tiian@ubuntu1404-64:~/tmp$ ls -la total 28 drwxrwxr-x 2 tiian tiian 4096 gen 15 21:59 . drwxr-xr-x 17 tiian tiian 4096 gen 15 21:52 .. -rw-rw-r-- 1 tiian tiian 4361 gen 15 22:00 ExampleXtaMACC31.class -rw-r--r-- 1 tiian tiian 9655 gen 15 21:57 ExampleXtaMACC31.java |
and the last one for Oracle sqlplus client
| [Shell terminal session - Oracle] |
tiian@ubuntu1404-64:~$ . ./oracle_env.sh tiian@ubuntu1404-64:~$ sqlplus hr/hr@lixa_ora_db SQL*Plus: Release 12.1.0.2.0 Production on Tue Mar 27 22:08:39 2018 Copyright (c) 1982, 2014, Oracle. All rights reserved. Last Successful login time: Sun Aug 26 2018 11:42:15 +02:00 Connected to: Oracle Database 12c Standard Edition Release 12.1.0.2.0 - 64bit Production SQL> |
create a FIFO (named pipe) in current directory:
| [Shell terminal session - AP1] |
tiian@ubuntu1404-64:~/tmp$ mkfifo xid.fifo tiian@ubuntu1404-64:~/tmp$ ls -la total 28 drwxrwxr-x 2 tiian tiian 4096 gen 15 22:06 . drwxr-xr-x 17 tiian tiian 4096 gen 15 21:52 .. -rw-rw-r-- 1 tiian tiian 4361 gen 15 22:00 ExampleXtaMACC31.class -rw-r--r-- 1 tiian tiian 9655 gen 15 21:57 ExampleXtaMACC31.java prw-rw-r-- 1 tiian tiian 0 gen 15 22:06 xid.fifo |
set LIXA_PROFILE environment variable to
XTA_DYN a profile without static
Resource Managers defined in
lixac_conf.xml:
| [Shell terminal session - AP1] |
tiian@ubuntu1404-64:~/tmp$ export LIXA_PROFILE=XTA_DYN tiian@ubuntu1404-64:~/tmp$ echo $LIXA_PROFILE XTA_DYN |
| [Shell terminal session - AP2] |
tiian@ubuntu1404-64:~/tmp$ export LIXA_PROFILE=XTA_DYN tiian@ubuntu1404-64:~/tmp$ echo $LIXA_PROFILE XTA_DYN |
Warning
Oracle JDBC client requires an entropy generator as explained here; at least two options are available:the parameter
-Djava.security.egd=file:/dev/./urandomcan be added to the command linean entropy generator, like rngd has been properly configured and it's up and running
Supposing that rngs is running, in the first terminal session, start ExampleXtaMACC31 in the role of AP1 and in the second terminal session, start ExampleXtaMACC31 in the role of AP2
| [Shell terminal session - AP1] |
tiian@ubuntu1404-64:~/tmp$ java -Djava.library.path=/opt/lixa/lib -cp /opt/lixa/share/lixa/java/xta.jar:/opt/oracle/OJDBC-Full/ojdbc7.jar:. ExampleXtaMACC31 1 1 1 xid.fifo Oracle, executing >INSERT INTO authors VALUES(1930, 'Bonatti', 'Walter')< XID='1279875137.320838774dc24d13a34a70675c1b4f72.308b817e7df229ddc410d4062b9a99cb' has been written to file 'xid.fifo' |
| [Shell terminal session - AP2] |
tiian@ubuntu1404-64:~/tmp$ java -Djava.library.path=/opt/lixa/lib -cp /opt/lixa/share/lixa/java/xta.jar:/opt/oracle/OJDBC-Full/ojdbc7.jar:. ExampleXtaMACC31 1 1 0 xid.fifo XID='1279875137.320838774dc24d13a34a70675c1b4f72.308b817e7df229ddc410d4062b9a99cb' has been read from file 'xid.fifo' Oracle, executing >INSERT INTO authors VALUES(1948, 'Casarotto', 'Renato')< |
Note
Application Program 1 suspends its execution and waits Application Program 2 start: this is a consequence of the FIFO behavior
check Oracle table content:
| [Shell terminal session - Oracle] |
SQL> select * from authors;
ID LAST_NAME FIRST_NAME
---------- -------------------- --------------------
1948 Casarotto Renato
1930 Bonatti Walter
|
if you start the superior and subordinate Application Program in the right order you can use even a regular file instead of the named FIFO (pipe); try to perform a SQL DELETE followed by a rollback using the name of a temporary file to use:
| [Shell terminal session - AP1] |
tiian@ubuntu1404-64:~/tmp$ java -Djava.library.path=/opt/lixa/lib -cp /opt/lixa/share/lixa/java/xta.jar:/opt/oracle/OJDBC-Full/ojdbc7.jar:. ExampleXtaMACC31 0 0 1 xid2.fifo Oracle, executing >DELETE FROM authors WHERE id=1930< XID='1279875137.eab32ba6aecc45e7924ac51b4e970321.308b817e7df229ddc410d4062b9a99cb' has been written to file 'xid2.fifo' |
| [Shell terminal session - AP2] |
tiian@ubuntu1404-64:~/tmp$ java -Djava.library.path=/opt/lixa/lib -cp /opt/lixa/share/lixa/java/xta.jar:/opt/oracle/OJDBC-Full/ojdbc7.jar:. ExampleXtaMACC31 0 0 0 xid2.fifo XID='1279875137.eab32ba6aecc45e7924ac51b4e970321.308b817e7df229ddc410d4062b9a99cb' has been read from file 'xid2.fifo' Oracle, executing >DELETE FROM authors WHERE id=1948< |
Note
Application Program 1 ends its execution without waiting for Application Program 2 start: this is a consequence of the regular file behavior
check Oracle table content:
| [Shell terminal session - Oracle] |
SQL> select * from authors;
ID LAST_NAME FIRST_NAME
---------- -------------------- --------------------
1948 Casarotto Renato
1930 Bonatti Walter
|
as expected, the two rows are still in the table because the XA global transaction has been rolled back by Application Program 2. To complete the exercise, perform a SQL DELETE followed by a commit:
| [Shell terminal session - AP1] |
tiian@ubuntu1404-64:~/tmp$ java -Djava.library.path=/opt/lixa/lib -cp /opt/lixa/share/lixa/java/xta.jar:/opt/oracle/OJDBC-Full/ojdbc7.jar:. ExampleXtaMACC31 1 0 1 xid.fifo Oracle, executing >DELETE FROM authors WHERE id=1930< XID='1279875137.1015009fb4714fdb9a2545d76b369f48.308b817e7df229ddc410d4062b9a99cb' has been written to file 'xid.fifo' |
| [Shell terminal session - AP2] |
tiian@ubuntu1404-64:~/tmp$ java -Djava.library.path=/opt/lixa/lib -cp /opt/lixa/share/lixa/java/xta.jar:/opt/oracle/OJDBC-Full/ojdbc7.jar:. ExampleXtaMACC31 1 0 0 xid.fifo XID='1279875137.1015009fb4714fdb9a2545d76b369f48.308b817e7df229ddc410d4062b9a99cb' has been read from file 'xid.fifo' Oracle, executing >DELETE FROM authors WHERE id=1948< |
check Oracle table content:
| [Shell terminal session - Oracle] |
SQL> select * from authors; no rows selected |
The table is now empty.
Source code for program ExampleXtaMACC31.java
is installed in directory
/opt/lixa/share/doc/lixa-X.Y.Z/examples/xta/java
and is available on GitHub.
Source code is fully commented for readability.
| The pattern in brief: | |
| Architecture: | see Figure 8.3, “Multiple applications layout” |
| Number of Application Programs: | 2 or more |
| Number of Resource Managers: | 1 or more for every Application Program |
| Number of Branches in the Gloabal Transaction: | 1 for every Application Program |
| Concurrency among Application Programs: | yes, subordinate AP prepares the transaction, returns control to superior AP and finally completes commit |
This is a Distributed Transaction Processing pattern introduced by XTA: two or more Application Programs use any set of Resource Manager(s) and perform concurrent operations inside distinct branches of a common XA global transaction. The Resource Manager(s) must support concurrent branches of the same global transaction: this is part of XA standard, but some resource managers might not support it.
The following picture shows an example that can be implemented, for example, using MySQL (or MariaDB) and PostgreSQL.
Figure 8.8. Example of “Multiple Applications, Consecutive Calls/Pseudo Synchronous” with two Application Programs and two Resource Managers

The pattern can not be implemented using the
standard TX Transaction Demarcation interface.
Figure 8.9. Simplified sequence diagram for the “Multiple Applications, Concurrent Branches/Pseudo Synchronous” Pattern

The above figure shows the logic necessary to build this type of applications; it's not a formally correct UML sequence diagram (all the XTA objects are in the same lifeline), but it should be clear enough to understand the proper operations sequence:
Both the Application Programs perform some some initial steps like: opening a native connection to the Resource Manager, creating a Transaction Manager object, a XA Resource Manager object, a Transaction object and finally enlisting and opening the Resource Manager
The first AP, named “superior” using XA terminology, starts the global transaction and possibly updates the state of its Resource Manager
The first AP retrieves the XID associated to the global transaction and starts some sort of “remote procedure call” [51] to invoke the second AP; it must pass the XID and all the application context necessary to operate (this is not relevant to XTA)
The second AP, named “subordinate” using XA terminology, branches the global transaction and possibly updates the state of its Resource Manager
The second AP starts the first phase of the distributed commit specifying “non_block=TRUE” option: this translates in performing “XA prepare” without performing “XA commit”
At the end of the first phase of the distributed commit, the second AP responds to first AP: typically a return code related to commit operation
Since then now, both the APs can run concurrently to complete the distributed commit specifying “non_block=FALSE” option (in the provided example, the first AP performs another update to its Resource Manager before committing)
The last operations are related to clean-up
Note
The dashed red rectangle highlights the XA global transaction.
Important
These are the relevant elements of this pattern:
it's designed for a typical client/server approach with some sort of request-response communication protocol in place
the Application Programs run concurrently, but synchronize themselves by mean of the communication protocol and the LIXA state server: the second phase of the two phase commit protocol can be started only after the completion of the first phase by all the participants
the second Application Program can not terminate immediately after returning the response to the caller: it must perform the second phase of the two phase commit protocol
the first Application Program can perform Resource Manager related operations before and after the call to the second Application Program
the diagram shows an example with two Application Programs, but the pattern can be applied to any number of Application Programs: a subordinate AP can become a superior AP of a called subordinate AP and so on
the diagram shows an example with only one Resource Manager for every Application Program, but there's no restriction on LIXA and XTA side, on the number of Resource Managers used by an Application Program
Note
Not all the Resource Managers have implemented the XA specifications in the same way. This section tracks some limitations that have been reported by the LIXA project.
As described in Oracle's official documentation [52] at paragraph 30-15 “Oracle XA Optimizations”, Oracle JDBC implements additional logic, in comparison with the XA specifications, when two ore more branches of the same global transaction are related to the same Oracle Database instance.
Important
In the event that both AP1 and AP2 use the same Oracle Database
instance strange behaviors could be reported. Furthermore, the second
call to rm.doSomething() from AP1 could fail as
described in this
case
documented by Red hat, with error
“ORA-02051: another session or branch in same transaction failed or finalized”. A relevant hypotesis described in the case is
“Oracle seems to disallow attempt to execute SQL on a
transaction branch when another branch in the same global transaction
has already prepared its transaction”.
On the other hand, no such limitation has been found in the Oracle OCI interface for C and C++.
The supplied examples (example_xta_macbps01.c and
example_xta_macbps02.c) use
PostgreSQL in the role of “Resource Manager 2” and MySQL
(or MariaDB) in the role of “Resource Manager 1”; please
refer to the instructions explained:
in the section called “MySQL/MariaDB Configuration” to set-up a running environment for MySQL server
in the section called “PostgreSQL Configuration” to set-up a running environment for PostgreSQL server
in the section called “Starting the state server (lixad)” to start up the LIXA state server.
Both programs must be used to execute the example:
example_xta_macbps01 in the role of the superior
Application Program (first AP) and
example_xta_macbps02 in the role of the
subordinate Application Program (second AP).
Create a working directory in a place you are comfortable with:
| [Shell terminal session] |
tiian@ubuntu1404-64:~$ cd tiian@ubuntu1404-64:~$ mkdir tmp tiian@ubuntu1404-64:~$ cd tmp tiian@ubuntu1404-64:~/tmp$ |
Copy files example_xta_macbps01.c and
example_xta_macbps02.c in your working dir:
| [Shell terminal session] |
tiian@ubuntu:~/tmp$ cp /opt/lixa/share/doc/lixa-X.Y.Z/examples/xta/example_xta_macbps01.c . tiian@ubuntu:~/tmp$ cp /opt/lixa/share/doc/lixa-X.Y.Z/examples/xta/example_xta_macbps02.c . |
Substitute “X.Y.Z” with the actual version of the software you installed.
Compile and link the C example programs:
| [Shell terminal session] |
tiian@ubuntu1404-64:~/tmp$ . /opt/lixa/bin/lixa_env.sh tiian@ubuntu1404-64:~/tmp$ gcc example_xta_macbps01.c $(lixa-config -x -c -f -l -d) $(mysql_config --libs_r) -o example_xta_macbps01 tiian@ubuntu1404-64:~/tmp$ gcc example_xta_macbps02.c $(lixa-config -x -c -f -l -d) -lpq -o example_xta_macbps02 |
If the previous steps worked for you, you should have two executable
files of name example_xta_macbps01 and
example_xta_macbps02 in your current directory:
| [Shell terminal session] |
tiian@ubuntu1404-64:~/tmp$ ls -l total 96 -rwxrwxr-x 1 tiian tiian 18499 apr 8 22:08 example_xta_macbps01 -rw-r--r-- 1 tiian tiian 10459 apr 8 11:58 example_xta_macbps01.c -rwxrwxr-x 1 tiian tiian 18319 apr 8 22:08 example_xta_macbps02 -rw-r--r-- 1 tiian tiian 11095 apr 8 11:58 example_xta_macbps02.c |
The example programs accept four arguments:
commit (or rollback): use “1” if you want to perform a global commit or “0” if you want to perform a global rollback
insert (or delete): use “1” if you want to insert rows in databases or “0” if you want to delete rows from databases
name of the FIFO (named pipe) that will be used to send messages from the superior AP to the subordinate AP
name of the FIFO (named pipe) that will be used to return messages from the subordinate AP to the superior AP
Open four terminal sessions: two for the example programs execution,
| [Shell terminal session - AP1] |
tiian@ubuntu1404-64:~/tmp$ ls -l example_xta_macbps01 -rwxrwxr-x 1 tiian tiian 18499 apr 8 22:08 example_xta_macbps01 |
| [Shell terminal session - AP2] |
tiian@ubuntu1404-64:~/tmp$ ls -l example_xta_macbps02 -rwxrwxr-x 1 tiian tiian 18319 apr 8 22:08 example_xta_macbps02 |
one for MySQL queries,
| [Shell terminal session - MySQL] |
tiian@ubuntu1404-64:~$ mysql -h localhost -u lixa lixa Reading table information for completion of table and column names You can turn off this feature to get a quicker startup with -A Welcome to the MySQL monitor. Commands end with ; or \g. Your MySQL connection id is 36 Server version: 5.5.59-0ubuntu0.14.04.1 (Ubuntu) Copyright (c) 2000, 2018, Oracle and/or its affiliates. All rights reserved. Oracle is a registered trademark of Oracle Corporation and/or its affiliates. Other names may be trademarks of their respective owners. Type 'help;' or '\h' for help. Type '\c' to clear the current input statement. mysql> |
and one for PostgreSQL queries
| [Shell terminal session - PostgreSQL] |
tiian@ubuntu1404-64:~$ psql testdb psql (9.3.22) Type "help" for help. testdb=> |
Set LIXA_PROFILE environment variable to
XTA_DYN,
a profile without static Resource Managers defined in
lixac_conf.xml:
| [Shell terminal session - AP1] |
tiian@ubuntu1404-64:~/tmp$ export LIXA_PROFILE=XTA_DYN tiian@ubuntu1404-64:~/tmp$ echo $LIXA_PROFILE XTA_DYN |
| [Shell terminal session - AP2] |
tiian@ubuntu1404-64:~/tmp$ export LIXA_PROFILE=XTA_DYN tiian@ubuntu1404-64:~/tmp$ echo $LIXA_PROFILE XTA_DYN |
create two named pipes (FIFO) to support communication between superior and subordinate Application Programs
| [Shell terminal session - AP1] |
tiian@ubuntu1404-64:~/tmp$ mkfifo sup2sub tiian@ubuntu1404-64:~/tmp$ mkfifo sub2sup tiian@ubuntu1404-64:~/tmp$ ls -l su* prw-rw-r-- 1 tiian tiian 0 apr 8 22:22 sub2sup prw-rw-r-- 1 tiian tiian 0 apr 8 22:22 sup2sub |
execute both the example programs to insert rows in tables and commit:
| [Shell terminal session - AP1] |
tiian@ubuntu1404-64:~/tmp$ ./example_xta_macbps01 1 1 sup2sub sub2sup MySQL, executing >INSERT INTO authors VALUES(1919, 'Levi', 'Primo')< Superior AP has sent XID '1279875137.b6df6743cbf54cb8b8323ca5ab771e6e.e107cfeee0661d23da9322f1ee73faba' to subordinate AP Superior AP has received 'PREPARED_for_COMMIT' reply from subordinate AP MySQL, executing >INSERT INTO authors VALUES(1898, 'Remarque', 'Erich Maria')< tiian@ubuntu1404-64:~/tmp$ |
| [Shell terminal session - AP2] |
tiian@ubuntu1404-64:~/tmp$ ./example_xta_macbps02 1 1 sup2sub sub2sup Subordinate AP has received XID '1279875137.b6df6743cbf54cb8b8323ca5ab771e6e.e107cfeee0661d23da9322f1ee73faba' from superior AP Subordinate AP has created a branch with XID '1279875137.b6df6743cbf54cb8b8323ca5ab771e6e.e107cfeee0661d23af7f136da1b84c3b' PostgreSQL, executing >INSERT INTO authors VALUES(1921, 'Rigoni Stern', 'Mario')< Subordinate AP has returned 'PREPARED_for_COMMIT' to superior AP tiian@ubuntu1404-64:~/tmp$ |
Note
The first (superior) Application Program suspends and waits the return value from the second (subordinate) Application Program.
The XID generated by the subordinate AP differs from the XID generated by the superior AP in the last 16 hexadecimal symbols of the “branch qualifier”; the first 16 hexadecimal symbols are the same: this is not required by XA specification but can be useful for troubleshooting purposes.
Check MySQL table content:
| [Shell terminal session - MySQL] |
mysql> select * from authors; +------+-----------+-------------+ | id | last_name | first_name | +------+-----------+-------------+ | 1898 | Remarque | Erich Maria | | 1919 | Levi | Primo | +------+-----------+-------------+ 2 rows in set (0.00 sec) mysql> |
check PostgreSQL table content:
| [Shell terminal session - PostgreSQL] |
testdb=> select * from authors; id | last_name | first_name ------+--------------+------------ 1921 | Rigoni Stern | Mario (1 row) testdb=> |
delete rows from tables, but rollback:
| [Shell terminal session - AP1] |
tiian@ubuntu1404-64:~/tmp$ ./example_xta_macbps01 0 0 sup2sub sub2sup MySQL, executing >DELETE FROM authors WHERE id=1919< Superior AP has sent XID '1279875137.1911a9c72cec45eea47ffc74cf95e000.e107cfeee0661d23da9322f1ee73faba' to subordinate AP Superior AP has received 'ROLLBACK' reply from subordinate AP MySQL, executing >DELETE FROM authors WHERE id=1898< tiian@ubuntu1404-64:~/tmp$ |
| [Shell terminal session - AP2] |
tiian@ubuntu1404-64:~/tmp$ ./example_xta_macbps02 0 0 sup2sub sub2sup Subordinate AP has received XID '1279875137.1911a9c72cec45eea47ffc74cf95e000.e107cfeee0661d23da9322f1ee73faba' from superior AP Subordinate AP has created a branch with XID '1279875137.1911a9c72cec45eea47ffc74cf95e000.e107cfeee0661d233a125b14214944da' PostgreSQL, executing >DELETE FROM authors WHERE id=1921< Subordinate AP has returned 'ROLLBACK' to superior AP tiian@ubuntu1404-64:~/tmp$ |
check MySQL table content:
| [Shell terminal session - MySQL] |
mysql> select * from authors; +------+-----------+-------------+ | id | last_name | first_name | +------+-----------+-------------+ | 1898 | Remarque | Erich Maria | | 1919 | Levi | Primo | +------+-----------+-------------+ 2 rows in set (0.00 sec) mysql> |
check PostgreSQL table content:
| [Shell terminal session - PostgreSQL] |
testdb=> select * from authors; id | last_name | first_name ------+--------------+------------ 1921 | Rigoni Stern | Mario (1 row) testdb=> |
delete rows and commit:
| [Shell terminal session - AP1] |
tiian@ubuntu1404-64:~/tmp$ ./example_xta_macbps01 1 0 sup2sub sub2sup MySQL, executing >DELETE FROM authors WHERE id=1919< Superior AP has sent XID '1279875137.c862b6aa72784c808e6c59388e4263a9.e107cfeee0661d23da9322f1ee73faba' to subordinate AP Superior AP has received 'PREPARED_for_COMMIT' reply from subordinate AP MySQL, executing >DELETE FROM authors WHERE id=1898< tiian@ubuntu1404-64:~/tmp$ |
| [Shell terminal session - AP2] |
tiian@ubuntu1404-64:~/tmp$ ./example_xta_macbps02 1 0 sup2sub sub2sup Subordinate AP has received XID '1279875137.c862b6aa72784c808e6c59388e4263a9.e107cfeee0661d23da9322f1ee73faba' from superior AP Subordinate AP has created a branch with XID '1279875137.c862b6aa72784c808e6c59388e4263a9.e107cfeee0661d234acf9ddb30da46f9' PostgreSQL, executing >DELETE FROM authors WHERE id=1921< Subordinate AP has returned 'PREPARED_for_COMMIT' to superior AP tiian@ubuntu1404-64:~/tmp$ |
check MySQL table content:
| [Shell terminal session - MySQL] |
mysql> select * from authors; Empty set (0.00 sec) mysql> |
check PostgreSQL table content:
| [Shell terminal session - PostgreSQL] |
testdb=> select * from authors; id | last_name | first_name ------+--------------+------------ (0 rows) testdb=> |
Source code for programs example_xta_macbps01.c
and example_xta_macbps02.c are
installed in directory
/opt/lixa/share/doc/lixa-X.Y.Z/examples/xta and
are available on GitHub. Source code is fully
commented for readability.
The supplied examples (example_xta_macbps11.cpp
and example_xta_macbps12.cpp) use
PostgreSQL in the role of “Resource Manager 2” and MySQL
(or MariaDB) in the role of “Resource Manager 1”; please
refer to the instructions explained:
in the section called “MySQL/MariaDB Configuration” to set-up a running environment for MySQL server
in the section called “PostgreSQL Configuration” to set-up a running environment for PostgreSQL server
in the section called “Starting the state server (lixad)” to start up the LIXA state server.
Both programs must be used to execute the example:
example_xta_macbps11 in the role of the superior
Application Program (first AP) and
example_xta_macbps12 in the role of the
subordinate Application Program (second AP).
Create a working directory in a place you are comfortable with:
| [Shell terminal session] |
tiian@ubuntu1404-64:~$ cd tiian@ubuntu1404-64:~$ mkdir tmp tiian@ubuntu1404-64:~$ cd tmp tiian@ubuntu1404-64:~/tmp$ |
Copy files example_xta_macbps11.cpp and
example_xta_macbps12.cpp in your working dir:
| [Shell terminal session] |
tiian@ubuntu:~/tmp$ cp /opt/lixa/share/doc/lixa-X.Y.Z/examples/xta/cpp/example_xta_macbps11.cpp . tiian@ubuntu:~/tmp$ cp /opt/lixa/share/doc/lixa-X.Y.Z/examples/xta/cpp/example_xta_macbps12.cpp . |
Substitute “X.Y.Z” with the actual version of the software you installed.
Compile and link the C++ example programs:
| [Shell terminal session] |
tiian@ubuntu1404-64:~/tmp$ . /opt/lixa/bin/lixa_env.sh tiian@ubuntu1404-64:~/tmp$ g++ example_xta_macbps11.cpp $(lixa-config -c -f -l -d --xta --language-cpp) $(mysql_config --libs_r) -o example_xta_macbps11 tiian@ubuntu1404-64:~/tmp$ g++ example_xta_macbps12.cpp $(lixa-config -c -f -l -d --xta --language-cpp) -lpq -o example_xta_macbps12 |
If the previous steps worked for you, you should have two executable
files of name example_xta_macbps11 and
example_xta_macbps12 in your current directory:
| [Shell terminal session] |
tiian@ubuntu1404-64:~/tmp$ ls -l total 80 -rwxrwxr-x 1 tiian tiian 26419 ago 26 21:56 example_xta_macbps11 -rw-r--r-- 1 tiian tiian 8779 ago 26 21:54 example_xta_macbps11.cpp -rwxrwxr-x 1 tiian tiian 26399 ago 26 21:56 example_xta_macbps12 -rw-r--r-- 1 tiian tiian 10028 ago 26 21:54 example_xta_macbps12.cpp |
The example programs accept four arguments:
commit (or rollback): use “1” if you want to perform a global commit or “0” if you want to perform a global rollback
insert (or delete): use “1” if you want to insert rows in databases or “0” if you want to delete rows from databases
name of the FIFO (named pipe) that will be used to send messages from the superior AP to the subordinate AP
name of the FIFO (named pipe) that will be used to return messages from the subordinate AP to the superior AP
Open four terminal sessions: two for the example programs execution,
| [Shell terminal session - AP1] |
tiian@ubuntu1404-64:~/tmp$ ls -l example_xta_macbps11 -rwxrwxr-x 1 tiian tiian 18499 apr 8 22:08 example_xta_macbps11 |
| [Shell terminal session - AP2] |
tiian@ubuntu1404-64:~/tmp$ ls -l example_xta_macbps12 -rwxrwxr-x 1 tiian tiian 18319 apr 8 22:08 example_xta_macbps12 |
one for MySQL queries,
| [Shell terminal session - MySQL] |
tiian@ubuntu1404-64:~$ mysql -h localhost -u lixa lixa Reading table information for completion of table and column names You can turn off this feature to get a quicker startup with -A Welcome to the MySQL monitor. Commands end with ; or \g. Your MySQL connection id is 36 Server version: 5.5.61-0ubuntu0.14.04.1 (Ubuntu) Copyright (c) 2000, 2018, Oracle and/or its affiliates. All rights reserved. Oracle is a registered trademark of Oracle Corporation and/or its affiliates. Other names may be trademarks of their respective owners. Type 'help;' or '\h' for help. Type '\c' to clear the current input statement. mysql> |
and one for PostgreSQL queries
| [Shell terminal session - PostgreSQL] |
tiian@ubuntu1404-64:~$ psql testdb psql (9.3.24) Type "help" for help. testdb=> |
Set LIXA_PROFILE environment variable to
XTA_DYN,
a profile without static Resource Managers defined in
lixac_conf.xml:
| [Shell terminal session - AP1] |
tiian@ubuntu1404-64:~/tmp$ export LIXA_PROFILE=XTA_DYN tiian@ubuntu1404-64:~/tmp$ echo $LIXA_PROFILE XTA_DYN |
| [Shell terminal session - AP2] |
tiian@ubuntu1404-64:~/tmp$ export LIXA_PROFILE=XTA_DYN tiian@ubuntu1404-64:~/tmp$ echo $LIXA_PROFILE XTA_DYN |
create two named pipes (FIFO) to support communication between superior and subordinate Application Programs
| [Shell terminal session - AP1] |
tiian@ubuntu1404-64:~/tmp$ mkfifo sup2sub tiian@ubuntu1404-64:~/tmp$ mkfifo sub2sup tiian@ubuntu1404-64:~/tmp$ ls -l su* prw-rw-r-- 1 tiian tiian 0 ago 26 22:01 sub2sup prw-rw-r-- 1 tiian tiian 0 ago 26 22:01 sup2sub |
execute both the example programs to insert rows in tables and commit:
| [Shell terminal session - AP1] |
tiian@ubuntu1404-64:~/tmp$ ./example_xta_macbps11 1 1 sup2sub sub2sup MySQL, executing >INSERT INTO authors VALUES(1919, 'Levi', 'Primo')< Superior AP has sent XID '1279875137.a65b66b6b0874a948f8f09b7a23dd471.e107cfeee0661d23da9322f1ee73faba' to subordinate AP Superior AP has received 'PREPARED_for_COMMIT' reply from subordinate AP MySQL, executing >INSERT INTO authors VALUES(1898, 'Remarque', 'Erich Maria')< tiian@ubuntu1404-64:~/tmp$ |
| [Shell terminal session - AP2] |
tiian@ubuntu1404-64:~/tmp$ ./example_xta_macbps12 1 1 sup2sub sub2sup Subordinate AP has received XID '1279875137.a65b66b6b0874a948f8f09b7a23dd471.e107cfeee0661d23da9322f1ee73faba' from superior AP Subordinate AP has created a branch with XID '1279875137.a65b66b6b0874a948f8f09b7a23dd471.e107cfeee0661d235888e12f34d54013' PostgreSQL, executing >INSERT INTO authors VALUES(1921, 'Rigoni Stern', 'Mario')< Subordinate AP has returned 'PREPARED_for_COMMIT' to superior AP tiian@ubuntu1404-64:~/tmp$ |
Note
The first (superior) Application Program suspends and waits the return value from the second (subordinate) Application Program.
The XID generated by the subordinate AP differs from the XID generated by the superior AP in the last 16 hexadecimal symbols of the “branch qualifier”; the first 16 hexadecimal symbols are the same: this is not required by XA specification but can be useful for troubleshooting purposes.
Check MySQL table content:
| [Shell terminal session - MySQL] |
mysql> select * from authors; +------+-----------+-------------+ | id | last_name | first_name | +------+-----------+-------------+ | 1898 | Remarque | Erich Maria | | 1919 | Levi | Primo | +------+-----------+-------------+ 2 rows in set (0.00 sec) mysql> |
check PostgreSQL table content:
| [Shell terminal session - PostgreSQL] |
testdb=> select * from authors; id | last_name | first_name ------+--------------+------------ 1921 | Rigoni Stern | Mario (1 row) testdb=> |
delete rows from tables, but rollback:
| [Shell terminal session - AP1] |
tiian@ubuntu1404-64:~/tmp$ ./example_xta_macbps11 0 0 sup2sub sub2sup MySQL, executing >DELETE FROM authors WHERE id=1919< Superior AP has sent XID '1279875137.b154aa98393d44098c8a20ed2ba488cf.e107cfeee0661d23da9322f1ee73faba' to subordinate AP Superior AP has received 'ROLLBACK' reply from subordinate AP MySQL, executing >DELETE FROM authors WHERE id=1898< tiian@ubuntu1404-64:~/tmp$ |
| [Shell terminal session - AP2] |
tiian@ubuntu1404-64:~/tmp$ ./example_xta_macbps12 0 0 sup2sub sub2sup Subordinate AP has received XID '1279875137.b154aa98393d44098c8a20ed2ba488cf.e107cfeee0661d23da9322f1ee73faba' from superior AP Subordinate AP has created a branch with XID '1279875137.b154aa98393d44098c8a20ed2ba488cf.e107cfeee0661d237add9066cfc34a81' PostgreSQL, executing >DELETE FROM authors WHERE id=1921< Subordinate AP has returned 'ROLLBACK' to superior AP tiian@ubuntu1404-64:~/tmp$ |
check MySQL table content:
| [Shell terminal session - MySQL] |
mysql> select * from authors; +------+-----------+-------------+ | id | last_name | first_name | +------+-----------+-------------+ | 1898 | Remarque | Erich Maria | | 1919 | Levi | Primo | +------+-----------+-------------+ 2 rows in set (0.00 sec) mysql> |
check PostgreSQL table content:
| [Shell terminal session - PostgreSQL] |
testdb=> select * from authors; id | last_name | first_name ------+--------------+------------ 1921 | Rigoni Stern | Mario (1 row) testdb=> |
delete rows and commit:
| [Shell terminal session - AP1] |
tiian@ubuntu1404-64:~/tmp$ ./example_xta_macbps11 1 0 sup2sub sub2sup MySQL, executing >DELETE FROM authors WHERE id=1919< Superior AP has sent XID '1279875137.06db3e25e74a4a03bdf7ef4924409255.e107cfeee0661d23da9322f1ee73faba' to subordinate AP Superior AP has received 'PREPARED_for_COMMIT' reply from subordinate AP MySQL, executing >DELETE FROM authors WHERE id=1898< tiian@ubuntu1404-64:~/tmp$ |
| [Shell terminal session - AP2] |
tiian@ubuntu1404-64:~/tmp$ ./example_xta_macbps12 1 0 sup2sub sub2sup Subordinate AP has received XID '1279875137.06db3e25e74a4a03bdf7ef4924409255.e107cfeee0661d23da9322f1ee73faba' from superior AP Subordinate AP has created a branch with XID '1279875137.06db3e25e74a4a03bdf7ef4924409255.e107cfeee0661d23cc258059f852467e' PostgreSQL, executing >DELETE FROM authors WHERE id=1921< Subordinate AP has returned 'PREPARED_for_COMMIT' to superior AP tiian@ubuntu1404-64:~/tmp$ |
check MySQL table content:
| [Shell terminal session - MySQL] |
mysql> select * from authors; Empty set (0.00 sec) mysql> |
check PostgreSQL table content:
| [Shell terminal session - PostgreSQL] |
testdb=> select * from authors; id | last_name | first_name ------+--------------+------------ (0 rows) testdb=> |
Source code for programs example_xta_macbps11.cpp
and example_xta_macbps12.cpp are
installed in directory
/opt/lixa/share/doc/lixa-X.Y.Z/examples/xta/cpp and
are available on GitHub. Source code is fully
commented for readability.
The supplied examples (ExampleXtaMACBPS31.java
and ExampleXtaMACBPS32.java) use
PostgreSQL in the role of “Resource Manager 2” and MySQL
(or MariaDB) in the role of “Resource Manager 1”; please
refer to the instructions explained:
in the section called “MySQL/MariaDB Configuration” to set-up a running environment for MySQL server
in the section called “PostgreSQL Configuration” to set-up a running environment for PostgreSQL server
in the section called “Starting the state server (lixad)” to start up the LIXA state server.
Both programs must be used to execute the example:
ExampleXtaMACBPS31.class in the role of the
superior Application Program (first AP) and
ExampleXtaMACBPS31.class in the role of the
subordinate Application Program (second AP).
Create a working directory in a place you are comfortable with:
| [Shell terminal session] |
tiian@ubuntu1404-64:~$ cd tiian@ubuntu1404-64:~$ mkdir tmp tiian@ubuntu1404-64:~$ cd tmp tiian@ubuntu1404-64:~/tmp$ |
Copy files ExampleXtaMACBPS31.java and
ExampleXtaMACBPS32.java in your working dir:
| [Shell terminal session] |
tiian@ubuntu:~/tmp$ cp /opt/lixa/share/doc/lixa-X.Y.Z/examples/xta/java/ExampleXtaMACBPS31.java . tiian@ubuntu:~/tmp$ cp /opt/lixa/share/doc/lixa-X.Y.Z/examples/xta/java/ExampleXtaMACBPS32.java . |
Substitute “X.Y.Z” with the actual version of the software you installed.
Use the proper paths for MySQL and PostgreSQL jars, then compile the Java example programs with something like:
| [Shell terminal session] |
tiian@ubuntu1404-64:~/tmp$ javac -cp /opt/lixa/share/lixa/java/xta.jar:/usr/share/java/mysql.jar ExampleXtaMACBPS31.java tiian@ubuntu1404-64:~/tmp$ javac -cp /opt/lixa/share/lixa/java/xta.jar:/opt/postgresql/postgresql.jar ExampleXtaMACBPS32.java |
If the previous steps worked for you, you should have two class
files of name ExampleXtaMACBPS31.class and
ExampleXtaMACBPS32.class in your current
directory:
| [Shell terminal session] |
tiian@ubuntu1404-64:~/tmp$ ls -l total 40 -rw-rw-r-- 1 tiian tiian 4360 gen 16 21:50 ExampleXtaMACBPS31.class -rw-r--r-- 1 tiian tiian 9006 gen 16 21:50 ExampleXtaMACBPS31.java -rw-rw-r-- 1 tiian tiian 4436 gen 16 21:51 ExampleXtaMACBPS32.class -rw-r--r-- 1 tiian tiian 10425 gen 16 21:47 ExampleXtaMACBPS32.java |
The example programs accept four arguments:
commit (or rollback): use “1” if you want to perform a global commit or “0” if you want to perform a global rollback
insert (or delete): use “1” if you want to insert rows in databases or “0” if you want to delete rows from databases
name of the FIFO (named pipe) that will be used to send messages from the superior AP to the subordinate AP
name of the FIFO (named pipe) that will be used to return messages from the subordinate AP to the superior AP
Open four terminal sessions: two for the example programs execution,
| [Shell terminal session - AP1] |
tiian@ubuntu1404-64:~/tmp$ ls -l ExampleXtaMACBPS31.class -rw-rw-r-- 1 tiian tiian 4360 gen 16 21:50 ExampleXtaMACBPS31.class |
| [Shell terminal session - AP2] |
tiian@ubuntu1404-64:~/tmp$ ls -l ExampleXtaMACBPS32.class -rw-rw-r-- 1 tiian tiian 4436 gen 16 21:51 ExampleXtaMACBPS32.class |
one for MySQL queries,
| [Shell terminal session - MySQL] |
tiian@ubuntu1404-64:~$ mysql -h localhost -u lixa lixa Reading table information for completion of table and column names You can turn off this feature to get a quicker startup with -A Welcome to the MySQL monitor. Commands end with ; or \g. Your MySQL connection id is 36 Server version: 5.5.62-0ubuntu0.14.04.1 (Ubuntu) Copyright (c) 2000, 2018, Oracle and/or its affiliates. All rights reserved. Oracle is a registered trademark of Oracle Corporation and/or its affiliates. Other names may be trademarks of their respective owners. Type 'help;' or '\h' for help. Type '\c' to clear the current input statement. mysql> |
and one for PostgreSQL queries
| [Shell terminal session - PostgreSQL] |
tiian@ubuntu1404-64:~$ psql testdb psql (9.3.24) Type "help" for help. testdb=> |
Set LIXA_PROFILE environment variable to
XTA_DYN,
a profile without static Resource Managers defined in
lixac_conf.xml:
| [Shell terminal session - AP1] |
tiian@ubuntu1404-64:~/tmp$ export LIXA_PROFILE=XTA_DYN tiian@ubuntu1404-64:~/tmp$ echo $LIXA_PROFILE XTA_DYN |
| [Shell terminal session - AP2] |
tiian@ubuntu1404-64:~/tmp$ export LIXA_PROFILE=XTA_DYN tiian@ubuntu1404-64:~/tmp$ echo $LIXA_PROFILE XTA_DYN |
create two named pipes (FIFO) to support communication between superior and subordinate Application Programs
| [Shell terminal session - AP1] |
tiian@ubuntu1404-64:~/tmp$ mkfifo sup2sub tiian@ubuntu1404-64:~/tmp$ mkfifo sub2sup tiian@ubuntu1404-64:~/tmp$ ls -l su* prw-rw-r-- 1 tiian tiian 0 gen 16 21:58 sub2sup prw-rw-r-- 1 tiian tiian 0 gen 16 21:57 sup2sub |
execute both the example programs to insert rows in tables and commit:
| [Shell terminal session - AP1] |
tiian@ubuntu1404-64:~/tmp$ java -Djava.library.path=/opt/lixa/lib -cp /opt/lixa/share/lixa/java/xta.jar:/usr/share/java/mysql.jar:. ExampleXtaMACBPS31 1 1 sup2sub sub2sup MySQL, executing >INSERT INTO authors VALUES(1919, 'Levi', 'Primo')< Superior AP has sent XID '1279875137.7f8a0b782a764545934d3052c38c89c0.cd976821ac38611801b6e378a35a3c7a' to subordinate AP Superior AP has received 'PREPARED_for_COMMIT' reply from subordinate AP MySQL, executing >INSERT INTO authors VALUES(1898, 'Remarque', 'Erich Maria')< tiian@ubuntu1404-64:~/tmp$ |
| [Shell terminal session - AP2] |
tiian@ubuntu1404-64:~/tmp$ java -Djava.library.path=/opt/lixa/lib -cp /opt/lixa/share/lixa/java/xta.jar:/opt/postgresql/postgresql.jar:. ExampleXtaMACBPS32 1 1 sup2sub sub2sup Subordinate AP has received XID '1279875137.7f8a0b782a764545934d3052c38c89c0.cd976821ac38611801b6e378a35a3c7a' from superior AP Subordinate AP has created a branch with XID '1279875137.7f8a0b782a764545934d3052c38c89c0.cd976821ac386118e3c0422932534d2e' PostgreSQL, executing >INSERT INTO authors VALUES(1921, 'Rigoni Stern', 'Mario')< Subordinate AP has returned 'PREPARED_for_COMMIT' to superior AP tiian@ubuntu1404-64:~/tmp$ |
Note
The first (superior) Application Program suspends and waits the return value from the second (subordinate) Application Program.
The XID generated by the subordinate AP differs from the XID generated by the superior AP in the last 16 hexadecimal symbols of the “branch qualifier”; the first 16 hexadecimal symbols are the same: this is not required by XA specification but can be useful for troubleshooting purposes.
Check MySQL table content:
| [Shell terminal session - MySQL] |
mysql> select * from authors; +------+-----------+-------------+ | id | last_name | first_name | +------+-----------+-------------+ | 1898 | Remarque | Erich Maria | | 1919 | Levi | Primo | +------+-----------+-------------+ 2 rows in set (0.00 sec) mysql> |
check PostgreSQL table content:
| [Shell terminal session - PostgreSQL] |
testdb=> select * from authors; id | last_name | first_name ------+--------------+------------ 1921 | Rigoni Stern | Mario (1 row) testdb=> |
delete rows from tables, but rollback:
| [Shell terminal session - AP1] |
tiian@ubuntu1404-64:~/tmp$ java -Djava.library.path=/opt/lixa/lib -cp /opt/lixa/share/lixa/java/xta.jar:/usr/share/java/mysql.jar:. ExampleXtaMACBPS31 0 0 sup2sub sub2sup MySQL, executing >DELETE FROM authors WHERE id=1919< Superior AP has sent XID '1279875137.76c07087a5d1433c9c985c8976800060.cd976821ac38611801b6e378a35a3c7a' to subordinate AP Superior AP has received 'ROLLBACK' reply from subordinate AP MySQL, executing >DELETE FROM authors WHERE id=1898< tiian@ubuntu1404-64:~/tmp$ |
| [Shell terminal session - AP2] |
tiian@ubuntu1404-64:~/tmp$ java -Djava.library.path=/opt/lixa/lib -cp /opt/lixa/share/lixa/java/xta.jar:/opt/postgresql/postgresql.jar:. ExampleXtaMACBPS32 0 0 sup2sub sub2sup Subordinate AP has received XID '1279875137.76c07087a5d1433c9c985c8976800060.cd976821ac38611801b6e378a35a3c7a' from superior AP Subordinate AP has created a branch with XID '1279875137.76c07087a5d1433c9c985c8976800060.cd976821ac386118d8720d87412a4927' PostgreSQL, executing >DELETE FROM authors WHERE id=1921< Subordinate AP has returned 'ROLLBACK' to superior AP tiian@ubuntu1404-64:~/tmp$ |
check MySQL table content:
| [Shell terminal session - MySQL] |
mysql> select * from authors; +------+-----------+-------------+ | id | last_name | first_name | +------+-----------+-------------+ | 1898 | Remarque | Erich Maria | | 1919 | Levi | Primo | +------+-----------+-------------+ 2 rows in set (0.00 sec) mysql> |
check PostgreSQL table content:
| [Shell terminal session - PostgreSQL] |
testdb=> select * from authors; id | last_name | first_name ------+--------------+------------ 1921 | Rigoni Stern | Mario (1 row) testdb=> |
delete rows and commit:
| [Shell terminal session - AP1] |
tiian@ubuntu1404-64:~/tmp$ java -Djava.library.path=/opt/lixa/lib -cp /opt/lixa/share/lixa/java/xta.jar:/usr/share/java/mysql.jar:. ExampleXtaMACBPS31 1 0 sup2sub sub2sup MySQL, executing >DELETE FROM authors WHERE id=1919< Superior AP has sent XID '1279875137.a31bf2c7780345f98112c613685780bd.cd976821ac38611801b6e378a35a3c7a' to subordinate AP Superior AP has received 'PREPARED_for_COMMIT' reply from subordinate AP MySQL, executing >DELETE FROM authors WHERE id=1898< tiian@ubuntu1404-64:~/tmp$ |
| [Shell terminal session - AP2] |
tiian@ubuntu1404-64:~/tmp$ java -Djava.library.path=/opt/lixa/lib -cp /opt/lixa/share/lixa/java/xta.jar:/opt/postgresql/postgresql.jar:. ExampleXtaMACBPS32 1 0 sup2sub sub2sup Subordinate AP has received XID '1279875137.a31bf2c7780345f98112c613685780bd.cd976821ac38611801b6e378a35a3c7a' from superior AP Subordinate AP has created a branch with XID '1279875137.a31bf2c7780345f98112c613685780bd.cd976821ac38611837020c0b51914e74' PostgreSQL, executing >DELETE FROM authors WHERE id=1921< Subordinate AP has returned 'PREPARED_for_COMMIT' to superior AP tiian@ubuntu1404-64:~/tmp$ |
check MySQL table content:
| [Shell terminal session - MySQL] |
mysql> select * from authors; Empty set (0.00 sec) mysql> |
check PostgreSQL table content:
| [Shell terminal session - PostgreSQL] |
testdb=> select * from authors; id | last_name | first_name ------+--------------+------------ (0 rows) testdb=> |
Source code for programs
ExampleXtaMACBPS31.java
and ExampleXtaMACBPS32.java are
installed in directory
/opt/lixa/share/doc/lixa-X.Y.Z/examples/xta/java
and are available on GitHub. Source code is fully
commented for readability.
The supplied examples (example_xta_macbps21.py
and example_xta_macbps22.py) use
PostgreSQL in the role of “Resource Manager 2” and MySQL
(or MariaDB) in the role of “Resource Manager 1”; please
refer to the instructions explained:
in the section called “XTA Technology Matrix” to build and install the Python database drivers that can be used with XTA
in the section called “MySQL/MariaDB Configuration” to set-up a running environment for MySQL server
in the section called “PostgreSQL Configuration” to set-up a running environment for PostgreSQL server
in the section called “Starting the state server (lixad)” to start up the LIXA state server.
Both programs must be used to execute the example:
example_xta_macbps21.py in the role of the
superior Application Program (first AP) and
example_xta_macbps22.py in the role of the
subordinate Application Program (second AP).
Python 2 and Python 3 can be used even mixing them: one for the first
AP and one for the second AP.
Create a working directory in a place you are comfortable with:
| [Shell terminal session] |
tiian@ubuntu1404-64:~$ cd tiian@ubuntu1404-64:~$ mkdir tmp tiian@ubuntu1404-64:~$ cd tmp tiian@ubuntu1404-64:~/tmp$ |
Copy files example_xta_macbps21.py and
example_xta_macbps22.py in your working dir:
| [Shell terminal session] |
tiian@ubuntu:~/tmp$ cp /opt/lixa/share/doc/lixa-X.Y.Z/examples/xta/python/example_xta_macbps21.py . tiian@ubuntu:~/tmp$ cp /opt/lixa/share/doc/lixa-X.Y.Z/examples/xta/python/example_xta_macbps22.py . |
Substitute “X.Y.Z” with the actual version of the software you installed.
The example programs accept four arguments:
commit (or rollback): use “1” if you want to perform a global commit or “0” if you want to perform a global rollback
insert (or delete): use “1” if you want to insert rows in databases or “0” if you want to delete rows from databases
name of the FIFO (named pipe) that will be used to send messages from the superior AP to the subordinate AP
name of the FIFO (named pipe) that will be used to return messages from the subordinate AP to the superior AP
Open four terminal sessions: two for the example programs execution,
| [Shell terminal session - AP1] |
tiian@ubuntu1404-64:~/tmp$ ls -l example_xta_macbps21.py -rw-r--r-- 1 tiian tiian 4701 ott 15 22:28 example_xta_macbps21.py |
| [Shell terminal session - AP2] |
tiian@ubuntu1404-64:~/tmp$ ls -l example_xta_macbps22.py -rw-r--r-- 1 tiian tiian 5266 ott 15 22:28 example_xta_macbps22.py |
one for MySQL queries,
| [Shell terminal session - MySQL] |
tiian@ubuntu1404-64:~$ mysql -h localhost -u lixa lixa Reading table information for completion of table and column names You can turn off this feature to get a quicker startup with -A Welcome to the MySQL monitor. Commands end with ; or \g. Your MySQL connection id is 36 Server version: 5.5.61-0ubuntu0.14.04.1 (Ubuntu) Copyright (c) 2000, 2018, Oracle and/or its affiliates. All rights reserved. Oracle is a registered trademark of Oracle Corporation and/or its affiliates. Other names may be trademarks of their respective owners. Type 'help;' or '\h' for help. Type '\c' to clear the current input statement. mysql> |
and one for PostgreSQL queries
| [Shell terminal session - PostgreSQL] |
tiian@ubuntu1404-64:~$ psql testdb psql (9.3.24) Type "help" for help. testdb=> |
Set LIXA_PROFILE environment variable to
XTA_DYN,
a profile without static Resource Managers defined in
lixac_conf.xml:
| [Shell terminal session - AP1] |
tiian@ubuntu1404-64:~/tmp$ export LIXA_PROFILE=XTA_DYN tiian@ubuntu1404-64:~/tmp$ echo $LIXA_PROFILE XTA_DYN |
| [Shell terminal session - AP2] |
tiian@ubuntu1404-64:~/tmp$ export LIXA_PROFILE=XTA_DYN tiian@ubuntu1404-64:~/tmp$ echo $LIXA_PROFILE XTA_DYN |
create two named pipes (FIFO) to support communication between superior and subordinate Application Programs
| [Shell terminal session - AP1] |
tiian@ubuntu1404-64:~/tmp$ mkfifo sup2sub tiian@ubuntu1404-64:~/tmp$ mkfifo sub2sup tiian@ubuntu1404-64:~/tmp$ ls -l su* prw-rw-r-- 1 tiian tiian 0 ott 15 22:35 sub2sup prw-rw-r-- 1 tiian tiian 0 ott 15 22:35 sup2sub |
execute both the example programs to insert rows in tables and commit:
| [Shell terminal session - AP1] |
tiian@ubuntu1404-64:~/tmp$ python example_xta_macbps21.py 1 1 sup2sub sub2sup MySQL, executing >INSERT INTO authors VALUES(1919, 'Levi', 'Primo')< Superior AP has sent XID '1279875137.9d22af42e46f4111b23ba3630479c6b9.e107cfeee0661d23da9322f1ee73faba' to subordinate AP Superior AP has received 'PREPARED_for_COMMIT' reply from subordinate AP MySQL, executing >INSERT INTO authors VALUES(1898, 'Remarque', 'Erich Maria')< Superior AP has committed its branch tiian@ubuntu1404-64:~/tmp$ |
| [Shell terminal session - AP2] |
tiian@ubuntu1404-64:~/tmp$ python example_xta_macbps22.py 1 1 sup2sub sub2sup Subordinate AP has received XID '1279875137.9d22af42e46f4111b23ba3630479c6b9.e107cfeee0661d23da9322f1ee73faba' from superior AP Subordinate AP has created a branch with XID '1279875137.9d22af42e46f4111b23ba3630479c6b9.e107cfeee0661d23feeb9fdbaca14974' PostgreSQL, executing >INSERT INTO authors VALUES(1921, 'Rigoni Stern', 'Mario')< Subordinate AP has returned 'PREPARED_for_COMMIT' to superior AP tiian@ubuntu1404-64:~/tmp$ |
Note
The first (superior) Application Program suspends and waits the return value from the second (subordinate) Application Program.
The XID generated by the subordinate AP differs from the XID generated by the superior AP in the last 16 hexadecimal symbols of the “branch qualifier”; the first 16 hexadecimal symbols are the same: this is not required by XA specification but can be useful for troubleshooting purposes.
Check MySQL table content:
| [Shell terminal session - MySQL] |
mysql> select * from authors; +------+-----------+-------------+ | id | last_name | first_name | +------+-----------+-------------+ | 1898 | Remarque | Erich Maria | | 1919 | Levi | Primo | +------+-----------+-------------+ 2 rows in set (0.00 sec) mysql> |
check PostgreSQL table content:
| [Shell terminal session - PostgreSQL] |
testdb=> select * from authors; id | last_name | first_name ------+--------------+------------ 1921 | Rigoni Stern | Mario (1 row) testdb=> |
delete rows from tables, but rollback:
| [Shell terminal session - AP1] |
tiian@ubuntu1404-64:~/tmp$ python example_xta_macbps21.py 0 0 sup2sub sub2sup MySQL, executing >DELETE FROM authors WHERE id=1919< Superior AP has sent XID '1279875137.84ab3fdb762742a096a8181043938232.e107cfeee0661d23da9322f1ee73faba' to subordinate AP Superior AP has received 'ROLLBACK' reply from subordinate AP MySQL, executing >DELETE FROM authors WHERE id=1898< Superior AP has rolled back its branch tiian@ubuntu1404-64:~/tmp$ |
| [Shell terminal session - AP2] |
tiian@ubuntu1404-64:~/tmp$ python example_xta_macbps22.py 0 0 sup2sub sub2sup Subordinate AP has received XID '1279875137.84ab3fdb762742a096a8181043938232.e107cfeee0661d23da9322f1ee73faba' from superior AP Subordinate AP has created a branch with XID '1279875137.84ab3fdb762742a096a8181043938232.e107cfeee0661d2397f7336b2f6449f2' PostgreSQL, executing >DELETE FROM authors WHERE id=1921< Subordinate AP has returned 'ROLLBACK' to superior AP tiian@ubuntu1404-64:~/tmp$ |
check MySQL table content:
| [Shell terminal session - MySQL] |
mysql> select * from authors; +------+-----------+-------------+ | id | last_name | first_name | +------+-----------+-------------+ | 1898 | Remarque | Erich Maria | | 1919 | Levi | Primo | +------+-----------+-------------+ 2 rows in set (0.00 sec) mysql> |
check PostgreSQL table content:
| [Shell terminal session - PostgreSQL] |
testdb=> select * from authors; id | last_name | first_name ------+--------------+------------ 1921 | Rigoni Stern | Mario (1 row) testdb=> |
delete rows and commit:
| [Shell terminal session - AP1] |
tiian@ubuntu1404-64:~/tmp$ python example_xta_macbps21.py 1 0 sup2sub sub2sup MySQL, executing >DELETE FROM authors WHERE id=1919< Superior AP has sent XID '1279875137.284ca606ec594b94a98a26a0e2e6730a.e107cfeee0661d23da9322f1ee73faba' to subordinate AP Superior AP has received 'PREPARED_for_COMMIT' reply from subordinate AP MySQL, executing >DELETE FROM authors WHERE id=1898< Superior AP has committed its branch tiian@ubuntu1404-64:~/tmp$ |
| [Shell terminal session - AP2] |
tiian@ubuntu1404-64:~/tmp$ python example_xta_macbps22.py 1 0 sup2sub sub2sup Subordinate AP has received XID '1279875137.284ca606ec594b94a98a26a0e2e6730a.e107cfeee0661d23da9322f1ee73faba' from superior AP Subordinate AP has created a branch with XID '1279875137.284ca606ec594b94a98a26a0e2e6730a.e107cfeee0661d23759dd6e4f8ad4afc' PostgreSQL, executing >DELETE FROM authors WHERE id=1921< Subordinate AP has returned 'PREPARED_for_COMMIT' to superior AP tiian@ubuntu1404-64:~/tmp$ |
check MySQL table content:
| [Shell terminal session - MySQL] |
mysql> select * from authors; Empty set (0.00 sec) mysql> |
check PostgreSQL table content:
| [Shell terminal session - PostgreSQL] |
testdb=> select * from authors; id | last_name | first_name ------+--------------+------------ (0 rows) testdb=> |
Source code for programs example_xta_macbps21.py
and example_xta_macbps22.py are
installed in directory
/opt/lixa/share/doc/lixa-X.Y.Z/examples/xta/python and
are available on GitHub. Source code is fully
commented for readability.
| The pattern in brief: | |
| Architecture: | see Figure 8.3, “Multiple applications layout” |
| Number of Application Programs: | 2 or more |
| Number of Resource Managers: | 1 or more for every Application Program |
| Number of Branches in the Gloabal Transaction: | 1 for every Application Program |
| Concurrency among Application Programs: | yes, subordinate AP creates a new branch and then executes asynchronously |
This is a Distributed Transaction Processing pattern introduced by XTA: two or more Application Programs use any set of Resource Manager(s) and perform concurrent operations inside distinct branches of a common XA global transaction. The Resource Manager(s) must support concurrent branches of the same global transaction: this is part of XA standard, but some resource managers might not support it.
The following picture shows an example that can be implemented, for example, using MySQL (or MariaDB) and PostgreSQL. [53]
Figure 8.10. Example of “Multiple Applications, Consecutive Calls/Pseudo Synchronous” with two Application Programs and two Resource Managers
The pattern can not be implemented using the
standard TX Transaction Demarcation interface.
Figure 8.11. Simplified sequence diagram for the “Multiple Applications, Concurrent Branches/Pseudo Asynchronous” Pattern

The above figure shows the logic necessary to build this type of applications; it's not a formally correct UML sequence diagram (all the XTA objects are in the same lifeline), but it should be clear enough to understand the proper operations sequence:
Both the Application Programs perform some some initial steps like: opening a native connection to the Resource Manager, creating a Transaction Manager object, a XA Resource Manager object, a Transaction object and finally enlisting and opening the Resource Manager
The first AP, named “superior” using XA terminology, starts the global transaction
The first AP retrieves the XID associated to the global transaction and uses some sort of “message passing” to send the XID to the second AP
The second AP, named “subordinate” using XA terminology, branches the global transaction and send back an acknowledge message to the first AP: this is helpful because the superior AP must not start its commit before subordinate branch creation
Since then now, the Application Programs can proceed asynchronously with the subsequent operations, specifically using the Resource Managers and committing the distinct branches
The last operations are related to clean-up
Note
The dashed red rectangle highlights the XA global transaction.
Important
These are the relevant elements of this pattern:
it's designed for a peer to peer approach with some sort of message passing communication protocol in place; it's not strictly asynchronous because there are a couple of synchronization points
the first synchronization point is represented by the XID sent from the superior AP to the subordinate AP; the acknowledge message is not strictly necessary, but the first AP must not call
tx.Commit()before the second AP completedtx.Branch(xid); conversely, second AP gets a warning because the branch can't be createdthe second synchronization point is implicit in
tx.Commit(): it's a blocking call and all the branches are silently synchronized by the LIXA state servereven if there are two synchronization points, the Application Programs can really operate concurrently on their Resource Managers and this aspect can allow faster transactions in comparison with the pattern described in the section called “The “Multiple Applications, Concurrent Branches/Pseudo Synchronous” Pattern”
the diagram shows an example with two Application Programs, but the pattern can be applied to any number of Application Programs in different ways: a subordinate AP can become a superior AP of a called subordinate AP and so on or the superior AP can trigger many subordinate APs
the diagram shows an example with only one Resource Manager for every Application Program, but there's no restriction on LIXA and XTA side, on the number of Resource Managers used by an Application Program
Note
Not all the Resource Managers have implemented the XA specifications in the same way. This section tracks some limitations that have been reported by the LIXA project.
As described in Oracle's official documentation [54] at paragraph 30-15 “Oracle XA Optimizations”, Oracle JDBC implements additional logic, in comparison with the XA specifications, when two ore more branches of the same global transaction are related to the same Oracle Database instance.
Important
In the event that both AP1 and AP2 use the same Oracle Database
instance strange behaviors could be reported. Furthermore, one of the
calls to rm.doSomething() from AP1 or AP2 could
fail as described in this
case
documented by Red hat, with error
“ORA-02051: another session or branch in same transaction failed or finalized”. A relevant hypotesis described in the case is
“Oracle seems to disallow attempt to execute SQL on a
transaction branch when another branch in the same global transaction
has already prepared its transaction”.
On the other hand, no such limitation has been found in the Oracle OCI interface for C and C++.
The supplied examples (example_xta_macbpa01.c and
example_xta_macbpa02.c) use
PostgreSQL in the role of “Resource Manager 2” and MySQL
(or MariaDB) in the role of “Resource Manager 1”; please
refer to the instructions explained:
in the section called “MySQL/MariaDB Configuration” to set-up a running environment for MySQL server
in the section called “PostgreSQL Configuration” to set-up a running environment for PostgreSQL server
in the section called “Starting the state server (lixad)” to start up the LIXA state server.
Both programs must be used to execute the example:
example_xta_macbpa01 in the role of the superior
Application Program (first AP) and
example_xta_macbpa02 in the role of the
subordinate Application Program (second AP).
Create a working directory in a place you are comfortable with:
| [Shell terminal session] |
tiian@ubuntu1404-64:~$ cd tiian@ubuntu1404-64:~$ mkdir tmp tiian@ubuntu1404-64:~$ cd tmp tiian@ubuntu1404-64:~/tmp$ |
Copy files example_xta_macbas01.c and
example_xta_macbpa02.c in your working dir:
| [Shell terminal session] |
tiian@ubuntu:~/tmp$ cp /opt/lixa/share/doc/lixa-X.Y.Z/examples/xta/example_xta_macbpa01.c . tiian@ubuntu:~/tmp$ cp /opt/lixa/share/doc/lixa-X.Y.Z/examples/xta/example_xta_macbpa02.c . |
Substitute “X.Y.Z” with the actual version of the software you installed.
Compile and link the C example programs:
| [Shell terminal session] |
tiian@ubuntu1404-64:~/tmp$ . /opt/lixa/bin/lixa_env.sh tiian@ubuntu1404-64:~/tmp$ gcc example_xta_macbpa01.c $(lixa-config -x -c -f -l -d) $(mysql_config --libs_r) -o example_xta_macbpa01 tiian@ubuntu1404-64:~/tmp$ gcc example_xta_macbpa02.c $(lixa-config -x -c -f -l -d) -lpq -o example_xta_macbpa02 |
If the previous steps worked for you, you should have two executable
files of name example_xta_macbpa01 and
example_xta_macbpa02 in your current directory:
| [Shell terminal session] |
tiian@ubuntu1404-64:~/tmp$ ls -l total 96 -rwxrwxr-x 1 tiian tiian 18599 apr 11 22:52 example_xta_macbpa01 -rw-r--r-- 1 tiian tiian 10387 apr 11 22:52 example_xta_macbpa01.c -rwxrwxr-x 1 tiian tiian 18525 apr 11 22:52 example_xta_macbpa02 -rw-r--r-- 1 tiian tiian 10537 apr 11 22:52 example_xta_macbpa02.c |
The example programs accept four arguments:
commit (or rollback): use “1” if you want to perform a global commit or “0” if you want to perform a global rollback
insert (or delete): use “1” if you want to insert rows in databases or “0” if you want to delete rows from databases
name of the FIFO (named pipe) that will be used to send messages from the superior AP to the subordinate AP
name of the FIFO (named pipe) that will be used to return messages from the subordinate AP to the superior AP
Open four terminal sessions: two for the example programs execution,
| [Shell terminal session - AP1] |
tiian@ubuntu1404-64:~/tmp$ ls -l example_xta_macbpa01 -rwxrwxr-x 1 tiian tiian 18599 apr 11 22:52 example_xta_macbpa01 |
| [Shell terminal session - AP2] |
tiian@ubuntu1404-64:~/tmp$ ls -l example_xta_macbpa02 -rwxrwxr-x 1 tiian tiian 18525 apr 11 22:52 example_xta_macbpa02 |
one for MySQL queries,
| [Shell terminal session - MySQL] |
tiian@ubuntu1404-64:~$ mysql -h localhost -u lixa lixa Reading table information for completion of table and column names You can turn off this feature to get a quicker startup with -A Welcome to the MySQL monitor. Commands end with ; or \g. Your MySQL connection id is 36 Server version: 5.5.59-0ubuntu0.14.04.1 (Ubuntu) Copyright (c) 2000, 2018, Oracle and/or its affiliates. All rights reserved. Oracle is a registered trademark of Oracle Corporation and/or its affiliates. Other names may be trademarks of their respective owners. Type 'help;' or '\h' for help. Type '\c' to clear the current input statement. mysql> |
and one for PostgreSQL queries
| [Shell terminal session - PostgreSQL] |
tiian@ubuntu1404-64:~$ psql testdb psql (9.3.22) Type "help" for help. testdb=> |
Set LIXA_PROFILE environment variable to
XTA_DYN,
a profile without static Resource Managers defined in
lixac_conf.xml:
| [Shell terminal session - AP1] |
tiian@ubuntu1404-64:~/tmp$ export LIXA_PROFILE=XTA_DYN tiian@ubuntu1404-64:~/tmp$ echo $LIXA_PROFILE XTA_DYN |
| [Shell terminal session - AP2] |
tiian@ubuntu1404-64:~/tmp$ export LIXA_PROFILE=XTA_DYN tiian@ubuntu1404-64:~/tmp$ echo $LIXA_PROFILE XTA_DYN |
create two named pipes (FIFO) to support communication between superior and subordinate Application Programs
| [Shell terminal session - AP1] |
tiian@ubuntu1404-64:~/tmp$ mkfifo sup2sub tiian@ubuntu1404-64:~/tmp$ mkfifo sub2sup tiian@ubuntu1404-64:~/tmp$ ls -l su* prw-rw-r-- 1 tiian tiian 0 apr 8 22:22 sub2sup prw-rw-r-- 1 tiian tiian 0 apr 8 22:22 sup2sub |
execute both the example programs to insert rows in tables and commit:
| [Shell terminal session - AP1] |
tiian@ubuntu1404-64:~/tmp$ ./example_xta_macbpa01 1 1 sup2sub sub2sup Superior AP has created a global transaction with XID '1279875137.23f76e42960242dabbbe0c79d701a710.e107cfeee0661d23da9322f1ee73faba' Superior AP has sent XID '1279875137.23f76e42960242dabbbe0c79d701a710.e107cfeee0661d23da9322f1ee73faba' to subordinate AP Superior AP has received XID '1279875137.23f76e42960242dabbbe0c79d701a710.e107cfeee0661d234a6a107d45254b67' from subordinate AP MySQL, executing >INSERT INTO authors VALUES(1919, 'Levi', 'Primo')< Superior AP has committed its branch |
| [Shell terminal session - AP2] |
tiian@ubuntu1404-64:~/tmp$ ./example_xta_macbpa02 1 1 sup2sub sub2sup Subordinate AP has received XID '1279875137.23f76e42960242dabbbe0c79d701a710.e107cfeee0661d23da9322f1ee73faba' from superior AP Subordinate AP has created a branch with XID '1279875137.23f76e42960242dabbbe0c79d701a710.e107cfeee0661d234a6a107d45254b67' Subordinate AP has sent XID '1279875137.23f76e42960242dabbbe0c79d701a710.e107cfeee0661d234a6a107d45254b67' to superior AP PostgreSQL, executing >INSERT INTO authors VALUES(1921, 'Rigoni Stern', 'Mario')< Subordinate AP has committed its branch |
Note
The first (superior) Application Program suspends and waits the return value from the second (subordinate) Application Program.
The XID generated by the subordinate AP differs from the XID generated by the superior AP in the last 16 hexadecimal symbols of the “branch qualifier”; the first 16 hexadecimal symbols are the same: this is not required by XA specification but can be useful for troubleshooting purposes.
Check MySQL table content:
| [Shell terminal session - MySQL] |
mysql> select * from authors; +------+-----------+-------------+ | id | last_name | first_name | +------+-----------+-------------+ | 1919 | Levi | Primo | +------+-----------+-------------+ 1 row in set (0.00 sec) mysql> |
check PostgreSQL table content:
| [Shell terminal session - PostgreSQL] |
testdb=> select * from authors; id | last_name | first_name ------+--------------+------------ 1921 | Rigoni Stern | Mario (1 row) testdb=> |
delete rows from tables, but rollback:
| [Shell terminal session - AP1] |
tiian@ubuntu1404-64:~/tmp$ ./example_xta_macbpa01 0 0 sup2sub sub2sup Superior AP has created a global transaction with XID '1279875137.110e8d024d1c4137a189c50e005a3432.e107cfeee0661d23da9322f1ee73faba' Superior AP has sent XID '1279875137.110e8d024d1c4137a189c50e005a3432.e107cfeee0661d23da9322f1ee73faba' to subordinate AP Superior AP has received XID '1279875137.110e8d024d1c4137a189c50e005a3432.e107cfeee0661d238b40227da3dd406d' from subordinate AP MySQL, executing >DELETE FROM authors WHERE id=1919< Superior AP has rolled back its branch |
| [Shell terminal session - AP2] |
tiian@ubuntu1404-64:~/tmp$ ./example_xta_macbpa02 0 0 sup2sub sub2sup Subordinate AP has received XID '1279875137.110e8d024d1c4137a189c50e005a3432.e107cfeee0661d23da9322f1ee73faba' from superior AP Subordinate AP has created a branch with XID '1279875137.110e8d024d1c4137a189c50e005a3432.e107cfeee0661d238b40227da3dd406d' Subordinate AP has sent XID '1279875137.110e8d024d1c4137a189c50e005a3432.e107cfeee0661d238b40227da3dd406d' to superior AP PostgreSQL, executing >DELETE FROM authors WHERE id=1921< Subordinate AP has rolled back its branch |
check MySQL table content:
| [Shell terminal session - MySQL] |
mysql> select * from authors; +------+-----------+-------------+ | id | last_name | first_name | +------+-----------+-------------+ | 1919 | Levi | Primo | +------+-----------+-------------+ 1 row in set (0.00 sec) mysql> |
check PostgreSQL table content:
| [Shell terminal session - PostgreSQL] |
testdb=> select * from authors; id | last_name | first_name ------+--------------+------------ 1921 | Rigoni Stern | Mario (1 row) testdb=> |
delete rows and commit:
| [Shell terminal session - AP1] |
tiian@ubuntu1404-64:~/tmp$ ./example_xta_macbpa01 1 0 sup2sub sub2sup Superior AP has created a global transaction with XID '1279875137.2a562ebe33654b4fa3d142569392ab13.e107cfeee0661d23da9322f1ee73faba' Superior AP has sent XID '1279875137.2a562ebe33654b4fa3d142569392ab13.e107cfeee0661d23da9322f1ee73faba' to subordinate AP Superior AP has received XID '1279875137.2a562ebe33654b4fa3d142569392ab13.e107cfeee0661d2396e0fac5217f44a8' from subordinate AP MySQL, executing >DELETE FROM authors WHERE id=1919< Superior AP has committed its branch |
| [Shell terminal session - AP2] |
tiian@ubuntu1404-64:~/tmp$ ./example_xta_macbpa02 1 0 sup2sub sub2sup Subordinate AP has received XID '1279875137.2a562ebe33654b4fa3d142569392ab13.e107cfeee0661d23da9322f1ee73faba' from superior AP Subordinate AP has created a branch with XID '1279875137.2a562ebe33654b4fa3d142569392ab13.e107cfeee0661d2396e0fac5217f44a8' Subordinate AP has sent XID '1279875137.2a562ebe33654b4fa3d142569392ab13.e107cfeee0661d2396e0fac5217f44a8' to superior AP PostgreSQL, executing >DELETE FROM authors WHERE id=1921< Subordinate AP has committed its branch |
check MySQL table content:
| [Shell terminal session - MySQL] |
mysql> select * from authors; Empty set (0.00 sec) mysql> |
check PostgreSQL table content:
| [Shell terminal session - PostgreSQL] |
testdb=> select * from authors; id | last_name | first_name ------+--------------+------------ (0 rows) testdb=> |
Source code for programs example_xta_macbpa01.c
and example_xta_macbpa02.c are
installed in directory
/opt/lixa/share/doc/lixa-X.Y.Z/examples/xta and
are available on GitHub. Source code is fully
commented for readability.
The supplied examples (example_xta_macbpa11.cpp
and example_xta_macbpa12.cpp) use
PostgreSQL in the role of “Resource Manager 2” and MySQL
(or MariaDB) in the role of “Resource Manager 1”; please
refer to the instructions explained:
in the section called “MySQL/MariaDB Configuration” to set-up a running environment for MySQL server
in the section called “PostgreSQL Configuration” to set-up a running environment for PostgreSQL server
in the section called “Starting the state server (lixad)” to start up the LIXA state server.
Both programs must be used to execute the example:
example_xta_macbpa11 in the role of the superior
Application Program (first AP) and
example_xta_macbpa12 in the role of the
subordinate Application Program (second AP).
Create a working directory in a place you are comfortable with:
| [Shell terminal session] |
tiian@ubuntu1404-64:~$ cd tiian@ubuntu1404-64:~$ mkdir tmp tiian@ubuntu1404-64:~$ cd tmp tiian@ubuntu1404-64:~/tmp$ |
Copy files example_xta_macbas11.cpp and
example_xta_macbpa12.cpp in your working dir:
| [Shell terminal session] |
tiian@ubuntu:~/tmp$ cp /opt/lixa/share/doc/lixa-X.Y.Z/examples/xta/cpp/example_xta_macbpa11.cpp . tiian@ubuntu:~/tmp$ cp /opt/lixa/share/doc/lixa-X.Y.Z/examples/xta/cpp/example_xta_macbpa12.cpp . |
Substitute “X.Y.Z” with the actual version of the software you installed.
Compile and link the C++ example programs:
| [Shell terminal session] |
tiian@ubuntu1404-64:~/tmp$ . /opt/lixa/bin/lixa_env.sh tiian@ubuntu1404-64:~/tmp$ g++ example_xta_macbpa11.cpp $(lixa-config -c -f -l -d --xta --language-cpp) $(mysql_config --libs_r) -o example_xta_macbpa11 tiian@ubuntu1404-64:~/tmp$ g++ example_xta_macbpa12.cpp $(lixa-config -c -f -l -d --xta --language-cpp) -lpq -o example_xta_macbpa12 |
If the previous steps worked for you, you should have two executable
files of name example_xta_macbpa11 and
example_xta_macbpa12 in your current directory:
| [Shell terminal session] |
tiian@ubuntu1404-64:~/tmp$ ls -l total 80 -rwxrwxr-x 1 tiian tiian 26419 ago 30 21:49 example_xta_macbpa11 -rw-r--r-- 1 tiian tiian 8305 ago 30 21:48 example_xta_macbpa11.cpp -rwxrwxr-x 1 tiian tiian 26342 ago 30 21:49 example_xta_macbpa12 -rw-r--r-- 1 tiian tiian 8614 ago 30 21:49 example_xta_macbpa12.cpp |
The example programs accept four arguments:
commit (or rollback): use “1” if you want to perform a global commit or “0” if you want to perform a global rollback
insert (or delete): use “1” if you want to insert rows in databases or “0” if you want to delete rows from databases
name of the FIFO (named pipe) that will be used to send messages from the superior AP to the subordinate AP
name of the FIFO (named pipe) that will be used to return messages from the subordinate AP to the superior AP
Open four terminal sessions: two for the example programs execution,
| [Shell terminal session - AP1] |
tiian@ubuntu1404-64:~/tmp$ ls -l example_xta_macbpa11 -rwxrwxr-x 1 tiian tiian 26419 ago 30 21:49 example_xta_macbpa11 |
| [Shell terminal session - AP2] |
tiian@ubuntu1404-64:~/tmp$ ls -l example_xta_macbpa12 -rwxrwxr-x 1 tiian tiian 26342 ago 30 21:49 example_xta_macbpa12 |
one for MySQL queries,
| [Shell terminal session - MySQL] |
tiian@ubuntu1404-64:~$ mysql -h localhost -u lixa lixa Reading table information for completion of table and column names You can turn off this feature to get a quicker startup with -A Welcome to the MySQL monitor. Commands end with ; or \g. Your MySQL connection id is 36 Server version: 5.5.61-0ubuntu0.14.04.1 (Ubuntu) Copyright (c) 2000, 2018, Oracle and/or its affiliates. All rights reserved. Oracle is a registered trademark of Oracle Corporation and/or its affiliates. Other names may be trademarks of their respective owners. Type 'help;' or '\h' for help. Type '\c' to clear the current input statement. mysql> |
and one for PostgreSQL queries
| [Shell terminal session - PostgreSQL] |
tiian@ubuntu1404-64:~$ psql testdb psql (9.3.24) Type "help" for help. testdb=> |
Set LIXA_PROFILE environment variable to
XTA_DYN,
a profile without static Resource Managers defined in
lixac_conf.xml:
| [Shell terminal session - AP1] |
tiian@ubuntu1404-64:~/tmp$ export LIXA_PROFILE=XTA_DYN tiian@ubuntu1404-64:~/tmp$ echo $LIXA_PROFILE XTA_DYN |
| [Shell terminal session - AP2] |
tiian@ubuntu1404-64:~/tmp$ export LIXA_PROFILE=XTA_DYN tiian@ubuntu1404-64:~/tmp$ echo $LIXA_PROFILE XTA_DYN |
create two named pipes (FIFO) to support communication between superior and subordinate Application Programs
| [Shell terminal session - AP1] |
tiian@ubuntu1404-64:~/tmp$ mkfifo sup2sub tiian@ubuntu1404-64:~/tmp$ mkfifo sub2sup tiian@ubuntu1404-64:~/tmp$ ls -l su* prw-rw-r-- 1 tiian tiian 0 ago 30 21:55 sub2sup prw-rw-r-- 1 tiian tiian 0 ago 30 21:55 sup2sub |
execute both the example programs to insert rows in tables and commit:
| [Shell terminal session - AP1] |
tiian@ubuntu1404-64:~/tmp$ ./example_xta_macbpa11 1 1 sup2sub sub2sup Superior AP has sent XID '1279875137.5aaef2e493c74a38a4547b446c859b1f.e107cfeee0661d23da9322f1ee73faba' to subordinate AP Superior AP has received '1279875137.5aaef2e493c74a38a4547b446c859b1f.e107cfeee0661d236f20dd6b11f54de1' reply from subordinate AP MySQL, executing >INSERT INTO authors VALUES(1919, 'Levi', 'Primo')< Superior AP has committed its branch |
| [Shell terminal session - AP2] |
tiian@ubuntu1404-64:~/tmp$ ./example_xta_macbpa12 1 1 sup2sub sub2sup Subordinate AP has received XID '1279875137.5aaef2e493c74a38a4547b446c859b1f.e107cfeee0661d23da9322f1ee73faba' from superior AP Subordinate AP has created a branch with XID '1279875137.5aaef2e493c74a38a4547b446c859b1f.e107cfeee0661d236f20dd6b11f54de1' Subordinate AP has returned '1279875137.5aaef2e493c74a38a4547b446c859b1f.e107cfeee0661d236f20dd6b11f54de1' to superior AP PostgreSQL, executing >INSERT INTO authors VALUES(1921, 'Rigoni Stern', 'Mario')< Subordinate AP has committed its branch |
Note
The first (superior) Application Program suspends and waits the return value from the second (subordinate) Application Program.
The XID generated by the subordinate AP differs from the XID generated by the superior AP in the last 16 hexadecimal symbols of the “branch qualifier”; the first 16 hexadecimal symbols are the same: this is not required by XA specification but can be useful for troubleshooting purposes.
Check MySQL table content:
| [Shell terminal session - MySQL] |
mysql> select * from authors; +------+-----------+-------------+ | id | last_name | first_name | +------+-----------+-------------+ | 1919 | Levi | Primo | +------+-----------+-------------+ 1 row in set (0.00 sec) mysql> |
check PostgreSQL table content:
| [Shell terminal session - PostgreSQL] |
testdb=> select * from authors; id | last_name | first_name ------+--------------+------------ 1921 | Rigoni Stern | Mario (1 row) testdb=> |
delete rows from tables, but rollback:
| [Shell terminal session - AP1] |
tiian@ubuntu1404-64:~/tmp$ ./example_xta_macbpa11 0 0 sup2sub sub2sup Superior AP has sent XID '1279875137.64630ff1b9ed45a9be0d61591fbd0902.e107cfeee0661d23da9322f1ee73faba' to subordinate AP Superior AP has received '1279875137.64630ff1b9ed45a9be0d61591fbd0902.e107cfeee0661d23b3d84907125644fb' reply from subordinate AP MySQL, executing >DELETE FROM authors WHERE id=1919< Superior AP has rolled back its branch |
| [Shell terminal session - AP2] |
tiian@ubuntu1404-64:~/tmp$ ./example_xta_macbpa12 0 0 sup2sub sub2sup Subordinate AP has received XID '1279875137.64630ff1b9ed45a9be0d61591fbd0902.e107cfeee0661d23da9322f1ee73faba' from superior AP Subordinate AP has created a branch with XID '1279875137.64630ff1b9ed45a9be0d61591fbd0902.e107cfeee0661d23b3d84907125644fb' Subordinate AP has returned '1279875137.64630ff1b9ed45a9be0d61591fbd0902.e107cfeee0661d23b3d84907125644fb' to superior AP PostgreSQL, executing >DELETE FROM authors WHERE id=1921< Subordinate AP has rolled back its branch |
check MySQL table content:
| [Shell terminal session - MySQL] |
mysql> select * from authors; +------+-----------+-------------+ | id | last_name | first_name | +------+-----------+-------------+ | 1919 | Levi | Primo | +------+-----------+-------------+ 1 row in set (0.00 sec) mysql> |
check PostgreSQL table content:
| [Shell terminal session - PostgreSQL] |
testdb=> select * from authors; id | last_name | first_name ------+--------------+------------ 1921 | Rigoni Stern | Mario (1 row) testdb=> |
delete rows and commit:
| [Shell terminal session - AP1] |
tiian@ubuntu1404-64:~/tmp$ ./example_xta_macbpa11 1 0 sup2sub sub2sup Superior AP has sent XID '1279875137.026b900538d1419da4ab8d728519c75d.e107cfeee0661d23da9322f1ee73faba' to subordinate AP Superior AP has received '1279875137.026b900538d1419da4ab8d728519c75d.e107cfeee0661d23158770b81d1b41b5' reply from subordinate AP MySQL, executing >DELETE FROM authors WHERE id=1919< Superior AP has committed its branch |
| [Shell terminal session - AP2] |
tiian@ubuntu1404-64:~/tmp$ ./example_xta_macbpa12 1 0 sup2sub sub2sup Subordinate AP has received XID '1279875137.026b900538d1419da4ab8d728519c75d.e107cfeee0661d23da9322f1ee73faba' from superior AP Subordinate AP has created a branch with XID '1279875137.026b900538d1419da4ab8d728519c75d.e107cfeee0661d23158770b81d1b41b5' Subordinate AP has returned '1279875137.026b900538d1419da4ab8d728519c75d.e107cfeee0661d23158770b81d1b41b5' to superior AP PostgreSQL, executing >DELETE FROM authors WHERE id=1921< Subordinate AP has committed its branch |
check MySQL table content:
| [Shell terminal session - MySQL] |
mysql> select * from authors; Empty set (0.00 sec) mysql> |
check PostgreSQL table content:
| [Shell terminal session - PostgreSQL] |
testdb=> select * from authors; id | last_name | first_name ------+--------------+------------ (0 rows) testdb=> |
Source code for programs example_xta_macbpa11.cpp
and example_xta_macbpa12.cpp are
installed in directory
/opt/lixa/share/doc/lixa-X.Y.Z/examples/xta/cpp
and are available on GitHub. Source code is fully
commented for readability.
The supplied examples (ExampleXtaMACBPA31.java
and ExampleXtaMACBPA32.java) use
PostgreSQL in the role of “Resource Manager 2” and MySQL
(or MariaDB) in the role of “Resource Manager 1”; please
refer to the instructions explained:
in the section called “MySQL/MariaDB Configuration” to set-up a running environment for MySQL server
in the section called “PostgreSQL Configuration” to set-up a running environment for PostgreSQL server
in the section called “Starting the state server (lixad)” to start up the LIXA state server.
Both programs must be used to execute the example:
ExampleXtaMACBPA31.class in the role of the
superior Application Program (first AP) and
ExampleXtaMACBPA32.java in the role of the
subordinate Application Program (second AP).
Create a working directory in a place you are comfortable with:
| [Shell terminal session] |
tiian@ubuntu1404-64:~$ cd tiian@ubuntu1404-64:~$ mkdir tmp tiian@ubuntu1404-64:~$ cd tmp tiian@ubuntu1404-64:~/tmp$ |
Copy files ExampleXtaMACBPA31.java and
ExampleXtaMACBPA32.java in your working dir:
| [Shell terminal session] |
tiian@ubuntu:~/tmp$ cp /opt/lixa/share/doc/lixa-X.Y.Z/examples/xta/java/ExampleXtaMACBPA31.java . tiian@ubuntu:~/tmp$ cp /opt/lixa/share/doc/lixa-X.Y.Z/examples/xta/java/ExampleXtaMACBPA32.java . |
Substitute “X.Y.Z” with the actual version of the software you installed.
Use the proper paths for MySQL and PostgreSQL jars, then compile the Java example programs with something like:
| [Shell terminal session] |
tiian@ubuntu1404-64:~/tmp$ javac -cp /opt/lixa/share/lixa/java/xta.jar:/usr/share/java/mysql.jar ExampleXtaMACBPA31.java tiian@ubuntu1404-64:~/tmp$ javac -cp /opt/lixa/share/lixa/java/xta.jar:/opt/postgresql/postgresql.jar ExampleXtaMACBPA32.java |
If the previous steps worked for you, you should have two class
files of name ExampleXtaMACBPA31.class and
ExampleXtaMACBPA32.class in your current
directory:
| [Shell terminal session] |
tiian@ubuntu1404-64:~/tmp$ ls -l total 40 -rw-rw-r-- 1 tiian tiian 4258 gen 16 22:18 ExampleXtaMACBPA31.class -rw-r--r-- 1 tiian tiian 8624 gen 16 22:17 ExampleXtaMACBPA31.java -rw-rw-r-- 1 tiian tiian 4449 gen 16 22:18 ExampleXtaMACBPA32.class -rw-r--r-- 1 tiian tiian 9066 gen 16 22:17 ExampleXtaMACBPA32.java |
The example programs accept four arguments:
commit (or rollback): use “1” if you want to perform a global commit or “0” if you want to perform a global rollback
insert (or delete): use “1” if you want to insert rows in databases or “0” if you want to delete rows from databases
name of the FIFO (named pipe) that will be used to send messages from the superior AP to the subordinate AP
name of the FIFO (named pipe) that will be used to return messages from the subordinate AP to the superior AP
Open four terminal sessions: two for the example programs execution,
| [Shell terminal session - AP1] |
tiian@ubuntu1404-64:~/tmp$ ls -l ExampleXtaMACBPA31.class -rw-rw-r-- 1 tiian tiian 4258 gen 16 22:18 ExampleXtaMACBPA31.class |
| [Shell terminal session - AP2] |
tiian@ubuntu1404-64:~/tmp$ ls -l ExampleXtaMACBPA32.class -rw-rw-r-- 1 tiian tiian 4449 gen 16 22:18 ExampleXtaMACBPA32.class |
one for MySQL queries,
| [Shell terminal session - MySQL] |
tiian@ubuntu1404-64:~$ mysql -h localhost -u lixa lixa Reading table information for completion of table and column names You can turn off this feature to get a quicker startup with -A Welcome to the MySQL monitor. Commands end with ; or \g. Your MySQL connection id is 41 Server version: 5.5.62-0ubuntu0.14.04.1 (Ubuntu) Copyright (c) 2000, 2018, Oracle and/or its affiliates. All rights reserved. Oracle is a registered trademark of Oracle Corporation and/or its affiliates. Other names may be trademarks of their respective owners. Type 'help;' or '\h' for help. Type '\c' to clear the current input statement. mysql> |
and one for PostgreSQL queries
| [Shell terminal session - PostgreSQL] |
tiian@ubuntu1404-64:~$ psql testdb psql (9.3.24) Type "help" for help. testdb=> |
Set LIXA_PROFILE environment variable to
XTA_DYN,
a profile without static Resource Managers defined in
lixac_conf.xml:
| [Shell terminal session - AP1] |
tiian@ubuntu1404-64:~/tmp$ export LIXA_PROFILE=XTA_DYN tiian@ubuntu1404-64:~/tmp$ echo $LIXA_PROFILE XTA_DYN |
| [Shell terminal session - AP2] |
tiian@ubuntu1404-64:~/tmp$ export LIXA_PROFILE=XTA_DYN tiian@ubuntu1404-64:~/tmp$ echo $LIXA_PROFILE XTA_DYN |
create two named pipes (FIFO) to support communication between superior and subordinate Application Programs
| [Shell terminal session - AP1] |
tiian@ubuntu1404-64:~/tmp$ mkfifo sup2sub tiian@ubuntu1404-64:~/tmp$ mkfifo sub2sup tiian@ubuntu1404-64:~/tmp$ ls -l su* prw-rw-r-- 1 tiian tiian 0 gen 16 22:22 sub2sup prw-rw-r-- 1 tiian tiian 0 gen 16 22:22 sup2sub |
execute both the example programs to insert rows in tables and commit:
| [Shell terminal session - AP1] |
tiian@ubuntu1404-64:~/tmp$ java -Djava.library.path=/opt/lixa/lib -cp /opt/lixa/share/lixa/java/xta.jar:/usr/share/java/mysql.jar:. ExampleXtaMACBPA31 1 1 sup2sub sub2sup Superior AP has sent XID '1279875137.85f2e53ef31c4935b48b8f3822e34b9f.cd976821ac38611801b6e378a35a3c7a' to subordinate AP Superior AP has received '1279875137.85f2e53ef31c4935b48b8f3822e34b9f.cd976821ac386118e674e93fa3094bf2' reply from subordinate AP MySQL, executing >INSERT INTO authors VALUES(1919, 'Levi', 'Primo')< Superior AP has committed its branch |
| [Shell terminal session - AP2] |
tiian@ubuntu1404-64:~/tmp$ java -Djava.library.path=/opt/lixa/lib -cp /opt/lixa/share/lixa/java/xta.jar:/opt/postgresql/postgresql.jar:. ExampleXtaMACBPA32 1 1 sup2sub sub2sup Subordinate AP has received XID '1279875137.85f2e53ef31c4935b48b8f3822e34b9f.cd976821ac38611801b6e378a35a3c7a' from superior AP Subordinate AP has created a branch with XID '1279875137.85f2e53ef31c4935b48b8f3822e34b9f.cd976821ac386118e674e93fa3094bf2' Subordinate AP has returned '1279875137.85f2e53ef31c4935b48b8f3822e34b9f.cd976821ac386118e674e93fa3094bf2' to superior AP PostgreSQL, executing >INSERT INTO authors VALUES(1921, 'Rigoni Stern', 'Mario')< Subordinate AP has committed its branch |
Note
The first (superior) Application Program suspends and waits the return value from the second (subordinate) Application Program.
The XID generated by the subordinate AP differs from the XID generated by the superior AP in the last 16 hexadecimal symbols of the “branch qualifier”; the first 16 hexadecimal symbols are the same: this is not required by XA specification but can be useful for troubleshooting purposes.
Check MySQL table content:
| [Shell terminal session - MySQL] |
mysql> select * from authors; +------+-----------+-------------+ | id | last_name | first_name | +------+-----------+-------------+ | 1919 | Levi | Primo | +------+-----------+-------------+ 1 row in set (0.00 sec) mysql> |
check PostgreSQL table content:
| [Shell terminal session - PostgreSQL] |
testdb=> select * from authors; id | last_name | first_name ------+--------------+------------ 1921 | Rigoni Stern | Mario (1 row) testdb=> |
delete rows from tables, but rollback:
| [Shell terminal session - AP1] |
tiian@ubuntu1404-64:~/tmp$ java -Djava.library.path=/opt/lixa/lib -cp /opt/lixa/share/lixa/java/xta.jar:/usr/share/java/mysql.jar:. ExampleXtaMACBPA31 0 0 sup2sub sub2sup Superior AP has sent XID '1279875137.82d2f4005de54d1ca7e866a7f9ab41a7.cd976821ac38611801b6e378a35a3c7a' to subordinate AP Superior AP has received '1279875137.82d2f4005de54d1ca7e866a7f9ab41a7.cd976821ac3861183632123936de4db4' reply from subordinate AP MySQL, executing >DELETE FROM authors WHERE id=1919< Superior AP has rolled back its branch |
| [Shell terminal session - AP2] |
tiian@ubuntu1404-64:~/tmp$ java -Djava.library.path=/opt/lixa/lib -cp /opt/lixa/share/lixa/java/xta.jar:/opt/postgresql/postgresql.jar:. ExampleXtaMACBPA32 0 0 sup2sub sub2sup Subordinate AP has received XID '1279875137.82d2f4005de54d1ca7e866a7f9ab41a7.cd976821ac38611801b6e378a35a3c7a' from superior AP Subordinate AP has created a branch with XID '1279875137.82d2f4005de54d1ca7e866a7f9ab41a7.cd976821ac3861183632123936de4db4' Subordinate AP has returned '1279875137.82d2f4005de54d1ca7e866a7f9ab41a7.cd976821ac3861183632123936de4db4' to superior AP PostgreSQL, executing >DELETE FROM authors WHERE id=1921< Subordinate AP has rolled back its branch |
check MySQL table content:
| [Shell terminal session - MySQL] |
mysql> select * from authors; +------+-----------+-------------+ | id | last_name | first_name | +------+-----------+-------------+ | 1919 | Levi | Primo | +------+-----------+-------------+ 1 row in set (0.00 sec) mysql> |
check PostgreSQL table content:
| [Shell terminal session - PostgreSQL] |
testdb=> select * from authors; id | last_name | first_name ------+--------------+------------ 1921 | Rigoni Stern | Mario (1 row) testdb=> |
delete rows and commit:
| [Shell terminal session - AP1] |
tiian@ubuntu1404-64:~/tmp$ java -Djava.library.path=/opt/lixa/lib -cp /opt/lixa/share/lixa/java/xta.jar:/usr/share/java/mysql.jar:. ExampleXtaMACBPA31 1 0 sup2sub sub2sup Superior AP has sent XID '1279875137.c824ea533d30425c920432b56264498d.cd976821ac38611801b6e378a35a3c7a' to subordinate AP Superior AP has received '1279875137.c824ea533d30425c920432b56264498d.cd976821ac3861184aaf2d887d434551' reply from subordinate AP MySQL, executing >DELETE FROM authors WHERE id=1919< Superior AP has committed its branch |
| [Shell terminal session - AP2] |
tiian@ubuntu1404-64:~/tmp$ java -Djava.library.path=/opt/lixa/lib -cp /opt/lixa/share/lixa/java/xta.jar:/opt/postgresql/postgresql.jar:. ExampleXtaMACBPA32 1 0 sup2sub sub2sup Subordinate AP has received XID '1279875137.c824ea533d30425c920432b56264498d.cd976821ac38611801b6e378a35a3c7a' from superior AP Subordinate AP has created a branch with XID '1279875137.c824ea533d30425c920432b56264498d.cd976821ac3861184aaf2d887d434551' Subordinate AP has returned '1279875137.c824ea533d30425c920432b56264498d.cd976821ac3861184aaf2d887d434551' to superior AP PostgreSQL, executing >DELETE FROM authors WHERE id=1921< Subordinate AP has committed its branch |
check MySQL table content:
| [Shell terminal session - MySQL] |
mysql> select * from authors; Empty set (0.00 sec) mysql> |
check PostgreSQL table content:
| [Shell terminal session - PostgreSQL] |
testdb=> select * from authors; id | last_name | first_name ------+--------------+------------ (0 rows) testdb=> |
Source code for programs
ExampleXtaMACBPA31.java
and ExampleXtaMACBPA32.java are
installed in directory
/opt/lixa/share/doc/lixa-X.Y.Z/examples/xta/java
and are available on GitHub. Source code is fully
commented for readability.
The supplied examples (example_xta_macbpa21.py
and example_xta_macbpa22.py) use
PostgreSQL in the role of “Resource Manager 2” and MySQL
(or MariaDB) in the role of “Resource Manager 1”; please
refer to the instructions explained:
in the section called “XTA Technology Matrix” to build and install the Python database drivers that can be used with XTA
in the section called “MySQL/MariaDB Configuration” to set-up a running environment for MySQL server
in the section called “PostgreSQL Configuration” to set-up a running environment for PostgreSQL server
in the section called “Starting the state server (lixad)” to start up the LIXA state server.
Both programs must be used to execute the example:
example_xta_macbpa21.py in the role of the
superior Application Program (first AP) and
example_xta_macbpa22.py in the role of the
subordinate Application Program (second AP).
Python 2 and Python 3 can be used even mixing them: one for the first
AP and one for the second AP.
Create a working directory in a place you are comfortable with:
| [Shell terminal session] |
tiian@ubuntu1404-64:~$ cd tiian@ubuntu1404-64:~$ mkdir tmp tiian@ubuntu1404-64:~$ cd tmp tiian@ubuntu1404-64:~/tmp$ |
Copy files example_xta_macbas21.py and
example_xta_macbpa22.py in your working dir:
| [Shell terminal session] |
tiian@ubuntu:~/tmp$ cp /opt/lixa/share/doc/lixa-X.Y.Z/examples/xta/python/example_xta_macbpa21.py . tiian@ubuntu:~/tmp$ cp /opt/lixa/share/doc/lixa-X.Y.Z/examples/xta/python/example_xta_macbpa22.py . |
Substitute “X.Y.Z” with the actual version of the software you installed.
The example programs accept four arguments:
commit (or rollback): use “1” if you want to perform a global commit or “0” if you want to perform a global rollback
insert (or delete): use “1” if you want to insert rows in databases or “0” if you want to delete rows from databases
name of the FIFO (named pipe) that will be used to send messages from the superior AP to the subordinate AP
name of the FIFO (named pipe) that will be used to return messages from the subordinate AP to the superior AP
Open four terminal sessions: two for the example programs execution,
| [Shell terminal session - AP1] |
tiian@ubuntu1404-64:~/tmp$ ls -l example_xta_macbpa21.py -rw-r--r-- 1 tiian tiian 4595 ott 15 22:51 example_xta_macbpa21.py |
| [Shell terminal session - AP2] |
tiian@ubuntu1404-64:~/tmp$ ls -l example_xta_macbpa22.py -rw-r--r-- 1 tiian tiian 4643 ott 15 22:52 example_xta_macbpa22.py |
one for MySQL queries,
| [Shell terminal session - MySQL] |
tiian@ubuntu1404-64:~$ mysql -h localhost -u lixa lixa Reading table information for completion of table and column names You can turn off this feature to get a quicker startup with -A Welcome to the MySQL monitor. Commands end with ; or \g. Your MySQL connection id is 36 Server version: 5.5.61-0ubuntu0.14.04.1 (Ubuntu) Copyright (c) 2000, 2018, Oracle and/or its affiliates. All rights reserved. Oracle is a registered trademark of Oracle Corporation and/or its affiliates. Other names may be trademarks of their respective owners. Type 'help;' or '\h' for help. Type '\c' to clear the current input statement. mysql> |
and one for PostgreSQL queries
| [Shell terminal session - PostgreSQL] |
tiian@ubuntu1404-64:~$ psql testdb psql (9.3.24) Type "help" for help. testdb=> |
Set LIXA_PROFILE environment variable to
XTA_DYN,
a profile without static Resource Managers defined in
lixac_conf.xml:
| [Shell terminal session - AP1] |
tiian@ubuntu1404-64:~/tmp$ export LIXA_PROFILE=XTA_DYN tiian@ubuntu1404-64:~/tmp$ echo $LIXA_PROFILE XTA_DYN |
| [Shell terminal session - AP2] |
tiian@ubuntu1404-64:~/tmp$ export LIXA_PROFILE=XTA_DYN tiian@ubuntu1404-64:~/tmp$ echo $LIXA_PROFILE XTA_DYN |
create two named pipes (FIFO) to support communication between superior and subordinate Application Programs
| [Shell terminal session - AP1] |
tiian@ubuntu1404-64:~/tmp$ mkfifo sub2sup tiian@ubuntu1404-64:~/tmp$ mkfifo sup2sub tiian@ubuntu1404-64:~/tmp$ ls -l su* prw-rw-r-- 1 tiian tiian 0 ott 15 22:54 sub2sup prw-rw-r-- 1 tiian tiian 0 ott 15 22:54 sup2sub |
execute both the example programs to insert rows in tables and commit:
| [Shell terminal session - AP1] |
tiian@ubuntu1404-64:~/tmp$ python example_xta_macbpa21.py 1 1 sup2sub sub2sup Superior AP has sent XID '1279875137.60142b5fab4b4f2ea4524778a3f983d8.e107cfeee0661d23da9322f1ee73faba' to subordinate AP Superior AP has received '1279875137.60142b5fab4b4f2ea4524778a3f983d8.e107cfeee0661d23c14e2bfc4bc9495b' reply from subordinate AP MySQL, executing >INSERT INTO authors VALUES(1919, 'Levi', 'Primo')< Superior AP has committed its branch |
| [Shell terminal session - AP2] |
tiian@ubuntu1404-64:~/tmp$ python example_xta_macbpa22.py 1 1 sup2sub sub2sup Subordinate AP has received XID '1279875137.60142b5fab4b4f2ea4524778a3f983d8.e107cfeee0661d23da9322f1ee73faba' from superior AP Subordinate AP has created a branch with XID '1279875137.60142b5fab4b4f2ea4524778a3f983d8.e107cfeee0661d23c14e2bfc4bc9495b' Subordinate AP has returned '1279875137.60142b5fab4b4f2ea4524778a3f983d8.e107cfeee0661d23c14e2bfc4bc9495b' to superior AP PostgreSQL, executing >INSERT INTO authors VALUES(1921, 'Rigoni Stern', 'Mario')< Subordinate AP has committed its branch |
Note
The first (superior) Application Program suspends and waits the return value from the second (subordinate) Application Program.
The XID generated by the subordinate AP differs from the XID generated by the superior AP in the last 16 hexadecimal symbols of the “branch qualifier”; the first 16 hexadecimal symbols are the same: this is not required by XA specification but can be useful for troubleshooting purposes.
Check MySQL table content:
| [Shell terminal session - MySQL] |
mysql> select * from authors; +------+-----------+-------------+ | id | last_name | first_name | +------+-----------+-------------+ | 1919 | Levi | Primo | +------+-----------+-------------+ 1 row in set (0.00 sec) mysql> |
check PostgreSQL table content:
| [Shell terminal session - PostgreSQL] |
testdb=> select * from authors; id | last_name | first_name ------+--------------+------------ 1921 | Rigoni Stern | Mario (1 row) testdb=> |
delete rows from tables, but rollback:
| [Shell terminal session - AP1] |
tiian@ubuntu1404-64:~/tmp$ python example_xta_macbpa21.py 0 0 sup2sub sub2sup Superior AP has sent XID '1279875137.ef2a359d5fd048de872d9300f2ce3db9.e107cfeee0661d23da9322f1ee73faba' to subordinate AP Superior AP has received '1279875137.ef2a359d5fd048de872d9300f2ce3db9.e107cfeee0661d233fda43cfc67242ec' reply from subordinate AP MySQL, executing >DELETE FROM authors WHERE id=1919< Superior AP has rolled back its branch |
| [Shell terminal session - AP2] |
tiian@ubuntu1404-64:~/tmp$ python example_xta_macbpa22.py 0 0 sup2sub sub2sup Subordinate AP has received XID '1279875137.ef2a359d5fd048de872d9300f2ce3db9.e107cfeee0661d23da9322f1ee73faba' from superior AP Subordinate AP has created a branch with XID '1279875137.ef2a359d5fd048de872d9300f2ce3db9.e107cfeee0661d233fda43cfc67242ec' Subordinate AP has returned '1279875137.ef2a359d5fd048de872d9300f2ce3db9.e107cfeee0661d233fda43cfc67242ec' to superior AP PostgreSQL, executing >DELETE FROM authors WHERE id=1921< Subordinate AP has rolled back its branch |
check MySQL table content:
| [Shell terminal session - MySQL] |
mysql> select * from authors; +------+-----------+-------------+ | id | last_name | first_name | +------+-----------+-------------+ | 1919 | Levi | Primo | +------+-----------+-------------+ 1 row in set (0.00 sec) mysql> |
check PostgreSQL table content:
| [Shell terminal session - PostgreSQL] |
testdb=> select * from authors; id | last_name | first_name ------+--------------+------------ 1921 | Rigoni Stern | Mario (1 row) testdb=> |
delete rows and commit:
| [Shell terminal session - AP1] |
tiian@ubuntu1404-64:~/tmp$ python example_xta_macbpa21.py 1 0 sup2sub sub2sup Superior AP has sent XID '1279875137.8993e8485b5e4036ad5c536d1555f5a7.e107cfeee0661d23da9322f1ee73faba' to subordinate AP Superior AP has received '1279875137.8993e8485b5e4036ad5c536d1555f5a7.e107cfeee0661d231e54035544b74771' reply from subordinate AP MySQL, executing >DELETE FROM authors WHERE id=1919< Superior AP has committed its branch |
| [Shell terminal session - AP2] |
tiian@ubuntu1404-64:~/tmp$ python example_xta_macbpa22.py 1 0 sup2sub sub2sup Subordinate AP has received XID '1279875137.8993e8485b5e4036ad5c536d1555f5a7.e107cfeee0661d23da9322f1ee73faba' from superior AP Subordinate AP has created a branch with XID '1279875137.8993e8485b5e4036ad5c536d1555f5a7.e107cfeee0661d231e54035544b74771' Subordinate AP has returned '1279875137.8993e8485b5e4036ad5c536d1555f5a7.e107cfeee0661d231e54035544b74771' to superior AP PostgreSQL, executing >DELETE FROM authors WHERE id=1921< Subordinate AP has committed its branch |
check MySQL table content:
| [Shell terminal session - MySQL] |
mysql> select * from authors; Empty set (0.00 sec) mysql> |
check PostgreSQL table content:
| [Shell terminal session - PostgreSQL] |
testdb=> select * from authors; id | last_name | first_name ------+--------------+------------ (0 rows) testdb=> |
Source code for programs example_xta_macbpa21.py
and example_xta_macbpa22.py are
installed in directory
/opt/lixa/share/doc/lixa-X.Y.Z/examples/xta/python
and are available on GitHub. Source code is fully
commented for readability.
[41] In the past, TX Transaction Demarcation Specification [TXspec], published in 1995 by X/Open, was designed for:
C and COBOL programming languages
single thread applications
applications executed under the control of TP Monitors
implicit (static) transactional context
Furthermore, TX conceptually relates to the DTP Reference Model Version 3 [RefModel], published in 1996 by X/Open, that was defined for:
applications executed under the control of TP Monitors
TP Monitors with integrated Transaction Managers
tight coupling between couples of Transaction Managers to propagate transactional contexts and to coordinated distributed transactions among different systems
[42] Under some circumstances, XTA can be used instead of JTA (Java Transaction API): it's not intended to be a JTA implementation or a JTA replacement, but it can be used as an alternative for some relevant use cases.
[43] Many authors consider two phase commit the root of every evil in the realm of massively distributed applications, but the author of XTA thinks that some specific use cases can take advantage from two phase commit transactionality
[44] Sometimes software versions make the difference, but this table don't cope with them and must not be intended like a compatibility and support matrix.
[45] IBM, DB2, MQ, MQSeries and WebSphere are trademarks of IBM™
[46] Oracle is a trademark of Oracle Corporation™
[47] MySQL is a trademark of Oracle Corporation™
[48]
Examples: mysql_real_connect for MySQL,
PQconnectDB for PostgreSQL.
[49] Some Resource Managers, like for example Oracle Database Server, don't allow to be created as “normal” connections and then transformed in XA connections: they must be directly created by XTA.
[50] Transaction Coupling (TC) TX extensions supports the pattern with a traditional TX like interface (see Chapter 7, Developing C Application Programs with the Transaction Coupling (TC) TX extensions)
[51] This must not be confused with a specific RPC technology: any communication technique that supports a request-response protocol can be used.
[52] Oracle (R) Database, JDBC Developer's Guide, 12c Release 1 (12.1); there are analogous documents for different Oracle Database's versions
[53] You may notice that this pattern uses the same architecture shown in Figure 8.8, “Example of “Multiple Applications, Consecutive Calls/Pseudo Synchronous” with two Application Programs and two Resource Managers” because it differs from the other pattern only in the order of XTA calls.
[54] Oracle (R) Database, JDBC Developer's Guide, 12c Release 1 (12.1); there are analogous documents for different Oracle Database's versions
This chapter explains some advanced concepts that the LIXA system administrator should know to solve some complex issues the XA technology could generate. LIXA technology provide two type of recovery:
Automatic Recovery: it happens silently and rolls back or commits the transactions that crashed before a consistent point had been reached
Manual Recovery: it is invoked by lixar utility to solve the transactions that cannot be automatically recovered
Important
lixar utility was designed to operate with statically
defined XA Resource Managers described in
lixac_conf.xml configuration file.
XTA, explained in
Chapter 8, Developing Application Programs using XTA (XA Transaction API) interface,
introduces dynamically defined XA Resource Managers that can't be managed
by lixar utility if they are not defined in
lixac_conf.xml too
If your environment is configured and runs as designed, when an Application Program fails an automatic recovery operation fix the problem as soon as possible. Below there is a first trivial scenarios:
the Application Program crashes before it reaches the
xa_prepare()function (called bytx_commit())the Resource Managers autonoumosly roll back the work in progress and the environment is cleaned up
the distributed transaction started but it did not initiated the two phase commit protocol: there is no relevant difference between this scenario and a single Resource Manager (one phase commit) scenario. The LIXA Transaction Manager does not manage a recovery phase.
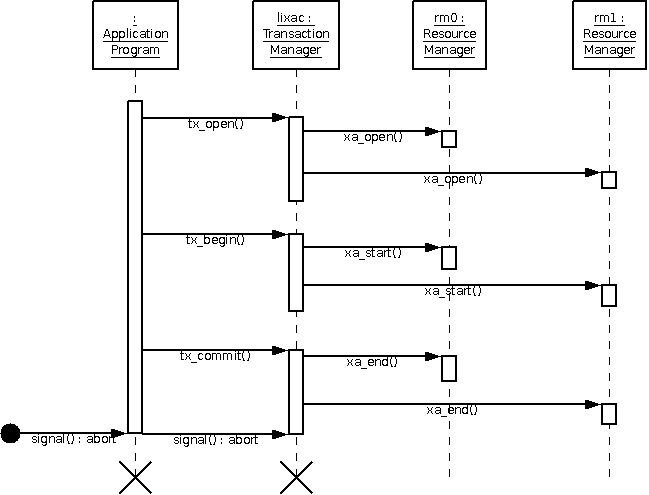
The following scenario is slightly different:
the Application Program crashes after it has passed the
xa_prepare()function but before it reaches thexa_commit()functionthe Resource Managers keep the prepared transaction “in flight” until the Transaction Manager decides the proper recovery action
an “equivalent” Application Program starts and activates the LIXA Transaction Manager with
tx_open()the LIXA Transaction Manager discovers there is a prepared transaction and establishes that it must commit the transaction
the second Application Program implicitly and inconsciously started the recovery process of a previously crashed Application Program
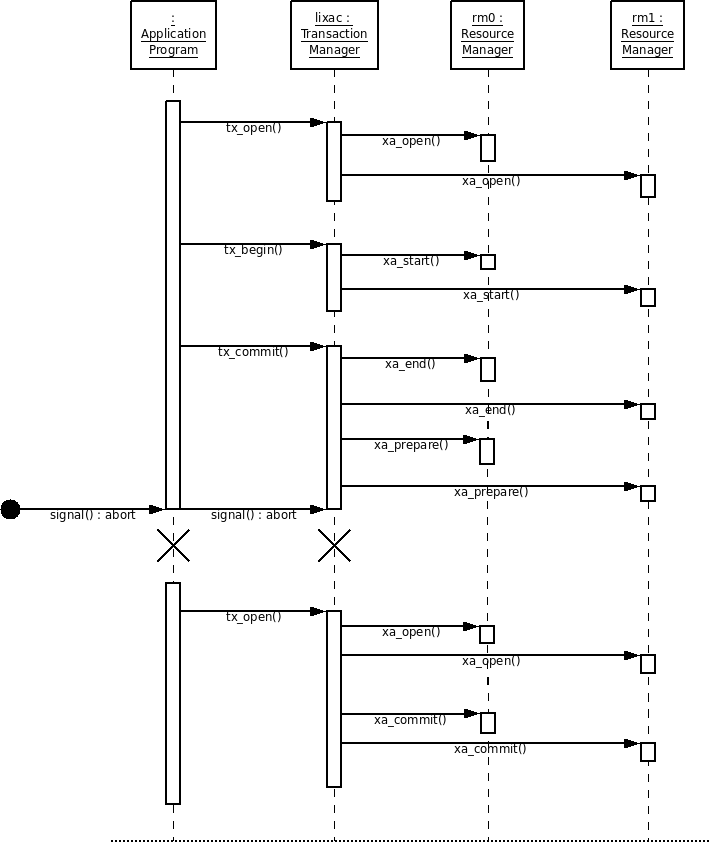
The above pattern is the result of the LIXA design: the Transaction
Manager is not an active component, but it's a passive one and
is embedded in the Application Program when it links the
lixac library
and activates it with the
tx_open() function.
Note
Depending on the crash time: slightly before the
prepare phase,
in the middle of the prepare phase,
after the completion of the prepare phase,
the LIXA Transaction Manager chooses a different recovery
operation between
xa_commit() and
xa_rollback().
Automatic (warm) recovery uses the information stored inside the LIXA state server to decide which transaction must be recovered and how it should be completed (committed or rolled back).
The above paragraphs explain what's happen when automatic recovery starts and completes (rolls back or commits) the transaction marked as “recovery pending”.
An “equivalent” Application Program starts and activates
the LIXA Transaction Manager with tx_open().
The LIXA Transaction Manager autonoumosly coordinates the transaction
completion and the Application Program is not aware of this
“under the covers” operation.
From the LIXA Transaction Manager point of view, two Application Programs are equivalent when they are associated to the same job.
The job associated to an Application Program can be:
the content of the environment variable
LIXA_JOBif it is seta string computed in this way if the environment variable
LIXA_JOBis not set:branch qualifier+ “/” +IP addresswhere
branch qualifieris computed as:MD5(lixac_conf.xml+ $(LIXA_PROFILE) +gethostid())
An example of branch qualifier is
“0fc29445b1d4c3f4ed6be2fea20f918b”, while an example of
job automatically associated to an Application Program is
“0fc29445b1d4c3f4ed6be2fea20f918b/127.0.0.1”
Note
If you don't set the environment variable
LIXA_JOB all the Application Programs that
meet this requirements:
they use a config file (
lixac_conf.xml) with the same contentthey use a
LIXA_PROFILEenvironment variable with the same contentthey run in a host that returns the same value to
gethostid()functionthey are calling the LIXA state server from the same IP address
are associated to the same job.
To pick-up the job associated to an Application Program you can activate the trace using the bit associated to the label “LIXA_TRACE_MOD_CLIENT_CONFIG”. Take a look to the section called “Tracing modules” for more information. This is an excerpt from the trace:
[...] 2011-12-03 17:00:59.746036 [6021/1078050640] client_config_job 2011-12-03 17:00:59.746073 [6021/1078050640] client_config_job: acquiring exclusive mutex 2011-12-03 17:00:59.746120 [6021/1078050640] client_config_job: 'LIXA_JOB' environment variable not found, computing job string... 2011-12-03 17:00:59.746175 [6021/1078050640] lixa_job_set_source_ip 2011-12-03 17:00:59.746275 [6021/1078050640] lixa_job_set_source_ip/excp=1/ret_cod=0/errno=0 2011-12-03 17:00:59.746339 [6021/1078050640] client_config_job: job value for this process is '0fc29445b1d4c3f4ed6be2fea20f918b/127.0.0.1 ' 2011-12-03 17:00:59.746379 [6021/1078050640] client_config_job: releasing exclusive mutex 2011-12-03 17:00:59.746514 [6021/1078050640] client_config_job/excp=3/ret_cod=0/errno=0 [...]
Important
Setting the environment variable LIXA_JOB
allows you to associate any Application Program to a custom
user defined job: this may be interesting if you are using a
workload balanced environment, this may be dangerous if you
associate Application Programs using a different set of
Resource Managers to the same job.
If you don't set LIXA_JOB environment variable,
the default behavior should be strong enought to avoid issues when
LIXA is used under “standard” conditions.
The previous section (see the section called “Application Program equivalence”) explains the conditions that must be met to enable automatic recovery. A tipical scenario that needs tuning is a workload balanced Application Server environment as is in the below picture:
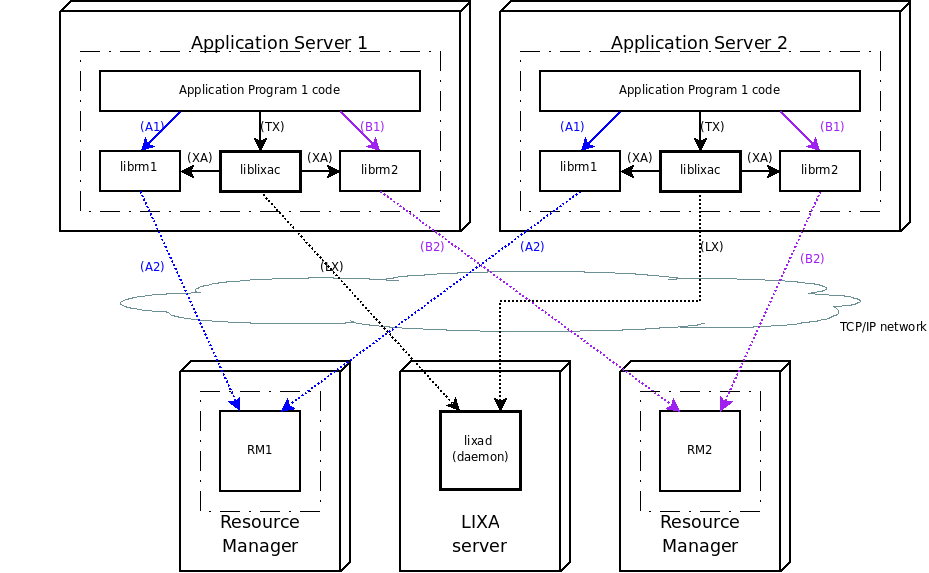
The same program (“Application Program 1”) is
executed by two different Application Servers: this is a typical
configuration used to improve service availability and scalability.
If the Application Server 1 is running in a different host than
Application Server 2 (this is a de facto standard), by default
LIXA will
associate two different jobs.
Important
The LIXA default behavior is not the optimal one when you are using a workload balanced environment.
If the host of Application Server 1 crashed, the Application Program running inside Application Server 2 could not automatically recover the transactions in “prepared/in-doubt/recovery pending” of the Application Server 1 because they are associated to a different job.
This is a scenario when setting LIXA_JOB is
strongly suggested.
Warning
When you set the LIXA_JOB environment variable
to control LIXA automatic recovery feature you
must not associate the same job to
Application Programs that use different sets of Resource Managers
or use the same set of Resource Managers but with different
options for any Resource Manager.
If you broke this rule, you would probably face difficult to
troubleshoot issues: automatic recovery could fail and you
would have to understand why.
Sometimes you need to force the automatic recovery to happen because the crashed Applicaton Program is a “one shot” program and you can not execute it a second time due to some functional constrain.
Any application program meeting the requirements described above can be used, lixat utility command too. The following example will show you how it works using PostgreSQL and Oracle Resource Managers.
First of all, you must configure, build and install the LIXA project software enabling PostgreSQL, Oracle and crash simulation features:
tiian@ubuntu:~/lixa$ ./configure --with-oracle=/usr/lib/oracle/xe/app/oracle/product/10.2.0/server \ > --with-postgresql-include=/usr/include/postgresql --with-postgresql-lib=/usr/lib \ > --enable-crash
then you must follow the steps described in the section called “An example with PostgreSQL & Oracle” to prepare the scenario environment. Open three different terminal sessions as explained in the above example, and try to insert/delete a row:
| [Shell terminal session] |
tiian@ubuntu:~/tmp$ echo $LIXA_PROFILE PQL_STA_ORA_DYN tiian@ubuntu:~/tmp$ echo $ORACLE_HOME /usr/lib/oracle/xe/app/oracle/product/10.2.0/server tiian@ubuntu:~/tmp$ echo $ORACLE_SID XE tiian@ubuntu:~/tmp$ echo $LD_LIBRARY_PATH /usr/lib/oracle/xe/app/oracle/product/10.2.0/server/lib: tiian@ubuntu:~/tmp$ ./example6_pql_ora insert Inserting a row in the tables... Oracle INSERT statement executed! tiian@ubuntu:~/tmp$ ./example6_pql_ora delete Deleting a row from the tables... Oracle DELETE statement executed! |
To simulate a crash after the xa_prepare()
completed successfully, you can set the environment variable
LIXA_CRASH_POINT to the value
LIXA_CRASH_POINT_PREPARE_2
(see src/common/lixa_crash.h:
| [Shell terminal session] |
tiian@ubuntu:~/tmp$ export LIXA_CRASH_POINT=15 tiian@ubuntu:~/tmp$ echo $LIXA_CRASH_POINT 15 tiian@ubuntu:~/tmp$ ./example6_pql_ora insert Inserting a row in the tables... Oracle INSERT statement executed! Aborted |
You can check there is a prepared (in-doubt) transaction inside Oracle:
| [Oracle terminal session] |
SQL> select * from dba_pending_transactions; FORMATID ---------- GLOBALID -------------------------------------------------------------------------------- BRANCHID -------------------------------------------------------------------------------- 1279875137 97DD30A150604AFDBFA5FDC94B611FD5 9BAC7BE1C129EA6EE31F2D71B318120C |
And the same transaction inside PostgreSQL:
| [PostgreSQL terminal session] |
testdb=> select * from pg_prepared_xacts;
transaction | gid | prepared | owner | database
-------------+------------------------------------------------------------------------------+-------------------------------+-------+----------
874 | 1279875137.97dd30a150604afdbfa5fdc94b611fd5.9bac7be1c129ea6ee31f2d71b318120c | 2011-12-14 22:02:50.462682+01 | tiian | testdb
|
It is suggested to activate the trace related to the “client recovery” module (see the section called “Tracing modules”) before running lixat program:
| [Shell terminal session] |
tiian@ubuntu:~/tmp$ export LIXA_TRACE_MASK=0x00040000
tiian@ubuntu:~/tmp$ /opt/lixa/bin/lixat
2011-12-14 22:22:01.740634 [27735/3073944240] client_recovery
2011-12-14 22:22:01.740771 [27735/3073944240] client_recovery: sending 197 bytes ('000191<?xml version="1.0" encoding="UTF-8" ?><msg level="0" verb="8" step="8"><client job="9bac7be1c129ea6ee31f2d71b318120c/127.0.0.1 " config_digest="9bac7be1c129ea6ee31f2d71b318120c"/></msg>') to the server for step 8
2011-12-14 22:22:01.759352 [27735/3073944240] client_recovery: receiving 561 bytes from the server |<?xml version="1.0" encoding="UTF-8" ?><msg level="0" verb="8" step="16"><answer rc="0"/><client job="9bac7be1c129ea6ee31f2d71b318120c/127.0.0.1 " config_digest="9bac7be1c129ea6ee31f2d71b318120c"><last_verb_step verb="5" step="16"/><state finished="0" txstate="3" will_commit="1" will_rollback="0" xid="1279875137.97dd30a150604afdbfa5fdc94b611fd5.9bac7be1c129ea6ee31f2d71b318120c"/></client><rsrmgrs><rsrmgr rmid="0" next_verb="0" r_state="1" s_state="33" td_state="10"/><rsrmgr rmid="1" next_verb="0" r_state="1" s_state="33" td_state="20"/></rsrmgrs></msg>|
2011-12-14 22:22:01.759776 [27735/3073944240] client_recovery_analyze
2011-12-14 22:22:01.759857 [27735/3073944240] client_recovery_analyze: the TX was committing
2011-12-14 22:22:01.759873 [27735/3073944240] client_recovery_analyze: rmid=0, r_state=1, s_state=33, td_state=10
2011-12-14 22:22:01.759884 [27735/3073944240] client_recovery_analyze: rmid=1, r_state=1, s_state=33, td_state=20
2011-12-14 22:22:01.759902 [27735/3073944240] client_recovery_analyze/excp=1/ret_cod=0/errno=0
2011-12-14 22:22:01.759921 [27735/3073944240] client_recovery: transaction '1279875137.97dd30a150604afdbfa5fdc94b611fd5.9bac7be1c129ea6ee31f2d71b318120c' must be committed
2011-12-14 22:22:01.759937 [27735/3073944240] client_recovery_commit
2011-12-14 22:22:01.759971 [27735/3073944240] client_recovery_commit: committing transaction '1279875137.97dd30a150604afdbfa5fdc94b611fd5.9bac7be1c129ea6ee31f2d71b318120c'
2011-12-14 22:22:01.759998 [27735/3073944240] client_recovery_commit: xa_commit for rmid=0, name='PostgreSQL_stareg', xa_name='PostgreSQL[LIXA]'...
2011-12-14 22:22:02.143764 [27735/3073944240] client_recovery_commit: rc=0
2011-12-14 22:22:02.143866 [27735/3073944240] client_recovery_commit: xa_commit for rmid=1, name='OracleXE_dynreg', xa_name='Oracle_XA'...
2011-12-14 22:22:03.188211 [27735/3073944240] client_recovery_commit: rc=0
2011-12-14 22:22:03.188272 [27735/3073944240] client_recovery_commit/excp=1/ret_cod=0/errno=0
2011-12-14 22:22:03.188318 [27735/3073944240] client_recovery: sending 187 bytes ('000181<?xml version="1.0" encoding="UTF-8" ?><msg level="0" verb="8" step="24"><recovery failed="0" commit="1"/><rsrmgrs><rsrmgr rmid="0" rc="0"/><rsrmgr rmid="1" rc="0"/></rsrmgrs></msg>') to the server for step 24
2011-12-14 22:22:03.188496 [27735/3073944240] client_recovery: sending 197 bytes ('000191<?xml version="1.0" encoding="UTF-8" ?><msg level="0" verb="8" step="8"><client job="9bac7be1c129ea6ee31f2d71b318120c/127.0.0.1 " config_digest="9bac7be1c129ea6ee31f2d71b318120c"/></msg>') to the server for step 8
2011-12-14 22:22:03.228361 [27735/3073944240] client_recovery: receiving 95 bytes from the server |<?xml version="1.0" encoding="UTF-8" ?><msg level="0" verb="8" step="16"><answer rc="1"/></msg>|
2011-12-14 22:22:03.228544 [27735/3073944240] client_recovery: the server answered LIXA_RC_OBJ_NOT_FOUND; there are no more transactions to recover
2011-12-14 22:22:03.228589 [27735/3073944240] client_recovery/excp=12/ret_cod=0/errno=0
tx_open(): 0
tx_close(): 0
|
You can now verify there are no more prepared/in-doubt transactions inside the Resource Managers:
| [Oracle terminal session] |
SQL> select * from dba_pending_transactions; no rows selected |
| [PostgreSQL terminal session] |
testdb=> select * from pg_prepared_xacts; transaction | gid | prepared | owner | database -------------+-----+----------+-------+---------- (0 rows) |
Important
The automatic (warm) recovery process completed successfully because ./example6_pql_ora and /opt/lixa/bin/lixat were associated to the same job and the LIXA state server (lixad) kept the state of the transaction in the meanwhile.
In the next paragraphs you can explore what happens if the previous conditions are not satisfied.
Manual (cold) recovery uses the information provided by the
Resource Managers querying them using
xa_recover().
This type of recovery should be used to resolve some unusual
situations.
If, for any reason, the LIXA state server (lixad) forgot the state of a transaction [55] or the transaction is in state “recovery failed” because a previous automatic (warm) recovery failed, you have to manually recover the transaction. The procedure to recover a “forgotten” transaction is the same you use to recover a “recovery failed” one, but additional server side clean-up is suggested for “recovery failed” transactions.
This example necessitates of the same environment set-up in
the section called “Forcing automatic recovery”; you must start running
the example program after you enabled the
LIXA_CRASH_POINT environment variable:
| [Shell terminal session] |
tiian@ubuntu:~/tmp$ export LIXA_CRASH_POINT=15 tiian@ubuntu:~/tmp$ echo $LIXA_CRASH_POINT 15 tiian@ubuntu:~/tmp$ ./example6_pql_ora insert Deleting a row from the tables... Oracle DELETE statement executed! Aborted |
and check there is a recovery pending transaction inside PostgreSQL and Oracle Resource Managers:
| [Oracle terminal session] |
SQL> select * from dba_pending_transactions; FORMATID ---------- GLOBALID -------------------------------------------------------------------------------- BRANCHID -------------------------------------------------------------------------------- 1279875137 957747F7F37B439EBCEA4146076AD322 9BAC7BE1C129EA6EE31F2D71B318120C |
| [PostgreSQL terminal session] |
testdb=> select * from pg_prepared_xacts;
transaction | gid | prepared | owner | database
-------------+------------------------------------------------------------------------------+-------------------------------+-------+----------
877 | 1279875137.957747f7f37b439ebcea4146076ad322.9bac7be1c129ea6ee31f2d71b318120c | 2011-12-14 22:55:14.973443+01 | tiian | testdb
|
Then you should stop and cold start the lixad state server:
| [Shell terminal session] |
tiian@ubuntu:~/tmp$ sudo su - lixa lixa@ubuntu:~$ ps -ef|grep lixad|grep -v grep lixa 24437 1 0 21:19 ? 00:00:00 /opt/lixa/sbin/lixad --daemon lixa@ubuntu:~$ pkill lixad lixa@ubuntu:~$ ps -ef|grep lixad|grep -v grep lixa@ubuntu:~$ ls /opt/lixa/var/ lixad_status1_1 lixad_status2_1 lixad_status3_1 README lixad_status1_2 lixad_status2_2 lixad_status3_2 lixa@ubuntu:~$ rm /opt/lixa/var/lixad_status* lixa@ubuntu:~$ ls /opt/lixa/var/ README lixa@ubuntu:~$ /opt/lixa/sbin/lixad --daemon lixa@ubuntu:~$ ps -ef|grep lixad|grep -v grep lixa 28594 1 0 23:00 ? 00:00:00 /opt/lixa/sbin/lixad --daemon lixa@ubuntu:~$ ls /opt/lixa/var/ lixad_status1_1 lixad_status2_1 lixad_status3_1 README lixad_status1_2 lixad_status2_2 lixad_status3_2 run.pid lixa@ubuntu:~$ exit logout |
These are the operations you just performed:
changed the user from your own to
lixauserchecked the lixad daemon was running
stopped the lixad daemon
checked the lixad daemon was not running
checked the lixad's state files
removed the lixad's state files
started the lixad daemon
checked the new lixad's state files
Running lixat does not automatically recover the transaction:
| [Shell terminal session] |
tiian@ubuntu:~/tmp$ export LIXA_TRACE_MASK=0x00040000 tiian@ubuntu:~/tmp$ /opt/lixa/bin/lixat tx_open(): 0 tx_close(): 0 |
Note
The program does not produce trace because “client recovery” module is not called (the state server does not pass information about recovery pending transactions to the LIXA client library).
| [Oracle terminal session] |
SQL> select * from dba_pending_transactions; FORMATID ---------- GLOBALID -------------------------------------------------------------------------------- BRANCHID -------------------------------------------------------------------------------- 1279875137 957747F7F37B439EBCEA4146076AD322 9BAC7BE1C129EA6EE31F2D71B318120C |
| [PostgreSQL terminal session] |
testdb=> select * from pg_prepared_xacts;
transaction | gid | prepared | owner | database
-------------+------------------------------------------------------------------------------+-------------------------------+-------+----------
877 | 1279875137.957747f7f37b439ebcea4146076ad322.9bac7be1c129ea6ee31f2d71b318120c | 2011-12-14 22:55:14.973443+01 | tiian | testdb
|
The lixar utility program with -p
option can be used to list the prepared transactions that can not be
automatically recovered:
| [Shell terminal session] |
tiian@ubuntu:~/tmp$ /opt/lixa/bin/lixar -p Execution options: - print report = yes - transaction(s) will be committed = no - transaction(s) will be rolled back = no - bypass xid branch qualifier check = no - bypass xid format id check = no - use TMENDRSCAN flag for last xa_recover call = no Recovery environment: LIXA_CONFIG_FILE_ENV_VAR = '(null)' LIXA_PROFILE_ENV_VAR = 'PQL_STA_ORA_DYN' LIXA_JOB_ENV_VAR = '(null)' Resource manager list: rmid=0, lixa_name='PostgreSQL_stareg', xa_name='PostgreSQL[LIXA]' rmid=1, lixa_name='OracleXE_dynreg', xa_name='Oracle_XA' Prepared and in-doubt transaction list: xid='1279875137.957747f7f37b439ebcea4146076ad322.9bac7be1c129ea6ee31f2d71b318120c': rmid=0 rmid=1 |
it reports some useful information and at the bottom there is the
list of in-doubt transactions.
The transaction is prepared/in-doubt for both Resource Managers;
sometimes it may be only for a subset of the Resource Managers
defined by LIXA_PROFILE.
You can manually recover the transaction using
the -x and -r (rollback) or
-c (commit):
| [Shell terminal session] |
tiian@ubuntu:~/tmp$ /opt/lixa/bin/lixar -p -x 1279875137.957747f7f37b439ebcea4146076ad322.9bac7be1c129ea6ee31f2d71b318120c -r Execution options: - print report = yes - transaction to commit/rollback = 1279875137.957747f7f37b439ebcea4146076ad322.9bac7be1c129ea6ee31f2d71b318120c - transaction(s) will be committed = no - transaction(s) will be rolled back = yes - bypass xid branch qualifier check = no - bypass xid format id check = no - use TMENDRSCAN flag for last xa_recover call = no Recovery environment: LIXA_CONFIG_FILE_ENV_VAR = '(null)' LIXA_PROFILE_ENV_VAR = 'PQL_STA_ORA_DYN' LIXA_JOB_ENV_VAR = '(null)' Resource manager list: rmid=0, lixa_name='PostgreSQL_stareg', xa_name='PostgreSQL[LIXA]' rmid=1, lixa_name='OracleXE_dynreg', xa_name='Oracle_XA' Prepared and in-doubt transaction list: xid='1279875137.957747f7f37b439ebcea4146076ad322.9bac7be1c129ea6ee31f2d71b318120c': rmid=0 rmid=1 Analizing transaction '1279875137.957747f7f37b439ebcea4146076ad322.9bac7be1c129ea6ee31f2d71b318120c': xa_rollback --> rmid=0, lixa_name='PostgreSQL_stareg', xa_name='PostgreSQL[LIXA]', rc=0 xa_rollback --> rmid=1, lixa_name='OracleXE_dynreg', xa_name='Oracle_XA', rc=0 |
You can now verify there are no prepared/in-doubt transactions inside the Resource Managers:
| [Oracle terminal session] |
SQL> select * from dba_pending_transactions; no rows selected |
| [PostgreSQL terminal session] |
testdb=> select * from pg_prepared_xacts; transaction | gid | prepared | owner | database -------------+-----+----------+-------+---------- (0 rows) |
We rolled back the deletion so the rows must be in place:
| [Oracle terminal session] |
SQL> select * from COUNTRIES where COUNTRY_ID = 'RS'; COUNTR ------ COUNTRY_NAME -------------------------------------------------------------------------------- REGION_ID ---------- RS Repubblica San Marino 1 |
| [PostgreSQL terminal session] |
testdb=> select * from AUTHORS; id | last_name | first_name ----+-----------+------------ 1 | Foo | Bar |
You can retrieve some help from lixar with
-? option:
| [Shell terminal session] |
tiian@ubuntu:~/tmp$ /opt/lixa/bin/lixar -? Usage: lixar [OPTION...] - LIXA recovery utility Help Options: -?, --help Show help options Application Options: -p, --print Print a report of all the prepared and in-doubt transactions compatible with current configuration and profile -x, --xid Select specified transaction for rollback/commit -X, --xid-file Select specified file as a list of transaction to rollback/commit -c, --commit Commit prepared & in-doubt transactions -r, --rollback Rollback prepared & in-doubt transactions -v, --version Print package info and exit -b, --bypass-bqual-check Bypass xid branch qualifier check -B, --bypass-formatid-check Bypass xid format id check -e, --use-tmendrscan-flag Use TMENDRSCAN flag for last xa_recover call |
This example is quite complex because a “recovery failed” transaction is unlikely. To create a “recovery failed” transaction we will use a special Resource Manager, the “LIXA monkey” one: it's a R.M. we can “program” to answer the Transaction Manager as we desire. We will emulate an heuristically completed transaction to force the LIXA Transaction Manager marking it as “recovery failed”.
Before we can start, you must set-up the same environment already explained in the section called “Recoverying forgotten transactions”. Open three terminals session and prepare the sessions as shown below:
| [Shell terminal session] |
tiian@ubuntu:~/tmp$ . /usr/lib/oracle/xe/app/oracle/product/10.2.0/server/bin/oracle_env.sh tiian@ubuntu:~/tmp$ echo $ORACLE_HOME /usr/lib/oracle/xe/app/oracle/product/10.2.0/server tiian@ubuntu:~/tmp$ echo $ORACLE_SID XE tiian@ubuntu:~/tmp$ export LIXA_PROFILE=MON_STA_PQL_STA_ORA_DYN tiian@ubuntu:~/tmp$ echo $LIXA_PROFILE MON_STA_PQL_STA_ORA_DYN tiian@ubuntu:~/tmp$ echo $LD_LIBRARY_PATH /usr/lib/oracle/xe/app/oracle/product/10.2.0/server/lib: |
The specified LIXA_PROFILE points to a
configuration with three Resource Managers: LIXA Monkey (a fake
R.M.), PostgreSQL (static registration) and Oracle DBMS (dynamic
registration).
| [Oracle terminal session] |
tiian@ubuntu:~$ . /usr/lib/oracle/xe/app/oracle/product/10.2.0/server/bin/oracle_env.sh tiian@ubuntu:~$ sqlplus "hr/hr" SQL*Plus: Release 10.2.0.1.0 - Production on Ven Dic 16 16:15:23 2011 Copyright (c) 1982, 2005, Oracle. All rights reserved. Connesso a: Oracle Database 10g Express Edition Release 10.2.0.1.0 - Production SQL> select * from COUNTRIES where COUNTRY_ID = 'RS'; no rows selected |
| [PostgreSQL terminal session] |
tiian@ubuntu:~$ psql testdb
Welcome to psql 8.3.16, the PostgreSQL interactive terminal.
Type: \copyright for distribution terms
\h for help with SQL commands
\? for help with psql commands
\g or terminate with semicolon to execute query
\q to quit
testdb=> SELECT * FROM authors;
id | last_name | first_name
----+-----------+------------
(0 rows)
|
Start the LIXA state server if it's not active:
| [Shell terminal session] |
tiian@ubuntu:~/tmp$ sudo su - lixa lixa@ubuntu:~$ /opt/lixa/sbin/lixad --daemon lixa@ubuntu:~$ ps -ef|grep lixad|grep -v grep lixa 7127 1 0 22:13 ? 00:00:00 /opt/lixa/sbin/lixad --daemon lixa@ubuntu:~$ exit logout |
Before we can start the program execution, we must create a file
named monkeyrm.conf in the current directory
and put the following content inside it:
| [Content of file monkeyrm.conf] |
xa_open/0 xa_start/0 xa_end/0 xa_prepare/0 xa_commit/0 xa_close/0 |
Now you can execute the program to verify it's running as expected; we are tracing the module “client XA switch” (see the section called “Tracing modules”) to verify the LIXA Monkey Resource Manager is properly configured:
| [Shell terminal session] |
tiian@ubuntu:~/tmp$ export LIXA_TRACE_MASK=0x00010000 tiian@ubuntu:~/tmp$ ./example6_pql_ora insert 2>&1 | grep monkey 2011-12-15 22:42:20.709697 [22490/3052672768] lixa_monkeyrm_open: xa_info='monkeyrm.conf', rmid=1, flags=0x0 2011-12-15 22:42:20.710101 [22490/3052672768] lixa_monkeyrm_open: creating new first level hash table... 2011-12-15 22:42:20.713087 [22490/3052672768] lixa_monkeyrm_open/g_hash_table_new_full/monkey_status: 0x804caa0 2011-12-15 22:42:20.713361 [22490/3052672768] lixa_monkeyrm_open: creating new second level hash table for tid=3052672768 2011-12-15 22:42:20.713719 [22490/3052672768] lixa_monkeyrm_open/g_hash_table_new_full/slht: 0x804cac8 2011-12-15 22:42:20.713994 [22490/3052672768] lixa_monkeyrm_open: creating new status block for tid=3052672768, rmid=1 2011-12-15 22:42:20.714248 [22490/3052672768] lixa_monkeyrm_open/g_malloc/mss: 0x804e998 2011-12-15 22:42:20.714521 [22490/3052672768] lixa_monkeyrm_open_init 2011-12-15 22:42:20.714783 [22490/3052672768] lixa_monkeyrm_open_init/g_array_new/mss->records: 0x804c550 2011-12-15 22:42:20.715139 [22490/3052672768] lixa_monkeyrm_open_init: verb='xa_open' 2011-12-15 22:42:20.715430 [22490/3052672768] lixa_monkeyrm_open_init: appending record verb=1, rc=0 2011-12-15 22:42:20.715691 [22490/3052672768] lixa_monkeyrm_open_init: verb='xa_start' 2011-12-15 22:42:20.715946 [22490/3052672768] lixa_monkeyrm_open_init: appending record verb=3, rc=0 2011-12-15 22:42:20.716340 [22490/3052672768] lixa_monkeyrm_open_init: verb='xa_end' 2011-12-15 22:42:20.716602 [22490/3052672768] lixa_monkeyrm_open_init: appending record verb=4, rc=0 2011-12-15 22:42:20.716864 [22490/3052672768] lixa_monkeyrm_open_init: verb='xa_prepare' 2011-12-15 22:42:20.717123 [22490/3052672768] lixa_monkeyrm_open_init: appending record verb=5, rc=0 2011-12-15 22:42:20.717377 [22490/3052672768] lixa_monkeyrm_open_init: verb='xa_commit' 2011-12-15 22:42:20.717671 [22490/3052672768] lixa_monkeyrm_open_init: appending record verb=6, rc=0 2011-12-15 22:42:20.717937 [22490/3052672768] lixa_monkeyrm_open_init: verb='xa_close' 2011-12-15 22:42:20.718196 [22490/3052672768] lixa_monkeyrm_open_init: appending record verb=2, rc=0 2011-12-15 22:42:20.718519 [22490/3052672768] lixa_monkeyrm_open_init/excp=3/ret_cod=0/errno=0 2011-12-15 22:42:20.718816 [22490/3052672768] lixa_monkeyrm_get_rc 2011-12-15 22:42:20.726862 [22490/3052672768] lixa_monkeyrm_get_rc: verb is 1, XA return code is 0 2011-12-15 22:42:20.727177 [22490/3052672768] lixa_monkeyrm_get_rc/excp=2/ret_cod=0/errno=0 2011-12-15 22:42:20.727429 [22490/3052672768] lixa_monkeyrm_open/excp=4/ret_cod=0/xa_rc=0/errno=0 2011-12-15 22:42:21.022655 [22490/3052672768] lixa_monkeyrm_start: xid='1279875137.7bdcf6c060e14bdba416302661187411.a100c8728292168b21ba7239bffc137d', rmid=1, flags=0x0 2011-12-15 22:42:21.022695 [22490/3052672768] lixa_monkeyrm_get_rc 2011-12-15 22:42:21.022705 [22490/3052672768] lixa_monkeyrm_get_rc: verb is 3, XA return code is 0 2011-12-15 22:42:21.022712 [22490/3052672768] lixa_monkeyrm_get_rc/excp=2/ret_cod=0/errno=0 2011-12-15 22:42:21.022719 [22490/3052672768] lixa_monkeyrm_start/excp=4/ret_cod=0/xa_rc=0/errno=0 2011-12-15 22:42:21.059688 [22490/3052672768] lixa_monkeyrm_end: xid='1279875137.7bdcf6c060e14bdba416302661187411.a100c8728292168b21ba7239bffc137d', rmid=1, flags=0x4000000 2011-12-15 22:42:21.059701 [22490/3052672768] lixa_monkeyrm_get_rc 2011-12-15 22:42:21.059709 [22490/3052672768] lixa_monkeyrm_get_rc: verb is 4, XA return code is 0 2011-12-15 22:42:21.059716 [22490/3052672768] lixa_monkeyrm_get_rc/excp=2/ret_cod=0/errno=0 2011-12-15 22:42:21.059723 [22490/3052672768] lixa_monkeyrm_end/excp=4/ret_cod=0/xa_rc=0/errno=0 2011-12-15 22:42:21.076478 [22490/3052672768] lixa_monkeyrm_prepare: xid='1279875137.7bdcf6c060e14bdba416302661187411.a100c8728292168b21ba7239bffc137d', rmid=1, flags=0x0 2011-12-15 22:42:21.076498 [22490/3052672768] lixa_monkeyrm_get_rc 2011-12-15 22:42:21.076512 [22490/3052672768] lixa_monkeyrm_get_rc: verb is 5, XA return code is 0 2011-12-15 22:42:21.076520 [22490/3052672768] lixa_monkeyrm_get_rc/excp=2/ret_cod=0/errno=0 2011-12-15 22:42:21.076527 [22490/3052672768] lixa_monkeyrm_prepare/excp=4/ret_cod=0/xa_rc=0/errno=0 2011-12-15 22:42:21.098722 [22490/3052672768] lixa_monkeyrm_commit: xid='1279875137.7bdcf6c060e14bdba416302661187411.a100c8728292168b21ba7239bffc137d', rmid=1, flags=0x0 2011-12-15 22:42:21.098747 [22490/3052672768] lixa_monkeyrm_get_rc 2011-12-15 22:42:21.098756 [22490/3052672768] lixa_monkeyrm_get_rc: verb is 6, XA return code is 0 2011-12-15 22:42:21.098764 [22490/3052672768] lixa_monkeyrm_get_rc/excp=2/ret_cod=0/errno=0 2011-12-15 22:42:21.098770 [22490/3052672768] lixa_monkeyrm_commit/excp=4/ret_cod=0/xa_rc=0/errno=0 2011-12-15 22:42:21.102841 [22490/3052672768] lixa_monkeyrm_close: xa_info='', rmid=1, flags=0x0 2011-12-15 22:42:21.102853 [22490/3052672768] lixa_monkeyrm_get_rc 2011-12-15 22:42:21.102862 [22490/3052672768] lixa_monkeyrm_get_rc: verb is 2, XA return code is 0 2011-12-15 22:42:21.102869 [22490/3052672768] lixa_monkeyrm_get_rc/excp=2/ret_cod=0/errno=0 2011-12-15 22:42:21.102877 [22490/3052672768] lixa_monkeyrm_close/excp=4/ret_cod=0/xa_rc=0/errno=0 tiian@ubuntu:~/tmp$ unset LIXA_TRACE_MASK tiian@ubuntu:~/tmp$ ./example6_pql_ora delete Deleting a row from the tables... Oracle DELETE statement executed! |
Don't forget the clean-up step (last command) before performing the next steps.
To create a “recovery pending” transaction, we are
going to force a crash after xa_prepare()
functions completed successfully:
| [Shell terminal session] |
tiian@ubuntu:~/tmp$ export LIXA_CRASH_POINT=15 tiian@ubuntu:~/tmp$ echo $LIXA_CRASH_POINT 15 tiian@ubuntu:~/tmp$ ./example6_pql_ora insert Inserting a row in the tables... Oracle INSERT statement executed! Aborted tiian@ubuntu:~/tmp$ unset LIXA_CRASH_POINT tiian@ubuntu:~/tmp$ echo $LIXA_CRASH_POINT |
Verify there is a prepared/in-doubt transaction inside Oracle:
| [Oracle terminal session] |
SQL> select * from dba_pending_transactions; FORMATID ---------- GLOBALID -------------------------------------------------------------------------------- BRANCHID -------------------------------------------------------------------------------- 1279875137 D2F5F0A5C37E485CB44D9FC16E72A33D 68D0E0CCBC6FC4B7FA616DF9AB122395 |
Verify there is a prepared/in-doubt transaction inside PostgreSQL:
| [PostgreSQL terminal session] |
testdb=> select * from pg_prepared_xacts;
transaction | gid | prepared | owner | database
-------------+------------------------------------------------------------------------------+-------------------------------+-------+----------
964 | 1279875137.d2f5f0a5c37e485cb44d9fc16e72a33d.68d0e0ccbc6fc4b7fa616df9ab122395 | 2011-12-16 16:38:47.921947+01 | tiian | testdb
|
To move the transaction in “recovery failed” status
we emulate
an “heuristically rolled back” in the automatic recovery
step.
Edit the file monkeyrm.conf to code the
new behavior of the LIXA Monkey R.M.:
| [Content of file monkeyrm.conf] |
xa_open/0 xa_commit/6 xa_close/0 |
Start the lixat utility command to start an “automatic (warm) recovery”; trace the “client recovery” (see the section called “Tracing modules”) module to understand what happens:
| [Shell terminal session] |
tiian@ubuntu:~/tmp$ export LIXA_TRACE_MASK=0x00040000
tiian@ubuntu:~/tmp$ /opt/lixa/bin/lixat
2011-12-16 16:44:09.970398 [8385/3073862320] client_recovery
2011-12-16 16:44:09.970575 [8385/3073862320] client_recovery: sending 197 bytes ('000191<?xml version="1.0" encoding="UTF-8" ?><msg level="0" verb="8" step="8"><client job="68d0e0ccbc6fc4b7fa616df9ab122395/127.0.0.1 " config_digest="68d0e0ccbc6fc4b7fa616df9ab122395"/></msg>') to the server for step 8
2011-12-16 16:44:10.007703 [8385/3073862320] client_recovery: receiving 632 bytes from the server |<?xml version="1.0" encoding="UTF-8" ?><msg level="0" verb="8" step="16"><answer rc="0"/><client job="68d0e0ccbc6fc4b7fa616df9ab122395/127.0.0.1 " config_digest="68d0e0ccbc6fc4b7fa616df9ab122395"><last_verb_step verb="5" step="16"/><state finished="0" txstate="3" will_commit="1" will_rollback="0" xid="1279875137.d2f5f0a5c37e485cb44d9fc16e72a33d.68d0e0ccbc6fc4b7fa616df9ab122395"/></client><rsrmgrs><rsrmgr rmid="0" next_verb="0" r_state="1" s_state="33" td_state="10"/><rsrmgr rmid="1" next_verb="0" r_state="1" s_state="33" td_state="10"/><rsrmgr rmid="2" next_verb="0" r_state="1" s_state="33" td_state="20"/></rsrmgrs></msg>|
2011-12-16 16:44:10.008178 [8385/3073862320] client_recovery_analyze
2011-12-16 16:44:10.008229 [8385/3073862320] client_recovery_analyze: the TX was committing
2011-12-16 16:44:10.008242 [8385/3073862320] client_recovery_analyze: rmid=0, r_state=1, s_state=33, td_state=10
2011-12-16 16:44:10.008261 [8385/3073862320] client_recovery_analyze: rmid=1, r_state=1, s_state=33, td_state=10
2011-12-16 16:44:10.008278 [8385/3073862320] client_recovery_analyze: rmid=2, r_state=1, s_state=33, td_state=20
2011-12-16 16:44:10.008303 [8385/3073862320] client_recovery_analyze/excp=1/ret_cod=0/errno=0
2011-12-16 16:44:10.008327 [8385/3073862320] client_recovery: transaction '1279875137.d2f5f0a5c37e485cb44d9fc16e72a33d.68d0e0ccbc6fc4b7fa616df9ab122395' must be committed
2011-12-16 16:44:10.008353 [8385/3073862320] client_recovery_commit
2011-12-16 16:44:10.008388 [8385/3073862320] client_recovery_commit: committing transaction '1279875137.d2f5f0a5c37e485cb44d9fc16e72a33d.68d0e0ccbc6fc4b7fa616df9ab122395'
2011-12-16 16:44:10.008412 [8385/3073862320] client_recovery_commit: xa_commit for rmid=0, name='LIXAmonkey1staRM', xa_name='LIXA Monkey RM (static)'...
2011-12-16 16:44:10.008464 [8385/3073862320] client_recovery_commit: rc=6
2011-12-16 16:44:10.008613 [8385/3073862320] client_recovery_commit: xa_commit for rmid=1, name='PostgreSQL_stareg', xa_name='PostgreSQL[LIXA]'...
2011-12-16 16:44:10.062892 [8385/3073862320] client_recovery_commit: rc=0
2011-12-16 16:44:10.062962 [8385/3073862320] client_recovery_commit: xa_commit for rmid=2, name='OracleXE_dynreg', xa_name='Oracle_XA'...
2011-12-16 16:44:10.275061 [8385/3073862320] client_recovery_commit: rc=0
2011-12-16 16:44:10.275128 [8385/3073862320] client_recovery_commit/excp=1/ret_cod=0/errno=0
2011-12-16 16:44:10.275286 [8385/3073862320] client_recovery: sending 212 bytes ('000206<?xml version="1.0" encoding="UTF-8" ?><msg level="0" verb="8" step="24"><recovery failed="1" commit="1"/><rsrmgrs><rsrmgr rmid="0" rc="6"/><rsrmgr rmid="1" rc="0"/><rsrmgr rmid="2" rc="0"/></rsrmgrs></msg>') to the server for step 24
2011-12-16 16:44:10.275483 [8385/3073862320] client_recovery: sending 197 bytes ('000191<?xml version="1.0" encoding="UTF-8" ?><msg level="0" verb="8" step="8"><client job="68d0e0ccbc6fc4b7fa616df9ab122395/127.0.0.1 " config_digest="68d0e0ccbc6fc4b7fa616df9ab122395"/></msg>') to the server for step 8
2011-12-16 16:44:10.315057 [8385/3073862320] client_recovery: receiving 95 bytes from the server |<?xml version="1.0" encoding="UTF-8" ?><msg level="0" verb="8" step="16"><answer rc="1"/></msg>|
2011-12-16 16:44:10.315261 [8385/3073862320] client_recovery: the server answered LIXA_RC_OBJ_NOT_FOUND; there are no more transactions to recover
2011-12-16 16:44:10.315315 [8385/3073862320] client_recovery/excp=12/ret_cod=0/errno=0
tx_open(): 0
tx_close(): 0
|
The trace gives us a lot of information:
lixat fires an automatic (warm) recovery for transaction XID='1279875137.d2f5f0a5c37e485cb44d9fc16e72a33d.68d0e0ccbc6fc4b7fa616df9ab122395'
the transaction must be committed because the crash followed a successful “prepare” phase
first Resource Manager returns 6:
XA_HEURRB(“the transaction branch has been heuristically rolled back”)second and third Resource Managers return 0: XA_OK
the client send a “recovery failed” message to the state server
Note
You could think the LIXA Transaction Manager should have not
performed the second and third
xa_commit after a failure with the
first Resource Manager. It seems a good idea, but unfortunately
it does not add much value because, if applied, it would
introduce a behaviour that depends on the order of the
operations. The LIXA Transaction Manager tryes to apply a
consistent rule: after a successful xa_prepare
all the Resource Managers must receive the same command
(xa_commit/xa_rollback).
You can check the (real) Resource Managers status:
| [Oracle terminal session] |
SQL> select * from dba_pending_transactions; no rows selected SQL> select * from COUNTRIES where COUNTRY_ID = 'RS'; COUNTR ------ COUNTRY_NAME -------------------------------------------------------------------------------- REGION_ID ---------- RS Repubblica San Marino 1 |
| [PostgreSQL terminal session] |
testdb=> select * from pg_prepared_xacts; transaction | gid | prepared | owner | database -------------+-----+----------+-------+---------- (0 rows) testdb=> SELECT * FROM authors; id | last_name | first_name ----+-----------+------------ 1 | Foo | Bar |
Inspecting the system log you can notify there was a problem:
| [Shell terminal session] |
tiian@ubuntu:~/tmp$ sudo tail /var/log/daemon.log Dec 16 16:44:09 ubuntu lixat[8385]: LXC000I this process is starting a new LIXA transaction manager (lixa package version is 0.5.36) Dec 16 16:44:10 ubuntu lixat[8385]: LXC003C resource manager 'LIXAmonkey1staRM' returned an error (6) while committing (xa_commit) during recovery phase for transaction '1279875137.d2f5f0a5c37e485cb44d9fc16e72a33d.68d0e0ccbc6fc4b7fa616df9ab122395' Dec 16 16:44:10 ubuntu lixat[8385]: LXC005W unable to recover transaction id '1279875137.d2f5f0a5c37e485cb44d9fc16e72a33d.68d0e0ccbc6fc4b7fa616df9ab122395'; this transaction must be manually recovered and the correlated record(s) must be manually fixed in lixad server status file Dec 16 16:44:10 ubuntu lixad[8157]: LXD012W a client notified recovery failed condition for the transaction registered in status file 3 and block 1 |
there is a critical message (LXC003C) and two warning messages (LXC005W, LXD012W). Pay attention the server notifies the problem (LXD012W) as well as the client (LXC005W). To inspect the content of the “recovery failed” transaction you may dump the state server:
| [Shell terminal session] |
tiian@ubuntu:~/tmp$ sudo su - lixa lixa@ubuntu:~$ pkill lixad lixa@ubuntu:~$ /opt/lixa/sbin/lixad --dump=u >/tmp/bar lixa@ubuntu:~$ exit logout |
and inspect the content of file /tmp/bar
[56]:
| [Content of file /tmp/bar] |
========================================================================
Second file ('/opt/lixa/var/lixad_status1_2') will be dumped
Magic number is: 24848 (24848)
Level is: 1 (1)
Last sync timestamp: 2011-12-16T16:38:23.482854+0100
Size: 17 blocks
Used block chain starts at: 16
Free block chain starts at: 0 (empty chain)
Dumping records following physical order: 0
Dumping records following free block chain: 0
Dumping records following used block chain: 1
------------------------------------------------------------------------
[...]
------------------------------------------------------------------------
Block: 9, next block in chain: 8
Block type: transaction manager record (transaction header)
Trnhdr/number of resource managers: 3
Trnhdr/resource manager blocks are: 10 11 12
Trnhdr/arrival time: 2011-12-16T16:26:04.790526+0100
Trnhdr/local socket address:port is 127.0.0.1:2345
Trnhdr/peer socket address:port is 127.0.0.1:52251
Trnhdr/config digest is '68d0e0ccbc6fc4b7fa616df9ab122395'
Trnhdr/job is '68d0e0ccbc6fc4b7fa616df9ab122395/127.0.0.1 '
Trnhdr/last (verb, step) are: [ (9,8) (4,8) (4,16) (5,8) (5,16) ]
Trnhdr/state/finished: 0
Trnhdr/state/txstate: 3
Trnhdr/state/will commit: 1
Trnhdr/state/will rollback: 0
Trnhdr/state/xid: '1279875137.592cec793be1433d8ffd18574211e0e2.68d0e0ccbc6fc4b7fa616df9ab122395'
Trnhdr/recoverying block id: 0
Trnhdr/recovery failed: 1
Trnhdr/recovery failed time: 2011-12-16T16:29:15.947057+0100
Trnhdr/recovery commit: 1
------------------------------------------------------------------------
Block: 8, next block in chain: 7
Block type: resource manager record
Rsrmgr/rmid: 2
Rsrmgr/state/next_verb: 0
Rsrmgr/state/xa_r_state: 1
Rsrmgr/state/dynamic: 0
Rsrmgr/state/xa_td_state: 10
Rsrmgr/state/xa_s_state: 33
Rsrmgr/lixac_conf.xml name: 'LIXAmonkey1staRM'
Rsrmgr/xa_name: 'LIXA Monkey RM (static)'
Rsrmgr/xa_open_info: 'monkeyrm.conf'
Rsrmgr/xa_open_flags: 0x0
Rsrmgr/xa_open_rc: 0
Rsrmgr/xa_start_flags: 0x0
Rsrmgr/xa_start_rc: 0
Rsrmgr/xa_end_flags: 0x4000000
Rsrmgr/xa_end_rc: 0
Rsrmgr/xa_prepare_flags: 0x0
Rsrmgr/xa_prepare_rc: 0
Rsrmgr/xa_commit_flags: 0x0
Rsrmgr/xa_commit_rc: 0
Rsrmgr/xa_rollback_flags: 0x0
Rsrmgr/xa_rollback_rc: 0
Rsrmgr/xa_forget_flags: 0x0
Rsrmgr/xa_forget_rc: 0
Rsrmgr/ax_reg_flags: 0x0
Rsrmgr/ax_reg_rc: 0
Rsrmgr/ax_unreg_flags: 0x0
Rsrmgr/ax_unreg_rc: 0
Rsrmgr/recovery_rc: 6
------------------------------------------------------------------------
Block: 7, next block in chain: 6
Block type: resource manager record
Rsrmgr/rmid: 1
Rsrmgr/state/next_verb: 0
Rsrmgr/state/xa_r_state: 1
Rsrmgr/state/dynamic: 1
Rsrmgr/state/xa_td_state: 20
Rsrmgr/state/xa_s_state: 33
Rsrmgr/lixac_conf.xml name: 'OracleXE_dynreg'
Rsrmgr/xa_name: 'Oracle_XA'
Rsrmgr/xa_open_info: 'Oracle_XA+Acc=P/hr/hr+SesTm=30+LogDir=/tmp+threads=true+DbgFl=7+Loose_Coupling=true'
Rsrmgr/xa_open_flags: 0x0
Rsrmgr/xa_open_rc: 0
Rsrmgr/xa_start_flags: 0x0
Rsrmgr/xa_start_rc: 0
Rsrmgr/xa_end_flags: 0x4000000
Rsrmgr/xa_end_rc: 0
Rsrmgr/xa_prepare_flags: 0x0
Rsrmgr/xa_prepare_rc: 0
Rsrmgr/xa_commit_flags: 0x0
Rsrmgr/xa_commit_rc: 0
Rsrmgr/xa_rollback_flags: 0x0
Rsrmgr/xa_rollback_rc: 0
Rsrmgr/xa_forget_flags: 0x0
Rsrmgr/xa_forget_rc: 0
Rsrmgr/ax_reg_flags: 0x0
Rsrmgr/ax_reg_rc: 0
Rsrmgr/ax_unreg_flags: 0x0
Rsrmgr/ax_unreg_rc: 0
Rsrmgr/recovery_rc: 0
------------------------------------------------------------------------
Block: 6, next block in chain: 5
Block type: resource manager record
Rsrmgr/rmid: 0
Rsrmgr/state/next_verb: 0
Rsrmgr/state/xa_r_state: 1
Rsrmgr/state/dynamic: 0
Rsrmgr/state/xa_td_state: 10
Rsrmgr/state/xa_s_state: 33
Rsrmgr/lixac_conf.xml name: 'PostgreSQL_stareg'
Rsrmgr/xa_name: 'PostgreSQL[LIXA]'
Rsrmgr/xa_open_info: 'dbname=testdb'
Rsrmgr/xa_open_flags: 0x0
Rsrmgr/xa_open_rc: 0
Rsrmgr/xa_start_flags: 0x0
Rsrmgr/xa_start_rc: 0
Rsrmgr/xa_end_flags: 0x4000000
Rsrmgr/xa_end_rc: 0
Rsrmgr/xa_prepare_flags: 0x0
Rsrmgr/xa_prepare_rc: 0
Rsrmgr/xa_commit_flags: 0x0
Rsrmgr/xa_commit_rc: 0
Rsrmgr/xa_rollback_flags: 0x0
Rsrmgr/xa_rollback_rc: 0
Rsrmgr/xa_forget_flags: 0x0
Rsrmgr/xa_forget_rc: 0
Rsrmgr/ax_reg_flags: 0x0
Rsrmgr/ax_reg_rc: 0
Rsrmgr/ax_unreg_flags: 0x0
Rsrmgr/ax_unreg_rc: 0
Rsrmgr/recovery_rc: 0
------------------------------------------------------------------------
[...]
========================================================================
First file ('/opt/lixa/var/lixad_status2_1') will be dumped
Magic number is: 24848 (24848)
Level is: 1 (1)
Last sync timestamp: 2011-12-16T16:23:40.512332+0100
Size: 10 blocks
Used block chain starts at: 0 (empty chain)
Free block chain starts at: 1
Dumping records following physical order: 0
Dumping records following free block chain: 0
Dumping records following used block chain: 1
========================================================================
First file ('/opt/lixa/var/lixad_status3_1') will be dumped
Magic number is: 24848 (24848)
Level is: 1 (1)
Last sync timestamp: 2011-12-16T16:38:47.933099+0100
Size: 10 blocks
Used block chain starts at: 4
Free block chain starts at: 5
Dumping records following physical order: 0
Dumping records following free block chain: 0
Dumping records following used block chain: 1
------------------------------------------------------------------------
[...]
|
The chain composed of blocks 9 (transaction manager record) and
8, 7, 6 (resource manager records) keeps the state of the
“recovery failed” transaction:
Trnhdr/recovery failed: 1
If “LIXA Monkey RM” Resource Manager was a real
Resource Manager, you could manually recovery the transaction
used the procedure shown in
the section called “Recoverying forgotten transactions”.
Unfortunately the LIXA Monkey RM is a fake Resource Manager and it
does not save the state anywhere: it is not able to correctly
answer to xa_recover() and there is no way to
show this last step.
As a final step, to clean-up the “recovery failed” state from LIXA state server, you have to recycle it using a special option:
| [Shell terminal session] | |||||||||||||||||||||||||||||||||||||||||||||||||
tiian@ubuntu:~/tmp$ sudo su - lixa lixa@ubuntu:~$ pkill lixad lixa@ubuntu:~$ /opt/lixa/sbin/lixad --daemon --clean-failed lixa@ubuntu:~$ pkill lixad[a] lixa@ubuntu:~$ exit logout | |||||||||||||||||||||||||||||||||||||||||||||||||
[a] The LIXA state server is stopped after start-up to guarantee the content of the state file(s) on the disk are up-to-date before dumping them. | |||||||||||||||||||||||||||||||||||||||||||||||||
Dump again the content of the state server:
| [Shell terminal session] |
tiian@ubuntu:~/tmp$ sudo su - lixa lixa@ubuntu:~$ /opt/lixa/sbin/lixad --dump=u >/tmp/bar lixa@ubuntu:~$ exit logout |
and check the content of the dump file again: the blocks 10, 9, 8, 7 should not be used or, if re-used, they should be related to a different transaction.
Important
Don't use
--clean-failed as a default
when starting LIXA state server (lixad):
this option should be used only after you inspected the content
of the state server and solved any in-doubt transaction.
Note
Operating this type of recovery can be easier if the LIXA state server is running in “maintenance mode” (see the section called “Maintenance mode execution”): only lixar can access the online content of the LIXA state server and ordinary clients (Application Program) can not perform transactions. It may be useful using the state server in “maintenance mode”, but only you can decide if your business rules allows it.
Important
The LIXA technology does not ask you to:
recycle the lixad state server to see the current status when dumping the content of the state server files (
--dumpoption)start the lixad state server in “maintenance mode” when performing “manual (cold) recovery”
The LIXA technology provides you these functions to simplify the administrative tasks, but deciding which option should be used it's your own responsability.
As explained in the section called “Automatic recovery concepts”, the “automatic (warm) recovery” is automatically performed by the LIXA Transaction Manager under the condition of “Application Program equivalence” (see the section called “Application Program equivalence”).
Sometimes you have to perform a “manual (cold) recovery” because “Application Program equivalence” is no more available. This is a typical scenario:
an Application Program crashed and its transaction is in “in-doubt/prepared (recovery pending) status”
the Application Program didn't specify a custom value for the environment variable
LIXA_JOByou changed the content of file
lixac_conf.xml, for example you added a new profilethe MD5 signature of file
lixac_conf.xmlchanged, the associatedbranch qualifierchanged, new transactions would be associated to a different jobautomatic (warm) recovery wouldn't be automatically performed and the transaction becomes a “forgotten” transaction.
Inspecting the list of recovery pending transaction using lixar -p does not return the desired transaction... What's going on?
By default, the lixar utility filters the
transactions
retrieved by the Resource Managers: it keeps only the transactions
with the same branch qualifier of the current
lixar running instance.
If you look at the section called “Application Program equivalence”,
you will realize that lixar
retrieves only the transactions started with
the same lixac_conf.xml,
the same $(LIXA_PROFILE) and
the same gethostid().
This behaviour helps the system engineer to see only the
“relevant” subset of the whole
“recovery pending” set.
If you are looking for all the transactions in
“recovery pending” status currently kept by the
Resource Managers associated to the current
LIXA_PROFILE, you must specify the
--bypass-bqual-check (-b) option.
This paragraph explains a side effect of the behavior explained above.
Suppose the following scenario happens:
your LIXA Transaction Manager saved the state of a “prepared/recovery pending” transaction inside the LIXA state server
you are not aware of the existence of that “prepared/recovery pending” transaction
you change the content of
lixac_conf.xmlfilelately you discover there is a “prepared/recovery pending” transaction that can not be automatically recovered by LIXA Transaction Manager and you perform manual recovery
unfortunately, LIXA state server will keep some records related to the manually recovered transaction “forever”.
Manual recovery does query LIXA state server to retrieve the list of “prepared/recovery pending” transactions because it is designed to solve the issue “state server does not have information” related to some transactions.
Note
The lixad option
--clean-failed explained in
the section called “Recoverying a “recovery failed” transaction”
does not help because the transaction was not in
“recovery failed” state.
Important
At the time of this writing there is not a specific tool to remove this type of “ghosts” from LIXA state server, you can clean-up those records using a cold start as explained in the section called “Recoverying forgotten transactions”. You must pay attention to avoid “in flight transaction purge”.
In a future release this behavior could be improved if any user asked for it.
The LIXA project technology can help you dealing with a different Transaction Manager (see the section called “Transaction Manager and Transaction Monitor”) too: the lixar utility program can be used to inspect (and manually recover) a transaction managed by a different Transaction Manager using two command options together:
--bypass-bqual-check(-b): to bypass branch qualifier based filtering--bypass-formatid-check(-B): to bypass format ID based filtering
If you use the above command options together,
lixar utility program will inspect (and eventually
commit/rollback) any XA transaction known by the Resource Managers
associated to the current LIXA_PROFILE.
Note
It's your own responsability to define a LIXA profile that's compatible with the configuration of the third party Transaction Manager used when managing the transaction: it must contain the same Resource Managers in the same order with the same options.
Warning
LIXA software is libre/free/open source software and you use it exclusively and consciously without any warranty at your own risk. Using LIXA software technology will probably put you in an unsupported state regarding to the third party Transaction Manager supplier.
In the previous sections we have dealt with “format id” and “branch qualifier”; you could ask “How can I discover the ‘format id’ and the ‘branch qualifier’ branch qualifier associated to my own Application Program?”
The easiest way to pick-up them is to use lixat
utility program using the same
LIXA_PROFILE you use when running your
Application Program:
tiian@ubuntu:~/src/lixa$ sudo su - lixa lixa@ubuntu:~$ /opt/lixa/sbin/lixad --daemon lixa@ubuntu:~$ ps -ef|grep lixad|grep -v grep lixa 8122 1 0 23:02 ? 00:00:00 /opt/lixa/sbin/lixad --daemon lixa@ubuntu:~$ exit logout tiian@ubuntu:~/src/lixa$ /opt/lixa/bin/lixat -c tx_open(): 0 tx_begin(): 0 tx_info(): 1 xid/formatID.gtrid.bqual = 1279875137.56af7a66398f4eca82b8826fe10165ad.9e4c11057107c73366c9fc421eaa85ca tx_commit(): 0 tx_close(): 0 tiian@ubuntu:~/src/lixa$ /opt/lixa/bin/lixat -c tx_open(): 0 tx_begin(): 0 tx_info(): 1 xid/formatID.gtrid.bqual = 1279875137.218f05b733fb4bc1aa3d21eeaf01fbab.9e4c11057107c73366c9fc421eaa85ca tx_commit(): 0 tx_close(): 0
From the above terminal output:
“formatID” is constant and the LIXA Transaction Manager uses the exadecimal value 1279875137 (that's the ASCII sequence of string “LIXA”)
“branch qualifier” is computed as explained in the section called “Application Program equivalence” and the value in the above example is “9e4c11057107c73366c9fc421eaa85ca”
“global transaction id” must be different for any transaction and you can see two different values in the above examples (it's computed using
uuid_generate()function).
If you were interested in retrieving them programmatically
(from your own C language program) you could use the standard
tx_info() function that returns a
TXINFO struct ([TXspec]).
Please pay attention the
XID struct contains binary data
(it does not contain ASCII data).
Utility lixar has been designed to operate in an
environment of statically defined Resource Managers: this was typical
for TX Demarcation Specification. XTA API provides a lot of flexibility
in comparison with TX: Resource Managers can be defined at run time;
furthermore, XTA for Java, allows the usage of every Resource Manager
that implement the javax.transaction.xa.XAResource
interface.
Under some conditions, when a standard XA Resource Manager and its switch load file exists, lixar can be used even to recover transactions managed by the XTA API, but there's actually no an alternative tool dedicated to XTA and XTA for Java.
PostgreSQL does not provide standard xa_
functions as well as MySQL/MariaDB. The LIXA project has implemented
the necessary functions building a proxy component that uses the
native PostgreSQL “XA like” SQL statements.
LIXA implementation serializes XIDs using a different algorithm than
PostgreSQL JDBC driver; lixar does not recognize
XIDs generated by PostgreSQL JDBC driver and recovery pending
transaction must be resolved manually. Here's an example:
tiian@ubuntu1404-64:~$ psql testdb
psql (9.3.24)
Type "help" for help.
testdb=> select * from pg_prepared_xacts;
transaction | gid | prepared | owner | database
-------------+--------------------------------------------------------------+-----------------------------+-------+----------
55122 | 1279875137_vF8w2TaEQDagSZWMOeqwqA==_Zf5GiZlb6PFbYYXrfE9CJw== | 2019-01-19 17:20:40.8768+01 | tiian | testdb
(1 row)
testdb=> ROLLBACK PREPARED '1279875137_vF8w2TaEQDagSZWMOeqwqA==_Zf5GiZlb6PFbYYXrfE9CJw==';
ROLLBACK PREPARED
testdb=> select * from pg_prepared_xacts; transaction | gid | prepared | owner | database
-------------+-----+----------+-------+----------
(0 rows)
[55] This should never happen: it could be a bug in LIXA project software or it might be the consequence of a “cold start” (you removed the state files) of lixad
[56] The state server can be analyzed without stopping it (pkill lixad), but it may happen you will not see the current content because the state server has not yet synchronized the state file(s). If the LIXA state server is processing many transactions per second you will probably see an up-to-date state, but if it was “sleeping” you wouldn't.
This chapter explains some internal details you can be interested in when you are dealing with complex environments.
The LIXA project software uses standard UNIX logging
syslog() function but it does not
set a specific facility
using the openlog() function.
The final destination of the log messages depends on the configuration
of the standard UNIX logging; Ubuntu 8.04, for examples, sends the
messages to file /var/log/daemon.log. This should
be in accordance with the content of the syslog
man page “LOG_DAEMON
system daemons without separate facility value”.
The messages produced by the LIXA project software are documented in
the file src/common/lixa_syslog.h
The messages produced by the LIXA project software use two different
prefixes: “LXC” for
lixac (client library) and
“LXD” for
lixad (state server).
Try the following example:
tiian@ubuntu:~$ ps -ef|grep lixad|grep -v grep
tiian@ubuntu:~$ /opt/lixa/bin/lixat
tx_open(): -7
inspecting the log file /var/log/daemon.log
you should find out something like this:
Dec 4 18:16:10 ubuntu lixat[6538]: LXC000I this process is starting a new LIXA transaction manager (lixa package version is 0.5.36)
Dec 4 18:16:10 ubuntu lixat[6538]: LXC002E unable to connect to LIXA server at address 127.0.0.1, port 2345
the lixat command is running as expected because the state server is not active. To see the messages produced by the state server you can try the following commands:
tiian@ubuntu:~$ sudo su - lixa
lixa@ubuntu:~$ /opt/lixa/sbin/lixad -d
lixa@ubuntu:~$ pkill lixad
lixa@ubuntu:~$ exit
logout
inspecting the log file /var/log/daemon.log
you should find out something like this:
Dec 4 18:22:46 ubuntu lixad[6694]: LXD000N this process is starting a new LIXA server (lixa package version is 0.5.36)
Dec 4 18:22:46 ubuntu lixad[6697]: LXD014N LIXA server entered daemon status
Dec 4 18:22:49 ubuntu lixad[6697]: LXD019N received signal 15, server immediate shutdown in progress...
Dec 4 18:22:49 ubuntu lixad[6697]: LXD006N server terminated activities
The log messages are differentiated by
priority; there is a direct
link between the letter in the seventh position and the severity of
the message:
D :
LOG_DEBUGI :
LOG_INFON :
LOG_NOTICEW :
LOG_WARNINGE :
LOG_ERRC :
LOG_CRIT
If LIXA software was logging too much in your production environment
you can configure the system log facility
(/etc/syslog.conf) to filter some messages, but
this tuning operation should not be necessary because the LIXA software
does not use the system log facility as a debugging tool: look at
the section called “Tracing” to discover how debug messages are managed.
The LIXA project can produce a lot of traces when the software is running; the tracing functions are included in the code by default but you can disable them when you configure the software before the build phase:
./configure --disable-trace
make
...
Warning
Excluding tracing functions can reduce CPU and memory usage when the software is running, but you should disable tracing only if you are really sure about it: without tracing you have no instruments to understand what's happening inside LIXA code when it's running.
In the case you didn't disable the tracing feature at build time (see above), you could activate the message production when you need it.
Important
LIXA provides two different tracing capabilities: one is based on the concept of "stack tracing" and allows to catch the exiting condition of every function call; the other one is based on the concept of "modules" and allows selective module tracing. Stack tracing is more usefulto catch anomalous conditions whenever they happen, while module tracing is more useful to get fine grain messages of a subset of functions to understand why things are not running as desired.
Stack tracing can be activated using the environment variable
LIXA_STACK_TRACE; three different values are
allowed:
ALLto stack trace every function call; this value should not be used in a production environment to avoid a stack trace message congestionERRORSto stack trace only the function calls that end with an error condition; this is the value suggested to detect anomalous conditions in production environmentsWARNINGSto stack trace only the function calls that end with either a warning or an error condition; this setting can produce trace messages that are not related to anomalous conditions
When activated, stack tracing produces JSON formatted records as in the example below (messages produced by a LIXA application):
2020-10-18 19:06:06.871362 [32034/47612092549696] { "type": "StackTrace", "date": "2020-10-18", "time": "19:06:06.871362", "process_id": 32034, "thread_id": 47612092549696, "function_name": "client_status_coll_get_cs", "source_file_name": "client_status.c", "source_file_line": "328", "exception": 1, "return_code": 1, "return_code_text": "WARNING: object not found", "errno": 0, "errno_text": "Success", "trace_module": 0x20000 }
2020-10-18 19:06:06.874283 [32034/47612092549696] { "type": "StackTrace", "date": "2020-10-18", "time": "19:06:06.874283", "process_id": 32034, "thread_id": 47612092549696, "function_name": "lixa_xa_open", "source_file_name": "lixa_xa.c", "source_file_line": "1446", "exception": 10, "return_code": -99, "return_code_text": "ERROR: an XA function returned an unexpected return code", "errno": 0, "errno_text": "Success", "trace_module": 0x2000 }
The JSON payload can be extracted by the whole message quite easily and it can be ingested by a log analytic platform like for instance the Elastic Stack (ELK).
Important
Not necessarily an error condition is the result of a bug: LIXA software try to manage as many as possible error conditions without hurting the user. Nevertheless, stack tracing can be useful in catching run time issues that are difficult to reproduce.
Note
Stack trace displays the bit that must be put in trace mask to get all the messages produced by the module that generated the exception. In the example above, look at "trace_module" field inside the JSON records.
The trace messages produced by LIXA code are divided by modules: you can activate the trace messages for one or more modules. There is not a concept of “severity” for the trace messages: if you activate the trace for a module, it will print all the trace messages of that module.
The table below shows how the LIXA software is partitioned in modules:
Table 10.1. Tracing module flags
| Module Trace Label | Hex Flag | Component | Function |
|---|---|---|---|
| LIXA_TRACE_MOD_SERVER | 0x00000001 | lixad (state server) | main program |
| LIXA_TRACE_MOD_SERVER_CONFIG | 0x00000002 | lixad (state server) | configuration: config file parsing and environment variable detection |
| LIXA_TRACE_MOD_SERVER_LISTENER | 0x00000004 | lixad (state server) | network listener and signal handler |
| LIXA_TRACE_MOD_SERVER_MANAGER | 0x00000008 | lixad (state server) | session client manager, thread manager, network I/O manager |
| LIXA_TRACE_MOD_SERVER_STATUS | 0x00000010 | lixad (state server) | persistent state |
| LIXA_TRACE_MOD_XTA | 0x00000020 | lixac
(client library) | XA Transaction API (XTA) functions |
| LIXA_TRACE_MOD_SERVER_XA | 0x00000040 | lixad (state server) | XA logic called by client |
| LIXA_TRACE_MOD_SERVER_REPLY | 0x00000080 | lixad (state server) | replies to client messages |
| LIXA_TRACE_MOD_SERVER_RECOVERY | 0x00000100 | lixad (state server) | logic necessary to answer the client recovery calls |
| LIXA_TRACE_MOD_SERVER_FSM | 0x00000200 | lixad (state server) | server FSM (finite state machine) functions |
| LIXA_TRACE_MOD_CLIENT_TX | 0x00001000 | lixac
(client library) | transaction demarcation (TX) functions:
tx_open(),
tx_begin(), ... |
| LIXA_TRACE_MOD_CLIENT_XA | 0x00002000 | lixac
(client library) | XA function wrapper:
xa_open(),
xa_start(),
ax_reg(), ... |
| LIXA_TRACE_MOD_CLIENT_CONN | 0x00004000 | lixac
(client library) | function necessary to connect to the state server (lixad) |
| LIXA_TRACE_MOD_CLIENT_CONFIG | 0x00008000 | lixac
(client library) | configuration: config file parsing and environment variable detection |
| LIXA_TRACE_MOD_CLIENT_XA_SWITCH | 0x00010000 | lixac
(client library) | XA switch file implementation of the dummy resource managers provided by LIXA and of the XA wrappers for the resource managers without a standard switch file |
| LIXA_TRACE_MOD_CLIENT_STATUS | 0x00020000 | lixac
(client library) | client status management |
| LIXA_TRACE_MOD_CLIENT_RECOVERY | 0x00040000 | lixac
(client library) | warm and cold recovery of the transaction(s) |
| LIXA_TRACE_MOD_CLIENT_GENERIC | 0x00080000 | lixac
(client library) | generic client functions |
| LIXA_TRACE_MOD_CLIENT_TPM | 0x00100000 | lixac
(client library) | client TPM functions |
| LIXA_TRACE_MOD_SERVER_TPM | 0x00200000 | lixad (state server) | server TPM functions |
| LIXA_TRACE_MOD_COMMON_CONFIG | 0x01000000 | lixab
(common base library) | configuration stuff common to all components |
| LIXA_TRACE_MOD_COMMON_XML_MSG | 0x02000000 | lixab
(common base library) | functions related to XML messages serialization and deserialization |
| LIXA_TRACE_MOD_COMMON_STATUS | 0x04000000 | lixab
(common base library) | convenience functions used to manage the status on client and server side |
| LIXA_TRACE_MOD_COMMON_UTILS | 0x08000000 | lixab
(common base library) | utility functions used by all the components |
| LIXA_TRACE_MOD_COMMON_XID | 0x10000000 | lixab
(common base library) | functions specialized for XID (transaction ID) management |
You can trace any module combination creating any
trace mask ORing the bits; for example:
0x00000003 will produce all the messages of
LIXA_TRACE_MOD_SERVERandLIXA_TRACE_MOD_SERVER_CONFIG0xffffffff will produce all the messages
0x00000000 will disable all the messages
Important
The suggested way to guess the modules require tracing is looking at the stack trace record produced activating stack tracing as described in the section called “Stack Tracing”.
The trace can be activated setting the environment variable
LIXA_TRACE_MASK before starting the execution of
the traced program. Try the following example...
Check the state server is not active:
tiian@ubuntu:~$ ps -ef|grep lixad|grep -v grep
try to execute lixat, the LIXA test program:
tiian@ubuntu:~$ /opt/lixa/bin/lixat tx_open(): -7
it gives us few information (TX_FAIL = -7): from
/opt/lixa/include/tx.h we can retrieve the
meaning: “fatal error”... Not so much...
We could try to trace the “CLIENT TX” module:
tiian@ubuntu:~$ export LIXA_TRACE_MASK=0x00001000 tiian@ubuntu:~$ /opt/lixa/bin/lixat 2011-12-04 12:19:49.235007 [8899/3073612464] lixa_tx_open 2011-12-04 12:19:49.241544 [8899/3073612464] lixa_tx_open/TX_*=-7/excp=5/ret_cod=-138/errno=111 tx_open(): -7
“ret_cod=-138” can be inspected inside
src/common/lixa_errors.h:
[...] /** * "connect" function error */ #define LIXA_RC_CONNECT_ERROR -138 [...]
now we know the errors happens using connect()
function; “errno=111” can be inspected inside
/usr/include/asm-generic/errno.h:
[...] #define ECONNREFUSED 111 /* Connection refused */ [...]
The error happens because the LIXA state server (lixad) is not running, but we can improve our diagnosis with a more detailed tracing adding “CLIENT CONN” module:
tiian@ubuntu:~$ export LIXA_TRACE_MASK=0x00005000 tiian@ubuntu:~$ /opt/lixa/bin/lixat 2011-12-04 17:00:49.447866 [4514/3074067120] lixa_tx_open 2011-12-04 17:00:49.452624 [4514/3074067120] client_connect 2011-12-04 17:00:49.452678 [4514/3074067120] client_connect: connecting socket 4 to server '127.0.0.1' port 2345 2011-12-04 17:00:49.454033 [4514/3074067120] client_connect/excp=2/ret_cod=-138/errno=111 2011-12-04 17:00:49.454872 [4514/3074067120] lixa_tx_open/TX_*=-7/excp=5/ret_cod=-138/errno=111 tx_open(): -7
the client is not able to contact the state server that is configured
to listen port 2345
at address
127.0.0.1
When running the state server (lixad) in daemon mode, you must explicitly ask lixad to use a trace file. Try the following steps...
tiian@ubuntu:~$ sudo su - lixa lixa@ubuntu:~$ export LIXA_TRACE_MASK=0x00000005 lixa@ubuntu:~$ /opt/lixa/sbin/lixad -d 2011-12-04 17:14:46.976067 [4888/3074164464] lixad/daemonize: fork() 2011-12-04 17:14:46.978399 [4889/3074164464] lixad/daemonize: setsid() 2011-12-04 17:14:46.979740 [4889/3074164464] lixad/daemonize: signal() 2011-12-04 17:14:46.980513 [4889/3074164464] lixad/daemonize: fork() 2011-12-04 17:14:46.982516 [4890/3074164464] lixad/daemonize: chdir() 2011-12-04 17:14:46.984002 [4890/3074164464] lixad/daemonize: umask()
the process is tracing the initial operations and after the
daemonization it does not produce any more
messages. By default stderr is used as the
standard tracing file, but the
daemon disconnects from the terminal
and closes the stderr file.
To avoid this issue you can specify a specific trace file name using
the -t (--trace-file) dedicated
option:
lixa@ubuntu:~$ /opt/lixa/sbin/lixad -d -t /tmp/lixad.trace lixa@ubuntu:~$ ls -la /tmp/lixad.trace -rw-r--r-- 1 lixa lixa 349 2011-12-04 17:29 /tmp/lixad.trace lixa@ubuntu:~$ pkill lixad
inspecting the content of /tmp/lixad.trace
you can now find messages related to the listener module too:
2011-12-04 17:29:12.435474 [5187/3074373360] lixad/daemonize: fork() 2011-12-04 17:29:12.436593 [5188/3074373360] lixad/daemonize: setsid() 2011-12-04 17:29:12.437187 [5188/3074373360] lixad/daemonize: signal() 2011-12-04 17:29:12.437245 [5188/3074373360] lixad/daemonize: fork() 2011-12-04 17:29:12.435474 [5187/3074373360] lixad/daemonize: fork() 2011-12-04 17:29:12.439878 [5189/3074373360] lixad/daemonize: now daemonized! 2011-12-04 17:29:12.441874 [5189/3074373360] lixad/main: starting 2011-12-04 17:29:12.447862 [5189/3074373360] server_listener 2011-12-04 17:29:12.447940 [5189/3074373360] server_listener: resolving address '127.0.0.1' for listener # 0 2011-12-04 17:29:12.448001 [5189/3074373360] server_listener: creating socket for listener # 0 2011-12-04 17:29:12.448033 [5189/3074373360] server_listener: socket for listener 0 is 10 2011-12-04 17:29:12.448044 [5189/3074373360] server_listener: setting SO_REUSE option for listener # 0 2011-12-04 17:29:12.448142 [5189/3074373360] server_listener: resolving address '0.0.0.0' for listener # 1 2011-12-04 17:29:12.448156 [5189/3074373360] server_listener: creating socket for listener # 1 2011-12-04 17:29:12.448174 [5189/3074373360] server_listener: socket for listener 1 is 11 2011-12-04 17:29:12.448183 [5189/3074373360] server_listener: setting SO_REUSE option for listener # 1 2011-12-04 17:29:12.448213 [5189/3074373360] server_listener_signal 2011-12-04 17:29:12.448262 [5189/3074373360] server_listener_signal/excp=3/ret_cod=0/errno=0 2011-12-04 17:29:12.448275 [5189/3074373360] server_listener_loop 2011-12-04 17:29:12.448284 [5189/3074373360] server_listener_loop: entering poll... 2011-12-04 17:29:23.499666 [5189/3074373360] server_listener_signal_action: signo=15 2011-12-04 17:29:23.499850 [5189/3074373360] server_listener_signal_action: sending message to thread id 0 2011-12-04 17:29:23.499877 [5189/3074373360] server_listener_signal_action: sending message to thread id 1 2011-12-04 17:29:23.499904 [5189/3074373360] server_listener_signal_action: sending message to thread id 2 2011-12-04 17:29:23.499942 [5189/3074373360] server_listener_signal_action: sending message to thread id 3 2011-12-04 17:29:23.499991 [5189/3074373360] server_listener_loop: ready file descriptors = 1 2011-12-04 17:29:23.500003 [5189/3074373360] server_listener_loop: slot=0, fd=2, POLLIN=1, POLLERR=0, POLLHUP=0, POLLNVAL=0 2011-12-04 17:29:23.500025 [5189/3074373360] server_listener_loop: waiting thread (1) id 3074329488 termination... 2011-12-04 17:29:23.521138 [5189/3074373360] server_listener_loop: waiting thread (2) id 3065920400 termination... 2011-12-04 17:29:23.521169 [5189/3074373360] server_listener_loop: waiting thread (3) id 3057511312 termination... 2011-12-04 17:29:23.521180 [5189/3074373360] server_listener_loop/excp=8/ret_cod=0/errno=4 2011-12-04 17:29:23.521190 [5189/3074373360] server_listener/excp=8/ret_cod=0/errno=4 2011-12-04 17:29:23.521558 [5189/3074373360] lixad/main: exiting
Note
The trace file is written using the
stdio
and the output is not flushed after every message: if you look
at the trace file of a running lixad state
server, you will not be able to read the last messages due to
the buffering of stdio
library. After the
server termination you are sure every trace message is inside the
trace file.
In the previous section you discovered how you can send the trace
messages of lixad. The
lixac library sends the
trace messages to the stderr file associated to
the terminal of the user that's running the process; many times you
would send the messages to a specific disk hosted file. You can
obtain this behavior using redirection:
tiian@ubuntu:~$ export LIXA_TRACE_MASK=0x00005000 tiian@ubuntu:~$ /opt/lixa/bin/lixat 2>/tmp/lixat.trace tx_open(): -7 tiian@ubuntu:~$ ls -la /tmp/lixat.trace -rw-r--r-- 1 tiian tiian 417 2011-12-04 17:43 /tmp/lixat.trace
You can inspect the content of the file
/tmp/lixat.trace:
2011-12-04 17:43:36.078314 [5544/3074013872] lixa_tx_open 2011-12-04 17:43:36.083822 [5544/3074013872] client_connect 2011-12-04 17:43:36.083890 [5544/3074013872] client_connect: connecting socket 4 to server '127.0.0.1' port 2345 2011-12-04 17:43:36.084862 [5544/3074013872] client_connect/excp=2/ret_cod=-138/errno=111 2011-12-04 17:43:36.084906 [5544/3074013872] lixa_tx_open/TX_*=-7/excp=5/ret_cod=-138/errno=111
Under some conditions, the last trace messages produced by the daemon
lixad are not captured in the event of a crash.
This can increase the difficulty of problem determination.
To avoid the buffering of trace messages for lixad,
use --enable-debug on
./configure command line:
./configure --enable-debug
The standard installation procedure explained in
Chapter 2, Installation uses
root account.
You can install the software in a home directory using a normal user
account, for instance lixa.
To specify an alternative installation path you have to use
--prefix option at configure time.
The following steps show how you can install the software in
lixa home directory.
lixa@ubuntu:~$ ls -l
total 1520
-rw-r--r-- 1 lixa lixa 1550959 2011-12-18 21:25 lixa-0.5.36.tar.gz
lixa@ubuntu:~$ tar xzf lixa-0.5.36.tar.gz
lixa@ubuntu:~$ cd lixa-0.5.36
lixa@ubuntu:~/lixa-0.5.36$ ./configure --prefix=/home/lixa/prod
[...]
config.status: creating config.h
config.status: executing depfiles commands
config.status: executing tests/atconfig commands
lixa@ubuntu:~/lixa-0.5.36$ make install
[...]
make[2]: Leaving directory `/home/lixa/lixa-0.5.36'
make[1]: Leaving directory `/home/lixa/lixa-0.5.36'
lixa@ubuntu:~/lixa-0.5.36$ ls -la /home/lixa/prod/
total 36
drwxr-xr-x 9 lixa lixa 4096 2011-12-18 21:30 .
drwxr-xr-x 5 lixa lixa 4096 2011-12-18 21:28 ..
drwxr-xr-x 2 lixa lixa 4096 2011-12-18 21:29 bin
drwxr-xr-x 2 lixa lixa 4096 2011-12-18 21:28 etc
drwxr-xr-x 2 lixa lixa 4096 2011-12-18 21:29 include
drwxr-xr-x 2 lixa lixa 4096 2011-12-18 21:29 lib
drwxr-xr-x 2 lixa lixa 4096 2011-12-18 21:29 sbin
drwxr-xr-x 3 lixa lixa 4096 2011-12-18 21:30 share
drwxr-xr-x 2 lixa lixa 4096 2011-12-18 21:29 var
lixa@ubuntu:~/lixa-0.5.36$ export LD_LIBRARY_PATH=/home/lixa/prod/lib
lixa@ubuntu:~/lixa-0.5.36$ /home/lixa/prod/sbin/lixad --daemon
lixa@ubuntu:~/lixa-0.5.36$ ps -ef|grep lixad|grep -v grep
lixa 23493 1 0 21:32 ? 00:00:00 /home/lixa/prod/sbin/lixad --daemon
lixa@ubuntu:~/lixa-0.5.36$ export PATH=$PATH:/home/lixa/prod/bin
lixa@ubuntu:~/lixa-0.5.36$ lixat
tx_open(): 0
tx_close(): 0
Installing LIXA using a non
root
account has some advantages:
there aren't post install steps to change the ownership of
etcandvardirectoriesyou can install the software without
rootprivileges
and some disadvantages:
the software is installed inside a home directory instead of a system path
there is no distinction between the administrative account that must manage the state (
var) and the configuration (etc) and the system account that must manage the software installation.
The LIXA client (lixac)
uses only one state server at a time, but different profiles can
use different state servers and you can statically balance the
workload.
We can not name it “workload balancing”, but this is
an effective way to manage large environments.
To configure many LIXA state servers you must put many
“sttsrv” tags in etc/lixac_conf.xml
as in the example below:
<sttsrvs>
<sttsrv name="local_1" domain="AF_INET" address="127.0.0.1" port="2345" />
<sttsrv name="local_2" domain="AF_INET" address="127.0.0.1" port="3456" />
</sttsrvs>
then you must specify different “sttsrv” tags in the profiles as in the example below:
<profile name="ORA_DYN_DB2_DYN">
<sttsrvs>
<sttsrv>local_1</sttsrv>
</sttsrvs>
<rsrmgrs>
<rsrmgr>OracleXE_dynreg</rsrmgr>
<rsrmgr>IBMDB2_dynreg</rsrmgr>
</rsrmgrs>
</profile>
<profile name="ORA_DYN_DB2_STA">
<sttsrvs>
<sttsrv>local_2</sttsrv>
</sttsrvs>
<rsrmgrs>
<rsrmgr>OracleXE_dynreg</rsrmgr>
<rsrmgr>IBMDB2_stareg</rsrmgr>
</rsrmgrs>
</profile>
If you were using LIXA software project in a mission critical environment, you should set-up an high availability configuration. If you take a look to Figure 3.1, “Typical LIXA topology” you will notice the lixad daemon is a single point of failure: if the system hosting lixad crashed, the Application Program could not perform distributed transaction processing due to the unavailability of lixad daemon.
To avoid the issues related to “single point of failure pathology” the suggested configuration is “Active/passive” as described in Wikipedia “High-availability cluster” page. You can use:
any cluster manager, for example Linux-HA Heartbeat
any shared disk technology like SAN (Storage Area Network), NAS (Network Attached Storage) or disk replication technology like DR:BD
lixad requires that the filesystem and the
block device support mmap(),
munmap() and msync() functions.
The faster the filesystem/block device you are using, the better the
lixad performance.
The easiest high-availability configuration uses:
a shared/mirrored disk containing the LIXA file tree (
/opt/lixaif you are using a default installation)a service dedicated IP address that must be activated on the host servicing LIXA
The following pictures show an high availability configuration in action:
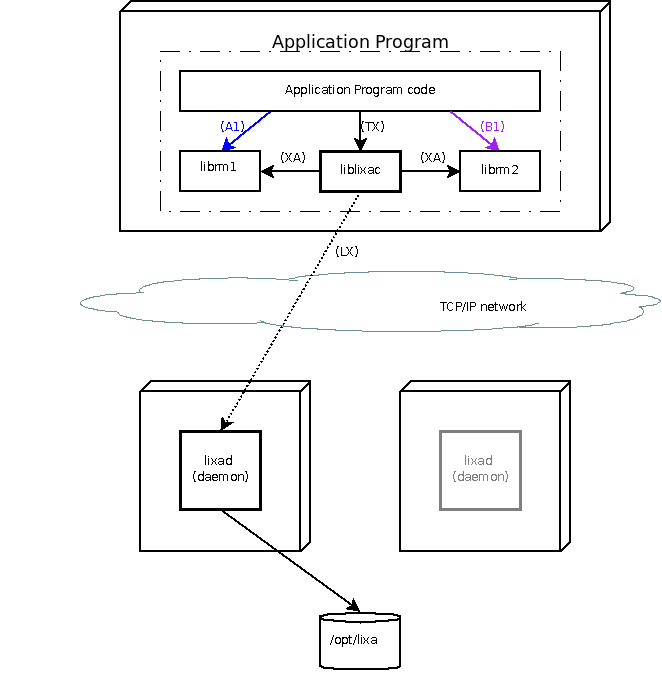
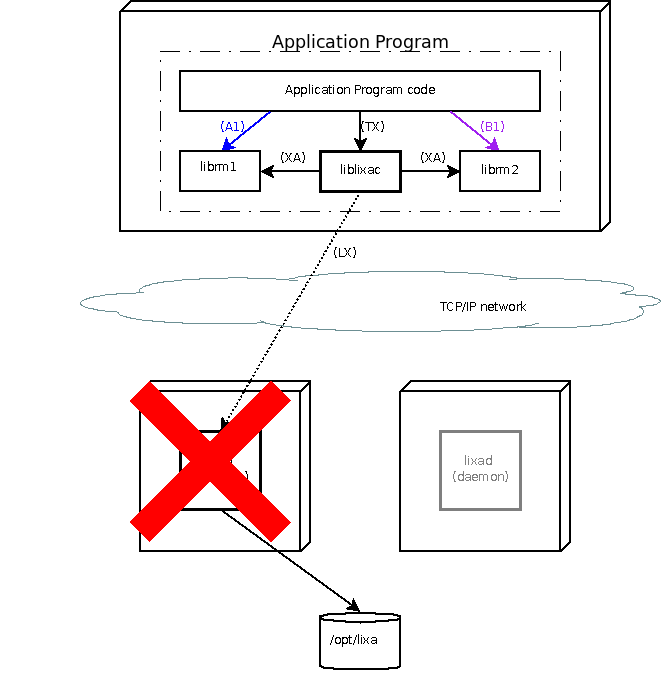
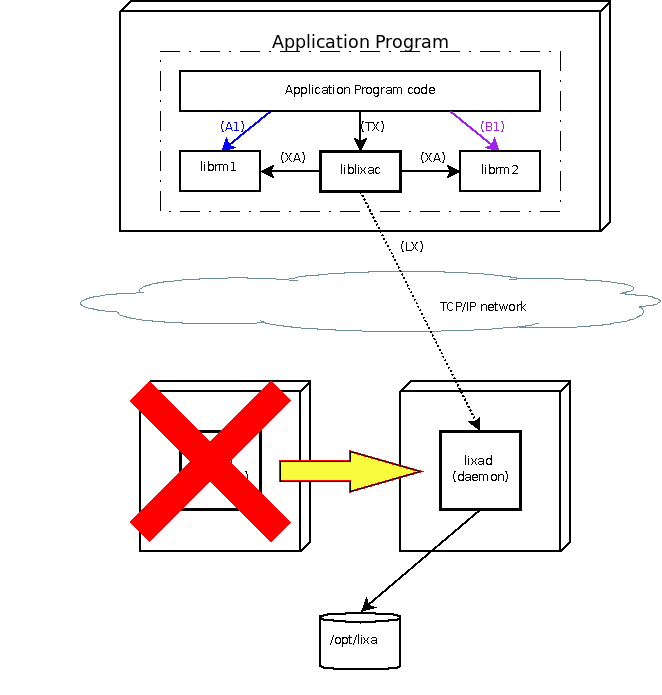
Note
If you put all the LIXA installation files
(/opt/lixa) in the shared disk you will not
be able to run LIXA utility program from the node that's not owning
the shared disk: this should not be an issue if your active/passive
cluster hosts only lixad.
If you were using a most complicated configuration, it might be
preferable to put only /opt/lixa/var and
/opt/lixa/etc in the shared disk. You could
implement such a configuration using symbolic links or customizing
the configure procedure with
--sysconfdir=DIR and
--localstatedir=DIR
options. Use ./configure --help
for more details.
lixavsr is a command line utility provided by LIXA project and dedicated to people interested in experimenting with the XA Specification.
The utility is a very stupid robot that can be programmed to execute a sequence of XA instructions. Here is a basic example of the type of experiments that can be performed:
0/xa_open("",0,TMNOFLAGS)/0
0/xa_start("231.a256cf41.ff45a3",0,TMNOFLAGS)/0
0/xa_end("231.a256cf41.ff45a3",0,TMSUCCESS)/0
0/xa_prepare("231.a256cf41.ff45a3",0,TMNOFLAGS)/0
0/xa_commit("231.a256cf41.ff45a3",0,TMNOFLAGS)/0
0/xa_start("231.a256cf41.ff45a3",0,TMNOFLAGS)/0
0/xa_end("231.a256cf41.ff45a3",0,TMSUCCESS)/0
0/xa_commit("231.a256cf41.ff45a3",0,TMONEPHASE)/0
0/xa_close("",0,TMNOFLAGS)/0
0/vsr_quit()/0
The robot is a driver that:
reads commands from a text file (see
doc/lixavsr.txtfor the syntax definition)activates, if necessary, new threads of control
sends every command to the prescribed thread of control
retrieves command return codes and check it with the desired ones
The command line options that are supported by lixavsr
can be retrieved with option
--help:
tiian@ubuntu1404-64:~/lixa$ /opt/lixa/bin/lixavsr --help
Usage:
lixavsr [OPTION...] - LIXA test utility
Help Options:
-h, --help Show help options
Application Options:
-f, --filename Name of the file with the actions that must be executed
-t, --threads Use threads instead of processes
-v, --version Print package info and exit
-s, --sleep Sleep 1 second before killing children at exit
Note
XA Specification introduces the concept of
thread of control but it does not prescribe how to
implement it: it's an abstract concept that applies to any generic
operating system. lixavsr enables you to implement
the abstract thread of control as a standard
POSIX process (default behavior) or as a standard POSIX thread
(using -t --threads command line
option).
Some Resource Managers can behave differently depending of the type of thread of control.
Some examples are provided inside directory
etc/lixavsr as shown below:
tiian@ubuntu1404-64:~/lixa$ ls -la etc/lixavsr/
total 132
drwxrwxr-x 2 tiian tiian 4096 mar 18 18:45 .
drwxr-xr-x 3 tiian tiian 4096 mar 18 18:39 ..
-rw-rw-r-- 1 tiian tiian 1051 mar 4 17:29 00_trivial.txt
-rw-rw-r-- 1 tiian tiian 799 mar 15 22:39 01_single_toc.txt
-rw-rw-r-- 1 tiian tiian 780 mar 15 22:08 02_single_toc.txt
-rw-rw-r-- 1 tiian tiian 1287 mar 15 22:09 03_double_toc.txt
-rw-rw-r-- 1 tiian tiian 1214 mar 15 22:13 04_double_toc.txt
-rw-rw-r-- 1 tiian tiian 2993 mar 15 22:14 10_suspend_resume.txt
-rw-rw-r-- 1 tiian tiian 2834 mar 15 22:14 11_end_join.txt
-rw-rw-r-- 1 tiian tiian 2921 mar 15 22:14 12_end_join.txt
-rw-rw-r-- 1 tiian tiian 1568 mar 15 22:15 13_end_join.txt
-rw-rw-r-- 1 tiian tiian 6767 mar 15 22:16 14_branch_ora.txt
-rw-rw-r-- 1 tiian tiian 6276 mar 15 23:34 15_branch_mys.txt
-rw-rw-r-- 1 tiian tiian 6280 mar 15 23:33 16_branch_pql.txt
-rw-rw-r-- 1 tiian tiian 7433 mar 15 23:33 17_branch_pql_ora.txt
-rw-rw-r-- 1 tiian tiian 5026 mar 15 23:32 18_branch_mys_pql.txt
-rw-rw-r-- 1 tiian tiian 5254 mar 15 23:32 19_branch_mys_ora.txt
-rw-rw-r-- 1 tiian tiian 14609 mar 18 18:45 Makefile
-rw-rw-r-- 1 tiian tiian 324 mar 18 18:45 Makefile.am
-rw-rw-r-- 1 tiian tiian 14519 mar 18 18:45 Makefile.in
-rw-rw-r-- 1 tiian tiian 283 mar 5 22:02 README
These files are not installed because they are a development tool, not a production tool: they are available only in the source tree.
Just as an example, here is a sample execution:
tiian@ubuntu1404-64:~/lixa$ export LIXA_PROFILE=PQL_STA
tiian@ubuntu1404-64:~/lixa$ /opt/lixa/bin/lixavsr -f etc/lixavsr/03_double_toc.txt
toc=0 xa_open("dbname=testdb",0,0x00000000)=0
toc=1 xa_open("dbname=testdb",0,0x00000000)=0
toc=0 xa_start("231.a256cf41.ff45a3",0,0x00000000)=0
toc=1 xa_start("231.a256cf42.ff45a4",0,0x00000000)=0
toc=0 xa_end("231.a256cf41.ff45a3",0,0x04000000)=0
toc=1 xa_end("231.a256cf42.ff45a4",0,0x04000000)=0
toc=0 xa_prepare("231.a256cf41.ff45a3",0,0x00000000)=0
toc=1 xa_prepare("231.a256cf42.ff45a4",0,0x00000000)=0
toc=0 xa_commit("231.a256cf41.ff45a3",0,0x00000000)=0
toc=1 xa_commit("231.a256cf42.ff45a4",0,0x00000000)=0
toc=0 xa_start("231.a256cf41.ff45a3",0,0x00000000)=0
toc=1 xa_start("231.a256cf42.ff45a4",0,0x00000000)=0
toc=0 xa_end("231.a256cf41.ff45a3",0,0x04000000)=0
toc=1 xa_end("231.a256cf42.ff45a4",0,0x04000000)=0
toc=0 xa_commit("231.a256cf41.ff45a3",0,0x40000000)=0
toc=1 xa_commit("231.a256cf42.ff45a4",0,0x40000000)=0
toc=0 xa_close("",0,0x00000000)=0
toc=1 xa_close("",0,0x00000000)=0
toc=0 exiting...
toc=1 exiting...
This chapter contains imformation useful to obtain the best performance of the LIXA state server (lixad) in your environment. As explained in the section called “Configuring the server” the server provide some configuration parameters that can be tuned.
There are basically two tuning paths:
number of server threads: the level of internal parallelism can be tuned according with the number of available CPUs
disk performance: several parameters are available to find the best trade off between performance and reliability
The two tuning paths are typically not fully independent: increasing the number of server threads increases the pressure to the disk(s) and vice versa.
The LIXA state server is a multi-threaded process with one network listener and many “managers”; every manager runs in a dedicated thread. Choosing the optimal number of threads requires some trials: following the “just work” concept the default configuration specifies 3 threads, but your installation might perform better using a different number (in the next paragraphs you can collect some hints).
Note
If you use the journal based state engine, lixad will start 3 different POSIX threads for every server thread; if you use the traditional state engine, lixad will start a single POSIX thread for every server thread.
Refer to the section called “Configuring the server” for information about how to specify the number of server threads.
To get the best IO performance, lixad provides 3 complementary strategies:
scattering IO through different disks: every server thread points its own set of state files, if your system provides independent disks, you can assign them to different server threads
choosing the state engine type: two state engines, traditional and journal based; the first has a proven track of reliability because it has been deployed in production environments since 2009 while the latter is a new engine released in 2020 and provides amazingly low latency
configuring the state engine: depending on the previous choice, different options are available to optimize the performance of the state engine
As explained in the section called “Configuring the server” every manager inside the LIXA state server uses a specific path for its status files. If you specify path associated to independent disks, you will obtain I/O independence for every the LIXA server thread.
The path specified can be a directory name (it must terminate with a slash) or the prefix of a file name. Different server threads must specify different paths.
Important
This approach provided benefits in the age of physical servers with RAID disk array controllers and spinning disks, but is no more actual for many storage configurations. In some configurations, like for example Microsoft Azure public cloud, the number of IOPS (Input Output Operations Per Second) depends on the type and the size of the virtual block device; the same applies to some enterprise storage system for on-premises datacenters. This optimization strategy is valuable only if many small disks support an higher number of IOPS in comparison with a single large disk.
Journal based state engine has been designed to provide a better alternative to the traditional state engine. From a performance point of view, the journal based state engine provides better results in most situations; nevertheless, due to the proven robustness, it's expected the usage of the traditional state engine will continue for some time, especially when high performance is not a must.
Independently from the chosen state engine, some common concept requires understanding to operate an aware choice.
First of all, the LIXA state server does not persist the data used by the Application Program, it only persists the state of the transactions. In the event that the state of a transaction is not preserved, you don't miss the data, but the state of the transaction that was manipulating the data. The direct consequence of the previous statement is that: in the worst case, if LIXA state server miss the state of the transaction, you have to rollback or commit the transaction manually. This is obviously not a situation you want to frequently have in your normal operations and this is why LIXA state server provides the highest level of resiliency.
If you want to be 100% sure you don't miss the state of the transaction, you must be 100% sure that the state of the transaction has been recorded in a durable way, typically in some storage device. Writing storage, even the fastest storage, is still a quite slow operation in comparison with other communication and computing operations. Very high performance storage can provide write latency below 1ms, but in a typical production environment, having 5ms write latency to the storage subsystem can be considered a good scenario. Incredibly enough, 5ms are a huge time for contemporary computing and contemporary networking.
To make a long story short, this is a typical trade-off between speed and safety: the faster you go, the less safe you can be. In a real case scenario, 100% safety is unlikely to be the best choice: it's capped by the technology limits and it risks to unnecessarily slow down your whole system.
The good news is that the LIXA state engines, both journal and traditional, provide parameters to tune the behavior.
The journal state engine provides two levels of resilience with two different Recovery Point Objectives depending on the type of crash encountered by the LIXA state server.
A soft crash is a crash that happens to the LIXA state server process (lixad), but it does not break the operating system. Common examples are:
killing lixad
lixad crashes due to some unexpected reason
In the event of a soft crash, the restart usually happens from the last active state table file without any data miss. As a consequence, when restart from the last active state table succeeds, the RPO is zero and there's no transaction state missing.
A hard crash is a crash related to the operating system or a damage to state table files. Common examples are:
operating system / hypervisor crashes
hardware failure
disk content corruption
In the event of a hard crash, the restart happens from the last consistent active state table file plus all the available consistent state log records.
Due to different strategies of log flushing, the corresponding RPO can be greater than zero.
The parameter fixes the minimum delay between the need of a transaction state flushing and the start of the I/O operation:
a low value slows down the lixad server due to frequent asking for log flushing
a value greater than zero increases the RPO for hard crash by the same amount
to have a guaranteed RPO=0 in the event of hard crash, this parameter must be set to zero
The parameter fixes the maximum delay between the need of a transaction state flushing and the start of the I/O operation:
a low value slows down the lixad server due to frequent asking for log flushing
a value greater than zero increases the RPO for hard crash by the same amount
to have a guaranteed RPO=0 in the event of hard crash, this parameter must be set to zero
The parameter must be greater or equal to
min_elapsed_sync_time: if both are set to
value zero, state log file is flushed as soon as a transaction needs
to persist a new state.
The parameter specifies the desired amount of disk space that must be used of every state log file. A state log file can be switched only when the previous state table synchronization has been completed. In presence of disks with high latency and high throughput, a larger value can be helpful to obtain better performances.
Important
Too large logs can produce adverse performances during state server restart in a couple of situations:
option
log_o_direct="1"(O_DIRECT) is usedthe state server restart follows a system reboot
In both cases, Linux operating system has not cached the log file page and all the reading must be done by the storage devices. As a rule of thumb, don't allocate a large log if there's no a valid performance benefit, during normal activity, in doing it.
The parameter has no direct impact on RPO.
The parameter specifies the quantity of RAM used as buffer for log writing: under some circumstances, higher values can improve performances.
The parameter has no direct impact on RPO.
The parameters specify the corresponding flags that must be used for
writing the state log files; as a general rule,
log_o_direct="1" (O_DIRECT) is faster than
log_o_dsync="1" (O_DSYNC) and
log_o_dsync="1" (O_DSYNC) is faster than
log_o_sync="1" (O_SYNC).
Important
To be precise, only log_o_sync=1 in
association with
min_elapsed_sync_time="0" and
max_elapsed_sync_time="0" guarantees RPO=0
in the event of hard crash for every hardware
configuration, but such configuration limitates the performance of
the LIXA state server and introduce additional latency.
In real life scenarios, depending on the characteristics of the storage subsystem, less restrictive options can be reasonably used. The best configuration requires investigation on the specific hardware configuration. The configuration provided by default can be considered a starting point to adjust according to the user's needs.
Note
Parameters log_o_* can be uses together, for
example you can specify both log_o_direct="1"
and log_o_dsync="1" to combine the effects of
O_DIRECT and O_DSYNC flags for log I/O.
The traditional state engine provides a single level of resilience and no difference among types of crash encountered by the LIXA state server.
Only two parameters can be configured:
min_elapsed_sync_time and
max_elapsed_sync_time while the others are
ignored.
The parameter fixes the minimum delay between the need of a transaction state flushing and the start of the memory map sync operation:
a low value slows down the lixad server due to frequent asking for map syncing
a value greater than zero increases the RPO by the same amount
to have a guaranteed RPO=0 this parameter must be set to zero
The parameter fixes the maximum delay between the need of a transaction state flushing and the start of the memory map sync:
a low value slows down the lixad server due to frequent asking for map syncing
a value greater than zero increases the RPO by the same amount
to have a guaranteed RPO=0 this parameter must be set to zero
The parameter must be greater or equal to
min_elapsed_sync_time: if both are set to
value zero, memory map is synchronized as soon as a transaction needs
to persist a new state.
The higher the value of RPO, the higher the chance you will have to perform manual recovery in the case of a server crash (manual recovery is explained in the section called “Manual (cold) recovery”).
On the other hand, don't force RPO=0 if you don't have clear evidence that you need it: depending on your business requirements and your hardware configuration, especially if you use the journal based state engine, the need for RPO=0 might be not necessary. LIXA web site contains detailed performance analysis of a couple of possible deployment models: refers to the following links to figure out how the performances are influenced by the configuration parameters.
The first architecture applies to traditional environments with monolithic applications distributed in different tiers: the Application Program and the LIXA state server run in different virtual machines. The figures show that the highest the RPO, the lowest the total latency introduced by LIXA in managing distributed transactions.
The second architecture applies to microservices environments with a sidecar approach, typical of Kubernetes deployments: the Application Program and the LIXA state server run in the same virtual machine (and in the same pod in a Kubernetes configuration). Even for this type of architecture the figures show that the highest the RPO, the lowest the total latency introduced by LIXA in managing distributed transactions. Furtherly, this second type of architecture exhibits a lower latency than the first type.
LIXA configuration parameters allow fine tuning of the state engine; in a real life environment, apply the following guidelines:
use default configuration for traditional state engine, if you want to be conservative, or journal based state engine, if you want to be innovative
choose the proper deployment architecture: "client/server" or "colocated" depending on your application architecture
in the event of scalability issues, you need to manager a huge number of Transactions per Second, split the workload in several LIXA state servers that work indipendently
in the event of latency issues, you need a very low latency, understand if an higher RPO fits your requirements; if no, split the workload in several LIXA state servers that work indipendently: the figures show that the latency is strictly correlated with the number of Transactions per Second managed by the state server
if you use the journal based state engine, monitor syslog messages: the engine generates useful messages if the storage configuration is not optimized
This chapter documents some errors that can happen in LIXA environments.
If your Application Program starts many short transactions, you can exhaust the number of ephemeral ports that can be used to create TCP/IP connections.
A typicaly simptom is tx_open() returning error
code -7.
To inspect it a little more, you can activate the tracing using
LIXA_TRACE_MASK=0x4000. Here is the typical error you can catch in the
trace:
2020-06-16 20:19:29.922380 [5786/139620897502976] client_connect/excp=2/ret_cod=-138/errno=99
where "ret_cod=-138" is associated to connect()
Linux function and "errno=99" means "EADDRNOTAVAIL".
The number of sockets in TIME_WAIT state can be checked with:
$ netstat -unta | grep TIME_WAIT | wc -l 14018
To workaround this issue, you can tell the Linux kernel to reuse sockets in TIME_WAIT state adding the following row
net.ipv4.tcp_tw_reuse=1
to file /etc/sysctl.conf
Important
Telling the Linux kernel to reuse sockets in TIME_WAIT state is not without consequences: please read the related documentation and use it at your own risk.
Books
[RefModel] Copyright © 1996 X/Open Company Limited. 1-85912-170-5. X/Open Company Ltd., U.K.. Distributed Transaction Processing: Reference Model, Version 3 .
[TXspec] Copyright © 1995 X/Open Company Limited. 1-85912-094-6. X/Open Company Ltd., U.K.. Distributed TP: The TX (Transaction Demarcation) Specification .
[XAspec] Copyright © 1991 X/Open Company Limited. 1-872630-24-3. X/Open Company Ltd., U.K.. Distributed TP: The XA Specification .
[XA+spec] Copyright © 1994 X/Open Company Limited. 1-85912-046-6. X/Open Company Ltd., U.K.. Distributed TP: The XA+ Specification Version 2 .
This book contains many examples related to LIXA usage, most of them require a proper configuration for the Resource Managers that must participate in the distributed transactions proposed by the examples. This appendix contains the required configurations and step by step explanation to help the set-up.
Note
The same configurations necessary to execute the examples, are used even by the test cases provided by LIXA.
Note
This appendix does not provide information related to the standard installation and configuration operations necessary for run a specific Resource Manager: only LIXA related configurations are explained.
The following diagram represents a simplified vision of the components
necessary to run an example program (example8_mys
in the picture) that uses MySQL as an XA Resource Manager.
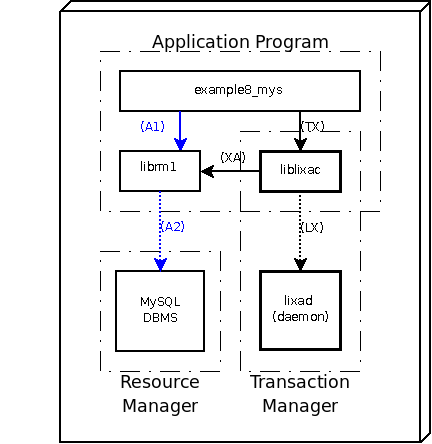
This section has been developed using MySQL 5.5.54 (or upper) and MariaDB 5.5.52 for Linux. Here is a brief list of the tested versions for Ubuntu 12.04, 14.04, 16.04, 18.04 and CentOS/RHEL 7.3, CentOS 8 and the installed packages:
tiian@ubuntu1204-64:~$ dpkg -l | grep -i mysql
ii libdbd-mysql-perl 4.020-1ubuntu0.1 Perl5 database interface to the MySQL database
ii libmysqlclient-dev 5.5.54-0ubuntu0.12.04.1 MySQL database development files
ii libmysqlclient18 5.5.54-0ubuntu0.12.04.1 MySQL database client library
ii mysql-client-5.5 5.5.54-0ubuntu0.12.04.1 MySQL database client binaries
ii mysql-client-core-5.5 5.5.54-0ubuntu0.12.04.1 MySQL database core client binaries
ii mysql-common 5.5.54-0ubuntu0.12.04.1 MySQL database common files, e.g. /etc/mysql/my.cnf
ii mysql-server 5.5.54-0ubuntu0.12.04.1 MySQL database server (metapackage depending on the latest version)
ii mysql-server-5.5 5.5.54-0ubuntu0.12.04.1 MySQL database server binaries and system database setup
ii mysql-server-core-5.5 5.5.54-0ubuntu0.12.04.1 MySQL database server binaries
tiian@ubuntu1404-64:~$ dpkg -l | grep -i mysql
ii libdbd-mysql-perl 4.025-1ubuntu0.1 amd64 Perl5 database interface to the MySQL database
ii libmysqlclient-dev 5.5.54-0ubuntu0.14.04.1 amd64 MySQL database development files
ii libmysqlclient18:amd64 5.5.54-0ubuntu0.14.04.1 amd64 MySQL database client library
ii mysql-client-5.5 5.5.54-0ubuntu0.14.04.1 amd64 MySQL database client binaries
ii mysql-client-core-5.5 5.5.54-0ubuntu0.14.04.1 amd64 MySQL database core client binaries
ii mysql-common 5.5.54-0ubuntu0.14.04.1 all MySQL database common files, e.g. /etc/mysql/my.cnf
ii mysql-server 5.5.54-0ubuntu0.14.04.1 all MySQL database server (metapackage depending on the latest version)
ii mysql-server-5.5 5.5.54-0ubuntu0.14.04.1 amd64 MySQL database server binaries and system database setup
ii mysql-server-core-5.5 5.5.54-0ubuntu0.14.04.1 amd64 MySQL database server binaries
tiian@ubuntu1604:~$ dpkg -l | grep -i mysql
ii libmysqlclient-dev 5.7.17-0ubuntu0.16.04.1 amd64 MySQL database development files
ii libmysqlclient20:amd64 5.7.17-0ubuntu0.16.04.1 amd64 MySQL database client library
ii mysql-client-5.7 5.7.17-0ubuntu0.16.04.1 amd64 MySQL database client binaries
ii mysql-client-core-5.7 5.7.17-0ubuntu0.16.04.1 amd64 MySQL database core client binaries
ii mysql-common 5.7.17-0ubuntu0.16.04.1 all MySQL database common files, e.g. /etc/mysql/my.cnf
ii mysql-server 5.7.17-0ubuntu0.16.04.1 all MySQL database server (metapackage depending on the latest version)
ii mysql-server-5.7 5.7.17-0ubuntu0.16.04.1 amd64 MySQL database server binaries and system database setup
ii mysql-server-core-5.7 5.7.17-0ubuntu0.16.04.1 amd64 MySQL database server binaries
Last login: Sat May 12 17:29:32 2018 from 192.168.122.1
tiian@ubuntu1804:~$ dpkg -l | grep -i mysql
ii libmysqlclient-dev 5.7.22-0ubuntu18.04.1 amd64 MySQL database development files
ii libmysqlclient20:amd64 5.7.22-0ubuntu18.04.1 amd64 MySQL database client library
ii mysql-client-5.7 5.7.22-0ubuntu18.04.1 amd64 MySQL database client binaries
ii mysql-client-core-5.7 5.7.22-0ubuntu18.04.1 amd64 MySQL database core client binaries
ii mysql-common 5.8+1.0.4 all MySQL database common files, e.g. /etc/mysql/my.cnf
ii mysql-server 5.7.22-0ubuntu18.04.1 all MySQL database server (metapackage depending on the latest version)
ii mysql-server-5.7 5.7.22-0ubuntu18.04.1 amd64 MySQL database server binaries and system database setup
ii mysql-server-core-5.7 5.7.22-0ubuntu18.04.1 amd64 MySQL database server binaries
[tiian@centos71-64 ~]$ rpm -qa | grep -i maria
mariadb-5.5.52-1.el7.x86_64
mariadb-server-5.5.52-1.el7.x86_64
mariadb-libs-5.5.52-1.el7.x86_64
mariadb-devel-5.5.52-1.el7.x86_64
[tiian@rhel73 ~]$ rpm -qa | grep -i maria
mariadb-devel-5.5.52-1.el7.x86_64
mariadb-5.5.52-1.el7.x86_64
mariadb-server-5.5.52-1.el7.x86_64
mariadb-libs-5.5.52-1.el7.x86_64
[tiian@centos8 tmp]$ rpm -qa | grep -i maria
mariadb-gssapi-server-10.3.17-1.module_el8.1.0+257+48736ea6.x86_64
mariadb-connector-c-3.0.7-1.el8.x86_64
mariadb-10.3.17-1.module_el8.1.0+257+48736ea6.x86_64
mariadb-common-10.3.17-1.module_el8.1.0+257+48736ea6.x86_64
mariadb-errmsg-10.3.17-1.module_el8.1.0+257+48736ea6.x86_64
mariadb-server-10.3.17-1.module_el8.1.0+257+48736ea6.x86_64
mariadb-connector-c-config-3.0.7-1.el8.noarch
mariadb-server-utils-10.3.17-1.module_el8.1.0+257+48736ea6.x86_64
mariadb-devel-10.3.17-1.module_el8.1.0+257+48736ea6.x86_64
mariadb-connector-c-devel-3.0.7-1.el8.x86_64
mariadb-backup-10.3.17-1.module_el8.1.0+257+48736ea6.x86_64
mariadb-java-client-2.2.5-2.el8.noarch
If you were using a different version you would need to adapt some commands to your environment.
Note
If you did not yet installed the software, please refer to the official site for your Linux distribution or to the official site of MySQL/MariaDB if your operating system does not distribute the software or you want to use a different MySQL/MariaDB version. This manual does not give you information related to MySQL/MariaDB: it is assumed that you have already installed and configured the database.
Note
This example requires you are running the database and the application on the same host: this is not a technical limitation, but a way to make it easy. Client/server configuration must work as well, but it needs some MySQL/MariaDB extra configuration: please refer to the database documentation.
Important
The LIXA software must be configured to support the MySQL/MariaDB server resource manager as explained in the section called “Linking third party resource managers”.
If your server didn't start-up automatically at boot time, you could start it with the following commands for Ubuntu:
| [Shell terminal session] |
tiian@ubuntu1204-64:/tmp$ sudo service mysql start mysql start/running, process 1607 tiian@ubuntu1204-64:/tmp$ sudo service mysql status mysql start/running, process 1607 tiian@ubuntu1204-64:/tmp$ ps -ef|grep mysql|grep -v grep mysql 1607 1 0 22:43 ? 00:00:00 /usr/sbin/mysqld |
or the following commands for CentOS:
| [Shell terminal session] |
[tiian@centos8 tmp]$ sudo systemctl start mariadb
[tiian@centos8 tmp]$ sudo systemctl status mariadb
● mariadb.service - MariaDB 10.3 database server
Loaded: loaded (/usr/lib/systemd/system/mariadb.service; enabled; vendor preset: disabled)
Active: active (running) since Sun 2020-10-11 15:08:59 CEST; 57s ago
Docs: man:mysqld(8)
https://mariadb.com/kb/en/library/systemd/
Process: 2013 ExecStartPost=/usr/libexec/mysql-check-upgrade (code=exited, status=0/SUCCESS)
Process: 1944 ExecStartPre=/usr/libexec/mysql-prepare-db-dir mariadb.service (code=exited, status=0/SUCCESS)
Process: 1919 ExecStartPre=/usr/libexec/mysql-check-socket (code=exited, status=0/SUCCESS)
Main PID: 1982 (mysqld)
Status: "Taking your SQL requests now..."
Tasks: 30 (limit: 11477)
Memory: 73.1M
CGroup: /system.slice/mariadb.service
└─1982 /usr/libexec/mysqld --basedir=/usr
Oct 11 15:08:58 centos8 systemd[1]: Starting MariaDB 10.3 database server...
Oct 11 15:08:59 centos8 mysql-prepare-db-dir[1944]: Database MariaDB is probably initialized in /var/lib/mysql already, nothing is done.
Oct 11 15:08:59 centos8 mysql-prepare-db-dir[1944]: If this is not the case, make sure the /var/lib/mysql is empty before running mysql-prepare-db-dir.
Oct 11 15:08:59 centos8 mysqld[1982]: 2020-10-11 15:08:59 0 [Note] /usr/libexec/mysqld (mysqld 10.3.17-MariaDB) starting as process 1982 ...
Oct 11 15:08:59 centos8 systemd[1]: Started MariaDB 10.3 database server.
[tiian@centos8 tmp]$ ps -ef | grep mysql|grep -v grep
mysql 1982 1 1 15:08 ? 00:00:00 /usr/libexec/mysqld --basedir=/usr
|
Create a new user authorization and a new database [57]:
| [Shell terminal session] |
tiian@ubuntu1204-64:/tmp$ mysql -u root -p Enter password: Welcome to the MySQL monitor. Commands end with ; or \g. Your MySQL connection id is 36 Server version: 5.5.54-0ubuntu0.12.04.1 (Ubuntu) Copyright (c) 2000, 2016, Oracle and/or its affiliates. All rights reserved. Oracle is a registered trademark of Oracle Corporation and/or its affiliates. Other names may be trademarks of their respective owners. Type 'help;' or '\h' for help. Type '\c' to clear the current input statement. mysql> GRANT ALL ON lixa.* TO 'lixa'@'localhost'; Query OK, 0 rows affected (0.00 sec) mysql> CREATE DATABASE lixa; Query OK, 1 row affected (0.00 sec) mysql> quit Bye |
On newest systems like for example Ubuntu 18.04, Ubuntu 20.04 and CentOS 8, the following commands can be used instead of the previous ones that don't work anymore:
| [Shell terminal session] |
tiian@ubuntu1804:~$ sudo mysql -u root [sudo] password for tiian: Welcome to the MySQL monitor. Commands end with ; or \g. Your MySQL connection id is 2 Server version: 5.7.22-0ubuntu18.04.1 (Ubuntu) Copyright (c) 2000, 2018, Oracle and/or its affiliates. All rights reserved. Oracle is a registered trademark of Oracle Corporation and/or its affiliates. Other names may be trademarks of their respective owners. Type 'help;' or '\h' for help. Type '\c' to clear the current input statement. mysql> CREATE USER 'lixa'@'localhost'; Query OK, 0 rows affected (0.02 sec) mysql> GRANT ALL ON lixa.* TO 'lixa'@'localhost'; Query OK, 0 rows affected (0.00 sec) mysql> CREATE DATABASE lixa; Query OK, 1 row affected (0.00 sec) mysql> quit Bye |
Note
MySQL 8.0 requires an additional privilege to perform XA RECOVER (SQL) statement as described here:
| [Shell terminal session] |
tiian@ubuntu2004:~$ sudo mysql -u root [sudo] password for tiian: Welcome to the MySQL monitor. Commands end with ; or \g. Your MySQL connection id is 14 Server version: 8.0.21-0ubuntu0.20.04.4 (Ubuntu) Copyright (c) 2000, 2020, Oracle and/or its affiliates. All rights reserved. Oracle is a registered trademark of Oracle Corporation and/or its affiliates. Other names may be trademarks of their respective owners. Type 'help;' or '\h' for help. Type '\c' to clear the current input statement. mysql> GRANT XA_RECOVER_ADMIN ON *.* TO 'lixa'@'localhost'; Query OK, 0 rows affected (0.07 sec) mysql> FLUSH PRIVILEGES; Query OK, 0 rows affected (0.04 sec) mysql> quit Bye |
The lixa@localhost user
has been created with all privileges on the “lixa”
database. Now a sample table must be created using this new user:
| [Shell terminal session] |
tiian@ubuntu1204-64:/tmp$ mysql -h localhost -u lixa lixa Reading table information for completion of table and column names You can turn off this feature to get a quicker startup with -A Welcome to the MySQL monitor. Commands end with ; or \g. Your MySQL connection id is 37 Server version: 5.5.54-0ubuntu0.12.04.1 (Ubuntu) Copyright (c) 2000, 2016, Oracle and/or its affiliates. All rights reserved. Oracle is a registered trademark of Oracle Corporation and/or its affiliates. Other names may be trademarks of their respective owners. Type 'help;' or '\h' for help. Type '\c' to clear the current input statement. mysql> SELECT DATABASE(); +------------+ | DATABASE() | +------------+ | lixa | +------------+ 1 row in set (0.01 sec) mysql> CREATE TABLE authors (id INTEGER NOT NULL PRIMARY KEY, last_name TEXT, first_name TEXT) ENGINE=InnoDB; Query OK, 0 rows affected (0.02 sec) mysql> DESCRIBE authors; +------------+---------+------+-----+---------+-------+ | Field | Type | Null | Key | Default | Extra | +------------+---------+------+-----+---------+-------+ | id | int(11) | NO | PRI | NULL | | | last_name | text | YES | | NULL | | | first_name | text | YES | | NULL | | +------------+---------+------+-----+---------+-------+ 3 rows in set (0.00 sec) mysql> SELECT * FROM authors; Empty set (0.00 sec) |
OK, the “authors” table was created using the “InnoDB” engine. If something went wrong, you should refer to MySQL documentation to fix the issue before the next step because you would not be able to execute the sample program without a basic running installation.
The following picture shows the overall architecture from the logical point of view.
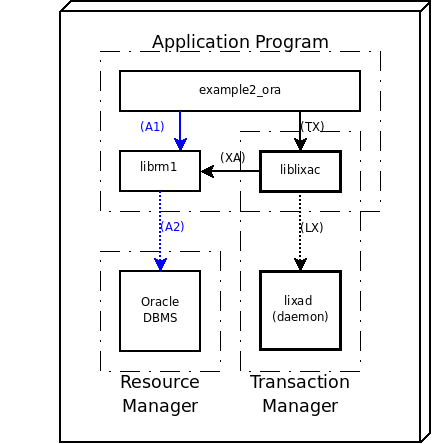
The configurations explained in this section was developed using different software versions:
Oracle Database 10g Release 2 and 11g Release 2 Express Edition using a local connection
Oracle Database 12c Release 1 (12.1) Standard Edition using a remote (SqlNet) connection
If you use a different configuration, you will need to fix some of the details shown by these examples.
Note
If you have not yet installed the software provided by Oracle, please refer to the official Oracle site to download the software and to pick-up the information necessary to install and configure the database. This manual does not give you information related to Oracle technology: it is assumed that you have already installed and configured the database.
Important
The LIXA software must be configured, compiled and installed to support the Oracle Database Server resource manager as explained in the section called “Linking third party resource managers”.
The following example is based on Oracle XE 10.2 and 11.2, but there shouldn't be too much differences with other Oracle versions.
If the database server was not running, you can start it with these commands
tiian@ubuntu:~/tmp$ sudo /etc/init.d/oracle-xe enable tiian@ubuntu:~/tmp$ sudo /etc/init.d/oracle-xe start Starting Oracle Net Listener. Starting Oracle Database 10g Express Edition Instance.
on some systems, like Ubuntu 10.04, you use somethig like this:
tiian@ubuntu:~/tmp$ sudo service oracle-xe enable tiian@ubuntu:~/tmp$ sudo service oracle-xe start Starting Oracle Net Listener. Starting Oracle Database 11g Express Edition Instance.
First of all you must be able to connect as “SYSDBA”
from a terminal session; the commands below show what happens when
I connect to the Oracle server using the user
sys with password
“oracle”
[58]
[59]:
tiian@ubuntu:~$ sudo su - oracle oracle@ubuntu:~$ echo $ORACLE_HOME /usr/lib/oracle/xe/app/oracle/product/10.2.0/server oracle@ubuntu:~$ sqlplus "sys/oracle as sysdba" SQL*Plus: Release 10.2.0.1.0 - Production on Thu Apr 7 22:23:56 2011 Copyright (c) 1982, 2005, Oracle. All rights reserved. Connected to: Oracle Database 10g Express Edition Release 10.2.0.1.0 - Production SQL> exit Disconnected from Oracle Database 10g Express Edition Release 10.2.0.1.0 - Production
You must check the file xaview.sql:
oracle@ubuntu:~$ ls -la $ORACLE_HOME/rdbms/admin/xaview.sql -rw-r--r-- 1 oracle dba 1754 2006-02-24 06:18 /usr/lib/oracle/xe/app/oracle/product/10.2.0/server/rdbms/admin/xaview.sql
It contains the SQL instructions necessary to create two specific system views that could be not defined in your database; the following commands are related to a database that contains the desired views:
oracle@ubuntu:~$ sqlplus "sys/oracle as sysdba" SQL*Plus: Release 10.2.0.1.0 - Production on Thu Apr 7 22:32:45 2011 Copyright (c) 1982, 2005, Oracle. All rights reserved. Connected to: Oracle Database 10g Express Edition Release 10.2.0.1.0 - Production SQL> select * from v$pending_xatrans$; no rows selected SQL> select * from v$xatrans$; no rows selected SQL> exit Disconnected from Oracle Database 10g Express Edition Release 10.2.0.1.0 - Production
If the command failed the views would be not defined and you would get something like this:
oracle@ubuntu:~$ sqlplus "sys/oracle as sysdba"
SQL*Plus: Release 10.2.0.1.0 - Production on Fri Apr 29 22:20:01 2011
Copyright (c) 1982, 2005, Oracle. All rights reserved.
Connected to:
Oracle Database 10g Express Edition Release 10.2.0.1.0 - Production
SQL> select * from v$pending_xatrans$;
select * from v$pending_xatrans$
*
ERROR at line 1:
ORA-00942: table or view does not exist
SQL> select * from v$xatrans$;
select * from v$xatrans$
*
ERROR at line 1:
ORA-00942: table or view does not exist
SQL> exit
Disconnected from Oracle Database 10g Express Edition Release 10.2.0.1.0 - Production
you can create them with a command like this:
oracle@ubuntu:~$ cat $ORACLE_HOME/rdbms/admin/xaview.sql | sqlplus "sys/oracle as sysdba" SQL*Plus: Release 10.2.0.1.0 - Production on Fri Apr 29 22:25:48 2011 Copyright (c) 1982, 2005, Oracle. All rights reserved. Connected to: Oracle Database 10g Express Edition Release 10.2.0.1.0 - Production SQL> SQL> SQL> SQL> SQL> SQL> SQL> SQL> SQL> SQL> SQL> SQL> SQL> SQL> SQL> SQL> SQL> SQL> SQL> SQL> SQL> SQL> SQL> SQL> SQL> SQL> SQL> SQL> SQL> DROP VIEW v$xatrans$ * ERROR at line 1: ORA-00942: table or view does not exist SQL> DROP VIEW v$pending_xatrans$ * ERROR at line 1: ORA-00942: table or view does not exist SQL> SQL> SQL> 2 3 4 5 6 7 8 View created. SQL> SQL> SQL> SQL> 2 3 4 5 6 7 8 9 10 11 View created. SQL> SQL> SQL> Disconnected from Oracle Database 10g Express Edition Release 10.2.0.1.0 - Production
The example programs supplied by the LIXA project are designed
to use the
hr user; you
must grant
the necessary privileges to all the users you want to use for
your Application Programs. The below commands show how to grant
the necessary privileges to
hr:
oracle@ubuntu:~$ sqlplus "sys/oracle as sysdba" SQL*Plus: Release 10.2.0.1.0 - Production on Thu Apr 7 22:44:44 2011 Copyright (c) 1982, 2005, Oracle. All rights reserved. Connected to: Oracle Database 10g Express Edition Release 10.2.0.1.0 - Production SQL> grant select on dba_pending_transactions to hr; Grant succeeded. SQL> grant select on v$pending_xatrans$ to hr; Grant succeeded. SQL> grant select on v$xatrans$ to hr; Grant succeeded. SQL> exit Disconnected from Oracle Database 10g Express Edition Release 10.2.0.1.0 - Production
Note
If the user
hr did not exist and
the above commands failed,
you should read Oracle documentation and pick-up the necessary
information to create it.
The example programs supplied by the LIXA project are designed
to use the
hr user; it might be
locked after Oracle software installation.
The below commands show how to unlock it:
oracle@ubuntu:~$ sqlplus "sys/oracle as sysdba" SQL*Plus: Release 10.2.0.1.0 - Production on Thu Apr 7 22:44:44 2011 Copyright (c) 1982, 2005, Oracle. All rights reserved. Connected to: Oracle Database 10g Express Edition Release 10.2.0.1.0 - Production SQL> ALTER USER hr ACCOUNT UNLOCK; User altered. SQL> ALTER USER hr IDENTIFIED BY hr; User altered. SQL> exit Disconnected from Oracle Database 10g Express Edition Release 10.2.0.1.0 - Production
You may perform the same operation using the graphical (web based) interface.
Note
Newer Oracle database versions set a default password limit: after such a limit, Oracle will start to issue ORA-28002 messages and XA functions will return with an error like below:
215229.2063.1888967424.1: ORA-28002: the password will expire within 6 days 215229.2063.1888967424.1: xaolgn: XAER_RMERR; logon failed. ORA-28002. 215229.2063.1888967424.1: xaoopen: return -3
To avoid this potential error, configure your users in the right way.
Execute the below commands to check the existence of table
countries and to create a new table with
name authors:
tiian@ubuntu:~$ sqlplus "hr/hr"[60] SQL*Plus: Release 10.2.0.1.0 - Production on Thu Apr 14 22:04:55 2011 Copyright (c) 1982, 2005, Oracle. All rights reserved. Connected to: Oracle Database 10g Express Edition Release 10.2.0.1.0 - Production SQL> select * from COUNTRIES where COUNTRY_ID = 'RS'; no rows selected SQL> CREATE TABLE hr.authors ( 2 id INTEGER NOT NULL UNIQUE, 3 last_name VARCHAR2(20), 4 first_name VARCHAR2(20)); Table created. SQL> exit Disconnected from Oracle Database 10g Express Edition Release 10.2.0.1.0 - Production
That's OK because the table does not contain the row we are going to insert.
If you experience this type of error: “ ORA-02049: time-out: distributed transaction waiting for lock ”, especially after a JDBC thin client used by XTA for Java crashed, you can change the system parameter to reduce the number of caught exceptions:
[oracle@centos7-oracle12 ~]$ sqlplus "sys/oracle as sysdba" SQL*Plus: Release 12.1.0.2.0 Production on Wed Dec 19 16:41:54 2018 Copyright (c) 1982, 2014, Oracle. All rights reserved. Connected to: Oracle Database 12c Standard Edition Release 12.1.0.2.0 - 64bit Production SQL> SELECT name,value FROM v$parameter where NAME='distributed_lock_timeout' ; NAME -------------------------------------------------------------------------------- VALUE -------------------------------------------------------------------------------- distributed_lock_timeout 60 SQL> ALTER SYSTEM SET distributed_lock_timeout=120 scope=spfile; System altered. SQL> commit; Commit complete.
The database instance must be restarted to activate the new value.
Warning
The parameter has system wide scope: please check official documentation and/or contact support before proceding.
Note
This example has been tested using Ubuntu Server LTS 14.04 and Oracle Instant Client 12.1
Using a remote configuration instead of a local configuration introduces two differences:
the Oracle Database Server must be configured to be accessible from another system: a listener must be configured
the Oracle Instant Client software must be installed and configured in the system that will connect to the database
The first part of the Oracle Database Server is pretty the same described in the section called “Local configuration (Server) and OCI”. All the statements remain valid for Oracle 12c Standard Edition with the exception of the paths. Here's a default path installation example:
[oracle@centos7-oracle12 ~]$ ls -la $ORACLE_HOME/rdbms/admin/xaview.sql -rw-r--r--. 1 oracle oinstall 1941 Apr 21 2011 /u01/app/oracle/product/12.1.0/dbhome_1/rdbms/admin/xaview.sql
Warning
Many recent Linux distributions, CentOS 7.x for example, automatically enable an internal firewall to prevent undesired accesses. If your firewall configuration does not allow Oracle traffic, you have no way to reach your database instance from a different system.
Here's a very basic example that accepts incoming connection from any network interface (IP address 0.0.0.0):
[oracle@centos7-oracle12 ~]$ cat $ORACLE_HOME/network/admin/listener.ora
LISTENER =
(DESCRIPTION_LIST =
(DESCRIPTION =
(ADDRESS = (PROTOCOL = TCP)(HOST = 0.0.0.0)(PORT = 1521))
(ADDRESS = (PROTOCOL = IPC)(KEY = EXTPROC1521))
)
)
You can check that the listener is accepting connection with this command:
[oracle@centos7-oracle12 ~]$ netstat -unta | grep 1521 | grep LISTEN tcp 0 0 0.0.0.0:1521 0.0.0.0:* LISTEN
and you can check a connection from a different system with something like this (adjust your IP address, port and Global Database Name):
tiian@ubuntu1404-64:~$ sqlplus hr/hr@192.168.122.81:1521/orcl.brenta.org SQL*Plus: Release 12.1.0.2.0 Production on Fri Jan 13 21:50:46 2017 Copyright (c) 1982, 2014, Oracle. All rights reserved. Last Successful login time: Fri Jan 13 2017 21:36:05 +01:00 Connected to: Oracle Database 12c Standard Edition Release 12.1.0.2.0 - 64bit Production SQL> exit Disconnected from Oracle Database 12c Standard Edition Release 12.1.0.2.0 - 64bit Production
Oracle Instant Client must be retrieved from Oracle portal. These are the suggested packages for version 12.1 if you want to use LIXA:
instantclient-basic-linux.x64-12.1.0.2.0.zip instantclient-precomp-linux.x64-12.1.0.2.0.zip instantclient-sdk-linux.x64-12.1.0.2.0.zip instantclient-sqlplus-linux.x64-12.1.0.2.0.zip
For the Linux operating system you can choose between ".rpm"
packages and ".zip" archives: feel free to install the packages
that you prefer.
Just as an example, here's the final layout of a tested
configuration using /opt/oracle as a prefix
tiian@ubuntu1404-64:~/lixa$ find /opt/oracle/ | sort
/opt/oracle/
/opt/oracle/instantclient_12_1
/opt/oracle/instantclient_12_1/adrci
/opt/oracle/instantclient_12_1/BASIC_README
/opt/oracle/instantclient_12_1/cobsqlintf.o
/opt/oracle/instantclient_12_1/genezi
/opt/oracle/instantclient_12_1/glogin.sql
/opt/oracle/instantclient_12_1/libclntshcore.so.12.1
/opt/oracle/instantclient_12_1/libclntsh.so
/opt/oracle/instantclient_12_1/libclntsh.so.12.1
/opt/oracle/instantclient_12_1/libipc1.so
/opt/oracle/instantclient_12_1/libmql1.so
/opt/oracle/instantclient_12_1/libnnz12.so
/opt/oracle/instantclient_12_1/libocci.so
/opt/oracle/instantclient_12_1/libocci.so.12.1
/opt/oracle/instantclient_12_1/libociei.so
/opt/oracle/instantclient_12_1/libocijdbc12.so
/opt/oracle/instantclient_12_1/libons.so
/opt/oracle/instantclient_12_1/liboramysql12.so
/opt/oracle/instantclient_12_1/libsqlplusic.so
/opt/oracle/instantclient_12_1/libsqlplus.so
/opt/oracle/instantclient_12_1/network
/opt/oracle/instantclient_12_1/network/admin
/opt/oracle/instantclient_12_1/network/admin/tnsnames.ora
/opt/oracle/instantclient_12_1/ojdbc6.jar
/opt/oracle/instantclient_12_1/ojdbc7.jar
/opt/oracle/instantclient_12_1/precomp
/opt/oracle/instantclient_12_1/precomp/admin
/opt/oracle/instantclient_12_1/precomp/admin/pcbcfg.cfg
/opt/oracle/instantclient_12_1/precomp/admin/pcscfg.cfg
/opt/oracle/instantclient_12_1/PRECOMP_README
/opt/oracle/instantclient_12_1/sdk
/opt/oracle/instantclient_12_1/sdk/admin
/opt/oracle/instantclient_12_1/sdk/admin/oraaccess.xsd
/opt/oracle/instantclient_12_1/sdk/demo
/opt/oracle/instantclient_12_1/sdk/demo/cdemo81.c
/opt/oracle/instantclient_12_1/sdk/demo/demo.mk
/opt/oracle/instantclient_12_1/sdk/demo/demo_proc_ic.mk
/opt/oracle/instantclient_12_1/sdk/demo/demo_procob_ic.mk
/opt/oracle/instantclient_12_1/sdk/demo/occidemod.sql
/opt/oracle/instantclient_12_1/sdk/demo/occidemo.sql
/opt/oracle/instantclient_12_1/sdk/demo/occidml.cpp
/opt/oracle/instantclient_12_1/sdk/demo/occiobj.cpp
/opt/oracle/instantclient_12_1/sdk/demo/occiobj.typ
/opt/oracle/instantclient_12_1/sdk/demo/oraaccess.xml
/opt/oracle/instantclient_12_1/sdk/demo/procdemo.pc
/opt/oracle/instantclient_12_1/sdk/demo/procobdemo.pco
/opt/oracle/instantclient_12_1/sdk/demo/setuporamysql.sh
/opt/oracle/instantclient_12_1/sdk/include
/opt/oracle/instantclient_12_1/sdk/include/ldap.h
/opt/oracle/instantclient_12_1/sdk/include/nzerror.h
/opt/oracle/instantclient_12_1/sdk/include/nzt.h
/opt/oracle/instantclient_12_1/sdk/include/occiAQ.h
/opt/oracle/instantclient_12_1/sdk/include/occiCommon.h
/opt/oracle/instantclient_12_1/sdk/include/occiControl.h
/opt/oracle/instantclient_12_1/sdk/include/occiData.h
/opt/oracle/instantclient_12_1/sdk/include/occi.h
/opt/oracle/instantclient_12_1/sdk/include/occiObjects.h
/opt/oracle/instantclient_12_1/sdk/include/oci1.h
/opt/oracle/instantclient_12_1/sdk/include/oci8dp.h
/opt/oracle/instantclient_12_1/sdk/include/ociap.h
/opt/oracle/instantclient_12_1/sdk/include/ociapr.h
/opt/oracle/instantclient_12_1/sdk/include/ocidef.h
/opt/oracle/instantclient_12_1/sdk/include/ocidem.h
/opt/oracle/instantclient_12_1/sdk/include/ocidfn.h
/opt/oracle/instantclient_12_1/sdk/include/ociextp.h
/opt/oracle/instantclient_12_1/sdk/include/oci.h
/opt/oracle/instantclient_12_1/sdk/include/ocikpr.h
/opt/oracle/instantclient_12_1/sdk/include/ocixmldb.h
/opt/oracle/instantclient_12_1/sdk/include/ocixstream.h
/opt/oracle/instantclient_12_1/sdk/include/odci.h
/opt/oracle/instantclient_12_1/sdk/include/oraca.h
/opt/oracle/instantclient_12_1/sdk/include/oratypes.h
/opt/oracle/instantclient_12_1/sdk/include/orid.h
/opt/oracle/instantclient_12_1/sdk/include/ori.h
/opt/oracle/instantclient_12_1/sdk/include/orl.h
/opt/oracle/instantclient_12_1/sdk/include/oro.h
/opt/oracle/instantclient_12_1/sdk/include/ort.h
/opt/oracle/instantclient_12_1/sdk/include/sql2oci.h
/opt/oracle/instantclient_12_1/sdk/include/sqlapr.h
/opt/oracle/instantclient_12_1/sdk/include/sqlca.h
/opt/oracle/instantclient_12_1/sdk/include/sqlcpr.h
/opt/oracle/instantclient_12_1/sdk/include/sqlda.h
/opt/oracle/instantclient_12_1/sdk/include/sqlkpr.h
/opt/oracle/instantclient_12_1/sdk/include/sqlucs2.h
/opt/oracle/instantclient_12_1/sdk/include/xa.h
/opt/oracle/instantclient_12_1/sdk/ott
/opt/oracle/instantclient_12_1/sdk/ottclasses.zip
/opt/oracle/instantclient_12_1/sdk/proc
/opt/oracle/instantclient_12_1/sdk/procob
/opt/oracle/instantclient_12_1/sdk/rtsora
/opt/oracle/instantclient_12_1/sdk/SDK_README
/opt/oracle/instantclient_12_1/sqlplus
/opt/oracle/instantclient_12_1/SQLPLUS_README
/opt/oracle/instantclient_12_1/uidrvci
/opt/oracle/instantclient_12_1/xstreams.jar
If your installation layout is different, adjust the following steps as necessary.
Oracle Instant Client does not provide
oracle_env.sh, but some
environment variables can be very handy and it is suggested you to
create your own oracle_env.sh as below:
#!/bin/sh export LD_LIBRARY_PATH=/opt/oracle/instantclient_12_1:$LD_LIBRARY_PATH export PATH=/opt/oracle/instantclient_12_1:/opt/oracle/instantclient_12_1/sdk:$PATH export ORACLE_HOME=/opt/oracle/instantclient_12_1
and to put it inside Oracle Instant Client base directory [61]:
tiian@ubuntu1404-64:~/lixa$ ls -la /opt/oracle/instantclient_12_1/oracle_env.sh -rwxr-xr-- 1 root root 216 mar 10 21:57 /opt/oracle/instantclient_12_1/oracle_env.sh
Use it when it's needed with shell sourcing:
tiian@ubuntu1404-64:~$ . /opt/oracle/instantclient_12_1/oracle_env.sh tiian@ubuntu1404-64:~$ echo $LD_LIBRARY_PATH /opt/oracle/instantclient_12_1: tiian@ubuntu1404-64:~$ echo $PATH /opt/oracle/instantclient_12_1:/opt/oracle/instantclient_12_1/sdk:/usr/local/sbin:/usr/local/bin:/usr/sbin:/usr/bin:/sbin:/bin:/usr/games:/usr/local/games tiian@ubuntu1404-64:~$ echo $ORACLE_HOME /opt/oracle/instantclient_12_1
A possible option to configure a remote database is based on the
"tnsnames.ora" file. It should be put at path
$ORACLE_HOME/network/admin/tnsnames.ora
Here's an example:
lixa_ora_db=
(DESCRIPTION=
(ADDRESS=(PROTOCOL=tcp)(HOST=centos7-oracle12.brenta.org)(PORT=1521))
(CONNECT_DATA=
(SERVICE_NAME=orcl.brenta.org)))
Note
Configuring Oracle networking feature requires a little bit of experience: be patient and consult official documentation and user group forums to obtain a working configuration.
Important
This example configuration uses lixa_ora_db
as the name understood by the Instant Client to reach the
database server.
The final step is the configuration check. If everything is OK, you should obtain something like this:
tiian@ubuntu1404-64:~$ sqlplus hr/hr@lixa_ora_db SQL*Plus: Release 12.1.0.2.0 Production on Fri Jan 13 21:36:05 2017 Copyright (c) 1982, 2014, Oracle. All rights reserved. Last Successful login time: Fri Jan 13 2017 21:35:16 +01:00 Connected to: Oracle Database 12c Standard Edition Release 12.1.0.2.0 - 64bit Production SQL> select * from COUNTRIES where COUNTRY_ID = 'RS'; no rows selected SQL> exit Disconnected from Oracle Database 12c Standard Edition Release 12.1.0.2.0 - 64bit Production
See the instructions reported in the section called “Check the data table before execution” to configure the tables necessary for examples execution.
The following diagram represents a simplified vision of the components
necessary to run an example program (example5_mys
in the picture) that uses PostgreSQL as an XA Resource Manager.
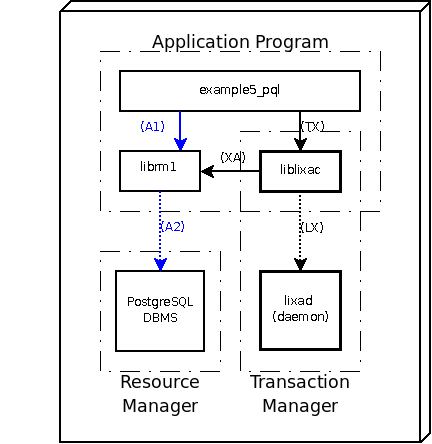
This section has been developed using PostgreSQL 9.1.24 (and upper) for Linux. Here is a brief list of the tested versions for Ubuntu 12.04, 14.04, 16.04, 18.04 and CentOS/RHEL 7.3, CentOS 8 and the installed packages:
tiian@ubuntu1204-64:/tmp$ dpkg -l | grep -i -e pq -e postgresql
ii libpq-dev 9.1.24-0ubuntu0.12.04 header files for libpq5 (PostgreSQL library)
ii libpq5 9.1.24-0ubuntu0.12.04 PostgreSQL C client library
ii postgresql 9.1+129ubuntu1 object-relational SQL database (supported version)
ii postgresql-9.1 9.1.24-0ubuntu0.12.04 object-relational SQL database, version 9.1 server
ii postgresql-client-9.1 9.1.24-0ubuntu0.12.04 front-end programs for PostgreSQL 9.1
ii postgresql-client-common 129ubuntu1 manager for multiple PostgreSQL client versions
ii postgresql-common 129ubuntu1 PostgreSQL database-cluster manager
tiian@ubuntu1404-64:/tmp$ dpkg -l | grep -i -e pq -e postgresql
ii libpq-dev 9.3.16-0ubuntu0.14.04 amd64 header files for libpq5 (PostgreSQL library)
ii libpq5 9.3.16-0ubuntu0.14.04 amd64 PostgreSQL C client library
ii postgresql 9.3+154ubuntu1 all object-relational SQL database (supported version)
ii postgresql-9.3 9.3.16-0ubuntu0.14.04 amd64 object-relational SQL database, version 9.3 server
ii postgresql-client-9.3 9.3.16-0ubuntu0.14.04 amd64 front-end programs for PostgreSQL 9.3
ii postgresql-client-common 154ubuntu1 all manager for multiple PostgreSQL client versions
ii postgresql-common 154ubuntu1 all PostgreSQL database-cluster manager
tiian@ubuntu1604:~$ dpkg -l | grep -i -e pq -e postgresql
ii libpq-dev 9.5.6-0ubuntu0.16.04 amd64 header files for libpq5 (PostgreSQL library)
ii libpq5:amd64 9.5.6-0ubuntu0.16.04 amd64 PostgreSQL C client library
ii postgresql 9.5+173 all object-relational SQL database (supported version)
ii postgresql-9.5 9.5.6-0ubuntu0.16.04 amd64 object-relational SQL database, version 9.5 server
ii postgresql-client-9.5 9.5.6-0ubuntu0.16.04 amd64 front-end programs for PostgreSQL 9.5
ii postgresql-client-common 173 all manager for multiple PostgreSQL client versions
ii postgresql-common 173 all PostgreSQL database-cluster manager
ii postgresql-contrib-9.5 9.5.6-0ubuntu0.16.04 amd64 additional facilities for PostgreSQL
tiian@ubuntu1804:~$ dpkg -l | grep -i -e pq -e postgresql
ii libpq-dev 10.3-1 amd64 header files for libpq5 (PostgreSQL library)
ii libpq5:amd64 10.3-1 amd64 PostgreSQL C client library
ii postgresql 10+190 all object-relational SQL database (supported version)
ii postgresql-10 10.3-1 amd64 object-relational SQL database, version 10 server
ii postgresql-client-10 10.3-1 amd64 front-end programs for PostgreSQL 10
ii postgresql-client-common 190 all manager for multiple PostgreSQL client versions
ii postgresql-common 190 all PostgreSQL database-cluster manager
[tiian@centos71-64 tmp]$ rpm -qa | grep -i -e pq -e postgresql
postgresql-libs-9.2.18-1.el7.x86_64
postgresql-devel-9.2.18-1.el7.x86_64
postgresql-9.2.18-1.el7.x86_64
postgresql-server-9.2.18-1.el7.x86_64
[tiian@rhel73 tmp]$ rpm -qa | grep -i -e pq -e postgresql
postgresql-devel-9.2.18-1.el7.x86_64
postgresql-9.2.18-1.el7.x86_64
postgresql-server-9.2.18-1.el7.x86_64
postgresql-libs-9.2.18-1.el7.x86_64
[tiian@centos8 tmp]$ rpm -qa | grep -i -e pq -e postgresql
postgresql-server-10.14-1.module_el8.2.0+487+53cc39ce.x86_64
libpq-12.4-1.el8_2.x86_64
postgresql-jdbc-42.2.3-3.el8_2.noarch
libpq-devel-12.4-1.el8_2.x86_64
postgresql-10.14-1.module_el8.2.0+487+53cc39ce.x86_64
If you were using a different version you would need to adapt some commands to your environment.
Note
If you did not yet installed the software, please refer to the official site for your Linux distribution or to the official site of PostgreSQL if your operating system does not distribute the software or you want to use a different PostgreSQL version. This manual does not give you information related to PostgreSQL: it is assumed that you have already installed and configured the database.
Note
This example requires you are running the database and the application on the same host: this is not a technical limitation, but a way to make it easy. Client/server configuration must work as well, but it needs some PostgreSQL extra configuration: please refer to the database documentation.
Important
The LIXA software must be configured to support the PostgreSQL server resource manager as explained in the section called “Linking third party resource managers”.
If your server didn't start-up automatically at boot time, you could start it with the following commands for Ubuntu:
| [Shell terminal session] |
tiian@ubuntu1204-64:~$ sudo service postgresql status Running clusters: tiian@ubuntu1204-64:~$ ps -ef|grep postgres|grep -v grep tiian@ubuntu1204-64:~$ sudo service postgresql start * Starting PostgreSQL 9.1 database server [ OK ] tiian@ubuntu1204-64:~$ sudo service postgresql status Running clusters: 9.1/main tiian@ubuntu1204-64:~$ ps -ef|grep postgres|grep -v grep postgres 1829 1 1 23:00 ? 00:00:00 /usr/lib/postgresql/9.1/bin/postgres -D /var/lib/postgresql/9.1/main -c config_file=/etc/postgresql/9.1/main/postgresql.conf postgres 1831 1829 0 23:00 ? 00:00:00 postgres: writer process postgres 1832 1829 0 23:00 ? 00:00:00 postgres: wal writer process postgres 1833 1829 0 23:00 ? 00:00:00 postgres: autovacuum launcher process postgres 1834 1829 0 23:00 ? 00:00:00 postgres: stats collector process |
or with the following ones for CentOS:
| [Shell terminal session] |
[tiian@centos8 tmp]$ sudo /usr/bin/postgresql-setup --initdb
* Initializing database in '/var/lib/pgsql/data'
* Initialized, logs are in /var/lib/pgsql/initdb_postgresql.log
[tiian@centos8 tmp]$ sudo systemctl start postgresql.service
[tiian@centos8 tmp]$ sudo systemctl enable postgresql.service
Created symlink /etc/systemd/system/multi-user.target.wants/postgresql.service → /usr/lib/systemd/system/postgresql.service.
[tiian@centos8 tmp]$ ps -ef|grep postgres|grep -v grep
postgres 2254 1 0 15:23 ? 00:00:00 /usr/bin/postmaster -D /var/lib/pgsql/data
postgres 2256 2254 0 15:23 ? 00:00:00 postgres: logger process
postgres 2258 2254 0 15:23 ? 00:00:00 postgres: checkpointer process
postgres 2259 2254 0 15:23 ? 00:00:00 postgres: writer process
postgres 2260 2254 0 15:23 ? 00:00:00 postgres: wal writer process
postgres 2261 2254 0 15:23 ? 00:00:00 postgres: autovacuum launcher process
postgres 2262 2254 0 15:23 ? 00:00:00 postgres: stats collector process
postgres 2263 2254 0 15:23 ? 00:00:00 postgres: bgworker: logical replication launcher
[tiian@centos8 tmp]$ sudo systemctl status postgresql.service
● postgresql.service - PostgreSQL database server
Loaded: loaded (/usr/lib/systemd/system/postgresql.service; enabled; vendor preset: disabled)
Active: active (running) since Sun 2020-10-11 15:23:45 CEST; 3min 7s ago
Main PID: 2254 (postmaster)
Tasks: 8 (limit: 11477)
Memory: 16.3M
CGroup: /system.slice/postgresql.service
├─2254 /usr/bin/postmaster -D /var/lib/pgsql/data
├─2256 postgres: logger process
├─2258 postgres: checkpointer process
├─2259 postgres: writer process
├─2260 postgres: wal writer process
├─2261 postgres: autovacuum launcher process
├─2262 postgres: stats collector process
└─2263 postgres: bgworker: logical replication launcher
Oct 11 15:23:44 centos8 systemd[1]: Starting PostgreSQL database server...
Oct 11 15:23:44 centos8 postmaster[2254]: 2020-10-11 15:23:44.877 CEST [2254] LOG: listening on IPv6 address "::1", port 5432
Oct 11 15:23:44 centos8 postmaster[2254]: 2020-10-11 15:23:44.877 CEST [2254] LOG: listening on IPv4 address "127.0.0.1", port 5432
Oct 11 15:23:44 centos8 postmaster[2254]: 2020-10-11 15:23:44.893 CEST [2254] LOG: listening on Unix socket "/var/run/postgresql/.s.PGSQL.5432"
Oct 11 15:23:44 centos8 postmaster[2254]: 2020-10-11 15:23:44.935 CEST [2254] LOG: listening on Unix socket "/tmp/.s.PGSQL.5432"
Oct 11 15:23:44 centos8 postmaster[2254]: 2020-10-11 15:23:44.957 CEST [2254] LOG: redirecting log output to logging collector process
Oct 11 15:23:44 centos8 postmaster[2254]: 2020-10-11 15:23:44.957 CEST [2254] HINT: Future log output will appear in directory "log".
Oct 11 15:23:45 centos8 systemd[1]: Started PostgreSQL database server.
|
Switch to user postgres,
associate your user to a matching database user
[62]
; my personal account is
tiian
and I created the same user inside PostgreSQL database:
| [Shell terminal session] |
tiian@ubuntu1204-64:~$ sudo su - postgres [sudo] password for tiian: postgres@ubuntu1204-64:~$ createuser --createdb tiian Shall the new role be a superuser? (y/n) n Shall the new role be allowed to create more new roles? (y/n) n postgres@ubuntu1204-64:~$ exit logout |
Even if most of the examples use local connection, for JDBC it's
necessary even a host connection; verify that config file
pg_hba.conf contains a couple of rows like the
following ones:
| [Shell terminal session] |
host all all 127.0.0.1/32 md5 host all all ::1/128 md5 |
and assign your user a password inside PostgreSQL database:
| [Shell terminal session] |
tiian@ubuntu1404-64:~/lixa$ sudo su - postgres postgres@ubuntu1404-64:~$ psql psql (9.3.24) Type "help" for help. postgres=# ALTER USER tiian WITH PASSWORD 'passw0rd'; ALTER ROLE postgres=# \q |
Create a new database and a table necessary to store some data:
| [PostgreSQL terminal session] |
[tiian@centos8 tmp]$ createdb testdb
[tiian@centos8 tmp]$ psql testdb
psql (10.14)
Type "help" for help.
testdb=> CREATE TABLE "authors" ("id" integer NOT NULL,"last_name" text,"first_name" text,Constraint "authors_pkey" Primary Key ("id"));
CREATE TABLE
testdb=> select * from authors;
id | last_name | first_name
----+-----------+------------
(0 rows)
testdb=> \q
|
OK, the “authors” table was created. If something went wrong, you should refer to PostgreSQL documentation to fix the issue before the next step because you would not be able to execute the sample program without a basic running installation.
Change the
max_prepared_transactions
parameter in file
postgresql.conf
to allow the desired number of prepared transactions (i.e. 10):
shared_buffers = 24MB # min 128kB
# (change requires restart)
#temp_buffers = 8MB # min 800kB
max_prepared_transactions = 10 # zero disables the feature
#max_prepared_transactions = 0 # zero disables the feature
# (change requires restart)
# Note: Increasing max_prepared_transactions costs ~600 bytes of shared memory
# per transaction slot, plus lock space (see max_locks_per_transaction).
# It is not advisable to set max_prepared_transactions nonzero unless you
# actively intend to use prepared transactions.
#work_mem = 1MB # min 64kB
#maintenance_work_mem = 16MB # min 1MB
#max_stack_depth = 2MB # min 100kB
and restart the PostgreSQL server with something like
service postgresql restart
(Ubuntu) or
systemctl restart postgresql.service
(CentOS)
using
root user.
[57] You need the password of MySQL root user to execute these commands.
[58]
I put this line (Oracle 10.2 32 bit)
. /usr/lib/oracle/xe/app/oracle/product/10.2.0/server/bin/oracle_env.sh
or this line (Oracle 11.2 64 bit)
. /u01/app/oracle/product/11.2.0/xe/bin/oracle_env.sh
in the file $HOME/.profile of the
oracle user to set-up
the default administration environment; it complains about
two shell errors, but for the sake of our example it's
safe.
[59] If you got some errors like these:
/usr/lib/oracle/xe/app/oracle/product/10.2.0/server/bin/nls_lang.sh: 114: [[: not found /usr/lib/oracle/xe/app/oracle/product/10.2.0/server/bin/nls_lang.sh: 114: [[: not found
you could edit the file /usr/lib/oracle/xe/app/oracle/product/10.2.0/server/bin/nls_lang.sh and substitute
#!/bin/sh with
#!/bin/bash in the first row as explained
here:
http://forums.oracle.com/forums/thread.jspa?messageID=1542334
[60] use
sqlplus hr/hr@lixa_ora_db
in the event that you are using a remote connection as explained above
[61] LIXA test suite, based on autotest looks for it: if it's not available, Oracle's tests are skipped.
[62]
If you wanted to use a database user different than your own
UNIX user, as it ever happens when the database is hosted on
a different system, you should configure
pg_hba.conf as well. Look at the PostgreSQL
documentation to pick up all the necessary details.